Using the Azure Queue Storage Connection Manager
The Azure Queue Storage Connection Manager is an SSIS connection manager that can be used to establish connections with Azure Queue Storage.
- General
- Advanced Settings
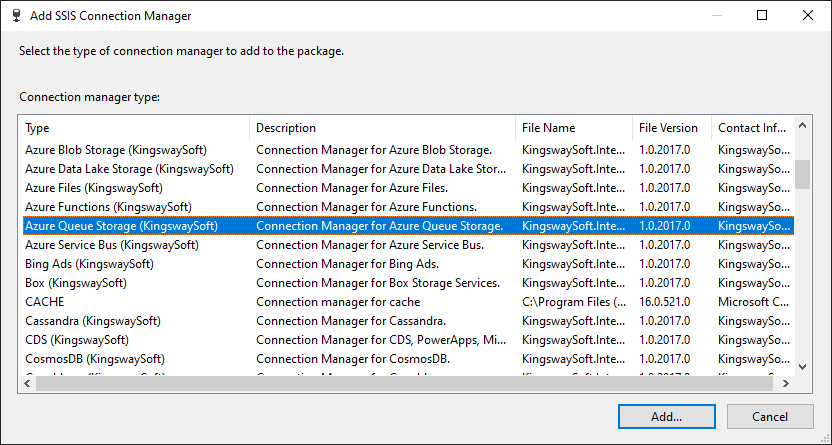
To add a new connection, right-click the Connection Manager area in your Visual Studio project, and choose "New Connection..." from the context menu. You will be prompted by the "Add SSIS Connection Manager" window. Select the "Azure Queue Storage (KingswaySoft)" item to add a new Azure Queue Storage Connection Manager.
The Azure Queue Storage Connection Manager contains the following two configuration pages:
- General
- Advanced Settings
General
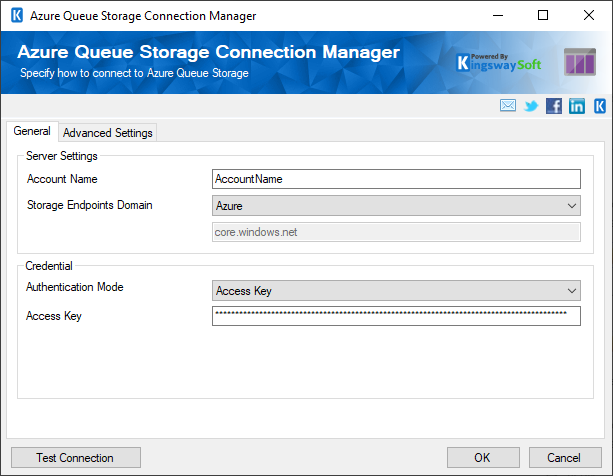
The General page allows you to specify connection properties and login credentials to Azure Queue Storage.
- Server Settings
-
- Account Name
-
The Account Name option allows you to specify the Storage Account you've created in Azure Storage Services, which can be found within Azure Portal by navigating to All Services -> Storage accounts -> {Your storage account name} -> Access Keys.
- Storage Endpoints Domain
-
The Storage Endpoints Domain drop-down displays a list of domains which allows you to pick the endpoint based on your location. There are five options available:
- Azure
- Azure China
- Azure Germany
- US Government
- Other (enter below) Credential
- Authentication Mode
-
There are three options available.
- Access Key
- OAuth Authorization Code
- OAuth Client Credentials (service-to-service authentication)
- Access Key
-
The Access Key option allows you to specify the access key for the Azure storage account. Similar to the above option, this can be found within Azure Portal by navigating to the All Services -> Storage accounts -> {Your storage account name} -> Access Keys page.
- OAuth Authorization Code
-
- Generate New Token File/Get Token
-
This button completes the entire OAuth authentication process inside of the toolkit. All you need to do is log in to the service endpoint and authorize our app to generate your token.
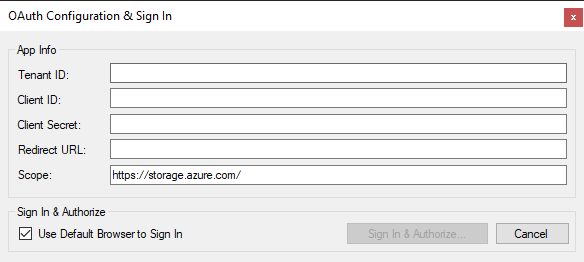
- Tenant Id
-
The Tenant Id option allows you to specify the unique ID which identifies the tenant you are connecting to. It defaults to “common” when no tenant id is specified.
- Client Id
-
The Client Id option allows you to specify the unique ID which identifies the application making the request.
- Client Secret
-
The Client Secret option allows you to specify the client secret belonging to your app.
- Redirect Url
-
The Redirect Url option allows you to specify the Redirect Url to complete the authentication process.
- Sign In & Authorize
-
- Use Default Browser to Sign In
-
When this option is checked the Sign In & Authorize button will open your default web browser in order to complete the OAuth authentication. When this option is unchecked, the Sign In & Authorize button will complete the entire OAuth authentication process inside of the toolkit.
- Sign In & Authorize Button
-
This button allows you to log in to the service endpoint and authorizes your app to generate a token.
- Token File Password
-
This option allows you to assign a new password for the token file which will be created.
- Save to Token File
-
This option allows specifying the location of where the token file will be saved.
- OAuth Client Credentials (service-to-service authentication):
-
- Tenant Id
-
The Tenant Id option allows you to specify the unique ID which identifies the tenant you are connecting to.
- Client Id
-
The Client Id option allows you to specify the unique ID which identifies the application making the request.
- Client Secret
-
The Client Secret option allows you to specify the client secret belonging to your app.
Advanced Settings
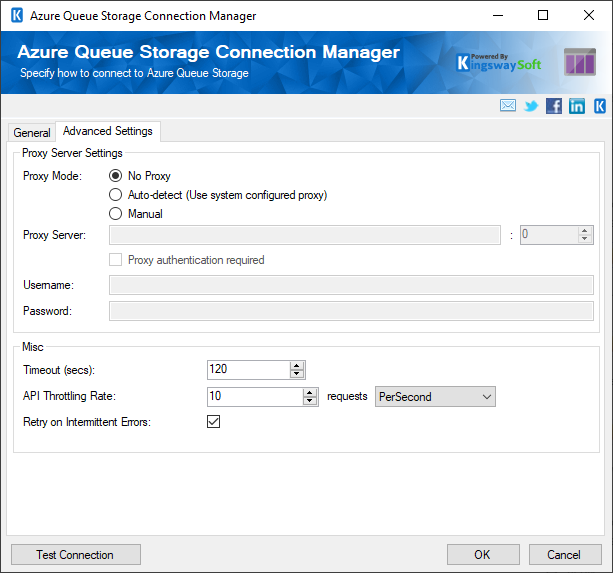
The Advanced Settings page of Azure Queue Storage Connection Manager allows you to specify how you want to configure the proxy server.
- Proxy Server Settings
-
- Proxy Mode
-
The Proxy Mode option allows you to specify how you want to configure the proxy server setting. There are three options available:
- No Proxy
- Auto-detect (Using system-configured proxy)
- Manual
- Proxy Server
-
Using the Proxy Server option, you can provide a proxy server to connect to Azure Queue Storage.
- Port
-
The Port option allows you to specify the port number of the proxy server for the connection.
- Username
-
The Username option allows you to specify the proxy user account.
- Password
-
The Password option allows you to specify the proxy user’s password.
Note: Proxy Password is not included in the Azure Queue Storage connection manager’s ConnectionString property by default. This is done by design for security reasons. However, you can include it in your ConnectionString if you want to parameterize your connection manager. The format would be ProxyPassword=myProxyPassword; (make sure you have a semicolon as the last character). It can be anywhere in the ConnectionString.