Installation
To install and run SSIS Productivity Pack, your system must have the following components installed.
- A supported SSIS design-time or run-time
- It can be one of the following:
- Azure-SSIS Integration Runtime (SSIS-IR)
- SSIS 2025
- SSIS 2022
- SSIS 2019
- SSIS 2017
- SSIS 2016
- SSIS 2014
- Runtime
-
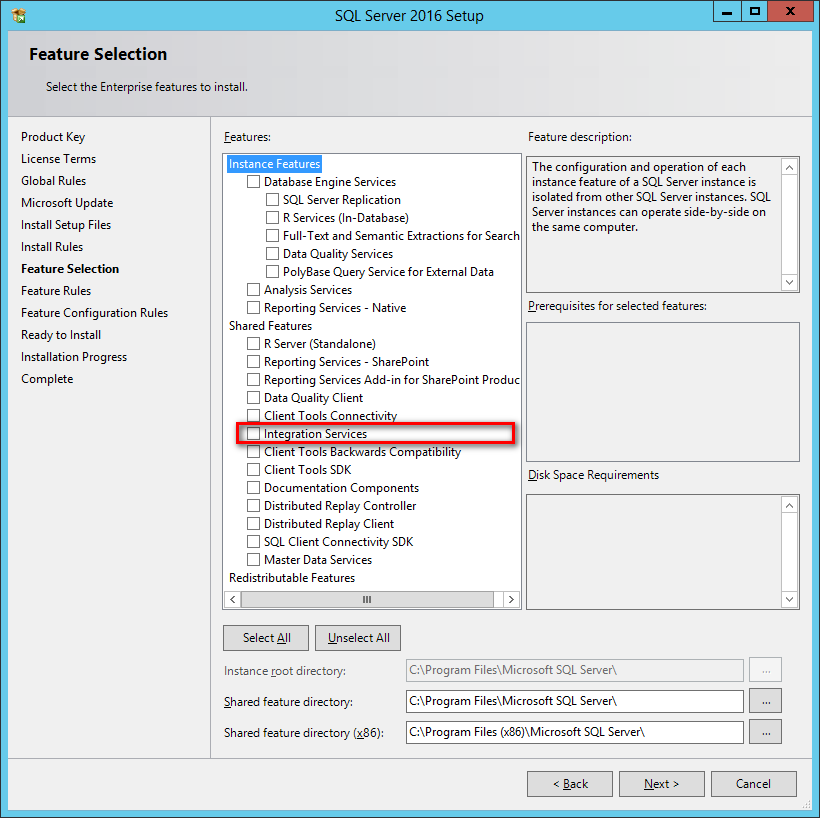
For SSIS run-time, the installation should use the corresponding SQL Server installation media, and you must select the "Integration Services" component during the installation, as shown below:
Note that when using SQL Server 2014, a cumulative update (preferably a recent service pack) is required to run our software during runtime. Otherwise, you may encounter some general .NET errors.
- Design-time
- For SSIS design-time, you should install the following:
- The latest version of SQL Server Integration Services Projects Extension
- A supported Visual Studio version, such as Visual Studio 2026 or 2022
Note that Visual Studio should be first installed before installing the SSIS Project Extension. In addition, it is possible to work with an older version of the SSDT installation if you have saved a copy of the original download. However, we generally recommend using the latest SSIS Project Extension and a recent Visual Studio installation for best compatibility.
- Windows Operating System
- Windows operating system requirements largely depend on the version of the SSIS runtime or design-time selected. We don't have any additional requirements in terms of the Windows operating system as long as it satisfies the minimum requirements of the SSIS runtime or design-time. The general guideline is that newer versions of the operating system tend to perform better. In summary, our software is compatible with the following Windows operating systems:
-
For desktop systems (mostly for development workstations)
- We generally recommend Windows 11 or greater.
- Earlier versions of Windows desktop systems, such as Windows 10, 8.1, 8, or 7, should typically work if the general prerequisites are met. However, these versions are generally not recommended due to their support status with Microsoft.
- We generally recommend Windows 11 or greater.
-
For server systems (mostly for runtime deployments)
- We generally recommend Windows Server 2019 or greater (including Windows Server 2022, Windows Server 2025, and potentially future Windows Server versions).
- Earlier versions of Windows Server operating systems, including Windows Server 2016 and Windows Server 2012, should work properly provided they satisfy the minimum requirements of the .NET Framework installation mentioned below. Please be mindful that those two versions are either approaching or have already reached their respective extended support, also known as end-of-life support.
- We generally recommend Windows Server 2019 or greater (including Windows Server 2022, Windows Server 2025, and potentially future Windows Server versions).
-
For desktop systems (mostly for development workstations)
- .NET Framework
-
-
- Our software requires the installation of .NET Framework 4.7.2 or above (including .NET Framework 4.8).
-
When you have confirmed that your system satisfies the necessary prerequisites, you can navigate to KingswaySoft's website at https://www.kingswaysoft.com to download the installation package.

After downloading the package, you can install the software by following the installation wizard.
Working with SSIS Toolbox
SSIS Toolbox is the first place that you will be looking for to see our components added to your ETL process during the design time.
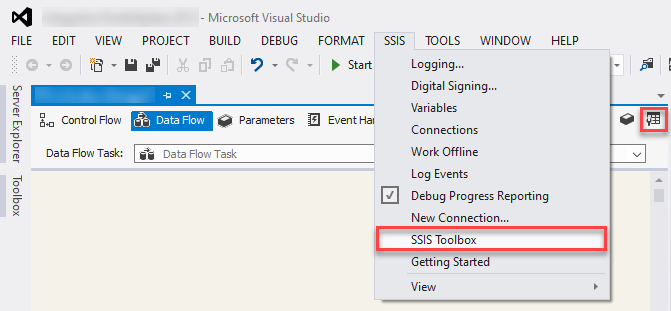
Note: When working with the SSIS Toolbox, make sure you are in the right view to see the right components. For instance, if you are looking for a data flow component, you need to make sure that you are in the Data Flow view, not the Control Flow view. Visual Studio shows different components depending on the design view that you are currently working on.
Once the control flow or data flow components are available in the SSIS Toolbox, you can start your ETL development by dragging them from the toolbox to the Visual Studio design surface.
License Manager
SSIS Productivity Pack comes with a license manager program that helps manage and activate the product license key to be used with the toolkit. The below information is useful for development workstations and Single Server license management. For Azure-SSIS IR deployments, license management and activation are handled through the PowerShell script. See Running SSIS Integration Toolkit on the Cloud for further details.
Without a commercial license, the SSIS Productivity Pack will operate under the Developer License, free to use for development or evaluation purposes. Under the developer license, you can use the software within the development tool (SSDT-BI, BIDS, or Visual Studio).
The only limitation of the free developer license is the inability to run the software outside of the development tool (SSDT-BI, BIDS, or Visual Studio). If you would like to run the software outside the development tool, such as running SSIS packages on a scheduled basis or from a command line, you will need to acquire a license from us.
If you want to test out the functionality by scheduling your SSIS packages, a trial license can be requested. To do so, launch the License Manager program, then click the "Change/Update License Key..." button, where you can request a free trial license after filling out the necessary Licensee Information.
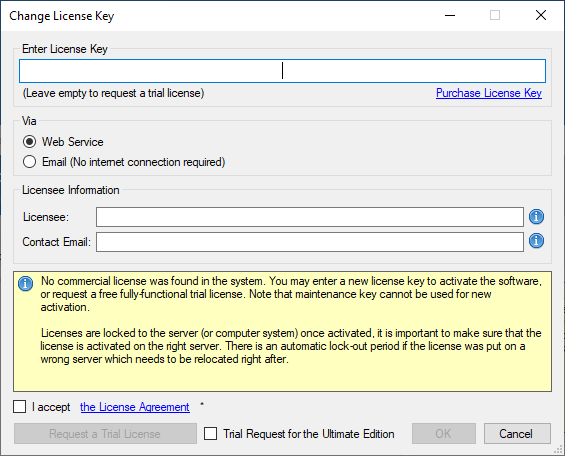
If you have received a product license key after placing an order through our online shopping cart system, click the "Change/Update License Key..." button and enter the product license key to activate the software and use the fully-featured commercial license.
The Licensee field is where you will specify the company the software is licensed to. You can include your system's machine name for future reference. For example, the Licensee can be "ABC Inc." or "XYZ Corp (SQLSVR-001)." The Contact Email would be the person we reach out to for any license-related notices such as renewal reminders.
To request a free trial license or activate a product license key that you have received, you can use the Web Service option to directly complete the process by sending the request to our license server. An Internet connection is required when the Web Service option is used. This is our recommended process.
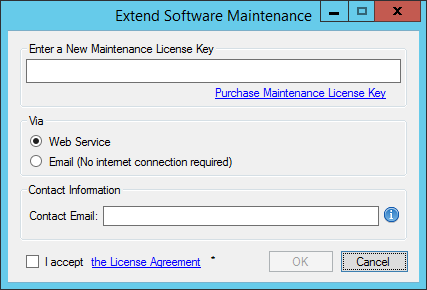
Alternatively, you can choose the Email option so that the license manager will generate an email for you, which you can send to us. The Email option should only be used if your system has no Internet access. It requires manual processing, so please expect to wait 24 to 48 hours before receiving a license file from us. Once you have received the license file from us via email, save it as a local file, and back in the License Manager, install the saved license file by clicking on the "Install License File..." button.
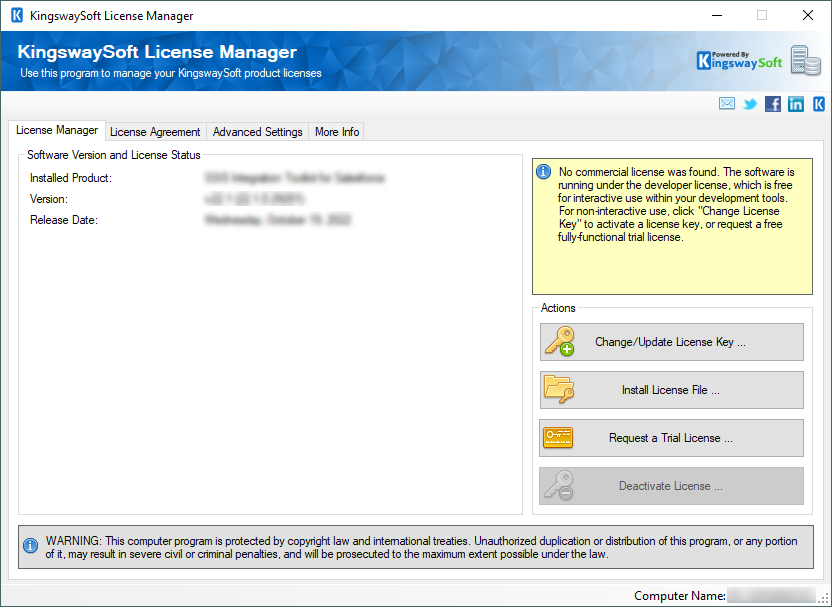
If you have acquired a license from us and the software has been activated, your license manager will appear as follows:
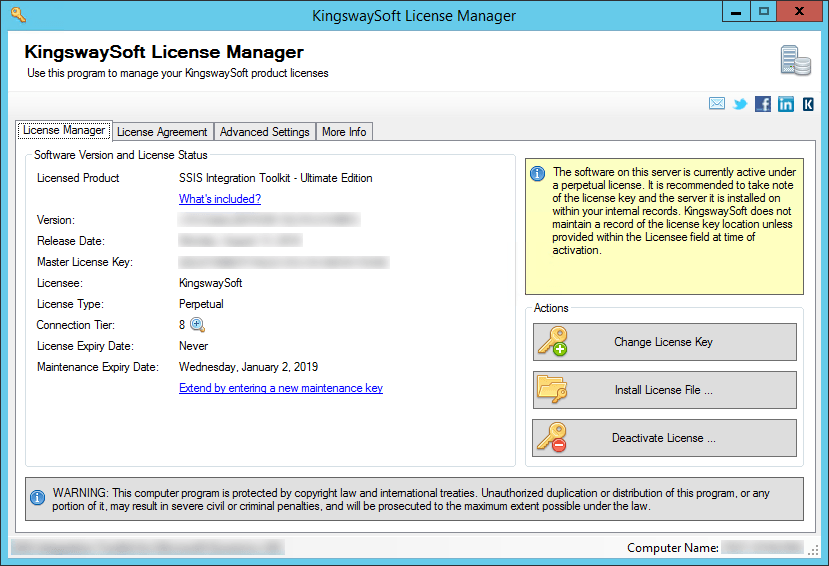
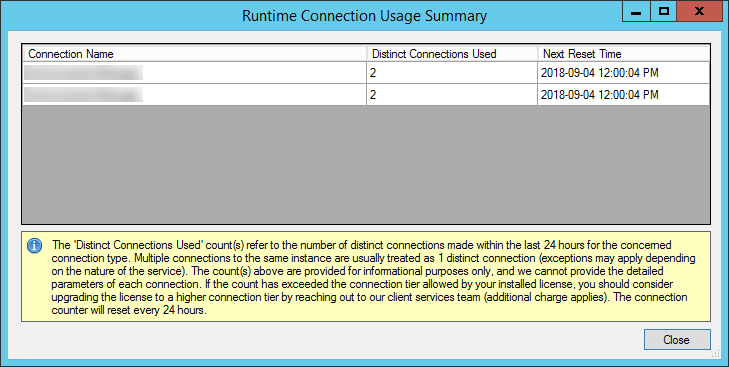
The Connection Tier will display the number of distinct connections your license supports per connection type within 24 hours at runtime. Multiple connections to the same instance are typically treated as one distinct connection (exceptions may apply depending on the service). Selecting the magnify icon will launch the Runtime Connection Usage Summary window, which will display counts on the number of connections made per connection type and when the 24-hour period will reset.
If you own a perpetual license from us, you should be able to see your Maintenance Expiry Date in the License Manager program. By default, your perpetual license should be instated with a one-year maintenance and upgrade included, which entitles you to use any version of the software released before your Maintenance Expiry Date. To extend your software license maintenance, log in to our portal and navigate to the license key using the License Keys menu. From there, you can renew the license or otherwise reach out to our Client Services team to request their assistance in renewing your license terms.
Note: Perpetual license is only applicable to clients who have previously acquired such a license before the deprecation of the license type. It is no longer offered for any new purchases.
Suppose your commercial license is a subscription license. In that case, you will not see the Maintenance Expiry Date option in the License Manager program since your subscription license comes with maintenance and upgrade for the entire subscription period. Instead, you will see your license expiry date and a progress bar with the number of days left on your subscription.
Note: You must run the License Manager program under a local administrative account due to the privileges required to write a license file to the system.