With all the recent trends of moving to the cloud in the industry, we have received a lot of inquiries from our clients about running our Integration Toolkit software on the cloud. Traditionally this is only possible through running our software in a fully configured virtual machine on the cloud. This is less than ideal, since you still have to worry about Windows operating system and SQL Server installation and configuration, system updates, security patches, among many other things. You get some benefits of cloud computing, but not at the full scale. The good news is, Microsoft has recently made the innovative move to make SSIS available as part of the Azure Data Factory (ADF) v2 offering. We are happy to announce that our software is now fully embracing the power of ADF v2, you can now run our software completely on the cloud using ADF v2 SSIS Integration Runtime after our Spring 2018 release that we made available on April 26, 2018.
Why is this such a big deal?
Without going to the great details of the general overall benefits of cloud computing, here are some special benefits of running SSIS on the cloud in the way we interpret this move.
- SSIS has been mostly considered an on-premises only solution, which carries a legacy tag whenever a discussion is brought up about modern cloud integration. With its availability on ADF v2, SSIS becomes a first-class integration offering that brings all its power and flexibility to the cloud.
- Running integration software on the cloud means that you have the closest proximity to the application server that you might integrate with. Giving an example, if your integration involves writing data to Microsoft Dynamics 365, you want your integration software to be as close as possible to the Dynamics 365 server as the network latency plays a significant role in affecting your integration performance. With the ability to pick whichever data center that your Azure-SSIS Integration Runtime (IR) resides, you have the opportunity to pick an instance that has the lowest possible network latency to your Dynamics 365 online server which offers the best possible reading and writing performance.
- Of course, all other cloud computing benefits apply as well, for instance, you don't have to worry about operating system configuration, SQL Server installation, Windows system updates, security patches, also you can easily scale your instance up or down as your integration needs change.
Prerequisites
In order to run our software on the cloud, you will need to meet the following prerequisites.
- An Azure Data Factory (ADF) subscription. ADF is the cloud environment for SSIS IR runtime.
- (Optionally) An Azure SQL subscription to host your SSISDB if that is required by your SSIS deployment practice.
- (Optionally) An Azure Blob Storage account if you use a deployment policy other than the Express Custom Setup option. When using an Azure Blob Storage account, you will need to use Azure Storage Explorer for file upload and management purposes.
- (Optionally) You may need to have some familiarity with Windows command line and PowerShell scripting when you choose certain deployment options.
- A license of our SSIS Integration Toolkit - Ultimate Edition for Azure SSIS-IR.
How does it work?
How this works largely depends on the provisioning strategy that you would be choosing, particularly when your ADF SSIS activities involve using any custom components (including any third-party components like ours or any custom SSIS components that you might have developed in-house). It is important to note that SSIS IR is a container-based infrastructure, and it is a volatile environment. What this means is, there is not a permanent Windows virtual machine image saved somewhere in Microsoft cloud for each IR instance. Instead, every time when you start your IR instance, it actually tries to provision an entirely new container using the configurations (very lightweight) that you have defined for the IR. For this particular reason, it is important to understand how IR provisioning works. To make it simple, we will share the 3 different options available when provisioning your SSIS IR instance(s) with custom components involved. The following are brief descriptions of the 3 options including some high-level procedure of the provisioning process. We mainly speak from the situation where there are third-party components involved. Otherwise, if you only use out-of-box SSIS components, none of the options discussed in the blog post is really relevant, since Azure allows to provision an SSIS IR instance in a matter of a few mouse clicks.
- Self-Served Custom Setup - This is not necessarily a terminology used by Microsoft, but rather something that we have created in our team to help differentiate from the other two options that we will be discussing. In using this option, most of the provisioning configurations are done through the Azure admin portal visually. In using this option, Azure portal provides the option to let you specify an SAS URL that is associated with your blob container, which contains the installation packages and command line scripts that will be executed during the startup or initial provisioning of the IR instance, in order to install third-party components or perform any required initialization such as loading or copying of authentication token files, file or registry manipulations, etc. As far as our components are concerned, the blob container should contain all the necessary KingswaySoft installation packages along with a Windows command file (the main.cmd file further discussed below) that will be executed during IR startup. needed for the provisioning of the IR instance.
- Express Custom Setup - As we have discussed, this is mostly the first option, the only difference is about the installation and provisioning of third-party components, which is done using the Express Custom Setup option available in the Azure portal, rather than the blob container by using a SAS URL. The option was introduced by Microsoft in ~2020 after their initial SSIS IR feature release (2018). The intention is to make the IR provisioning even easier when there are third-party components involved.
- Fully-Scripted Provisioning - This was the only option available at the time when SSIS IR was initially introduced in early 2018. The option is still possible, but it is a much more involved process in comparing to the first two options. If you are interested in the approach, you may head to the archive version of this blog post.
Our focus in this blog post is mostly about the first two approaches. The process of using the two options is almost identical, except that there is only one checkbox in Azure portal that will determine you go one way or another. Let's have a quick go-through of the process so that you get the idea. For clarity purposes, we will provide you a table that shows you how one option differs from the others below.
| Pros | Cons | |
| Self-Served Custom Setup |
|
|
| Express Custom Setup |
|
|
| Fully-Scripted Provisioning |
|
|
In this blog post, our main interests are the first two options. We don't believe there is a strong reason to use the last option after Microsoft has introduced the first two options over a span of two year period after the initial release of the SSIS IR platform feature. If you are still interested in the last option, you may refer to our archive blog post on this topic.
Let's get started with the first two options by walking you through the process.
Getting Started with the Provisioning Process
- First of all, you need to navigate to Azure Data Factory module from within Microsoft Azure admin portal. From Azure admin portal, you can search for Data Factories to find the service if it is not currently a shortcut in the portal for you yet.
- Create a new Data Factory if you don't have one yet.
- From within the Data Factory you have just created, you would click the "Launch Studio" button under Azure Data Factory Studio section to launch the studio program, which navigate you to the Azure Data Factory portal.
- Once in Azure Data Factory portal, you would need to navigate to either the Manage or Monitor module, and then click the Integration runtimes
- From there, you can add a new Integration runtime, or otherwise you may make configuration changes to an existing Integration runtime.
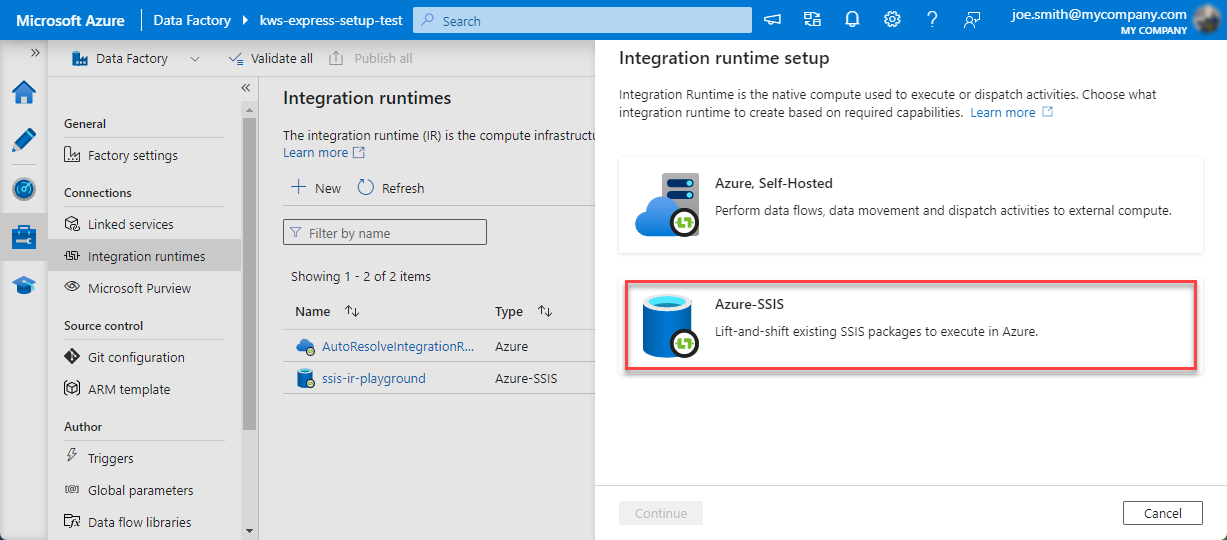
- You will now be presented a screen that allows you to select whether you are creating a self-hosted IR or a new general IR instance. Here you would typically choose the Azure-SSIS option which is to create a general SSIS IR instance.
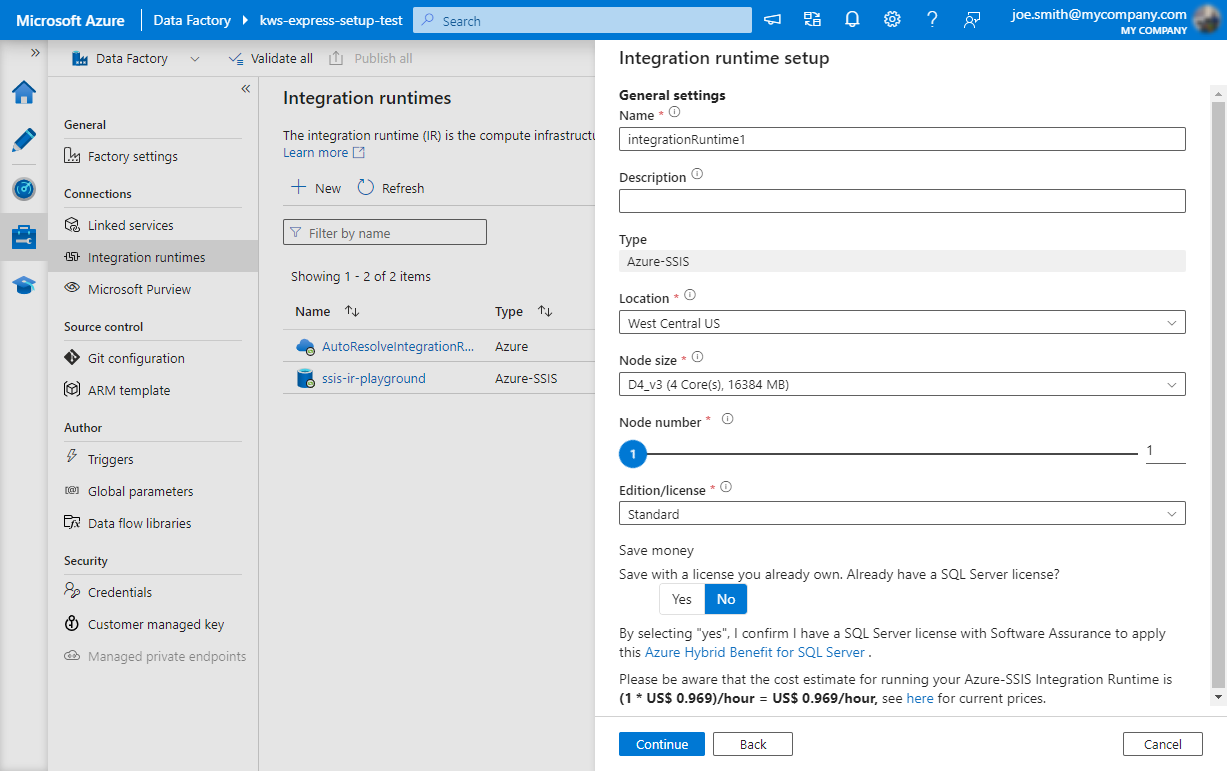
- In the popup screen, you would need to enter an IR name to be created, among a few other options to be specified. It is important to note that our software license is generally tied to the IR instance name. Once a license is installed or registered to a license, there isn't an easy way to move the license to a different IR instance. For this reason, you should carefully plan for the IR name. Also in this window, you would need to specify the location where the IR resides in which is essentially the data center that the IR will be operating in. In addition, you would need to specify the node number and node size of IR instance. It is our general recommendation that you would use a node size of 1 to save you the operating cost. It is worth noting that you will need a higher license tier if your node size is 3 or above.
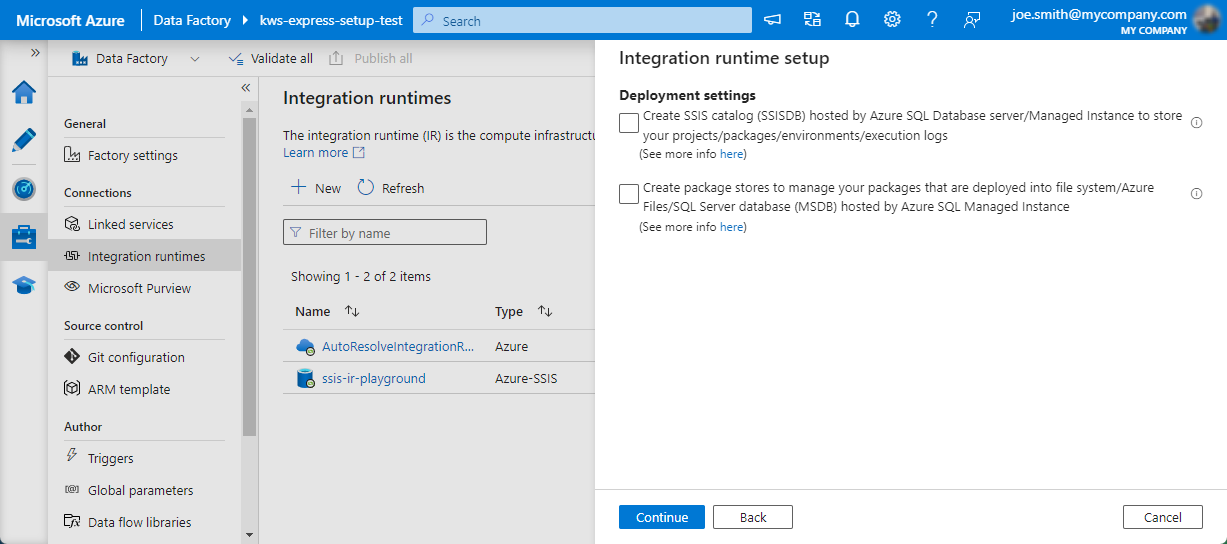
- Once the basic information for the IR has been provided, you may click the Continue button to proceed to the next step where you can specify whether you would like to create an SSIS catalog DB (SSISDB) and/or SSIS package stores for SSIS deployment purposes. The two options can provide certain benefits from deployment and execution logging perspective, but both are optional, you would make a choice based on your preferences.
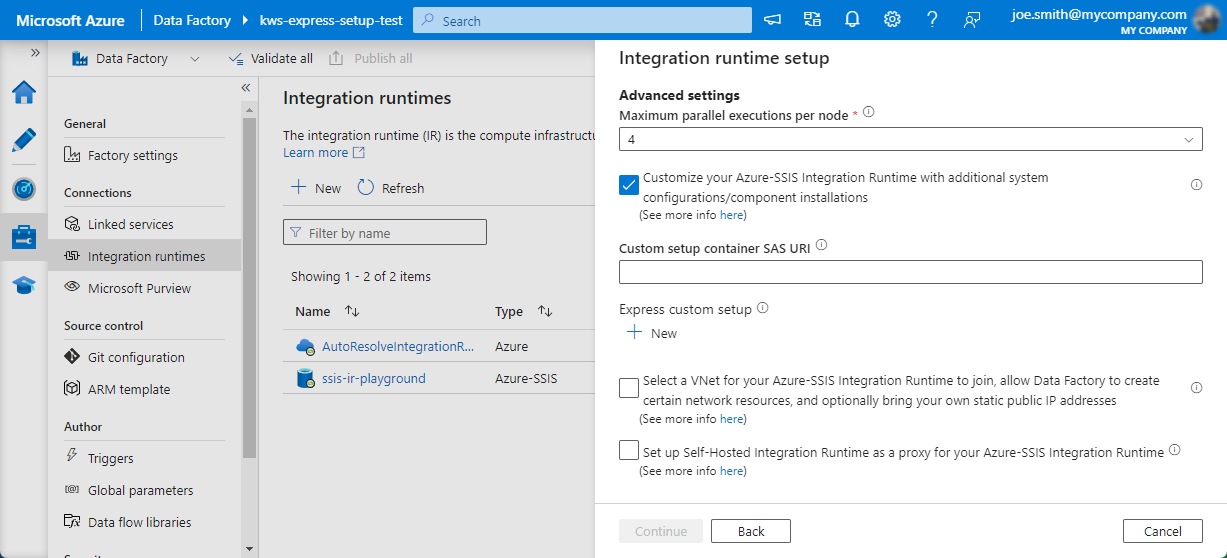
Once the above procedure has been completed, the basic information of the IR instance has been specified, you should be proceeding to the Advanced settings page in which you can provide information for custom setup, which is where the option becomes a little different depending on your provisioning strategy related to third-party component setup. We will break into two sections to cover the detailed steps for the above-discussed two provisioning options:
Self-Served Custom Setup
Your self-served custom setup procedure would continue from step 8 above, from which we were left at the Advanced settings page. The following are the remaining steps for this provisioning process.
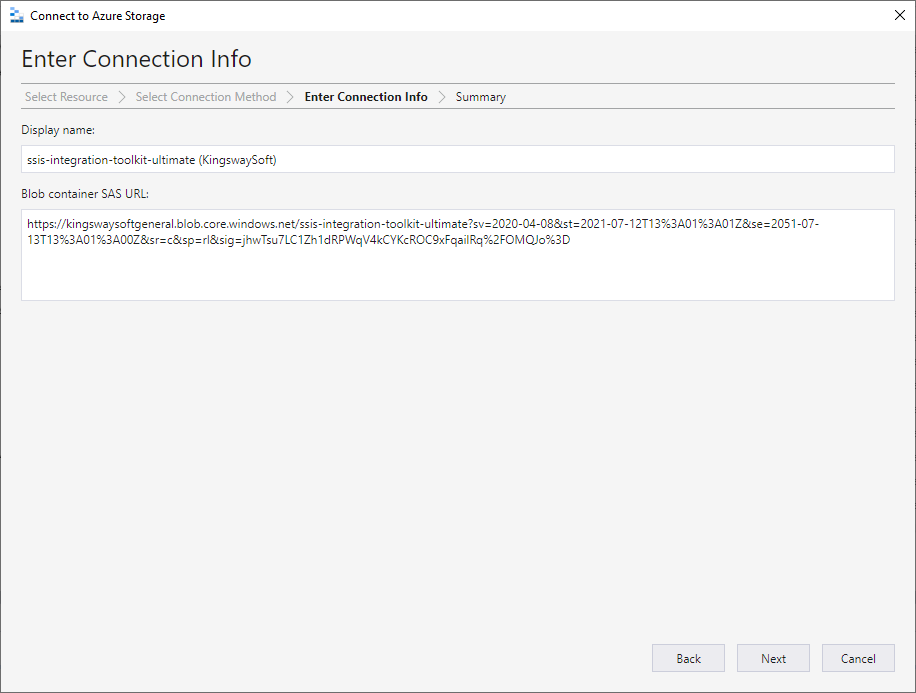
- In the Advanced settings page, you would be entering a SAS URL using the Custom setup container SAS URI option. We will discuss how you should obtain or generate the SAS URL needed below, which is essentially a SAS URL which points to a blob container that contains the provisioning artifacts of your IR instance.
- After the SAR URL has been properly entered in the Advanced settings page, you would click the Continue button, and you will be presented with a final summary page for your review before provisioning or creating the IR instance.
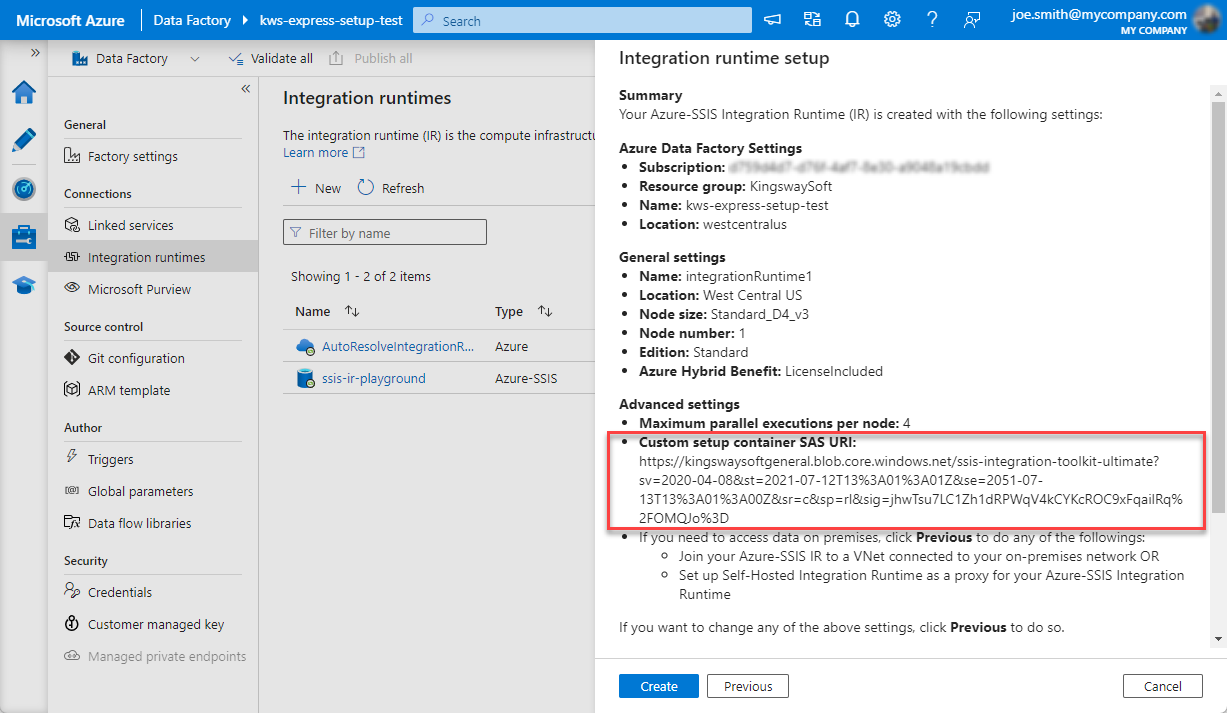
- Once you have confirmed everything is in order on the screen, you may click the Create button, in which case the Azure platform will start to provision the IR instance for you.
Express Custom Setup
Your Express Custom Setup procedure would also continue from step 8 above in the Getting Started with the Provisioning Process section, from which we were left at the Advanced settings page. The following are the remaining steps for this provisioning process.
- In the Advanced settings page, you would be clicking the + New button underneath the Express custom setup option.
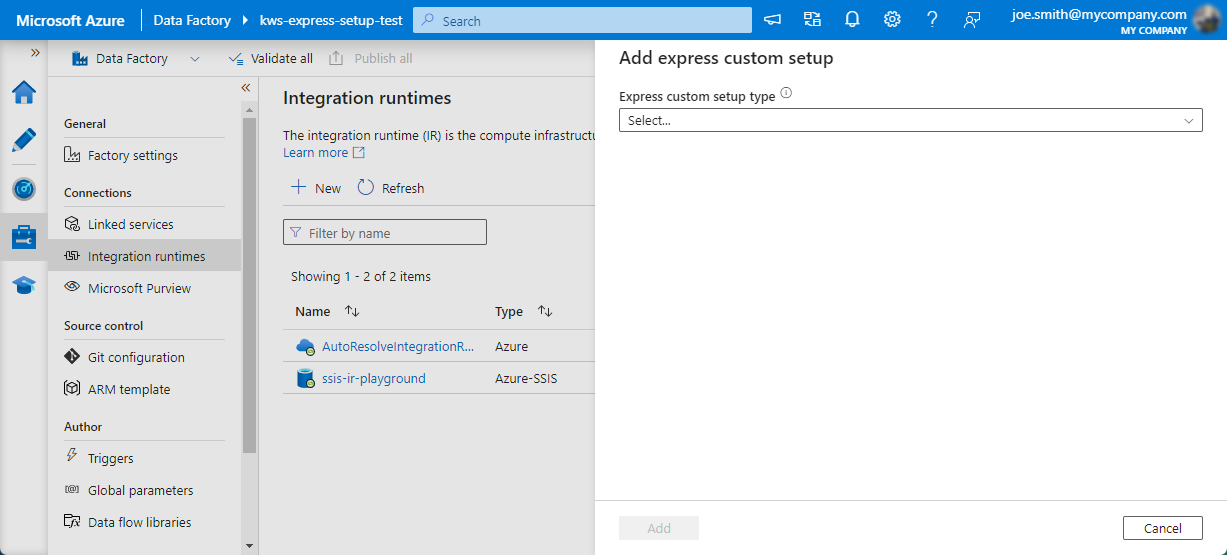
- In the
Add express custom setup window, you would first select the
Install licensed component option, then you will be presented with a dropdown list for the
Component name option, in which you can select either of the following two options:
- KingswaySoft's SSIS Integration Toolkit
- KingswaySoft's Productivity Pack
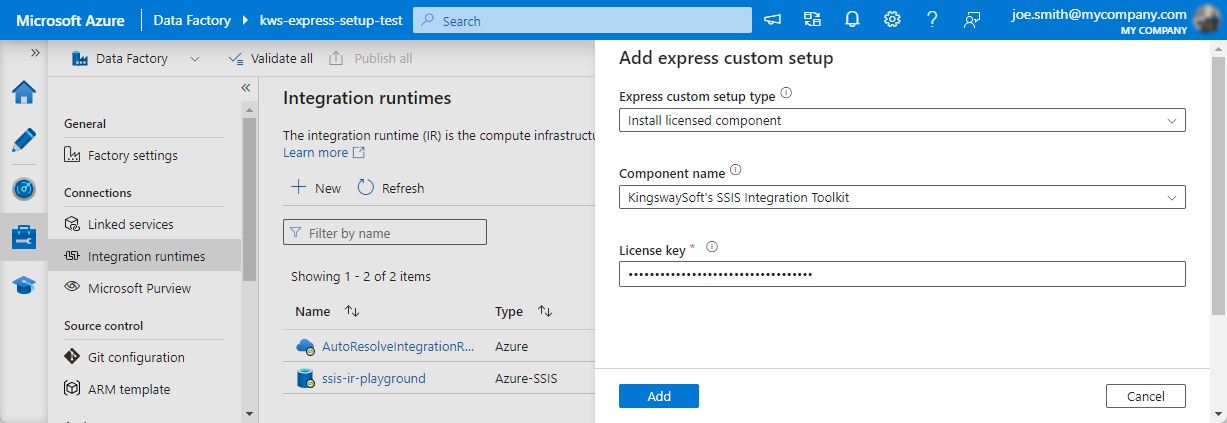
- Continuing in the Add express custom setup window, you would need to enter a license key that you have acquired from us. Note that you should be acquiring an SSIS Integration Toolkit - Ultimate Edition license from us that is for Azure SSIS-IR instance.
- Continuing in the Add express custom setup window, you would click the Add button to finish adding the new express custom setup. You should now see the new custom setup added to the list in the Advanced settings page.

- After everything is done in the Advanced settings page, you would click the Continue button, and you will be presented with a final summary page for your review before provisioning or creating the IR instance. You would pay some extra attention to the Express custom setups section.
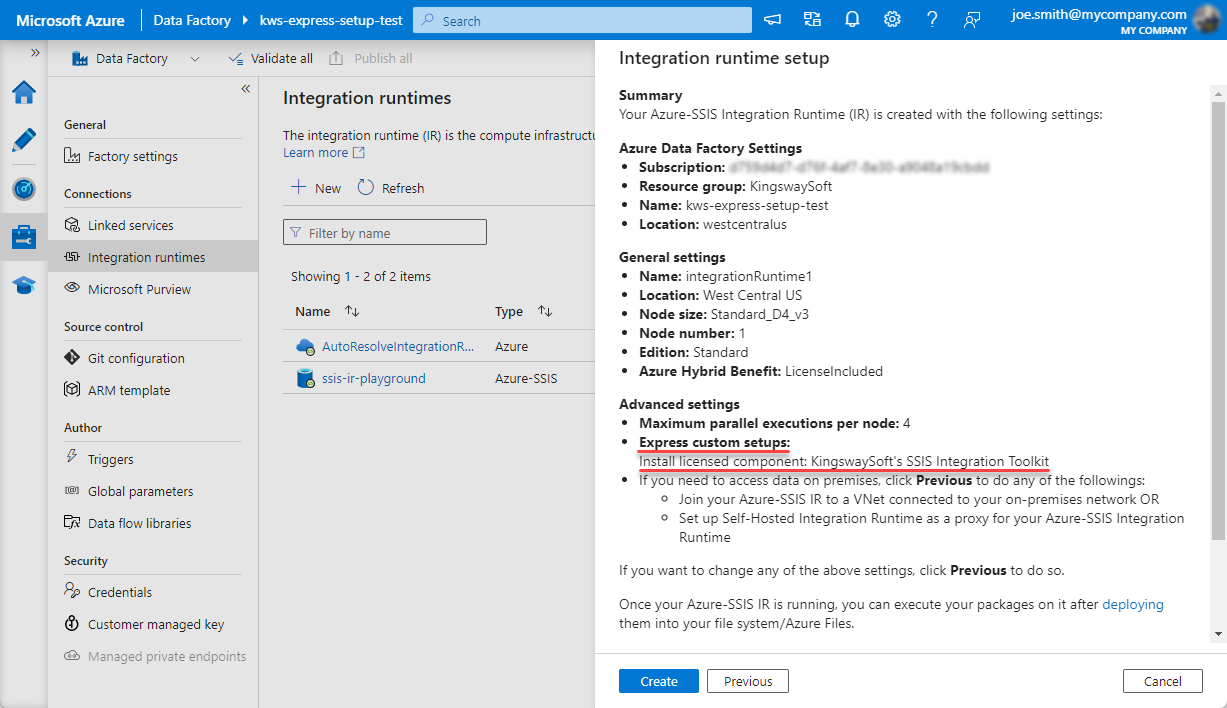
- Once you have confirmed everything is in order on the screen, you may click the Create button, in which case the Azure platform will start to provision the IR instance for you.
Create Your Own Blob Container
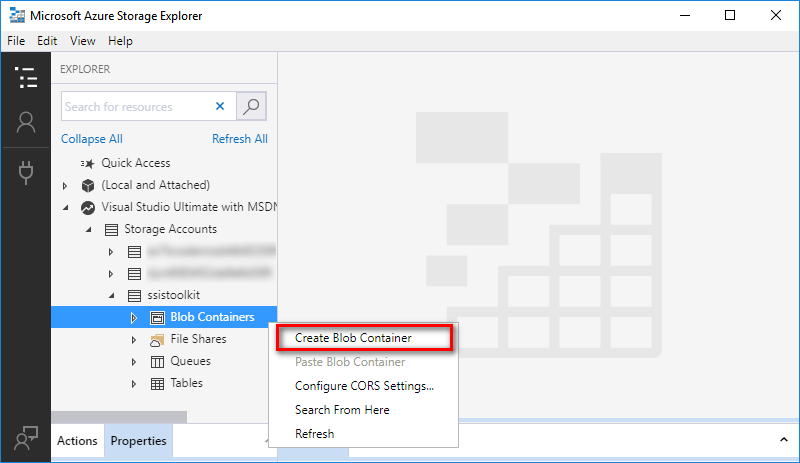
As we previously mentioned, you need your own blob container in order for the self-served provisioning process to succeed. In order to create a blob container, you need to first create a storage account using your Azure subscription. This can be done easily within Azure Portal.
Once you have an Azure Storage Account ready, you can then start Azure Storage Explorer and connect to your subscription, and you should be able to find your Storage Account in the explorer once you are connected. You would right click the "Blob Container" node underneath your Storage Account, and choose the "Create Blob Container" option. You would then specify a container name which is fairly straightforward.
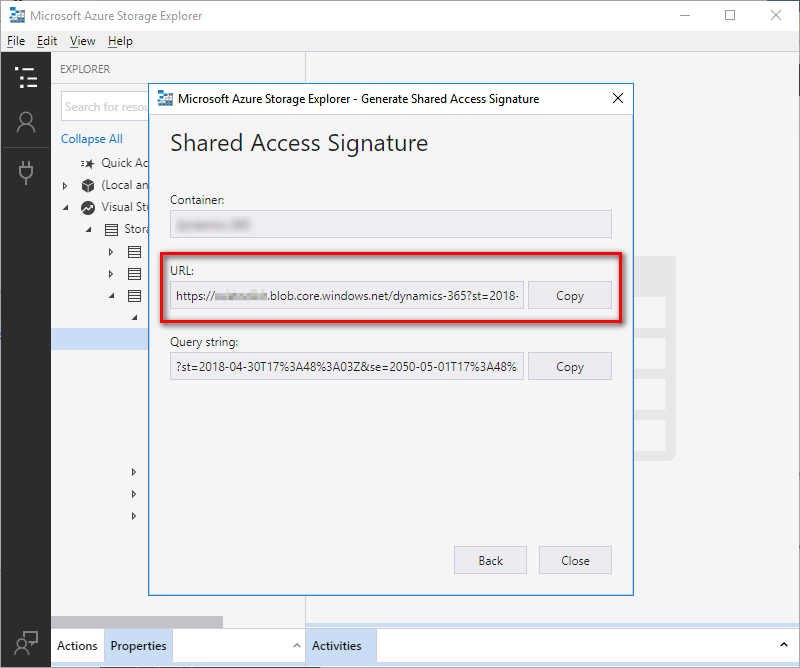
After the blob container has been created, you can right click the container, and choose the Get Shared Access Signature... option to get a SAS URL which you can use for the PowerShell script that we have been discussing.
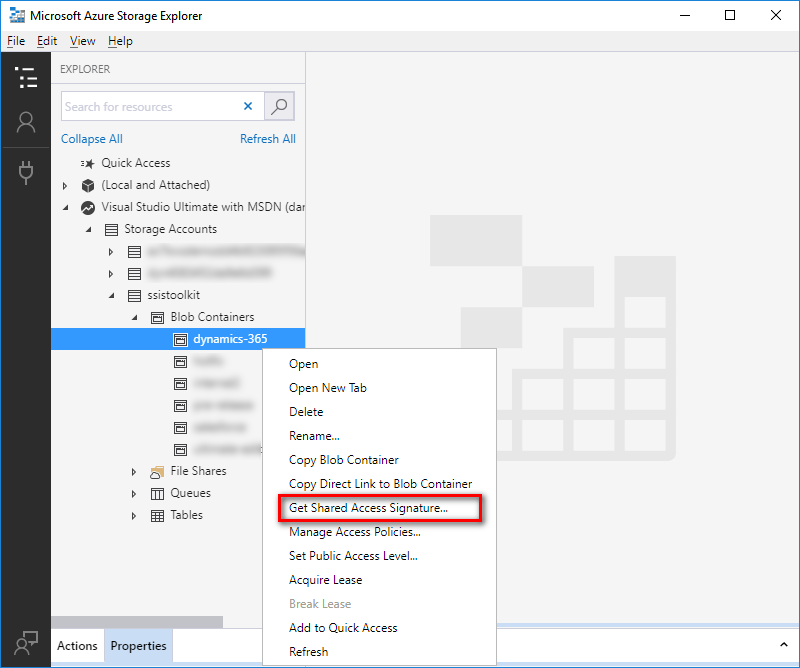
In the prompt window, you can configure how the SAS grant works, it is important to note that you need to have the Add and Write privileges enabled, this is important so that the Azure-SSIS IR provisioning process could properly write log files to your container which you can review if anything goes wrong during the provisioning process. This is the reason that you should not use the SAS URL that we have shared below directly as your Custom setup container SAS URI option as our SAS URL is shared in a read-only fashion, you would not receive any log files if something goes wrong during the provisioning process.
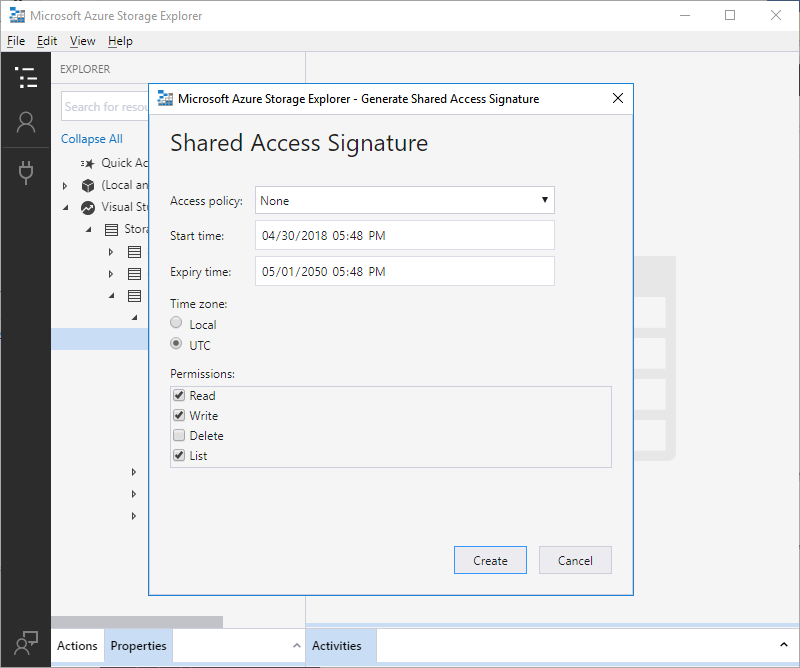
Once you have clicked the Create button, you will get a URL that can be used as the Custom setup container SAS URI option discussed above. If you are using the legacy approach to provision the IR instance, you would use the URL in your PowerShell script.
KingswaySoft Shared Blob Container
The following is the URL you can use to get a list of all of our recent installation programs along with a License Manager program. The container also provides a sample main.cmd file that you can modify for your use. You can attach to our container so that you can copy or download files from our container to your own container where you can make modifications to main.cmd script to include license activation with your own key.
https://kingswaysoftgeneral.blob.core.windows.net/ssis-integration-toolkit-ultimate?sv=2020-04-08&st=2021-07-12T13%3A01%3A01Z&se=2051-07-13T13%3A01%3A00Z&sr=c&sp=rl&sig=jhwTsu7LC1Zh1dRPWqV4kCYKcROC9xFqailRq%2FOMQJo%3D
Note: The above URL is not meant to be opened in your web browser as a typical web link. Instead, it is a URL that can be used in Azure Storage Explorer. From within the program, there is an option that you can attach to the blob container using the URL, as explained below.
A few things to note when using our blob container.
- The container will only have our most recent official releases. If you ever need to run a particular version in the past, you will have to manually extract our installation packages by downloading the older version, extracting the .msi files before uploading to your own container - if you ever do so, please make sure that you are using our Spring 2018 release or later. Prior versions will not work properly from licensing perspective.
- We don't guarantee the availability of this particular container.
- In case the above URL does not work anymore, you can always extract the installation files you can get from our download pages (do please always get the most recent release - at least the Spring 2018 release or later).
- In case we have changed to a new one, we will post the new URL here, you are welcome to check this blog post.
- You should NOT use our container directly as your Custom setup container SAS URI option, since our container is shared in a read-only mode, you have no way to make any changes to the main.cmd which contains a license activation command that will actually fail because of a fake key used in our version. In addition, if anything goes wrong during the provisioning process, there will be no way for you to receive any log files in our blob container, as it is shared as read-only.
-
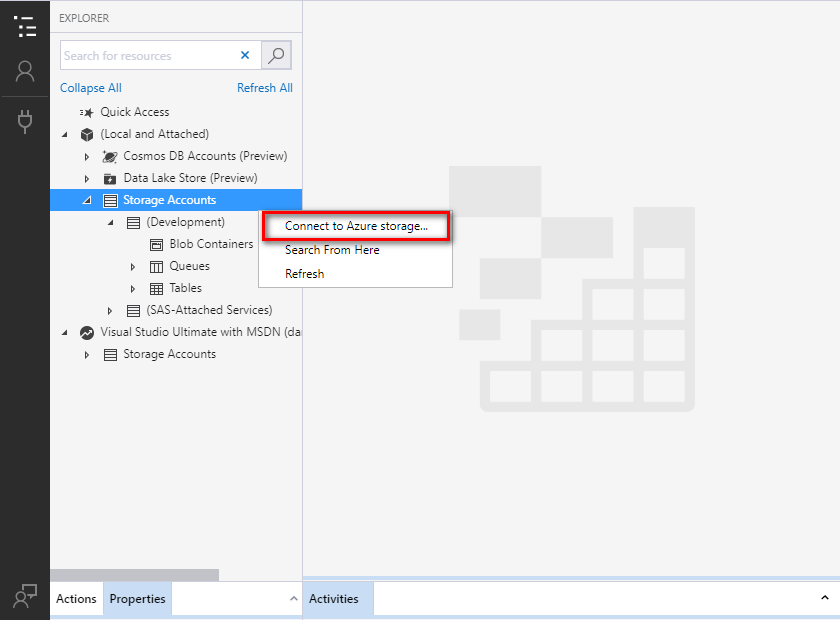
To connect (or attach) to our blob container, you would first right click on the "Storage Accounts" node under "(Local and Attached)", and choose "Connect to Azure storage..." as shown below.
In the popup window, you would choose the "Blob Container" option.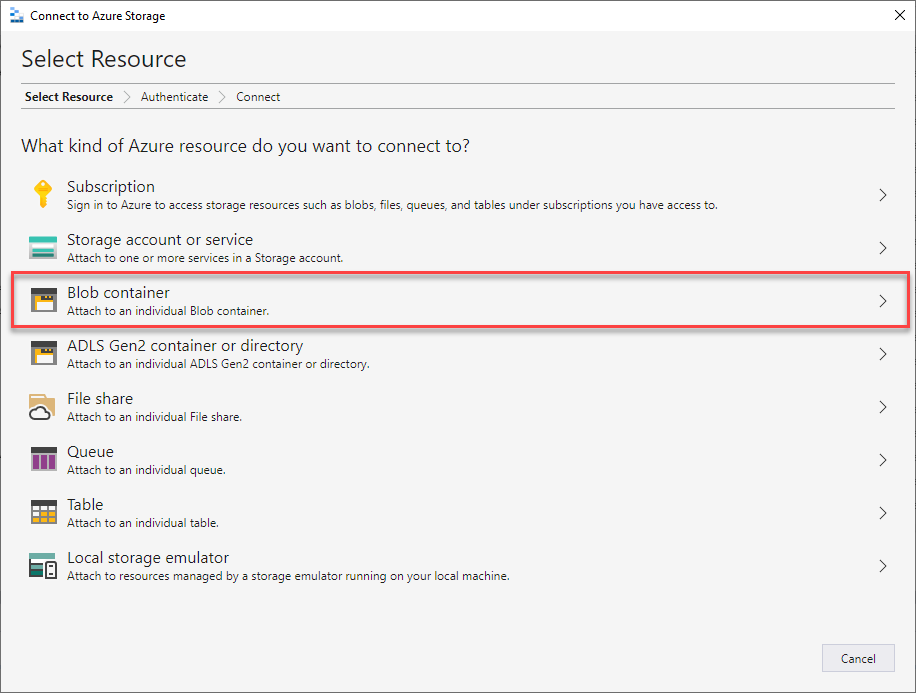
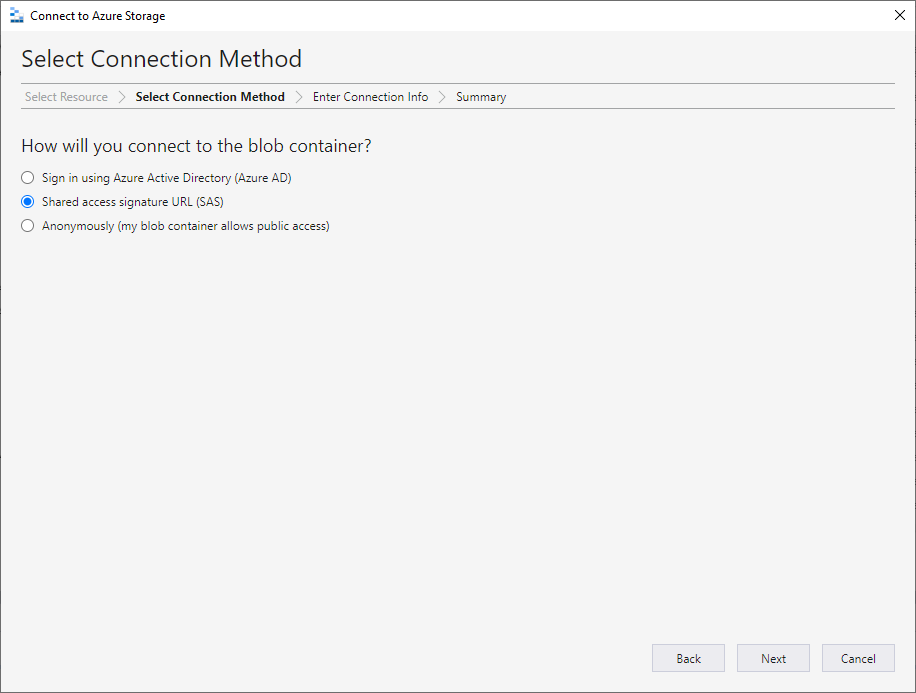
Continue to the next page, you would choose the "Shared access signature URL (SAS)" option.
Entering the next step, you would enter the URL that we have shared above.
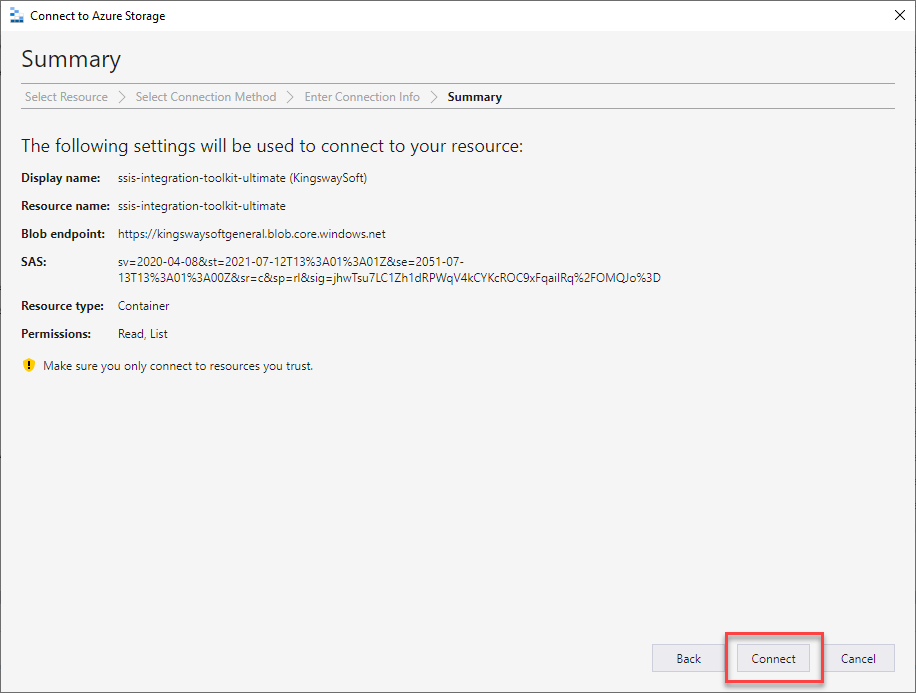
In the last page, you are given the opportunity to review everything before you can complete the attach process by clicking the Connect button.
Once this is done, you should have connected (or attached) to our container from where you can download our latest and greatest SSIS Integration Toolkit software. Within the container, you can see all the installation files from our SSIS Integration Toolkit product family including SSIS Productivity Pack. You may not necessarily need them all. You can remove any of them as needed - do note you should update the main.cmd file if you have decided to remove any of them from being used during the provisioning process.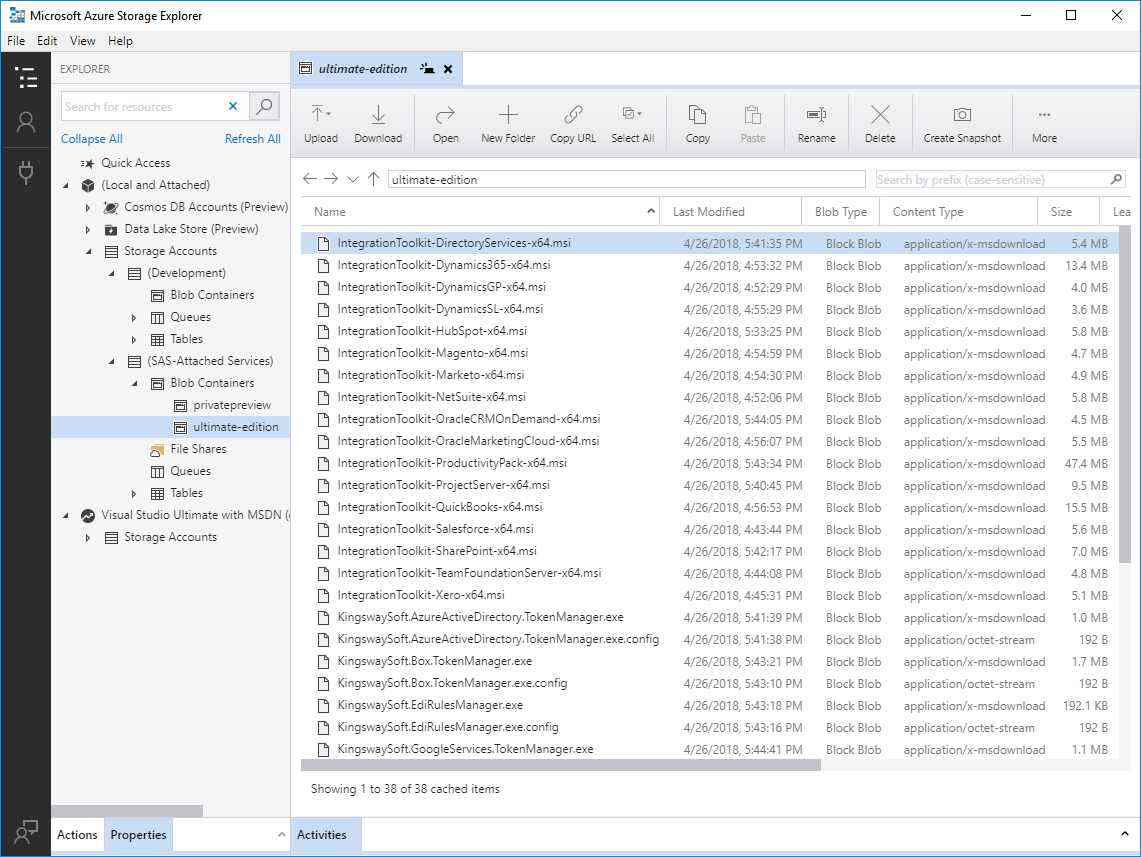
The main.cmd File
The main.cmd file is a file that you can put in your blob container, which will be automatically executed at the time when the IR instance is provisioned or started, provided that the blob container is specified as the Custom setup container SAS URI option. The following is the file content of the main.cmd file in our blob container which you can use as reference, it contains necessary command lines that will properly install and license our software for runtime use. You would need to make necessary updates to the file to insert your own licensing details in order for it to work properly. In addition, you may make further updates to the file to create a more tailored provisioning process such as adding your own custom components, creating necessary folder path for integration purposes, or even add required files to the IR if needed.
@echo off
setlocal

set "KingswaySoftInstaller=ssis-integration-toolkit-installer.exe"
set "KingswaySoftLicenseManager=KingswaySoft.LicenseManager.Console.exe"

REM Check installer
if exist "%~dp0%KingswaySoftInstaller%" (
    echo %KingswaySoftInstaller% found, installing SSIS Integration Toolkit...
    %KingswaySoftInstaller% /quiet /norestart /log "%CUSTOM_SETUP_SCRIPT_LOG_DIR%\install.log" AcceptLicense="true"
    set "INSTALLATION_EXIT_CODE=%ERRORLEVEL%"
    if "%INSTALLATION_EXIT_CODE%"=="0" (
        echo Installation completed
    ) ELSE (
        echo Installation failed with error code: %INSTALLATION_EXIT_CODE% 1>&2
    )
) else (
    echo ERROR: %KingswaySoftInstaller% not found in: %~dp0
    exit /b 1
)

REM Check license manager
if exist "%~dp0%KingswaySoftLicenseManager%" (
    echo %KingswaySoftLicenseManager% found, activating license...
	%KingswaySoftLicenseManager% /a /k XXXXX-XXXXX-XXXXX-XXXXX-XXXXX-XXXXX /e [email protected] /l "Company Name" /st
    echo License activation completed with exit code %ERRORLEVEL%.

	REM Alternatively you can request a free trial license using the command below (uncomment first) - note that only one trial license can be issued per IR instance.
	REM echo Request a 14-day free trial license for testing.
	REM %KingswaySoftLicenseManager% /t /e [email protected] /l "Company Name" /u true /st
	REM echo Trial license request completed with exit code %ERRORLEVEL%.

	REM Print out current licensing status
	%KingswaySoftLicenseManager% /s
) else (
    echo ERROR: %KingswaySoftLicenseManager% not found in: %~dp0
    exit /b 1
)

endlocal
The above script works for our release v26.1 or later. In case you are running v25.2 or earlier releases of our Integration Toolkits and/or SSIS Productivity Pack, you can find the sample main.cmd file in our blob container underneath the v25.2 folder.
Working with Self-Hosted SSIS IR Instance
SSIS Integration Toolkit can operate on an self-hosted SSIS IR instance as well. Self-hosted SSIS IR allows the packages to be executed in local network in which case you get access to your on-premises resources and data sources which might not be possible if it is running on the cloud completely. When you have a self-hosted IR involved, it is possible that some of your data access is done on the cloud while another connection might be talking to a local network resource for reading or writing. This is mainly determined by the connection manager's ConnectByProxy option - this is an option available to all connection managers if you have a proper SSDT version installed (like a SSDT version released after 2021'ish).
- When the ConnectByProxy option is set to false in the connection manager (which is the default), all communication to the connection will be happening on the cloud.
- When the ConnectByProxy option is set to true in the connection manager, all communication to the connection will be happening on the self-hosted IR, not the one on the cloud. Doing so allows you to connect to on-premises resources or data resources.
Because of that, there are certain consideration when licensing our software if a self-hosted IR is used.
- You generally should license both the online IR and self-hosted IR.
- The self-hosted IR is technically a virtual machine that runs on your local network, so it works like an on-premises server. For this reason, the self-hosted IR should be licensed under the Single Server licensing option. You would typically log into the virtual machine to install and activate the license there.
Development, Deployment and Scheduling
Development will be exactly the same as you develop for on-premises SSIS installations. You would want to use the latest SSDT installation that you can download from Microsoft website. At the time of deployment, instead of targeting an on-premises SQL installation, you would target the server that hosts your SSISDB database on cloud using an Azure SQL login. The entire deployment process is identical to what you would do with an on-premises installation except that you would target the server on the cloud using an SQL login as we just mentioned (integrated authentication is not an option in this case).
For scheduling, there are three options, as described below with respective links provided:
- You can use an on-premises SQL Server and create a linked server to the cloud SSISDB database server, and setup a scheduled job on the on-premises server. This option is in certain way defeating the purpose of cloud computing, but it is an option to consider.
- You can setup a SQL Server Elastic Job to schedule the execution on the cloud.
- You can use an ADF v2 activity to schedule the execution on the cloud. The activity can be either an Execute SSIS Package activity or an ADF SQL Server Stored Procedure activity.
A few final notes
It is worth noting the following when working with Azure-SSIS Integration Runtime due to the special deployment infrastructure:
- We only provide subscription-based license for your Azure-SSIS Integration Runtime deployment, you will need to purchase one of our Azure-SSIS IR instance licenses, our single server licenses will not work.
- We only offer the Ultimate license option on SSIS IR as it is a fully managed environment, there isn't any options available to perform system operations or manipulations including even file installations once the instance has been provisioned.
- Our software does automatically request a trial license after it is initially provisioned, if a license does not exist in the system.
- You need to use our most recent Spring 2018 release or later (We generally recommend you use the latest of our software releases) in order to work with the Azure-SSIS Integration Runtime.
- When provisioning your Azure-SSIS instance to work with Microsoft Dynamics 365 online, you may consider choosing a location that is as close as possible to your Dynamics 365 online server so that you can get the best possible performance due to a low network latency which you don't typically get with an on-premises SSIS installation.
Happy cloud-SSIS'ing!