Setting Up a Calendly REST Connection Manager
The REST Connection Manager is an SSIS connection manager that can be used to establish connections and facilitate data integration with REST based APIs and services such as Calendly, among many more.
Integration for Calendly is enabled by the following two components:
To add a new connection, right-click the Connection Manager area in your Visual Studio project, and choose "New Connection..." from the context menu. You will be prompted the "Add SSIS Connection Manager" window. Select the "REST (KingswaySoft)" item to add a new REST Connection Manager.
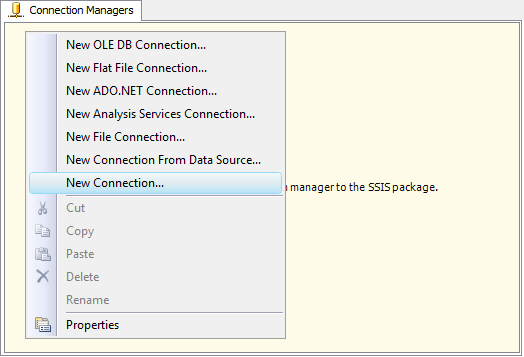
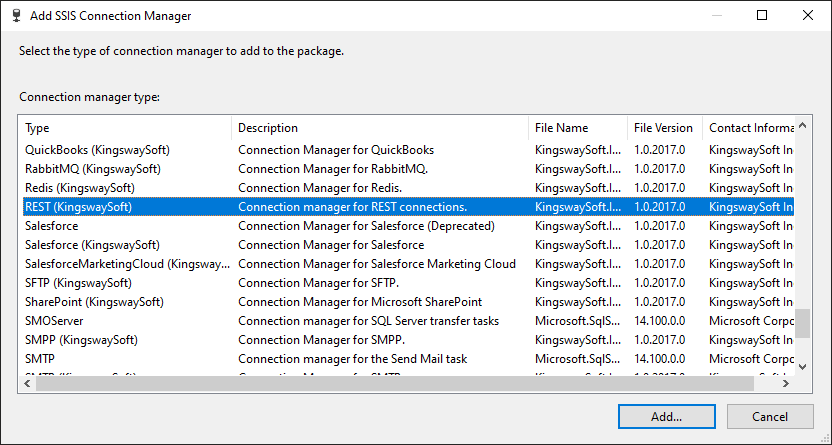
The REST Connection Manager contains 2 pages of configuration.
- General
- Advanced Settings
General Page
The General page allows you to specify connection properties and login credentials for Calendly REST service:
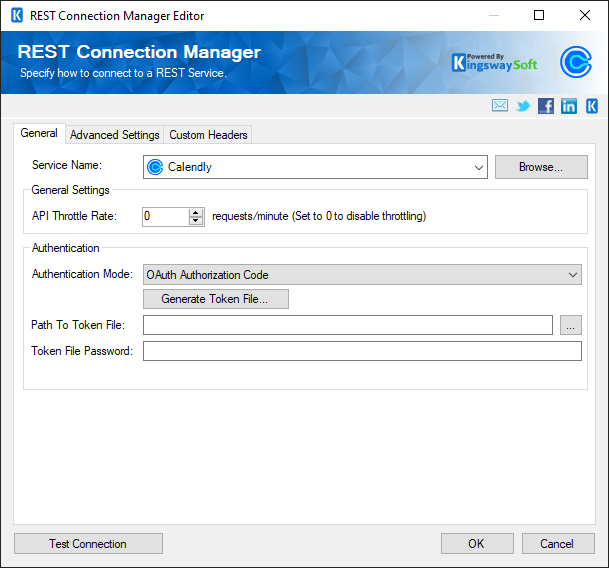
- Service Name
-
The REST service that will be connected to.
- API Throttle Rate
-
The API Throttling Rate will limit the number of requests that can be sent per minute.
- Authentication
- Authentication Mode
There are two options to choose from:
-
OAuth Authorization Code
-
Personal Token
- OAuth Client Credentials
-
The Client Id and Client Secret are to be used when authenticating Calendly service. This option is available when OAuth Client Credentials Mode is selected.
- OAuth Authorization Code
- Generate Token
-
This button opens a dialogue box in order to sign in to your instance to generate a new Token.
-
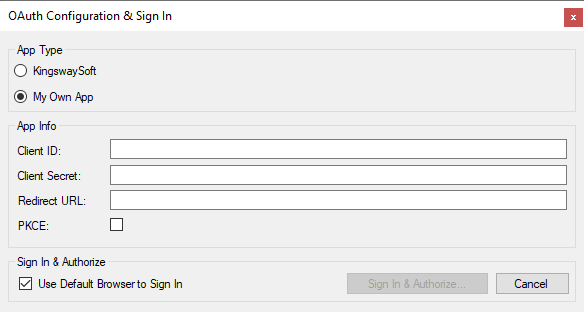
- App Type: the following two options exist for App Type
-
- KingswaySoft: This is for testing purposes only and should never be used in production. It provides a sample Integration Key, Secret, and Redirect URL.
- My Own App: This option should be used when you want to connect to your own data. Selecting this option allows you to enter the Integration Key and Secret which you get from your OAuth setup on the API side. The Redirect URL is the one that you had specified in the App settings.
- PKCE
- This option can be checked to use only the Client Id and the Redirect URL for authentication.
- Sign In & Authorize
-
- Use Default Browser to Sign In: When this option is checked the Sign In and Authorize button will open your default web browser in order to complete the OAuth authentication. When this option is unchecked, the Sign In and Authorize button will complete the entire OAuth authentication process inside of the toolkit.
- Sign In and Authorize: This button allows you to log in to the service endpoint and authorize your app to generate a token.
- Path To Token File (“OAuth Authorization Code” Authentication Mode)
-
This option allows you to enter the path to the token file on the file system.
- Token File Password (“OAuth Authorization Code” Authentication Mode)
-
The password to the token file.
- Personal Token ("Personal Token" Authentication mode)
-
Enter the password used to connect to your Calendly instance.
- Test Connection
-
After all the connection information has been provided, you may click the "Test Connection" button to test if the user credentials entered can connect to the selected REST service.
Advanced Settings Page
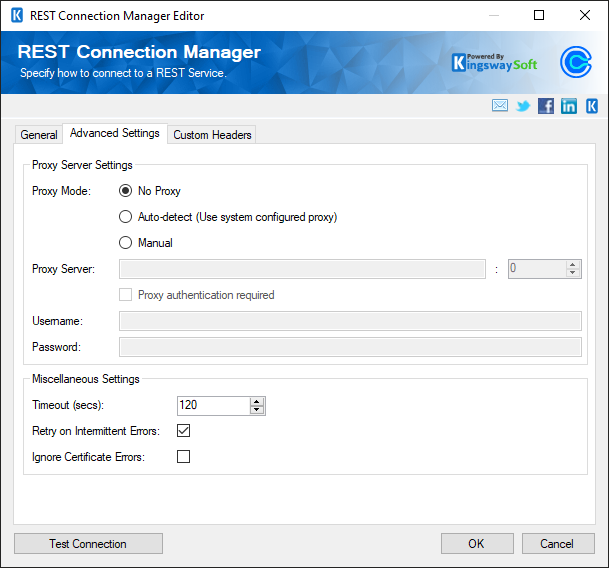
- Proxy Mode
-
The Proxy Mode option allows you to specify how you want to configure the proxy server setting. There are three options available.
- No Proxy
- Auto-detect (Using system-configured proxy)
- Manual
- Proxy Server
-
Using the Proxy Server option allows you to specify the name of the proxy server for the connection.
- Port
-
The Port option allows you to specify the port number of the proxy server for the connection.
- Username (Proxy Server Authentication)
-
The Username option (under Proxy Server Authentication) allows you to specify the proxy user account.
- Password (Proxy Server Authentication)
-
The Password option (under Proxy Server Authentication) allows you to specify the proxy user's password.
Note: The Proxy Password is not included in the connection manager's ConnectionString property by default. This is by design for security reasons. However, you can include it in your ConnectionString if you want to parameterize your connection manager. The format would be ProxyPassword=myProxyPassword; (make sure you have a semicolon as the last character). It can be anywhere in the ConnectionString.
- Timeout
-
The number of seconds requests should wait before timing out.
-
- Retry on Intermittent Errors
-
The retry on intermittent errors option determines if requests will be retried when there is an error. If this option is checked requests will be retried up to 3 times.
- Ignore Certificate Errors
- This option can be used to ignore those SSL certificate errors when connecting to Calendly servers.
Warning: Enabling the "Ignore Certificate Errors" option is generally NOT recommended, particularly for production instances. Unless there is a strong reason to believe the connection is secure - such as the network communication is only happening in an internal infrastructure, this option should be unchecked for best security.
Custom Headers Page
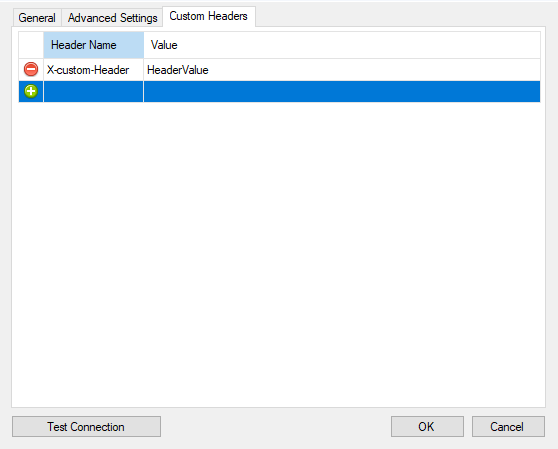
The Custom Headers page will allow you to set the Header Name and Header Value. You may select the green icon to add another row, and the red icon to remove an existing header you have configured.

