Redis Destination Component
The Redis Destination Component is an SSIS data flow pipeline component that can be used to write data to Redis. You can Upsert, and Delete records using this component. There are three pages of configuration:
- General
- Columns
- Error Handling
The General page is used to specify general settings for the Redis Destination component. The Columns page is used to manage columns from the upstream component. The Error Handling page allows you to specify how errors should be handled when they occur.
General Page
The General page allows you to specify general settings for the component.
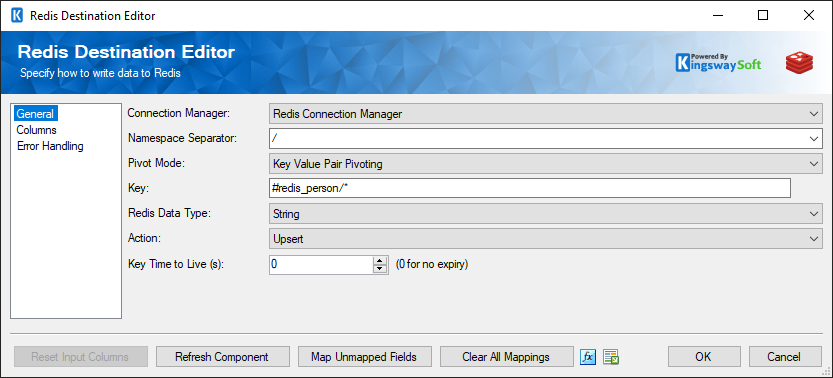
- Connection Manager
-
The Redis Destination Component requires a connection in order to connect to Redis. The Connection Manager drop-down will show a list of all connection managers that are available to your current SSIS packages.
- Namespace Separator
-
The Namespace Separator drop-down displays a list of Namespaces you can choose from, or specify the Namespace in the field.
- Pivot Mode
-
The Pivot Mode lets you choose either Key Value Pair Pivoting, or to have No Pivoting.
- Key
-
The Key for the metadata can be loaded by clicking on the ellipsis (...) button next to the Key field.
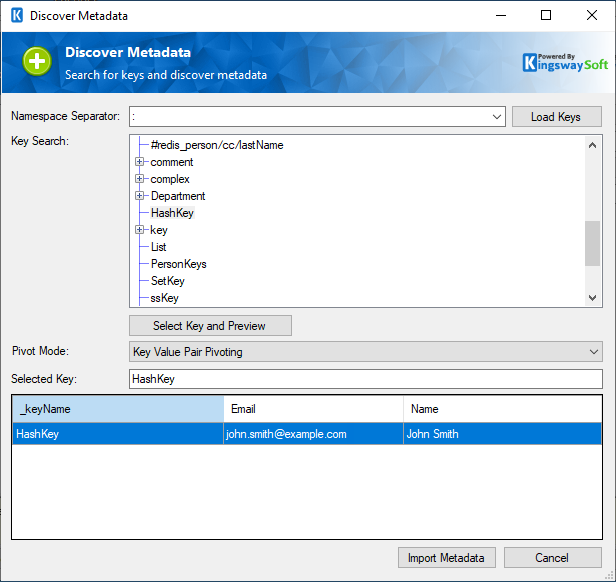
Namespace Separator: Choose from the drop down to select the Namespace separator
Load Keys: Click on the button to load all available keys. In the Key Search space below that, the key can be selected. Once selected, click on "Select Key and Preview".
Pivot Mode: Choose the Pivot mode as Key Value Pair Pivot or No Pivoting.
Selected Key: The Selected Key would be displayed here.
Import Metadata: Click here to import the metadata to the component in the columns page.
- Redis Data Type
-
Choose the Redis Data Type from the drop-down list:
- String
- Hash
- List
- Set
- Sorted Set
- Complex
- Action
-
Choose the Action from the drop-down list.
- Upsert
- Delete
- Key Time to Live (s)
-
Set the Key Time to Live in seconds by editing the field. Set to "0" for no expiry.
- Refresh Component Button
-
Clicking the Refresh Component Button will bring up a prompt for you to confirm the refresh. After clicking “OK”, it will remove any existing columns and add any columns it can find in the specified table.
- Reset Columns Button
-
Clicking the Reset Columns button will bring up a prompt for you to confirm the reset. After clicking “OK”, it will remove any existing columns and replace them with that of the Input Columns.
- Map Unmapped Fields Button
-
By clicking this button, the component will try to map any unmapped attributes by matching their names with the input columns from upstream components.
- Clear All Mappings Button
-
By clicking this button, the component will reset (clear) all your mappings in the destination component.
- Expression fx Icon
-
Click the blue fx icon to launch SSIS Expression Editor to enable dynamic updates of the property at run time.
- Generate Documentation Icon
-
Click the Generate Documentation icon to generate a Word document that describes the component's metadata including relevant mapping, and so on.
Columns Page
The Columns page of the Redis Destination Component allows you to map the columns from upstream components to the Redis Fields.
On the Columns page, you would see a grid that contains four columns as shown below.
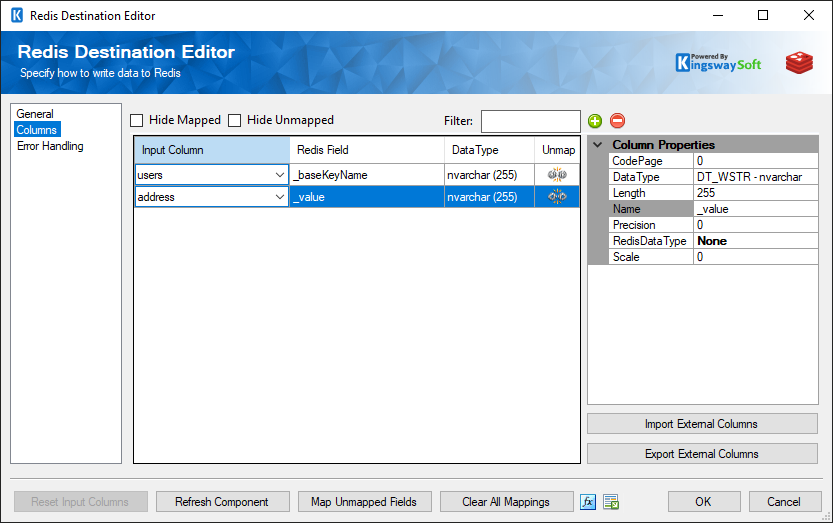
The Columns Page grid consists of:
- Input Column: You can select an input column from an upstream component here.
- Redis Field: Column that will be retrieved from Redis.
- Data Type: The data type of this field.
- Properties window for the field selected:
- CodePage: Specify the Code Page of the field.
- Data type: The data type can be changed accordingly.
- Length: Specify the length of the fields. If the data type specified is a string, the length specified here would be the maximum size.
- Name: Specify the column name.
- Precision: Specify the number of digits in a number.
-
Redis Datatype: Specify the Redis Datatype by choosing from the drop-down. The below can be chosen from the list.
- None
- String
- Hash
- List
- Sorted Set
- Complex
- JSON
- Scale: Specify the number of digits to the right of the decimal point in a number.
- Import External Columns: Option to import the columns and their properties from a file.
- Export External Columns: Option to save the columns and their properties to a JSON file for later reuse.
- + sign: Add field to Redis.
- - sign: Remove field from Redis.
Error Handling Page
The Error Handling page allows you to specify how errors should be handled when they happen.
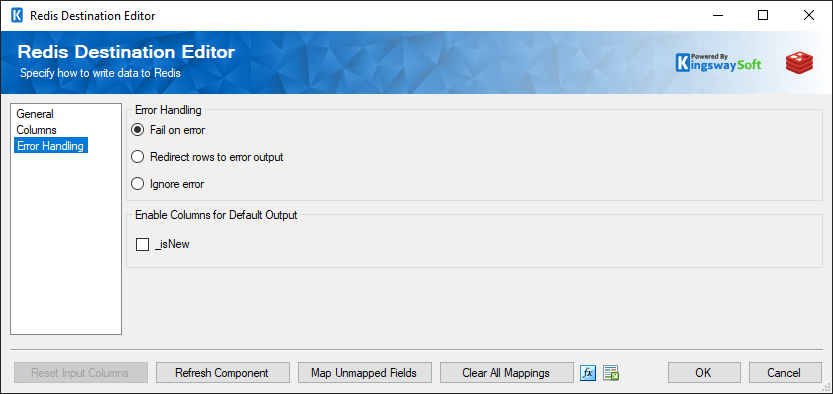
There are three options available.
- Fail on error
- Redirect rows to error output
- Ignore error
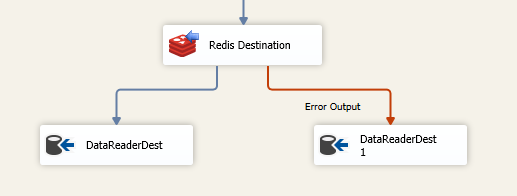
When the Redirect rows to error output option is selected, rows that failed to write to the Redis will be redirected to the ‘Error Output’ output of the Destination Component. As indicated in the screenshot below, the blue output connection represents rows that were successfully written, and the red ‘Error Output’ connection represents rows that were erroneous. The ‘ErrorMessage’ output column found in the ‘Error Output’ may contain the error message that was reported by the server or the component itself.
On the Error Handling page, there is also an option that can be used to enable or disable the following output fields for the destination component.
- _isNew: Contains value to indicate whether it is a newly created record or an existing one. This is useful when you use Upsert action.