Using the Couchbase Destination Component
The Couchbase Destination component is an SSIS data flow pipeline component that can be used to write/send data to Couchbase. You can Insert, Update, Replace, and Delete records using this component. The following pages are available for configuration:
- General
- Document Designer
- Columns
- Advanced
- Error Handling
General Page
The General page of the Couchbase Destination Component allows you to specify the general settings of the component.
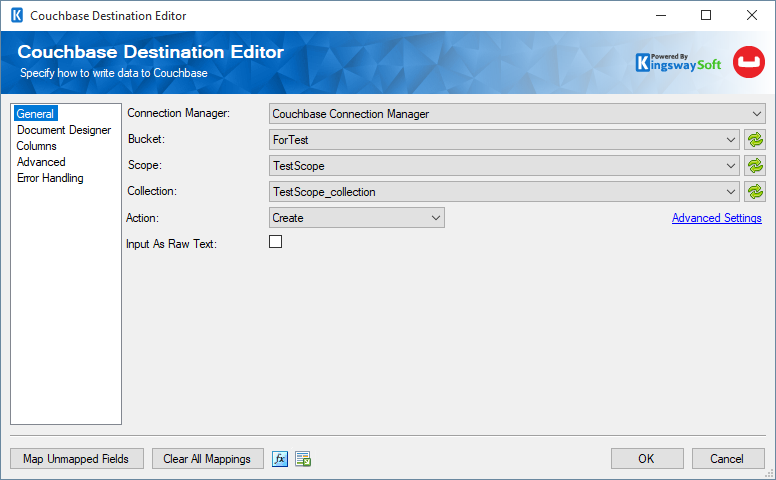
- Connection Manager
-
The Couchbase Destination Component requires a Couchbase connection in order to connect with Couchbase. The Connection Manager drop-down will show a list of all Couchbase connection managers that are available to your current SSIS package.
- Bucket
-
The Bucket dropdown shows a list of Couchbase Buckets available to you. After selecting the Bucket you wish to write to, the Collection drop-down will be populated with Collections in the selected Bucket.
- Scope
-
The Scope dropdown shows a list of Couchbase Scopes available to you based on the Bucket selected.
- Collection
-
The Collection specifies the Couchbase Collection you wish to write to. When you choose a collection, the Couchbase Document Importer opens.

-
The Bucket name and the scope and Collection can be chosen or left as it was for what was chosen on the general page. Choose the 'Documents to scan" to set how many document records to be scanned to get the design. Set to "0" to read all. And add a query if required. Once done, click on "Import" to import the document design, which can be viewed on the "Document designer" page.
- Action
-
The available actions:
- Insert: Send new Documents to the Couchbase Collection.
- Replace: Replace entire Documents in the Couchbase Collection based on the Filter String.
- Upsert: Update or create (Upsert) fields in matching Documents in the Couchbase Collection.
- Delete: Delete matching Documents in the Couchbase Collection based on the Filter String.
-
Control how many parallel threads or workers can write data simultaneously during the operation.
- Input as Raw Text
- Select this option to specify that the input would be raw text.
- Map Unmapped Fields Button
-
By clicking this button, the component will try to map any unmapped attributes by matching their names with the input columns from upstream components.
- Clear All Mappings Button
-
By clicking this button, the component will reset (clear) all your mappings in the destination component.
- Expression fx Icon
-
Click the blue fx icon to launch SSIS Expression Editor to enable dynamic updates of the property at run time.
- Generate Documentation Icon
-
Click the Generate Documentation icon to generate a Word document that describes the component's metadata including relevant mapping, and so on.
Document Designer Page
The Document Designer page allows you to build the design of the document you are trying to write to or import the design from an existing document.
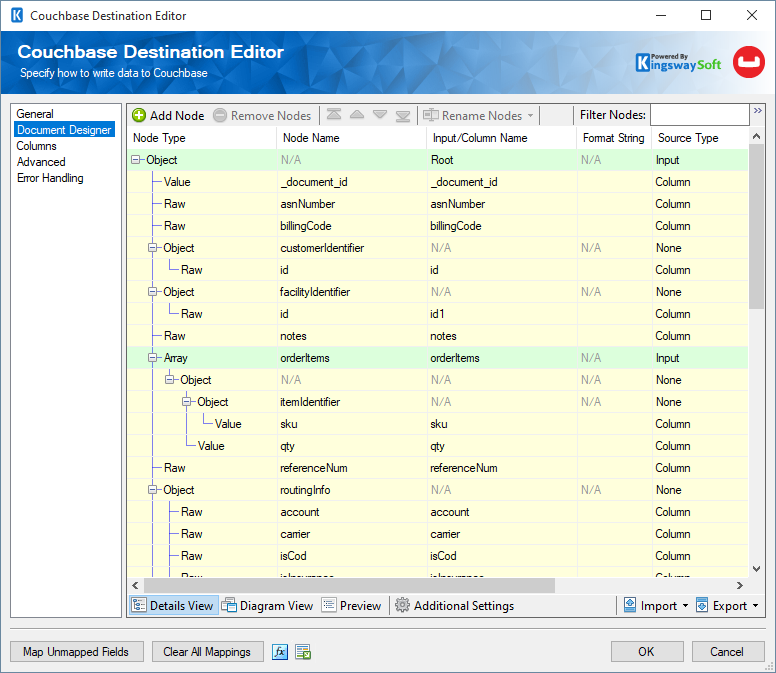
The Document Designer includes the following four tabs:
- Details View
- Diagram View
- Preview
- Additional Settings
In the Details View tab, the top part of the page is used to manually configure the nodes in the design:
- Add Node: This button will add a new node to your Document design.
- Remove Nodes: This button will remove a node from your Document design.
- Direction buttons: These buttons can be used to rearrange the position of the nodes.
-
Rename Nodes: This option allows you to specify how the node name should be represented.
- Use Qualified Names: When this option is selected, the output/column name will be set to the full qualified node name based on the node location in the document.
- Use Short Names: When this option is selected, the output/column name will be set to the given Node Name directly.
-
Filter Columns: This option allows you to show or hide certain Columns in the grid.
- Show Basic Columns: When this option is selected, only basic columns will be shown in the grid.
- Show All Columns: When this option is selected, all available columns will be shown in the grid.
- Filter Nodes: This option allows you to filter the list of nodes shown in the grid by typing a keyword in the textbox.
The Details View grid consists of:
-
Node Type: This option allows you to specify the type of the Node in your document design, There are four options available:
- Array
- Object
- Value
- Raw
- Node Name: The Name of the Node in the document.
- Input/Column Name: The name which will be used for the node when writing to the document.
- Is Repeated: This option allows you to specify if a node is repeated within a document. (Available when Show All Columns is selected)
- Format String: This option allows you to specify the target output format for a string when converting datetime/number values to a string. It follows the same .Net formatting function found at this link. (Available when Show All Columns is selected)
-
Source type: The type of input for a node, available options are:
- Column
- Variable
- Property Name From Column Value
- Node-Write Settings: This option allows you to specify the settings of each node such as the datatype or the Variable Name based on the selected Source Type.
-
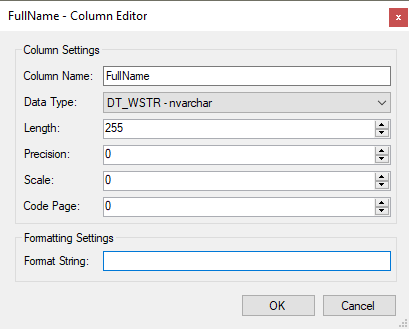
- Column Name: The name of the column.
- Data Type: The data type of the field which can be changed accordingly.
- Length: This option allows you to specify the Length of the fields. If the data type specified is a string, the length specified here would be the maximum size. If the data type is not a string, the length will be ignored.
- Precision: This option allows you to specify the number of digits in a number.
- Scale: This option allows you to specify the number of digits to the right of the decimal point in a number.
- Code Page: This option allows you to specify the Code Page of the field.
- Is Object ID(since v22.1): When this option is enabled, the value of the _id field will be wrapped with the ObjectId Couchbase method. It will convert the input value to the form of a string literal "ObjectId(...)".
In the Diagram View tab, you would be able to view the document design as a diagram where you can link different inputs with each other in order to create the hierarchy of your document and establish relationships between the different inputs:
-
- Create New Input
-
This option allows you to create a new Input and link it to an existing input if required based on the intended document design.
- Delete Selected Input
-
This option allows you to remove existing Inputs from the diagram
- Reset Layout
-
This option allows you to reset the layout of the diagram which would reorganize the location of each input.
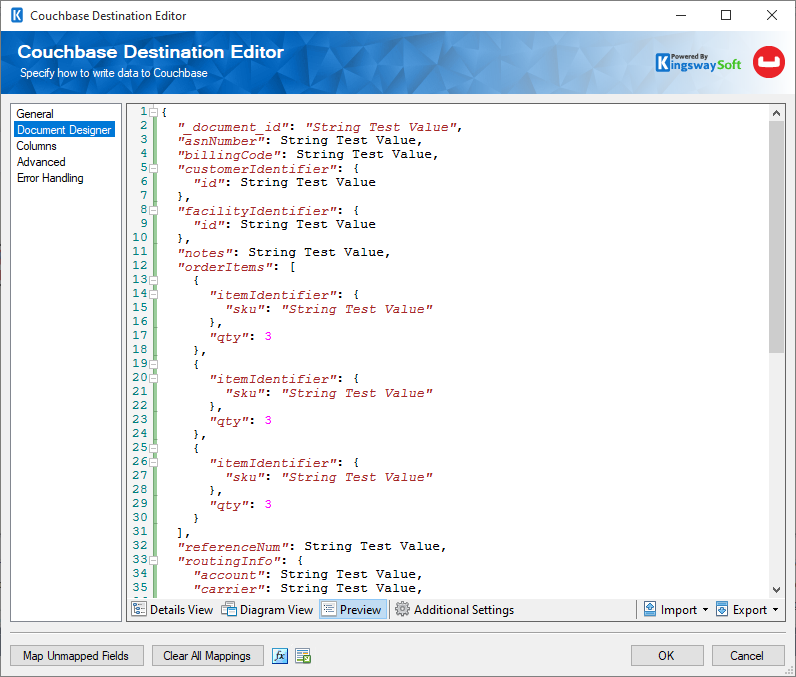
In the Preview tab, the component will show a sample of the document which will be created with test values.
In the Additional Settings tab, you would find the following options:
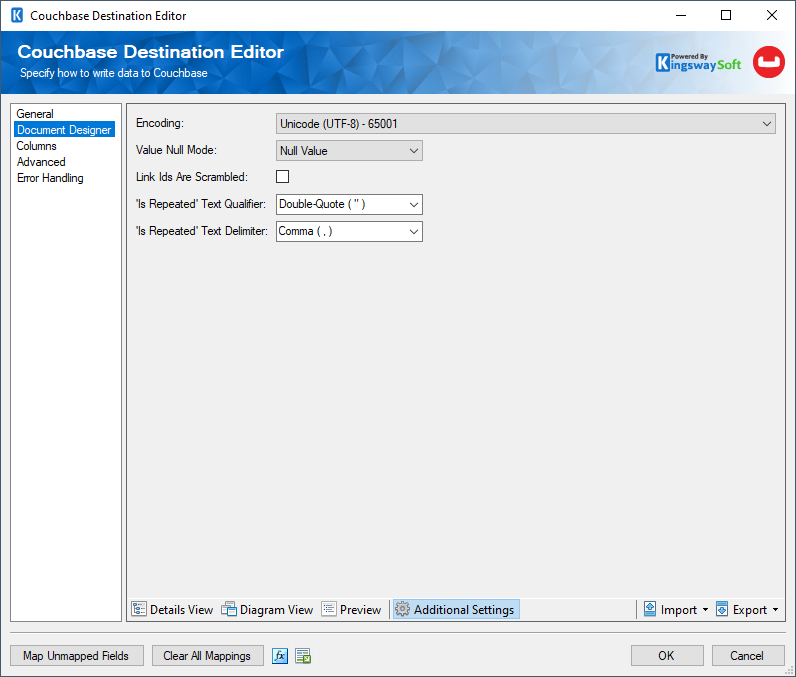
-
Null Mode: This option allows you to specify the handling of Null values. There are 3 options:
- Don't Show
- Empty String
- Null Value
-
'Is Repeated' Text Qualifier: This option allows you to specify the
Text Qualifier used in a document when the
Is Repeated property is set to
True for one or more nodes. There are four options available:
- Double-quote(“).
- Single-quote (‘)
- Tick (`)
- None
-
'Is Repeated' Text Delimiter: This option allows you to specify the
Text Delimiter used in a document when the
Is Repeated property is set to
True for one or more nodes. There are seven options available:
- Newline (\n)
- Carriage Return (\r)
- Semicolon (;)
- Colon (:)
- Comma (,)
- Tab (\t)
- Vertical Bar (|)
- Import
-
This option allows you to import the design of your document from one of the following five sources:
- Designer Settings: Import the design from an existing .designer.settings file.
- Input (Reset Design): Create the design based on the input columns for the upstream components.
- JSON (Local File): Import the design based on a JSON file on your local file system.
- JSON Schema (Local File): Import the design based on a JSON Schema file on your local file system.
- Export
-
Designer Settings: This option allows you to export the current document design to a .designer.settings file which can be used later to import the same design in a different component.
Columns Page
The Columns page of the Couchbase Destination Component allows you to map the columns from upstream components to the Couchbase Fields.
On the Columns page, you would see a grid that contains four columns as shown below.

- Input Column: You can select an input column from an upstream component here.
- Couchbase Field: The Couchbase field that you are writing data to.
- ObjectId(since v22.1): This column indicates if the field value will be wrapped with the ObjectId Couchbase method.
- Data Type: This column indicates the type of value for the current field.
- Unmap: This column can be used to unmap the field from the upstream input column, or otherwise it can be used to map the field to an upstream input column by matching its name if the field is not currently mapped.
Advanced Page
The Advanced page of the Couchbase Destination Component allows you to specify the advanced settings of the component.
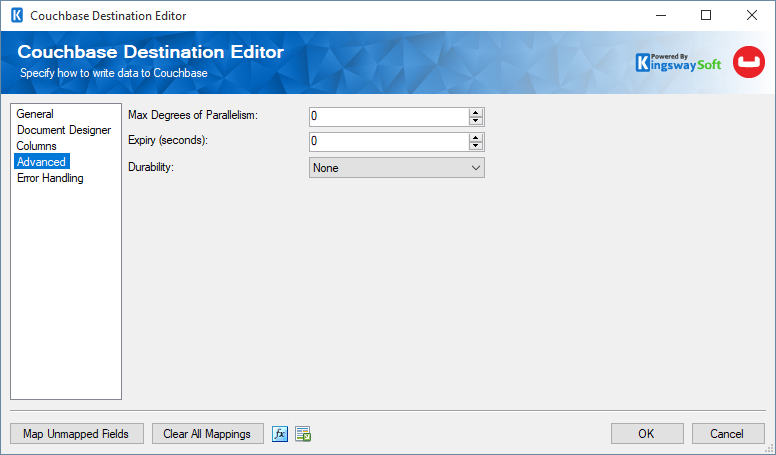
- Max Degrees of Parallelism
- Control how many parallel threads or workers can write data simultaneously during the operation
- Expiry
-
The expiry time in seconds
- Durability
-
The durability can be chosen from the drop down list: None, Default, Majority, MajorityAndPersistActive, or PersistsToMajority
- Preserve Time to Live
-
Available for Upsert and Replace action, controls if the document's existing expiration time is kept when the document is updated or replaced.
Error Handling Page
The Error Handling page allows you to specify how errors should be handled when they happen.
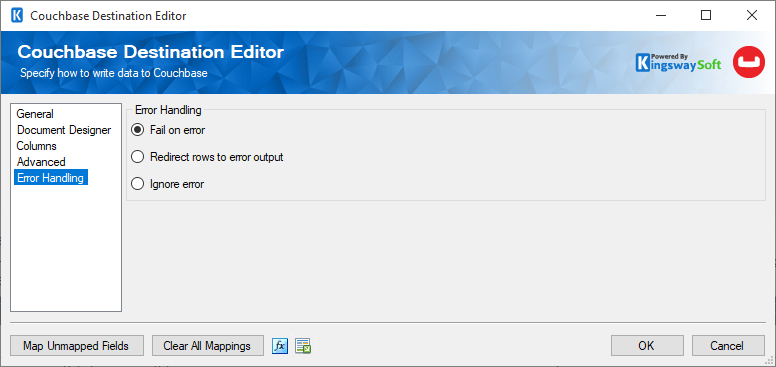
There are three options available.
- Fail on error
- Redirect rows to error output
- Ignore error
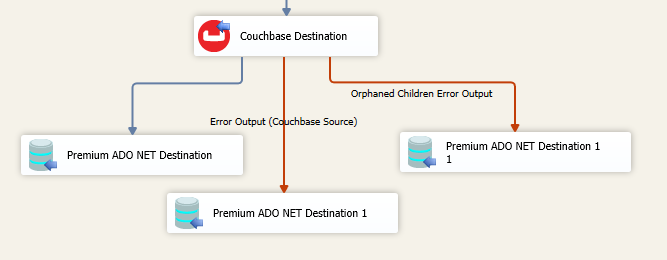
When the Redirect rows to error output option is selected, rows that failed to write to Couchbase will be redirected to the 'Error Output' output of the Destination Component. As indicated in the screenshot below, the green output connection represents rows that were successfully written, and the red 'Error Output' connection represents rows that were erroneous. The 'ErrorMessage' output column found in the 'Error Output' may contain the error message that was reported by Couchbase or the component itself.
Note: Use extra caution when selecting Ignore error option, since the component will remain silent for any errors that have occurred.