Note: This documentation page only applies to the MongoDB destination component shipped in SSIS Productivity Pack v21.1 and prior. If you are using our v21.2 release or later, you should check the new documentation page. In our new versions, we offer many advanced features which were not possible in older versions due to the significant infrastructure updates. Upgrading to the new versions is highly recommended and would provide a lot of benefits.
Using the MongoDB Destination Component
The MongoDB Destination component is an SSIS data flow pipeline component that can be used to write/send data to MongoDB. You can Insert, Update, Replace, and Delete records using this component. There are three pages of configuration:
- General
- Columns
- Error Handling
General Page
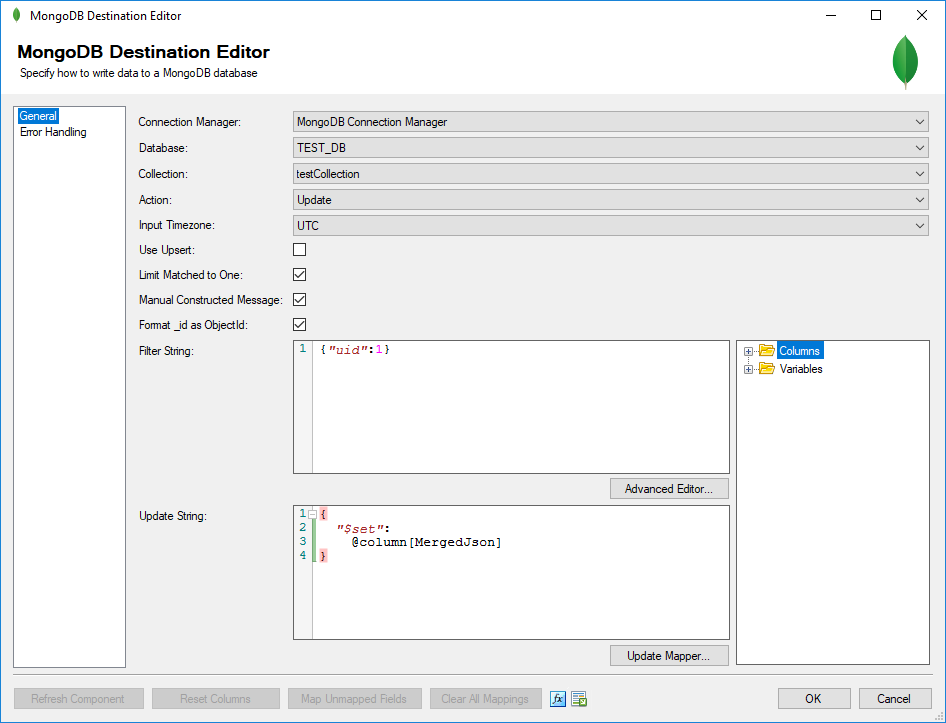
The General page of the MongoDB Destination Component allows you to specify the general settings of the component.
- Connection Manager
-
The MongoDB Destination Component requires a MongoDB connection in order to connect with MongoDB. The Connection Manager drop-down will show a list of all MongoDB connection managers that are available to your current SSIS package.
- Database
-
The Database drop-down shows a list of MongoDB Databases available to you. After selecting the Database you wish to write to, the Collection drop-down will be populated with Collections in the selected Database.
- Collection
-
The Collection specifies the MongoDB Collection you wish to write to.
- Action
-
There are 4 available actions:
- Insert: Send new Documents to the MongoDB Collection
- Replace: Replace entire Documents in the MongoDB Collection based on the Filter String
- Update: Update fields in matching Documents in the MongoDB Collection based on the Filter String and Update String
- Delete: Delete matching Documents in the MongoDB Collection based on the Filter String
- Insert as JSON
-
If the input column data is in JSON format, enable this option. You can send data as JSON for both Insert and Replace actions.
- Limit Matched To One
-
When this is enabled only one Document can match the Filter String in the MongoDB Collection. Any additional matches are ignored. This property only applies to the Replace, Update and Delete actions. Note it is always enabled for the Replace action.
- Use Upsert
-
This enables upsert functionality on the current action (If no Documents match the filter string in the MongoDB Collection, a new one is created). This property only applies to the Replace and Update actions.
- Batch Size
-
This is the number of documents to send to MongoDB at a time. This option is only available for the Insert action.
- Null Mode(since v10.0)
-
This property specifies how to handle NULL values. There are three options:
- Don't Show: This option will hide nodes whose values are null.
- Empty String: This option will convert NULL values to an empty string.
- Null Value: This option will write null.
- Format _id as ObjectId
-
When this option is enabled, the value of the _id field will be wrapped with the ObjectId MongoDB method. It will convert the input value to the form of a string literal "ObjectId(...)".
- Input Timezone
-
The Input Timezone setting tells the component what format any incoming datetime values are in, and uses this information to write the correct date to MongoDB. There are two options available.
- UTC
- Local: Any datetime values will be treated as the local system time where the package is run.
- Filter String
-
Specify a MongoDB filter string to filter the Documents to perform an action on. This property only applies to the Replace, Update, and Delete actions.
- Advanced Editor Button
-
Launches the Advanced Editor that allows you to create MongoDB filter strings (details below).
The Advanced Editor allows you to construct MongoDB filter strings from a list of conditions and operators. It also supports injecting variables and input columns into the expression.
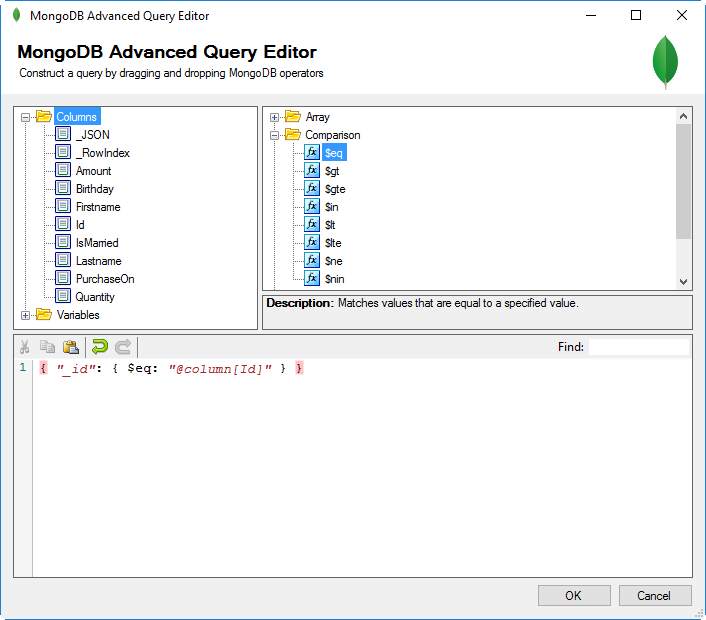
Drag and drop filter string items from the list of available conditional items in the top right tree view. Then modify the expression as needed. You can also drag and drop variables and input columns from the top left tree view. When done, click the OK button to return to the MongoDB Destination Component Editor with the newly constructed Filter String.
- Refresh Component Button
-
Clicking the Refresh Component button causes the component to retrieve an updated list of MongoDB database collection.
- Reset Columns Button
-
Clicking the Reset Columns button will bring up a prompt for you to confirm the reset. After clicking “OK”, it will remove any existing columns and replace them with that of the Input Columns.
- Map Unmapped Fields Button
-
By clicking this button, the component will try to map any unmapped attributes by matching their names with the input columns from upstream components.
- Clear All Mappings Button
-
By clicking this button, the component will reset (clear) all your mappings in the destination component.
- Expression fx Icon
-
Click the blue fx icon to launch SSIS Expression Editor to enable dynamic updates of the property at run time.
- Generate Documentation Icon
-
Click the Generate Documentation icon to generate a Word document that describes the component's metadata including relevant mapping, and so on.
Columns Page
The Columns page of the MongoDB Destination Component allows you to map the columns from upstream components to the MongoDB Fields.
On the Columns page, you would see a grid that contains four columns as shown below.
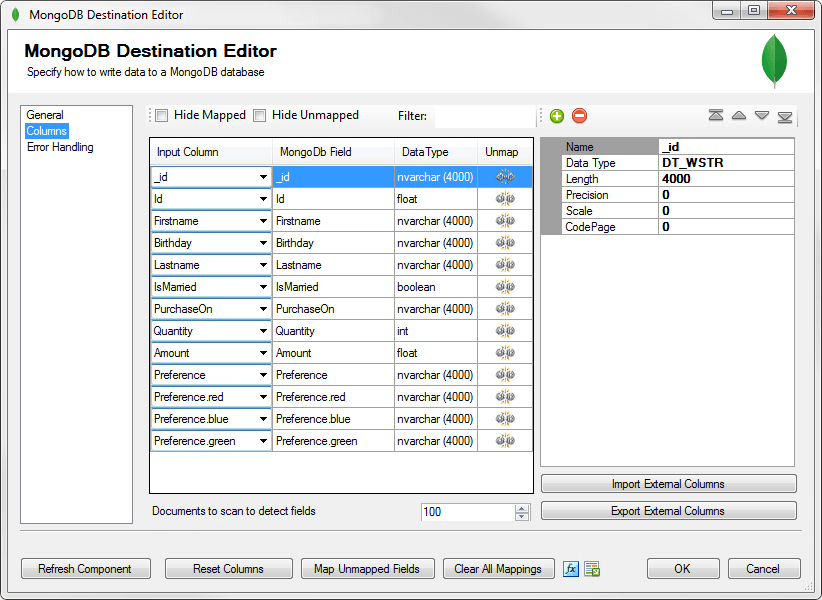
- Input Column: You can select an input column from an upstream component here.
- MongoDB Field: The MongoDB field that you are writing data to.
- Data Type: This column indicates the type of value for the current field.
- Unmap: This column can be used to unmap the field from the upstream input column, or otherwise it can be used to map the field to an upstream input column by matching its name if the field is not currently mapped.
- Properties window for the field listed. These values are configurable.
- Name: Specify the Column name.
- Data Type: The data type can be changed according.
- Length: if the data type specified is a string, the length specified here would be the maximum size. If the data type is not a string, the length will be ignored.
- Precision: Specify the number of digits in a number.
- Scale: Specify the number of digits to the right of the decimal point in a number.
- CodePage: Specify the Code Page of the field.
- Documents to scan to detect fields: This option allows you to specify the number of rows to scan in order to detect the table metadata, mainly the column information.
- Import External Column: Option to import the Columns and their properties from a file.
- Export External Column: Option to save the Columns and their properties to a JSON file later for reuse.
- + sign: Add a field.
- - sign: Remove a field.
- Arrows: Move the fields to a desired location in the file.
Error Handling Page
The Error Handling page allows you to specify how errors should be handled when they happen.
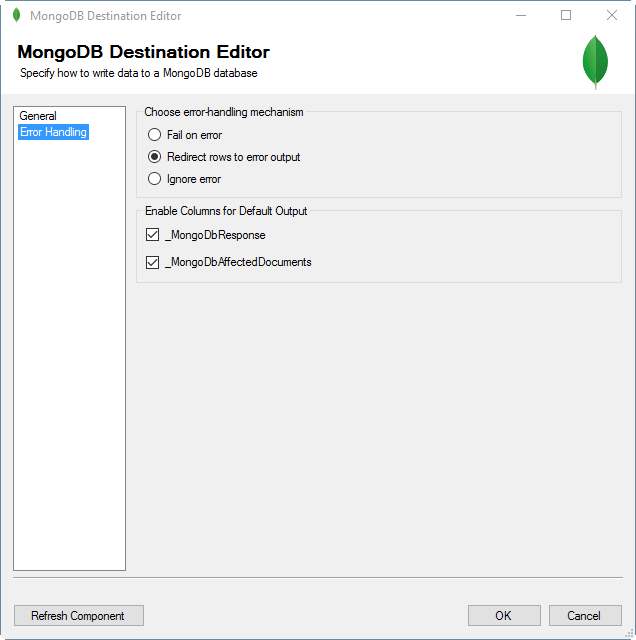
There are three options available.
- Fail on error
- Redirect rows to error output
- Ignore error
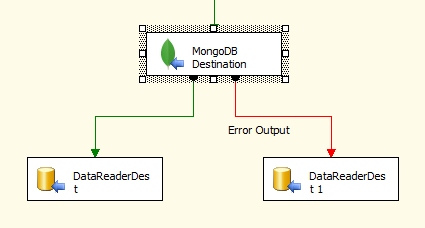
When the Redirect rows to error output option is selected, rows that failed to write to MongoDB will be redirected to the 'Error Output' output of the Destination Component. As indicated in the screenshot below, the green output connection represents rows that were successfully written, and the red 'Error Output' connection represents rows that were erroneous. The 'ErrorMessage' output column found in the 'Error Output' may contain the error message that was reported by MongoDB or the component itself.
Note: Use extra caution when selecting Ignore error option, since the component will remain silent for any errors that have occurred.
Enable Columns for Default Output
- _MongoDbResponse: Contains the JSON response from MongoDB.
- _MongoDbAffectedDocuments: Contains the number of affected documents.