Using the Premium ADO.NET Destination Component
The Premium ADO.NET Destination Component utilizes the out-of-the-box ADO.NET Connection Manager to facilitate writing to databases. There are four pages that can be configured:
- General
- Output
- Pre & Post Commands
- Error Handling
General Page
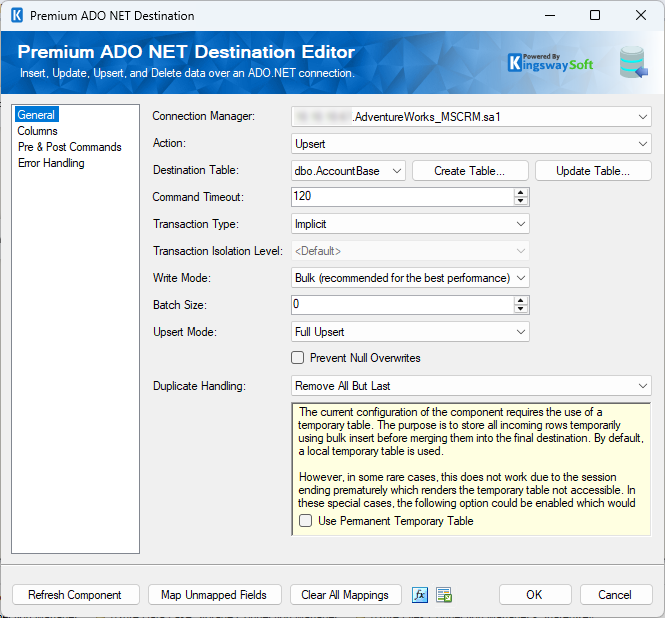
The General page of the Premium ADO.NET Destination Component allows you to specify the general settings of the component.
- Connection Manager
-
The Premium ADO.NET Destination Component requires an ADO.NET connection manager. The component currently supports the following data providers:
- SQL Client Data Provider
- ODBC Data Provider
- OLE DB Data Providers
- Oracle Client Data Provider
- ODP.NET Managed and Unmanaged
- MySQL Client Data Provider
- PostgreSQL Data Provider
- Db2 Data Provider
- Firebird Data Provider
- Sybase Data Provider
- SQLite Data Provider
- Action
-
The command you want to execute on the Destination Table. Available actions include:
- Insert: Add records to the Destination Table.
- Update: Update existing records in the Destination Table
- Upsert: If the specified record exists in the Destination Table, it is updated, otherwise it is inserted.
- Delete: Delete existing records from the Destination Table
- Full Sync (since v7.1): Synchronize input data to the Destination Table. Full Sync action differs from Upsert action in the way that it can delete those records in the target system but not in the source system.
- Custom Command (since v6.0): Allows you to write your own database command. When Custom Command action is selected you will notice a command textbox and a tree view will appear. The tree view contains a list of Input Columns, SSIS Variables, and Database Tables from the selected ADO.NET Connection Manager. Selecting a table will expand it with its columns. You can drag and drop the items in the tree view to the command text box to help construct the command. During runtime, the command is executed for each record in the Input. Column and Variable values are properly parameterized and prepared for the database.
- Insert: Add records to the Destination Table.
- Destination Table
-
The Destination Table drop-down displays a list of available tables for the database specified in the Connection Manager.
- Create Table
-
This command will launch the ADO.NET Table Creator, which you can use to create a database table based on the input columns from upstream components.
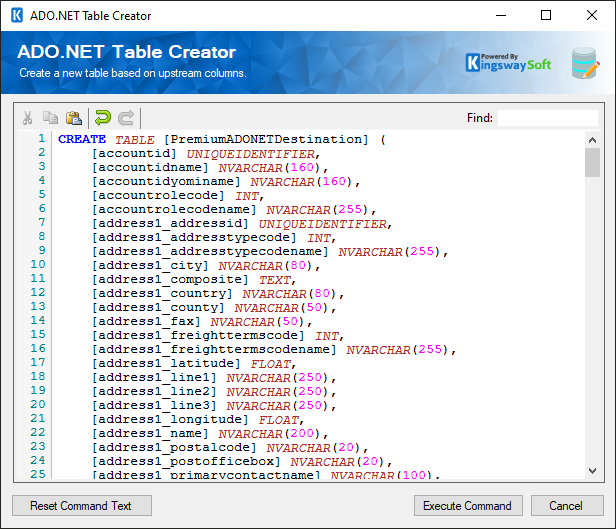
It auto-generates a command based on the selected Connection Manager and Input Columns to create a new table. You can further customize the command to suit your needs, and then click the 'Execute Command' button. You will be informed if the command was executed successfully or not, and the table you created will be selected in the Destination Table property.
- Update Table (Since v22.1)
-
This command will launch the ADO.NET Table Updater, which you can use to Update or alter a database table based on the input columns from upstream components.
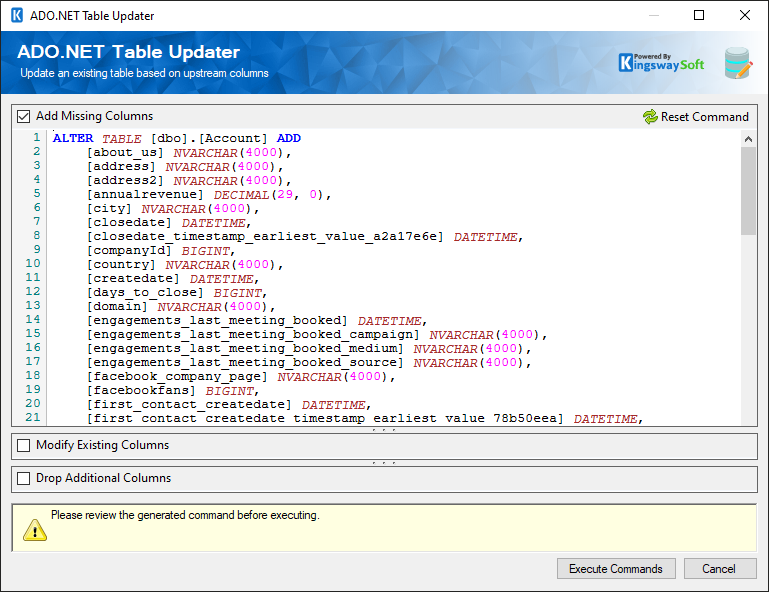
It auto-generates a command based on the selected Connection Manager and Input Columns to create a new table. You can further customize the command to suit your needs, and then click the 'Execute Command' button. There are three types of Alter commands that you can perform based on your requirement:
- Add Missing Columns
- Modify Existing Columns
- Drop Additional Columns
- Use Bulk(this option has been deprecated since v20.1 - the same function is available in the Write Mode option discussed below)
-
When this option is checked, it means that it will use bulk-based writing, which can significantly improve writing performance. We highly recommend this option if it is available. If you do not see this option (v10.0 or prior), it simply means that the current ADO.NET Connection Manager does not support Bulk writing. The option works slightly differently depending on the action that has been chosen:
- Insert: Records are bulk inserted into the target table per SSIS buffer. Records directed to the default output have been successfully written.
- Update, Upsert, Delete, or Full Sync: A temporary table is created for records to be bulk inserted per the batch size setting in the component. When the last record is processed by the component, a MERGE command is executed against the temporary table and the target table. In SQL, three default Bulk Reporting outputs return information on each record affected by the MERGE statement.
- Command Timeout (since v7.1)
-
The Command Timeout option allows you to specify the number of seconds for the command timeout values. The default value is 120 seconds.
- Transaction Type
-
This option allows you to specify the type of transactions by choosing Explicit and selecting an Isolation Level, or by choosing Implicit.
- Transaction Isolation Level (Available only when "Explicit" Transaction Type is selected)
-
The Transaction Isolation Level option allows you to specify concurrency behaviors for database tables. Different data providers support different isolation levels.
- Write Mode (since v20.1)
-
The Write Mode option allows you to specify how the data is written into the database. There are a total of three options available depending on the database connection:
- Row by Row
- Batch
- Bulk
- Upsert Mode (Only for Upsert action since v25.1)
-
The Upsert Mode option allows you to specify how the data is written while performing an Upsert action. There are a total of three options available:
- Full Upsert
- Insert Only - Existing records are ignored
- Update Only - New records are ignored
-
- Batch Size
-
The Batch Size option, which is available when you choose Bulk in Write Mode, allows you to specify how many records you want to send to the target database server at a time. The default value is 0, which means the SSIS buffer size will be used.
- Prevent Null Overwrites (since v8.0)
-
The Prevent Null Overwrites option allows you to ignore any fields that have a null value. By ignoring a field, the null value will not be sent to the target table. This option is only available for Update and Upsert actions.
- Ignore Unchanged Records
-
The Ignore Unchanged Records option allows you to skip updates when the data matches an existing record in the destination. This reduces unnecessary writes which would improve performance. Available for the Update, Upsert, and Full Sync actions.
- Allow Delete All on Zero Input Rows (Only when Full Sync Action is selected, since v26)
-
The Allow Delete All on Zero Input Rows option determines whether all records in the destination table should be deleted when the component receives zero input rows. By default, this option is disabled to prevent accidental data loss. When enabled, the Full Sync action will treat zero incoming rows as a valid result and will delete all existing records in the target table.
- Fail On No Affected Records (since v23.1)
-
The Fail On No Affected Records option allows you to toggle between whether to fail or not when there are no affected records for that action. This option is only available for Update and Delete actions.
- Disable Foreign Key Checks (since v22.1)
-
The Disable Foreign Key Checks option is available when working with a MySQL/MariaDB connection, it allows disabling foreign key checks while loading data in the target database table. This can be beneficial for the following scenarios/considerations:
- This can speed up the write performance since FK checks are not enforced during the load. However, this is not the primary intention of this option. Please continue reading below.
- This can help with situations where you have multiple database tables to be loaded while there are some complex foreign key relationships involved. With the option enabled, you can load those tables in any random order without having to worry about foreign key dependencies between the tables.
- This option is primarily designed for the situation where you know that you would have valid FK references for all your input data, otherwise you may end up with invalid FK references in the target table.
- This can speed up the write performance since FK checks are not enforced during the load. However, this is not the primary intention of this option. Please continue reading below.
- Ignore Unique Constraints (since v22.1)
- The Ignore Unique Constraints option is available when working with an Oracle ODP.NET Unmanaged data provider connection, and when checked, it ignores the unique constraints imposed on records.
- Duplicate Handling (since v7.1)
-
The Duplicate Handling option allows you to specify how input duplicates should be handled when the Use Bulk option is enabled on Update/Upsert/Delete/Full Sync actions. There are three options available:
- Remove All But Last
- Remove All But First
- Ignore
- Use Permanent Temporary Table
-
The current configuration of the component requires the use of a temporary table. The purpose is to store all incoming rows temporarily using bulk insert before merging them into the final destination. By default, a local temporary table is used. However, in some rare cases, this does not work due to the session ending prematurely, which renders the temporary table not accessible. In these special cases, the following option could be enabled, which would create the table in tempdb. The table is dropped when the SQL server is restarted, and the component also attempts to drop the table upon successful execution.
- Expression fx Icon
-
Click the blue fx icon to launch the SSIS Expression Editor to enable dynamic updates of the property at run time.
- Generate Documentation Icon
-
Click the Generate Documentation icon to generate a Word document that describes the component's metadata, including relevant mapping and more.
Columns Page
The Columns page of the Premium ADO.NET Destination Component allows you to map the columns from upstream components to fields of the specified Destination Table in the General Page. The Columns page is not available when the selected action is Custom Command.

- Key Column: The key checkbox column is used when performing an update (Update or Upsert) where the selected fields represent key columns. These fields are used in the WHERE clause of the UPDATE statement. This column is not available when using INSERT because there is no condition, and not available when using DELETE because every column is a conditional/key field.
- Input Column: Select an Input Column from an upstream component here.
- Destination Table Column: This is the field you are writing data to.
- Lookup (since v8.0): Enable the lookup feature by mapping the virtual '<Lookup>' input column to the destination table column. When this option is selected, the component can perform a lookup based on input values. For further information about how to use the Lookup feature, please refer to the Working with the Lookup Feature section below.
- Data Type: This column indicates the value type for the current field.
- Unmap: This column can be used to unmap the field from the upstream input column, or otherwise it can be used to map the field to an upstream input column by matching its name if the field is not currently mapped.
Working with the Lookup Feature
The Lookup feature allows you to perform a lookup based on the input values. To configure the Lookup feature, map the destination table column with the virtual '<Lookup>' input column. You will be presented with the following screen:
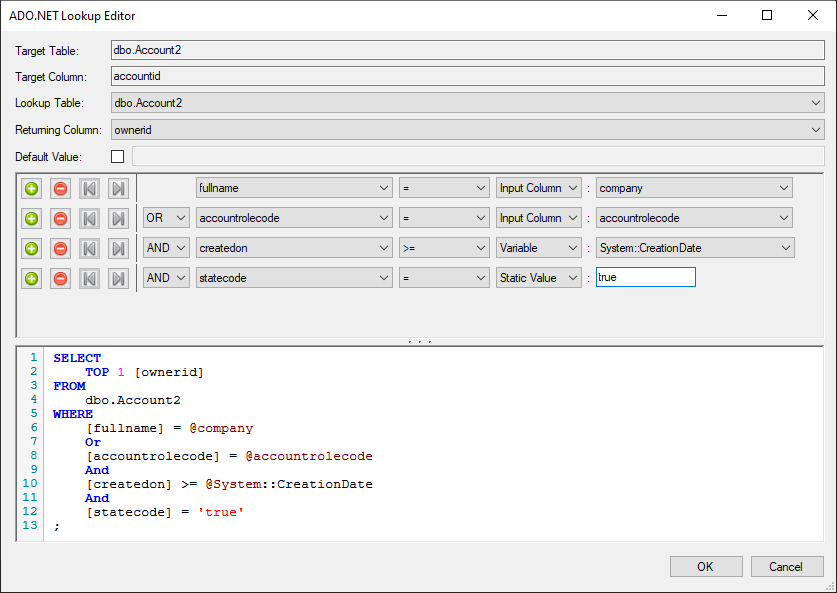
- Target Table
-
The Target Table is a read-only property that shows the destination table configured in the Premium ADO.NET Destination component.
- Target Column
-
The Target Column is a read-only property that shows the target column configured to use the Lookup feature.
- Lookup Table
-
Select the Lookup Table from the drop-down list that displays available tables for the database specified in the Connection Manager.
- Returning Column
-
Select the Returning Column from the drop-down list that displays available columns for the specified Lookup Table.
- Default Value
-
When the Default Value is specified, the component will use this default value to write to the target column should the input value lookup fail.
- Lookup Condition
-
- + sign: Add lookup condition.
- - sign: Remove lookup condition.
- Arrows: Use arrows to group the lookup conditions.
- AND/OR: Specify AND or OR to create logical expressions of your lookup conditions.
- Lookup Column: Select the lookup column from the drop-down list that displays available columns for the specified Lookup Table.
-
Operator: Use the query operator to specify how each input value in a clause must relate to the corresponding value in a lookup table.
- =: the value of the field is equal to the selected lookup value
- <>: the value of the field is not equal to the selected lookup value
- >: the value of the field is greater than the selected lookup value
- <: the value of the field is less than the selected lookup value
- >=: the value of the field is greater than or equal to the selected lookup value
- <=: the value of the field is less than or equal to the selected lookup value
-
LIKE: the value of the field is equal to the selected lookup value based on pattern match, supports %, _, [ ], and [^] wildcards
- Note: This option may impact performance, so consider using = whenever possible.
-
NOT LIKE: the value of the field is not equal to the selected lookup value based on pattern match, supports %, _, [ ], and [^] wildcards
- Note: This option may impact performance, consider using <> whenever possible.
- BETWEEN: the value of the field is between the values of two selected lookup values
- IS NULL: the value of the field is NULL
- IS NOT NULL: the value of the field is not NULL
-
Input Value: The Input Value for the lookup condition. Available options are:
- Input Column
- Enables user to perform Lookup match by selecting a field from the Lookup Table Column.
- Variable
- Enables user to perform Lookup match based on a System or User SSIS variable.
- Static Value
- Enables user to perform Lookup match based on a static value.
- Input Column
Output Parameters Page
The Output Parameters page of the Premium SQL Server Destination Component comes up when Custom Command action is chosen in the General Page.
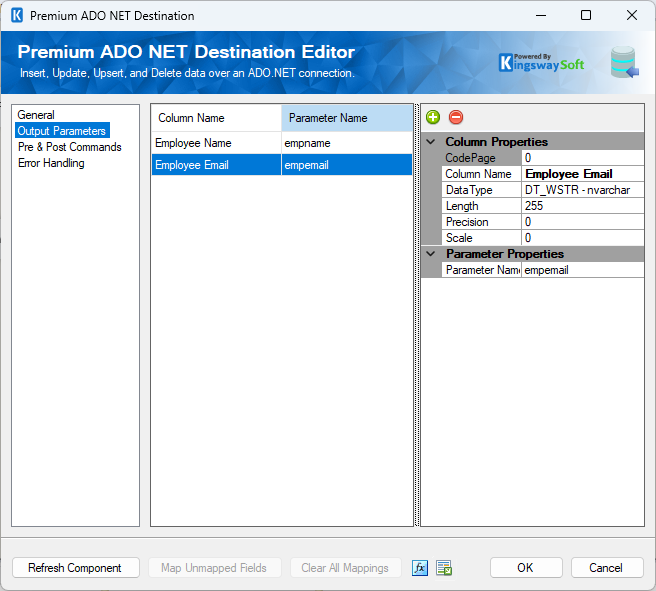
- Column Name: This would be the column name that needs to show up in the SSIS pipeline in downstream data flow metadata.
- Parameter name: This is the name of the output parameter that is defined in your command/procedure.
Pre & Post Commands Page (since v9.0)
The Pre & Post Commands page allows you to specify commands to execute before and after component execution.
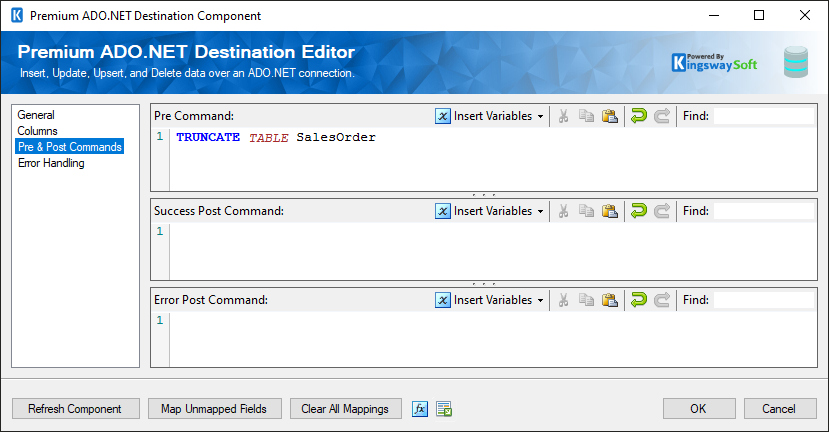
Pre and Post Command textboxes now support the use of User and System Variables (since v21.1). Simply select a variable under the Insert Variables drop-down menu, and a placeholder value will be inserted into the command text.
- Pre Command (since v9.0)
-
The Pre Command will be executed in Pre-Execute. Leave blank to NOT execute any command.
- Success Post Command (Since v23.1)
-
The Success Post Command will be executed in post-execute when its success. Leave blank to NOT execute any command.
- Error Post Command (Since v23.1)
-
The Error Post Command will be executed in post-execute when there is n error. Leave blank to NOT execute any command.
Error Handling Page
The Error Handling page allows you to specify how errors should be handled when they happen.
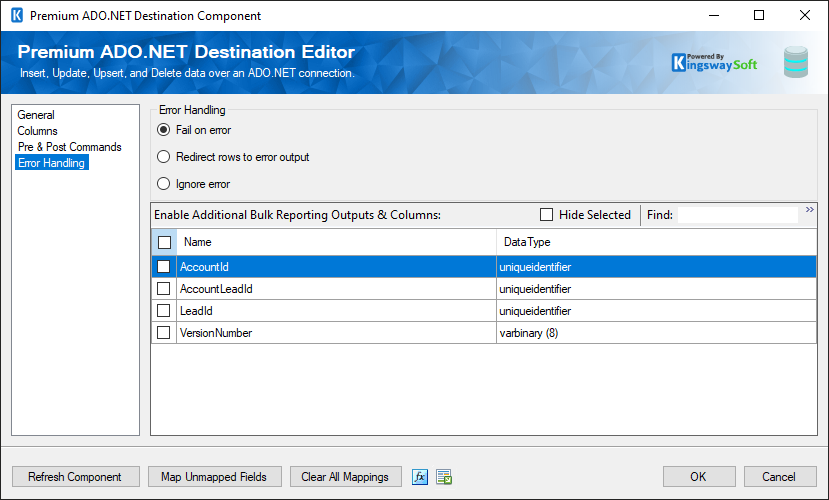
There are three options available:
- Fail on error
- Redirect rows to error output
- Ignore error
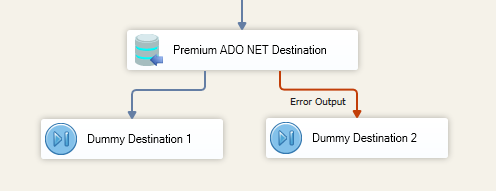
When the Redirect rows to error output option is selected, rows that failed to be sent will be redirected to the 'Error Output' output of the transformation component. As indicated in the screenshot below, the green output connection represents rows that were successfully sent, and the red 'Error Output' connection represents erroneous rows. The 'ErrorMessage' output column found in the 'Error Output' may contain the error message that was reported by the server or the component itself.
Note: Use extra caution when selecting Ignore error option, since the component will remain silent for any errors that have occurred.
Note: When there is an error during the execution of the Post Command, the component will always fail by reporting an error, even though the Error Handling option may have been chosen otherwise.
On the Error Handling page, some options can be used to enable or disable the following output fields for the destination component's Default Output.
- _AffectedRows: Reports the number of affected rows for the SQL script executed for each incoming row. This option is not available when the Bulk mode is used.