Email is a vital channel for customer communication, but that valuable data often remains siloed in inboxes, disconnected from your core business systems. On the other hand, NetSuite is one such capable ERP/CRM application, designed to work with complex relational data for optimal efficiency. Manually saving emails and attachments to your ERP or CRM, like NetSuite, is possible, but it would be a tedious process and is prone to errors. The challenge lies in efficiently creating those email communication records in NetSuite and having them properly linked to the corresponding customer records in the ERP application. For instance, when a client sends an email inquiry, a purchase order document, or any other files, these need to be accurately saved in NetSuite while associated with the proper customer records in order to effectively track client communications. This process involves not only linking the data but also managing details such as the date received, email order, priority, and any attachments, all while ensuring no data loss. This is where KingswaySoft solution makes a difference. With our components, you can quickly design data flows to handle these scenarios through an intuitive drag-and-drop interface, saving time and ensuring a smooth and simplified development experience. In this blog post, we will walk you through how to integrate emails from an Exchange/Outlook mailbox with their respective NetSuite customer records, paying special attention to handling email attachments seamlessly, which is an important aspect of the design in order to be successful.
Key Benefits of This Integration
- Centralized repository for customer data along with related customer email engagement records.
- Enhanced collaboration across teams working on customer cases
- Improved service efficiency
- Secure and compliant data handling
This demonstration uses the SSIS Integration Toolkit for NetSuite and the SSIS Productivity Pack, leveraging the following components in the data flow:
- Email Source Component
- Premium Derived Column Component
- Premium Service Lookup Component
- Premium Lookup Component
- NetSuite Destination Component
For your convenience, we have provided a download of the sample package if you would like to get started quickly. Note that you can customize the package by adding your own connection managers, and it can be tailored for your specific integration needs.
Overall Data Flow Design
The overall design of the flow would look like something below. You can see that the data flow starts off with an Email Source Component, which reads emails and produces two outputs: Primary (email message data) and Attachment (attachment details and binary file content). The flow processes these outputs through a series of lookups and writes them to a NetSuite Destination Component targeting the File object. For the records that succeed, their corresponding reference is written and tagged with the Customer Message endpoint in a second NetSuite Destination. For the emails that have no attachments, those records are directed to another NetSuite Destination, writing to the Message endpoint without attachment references.

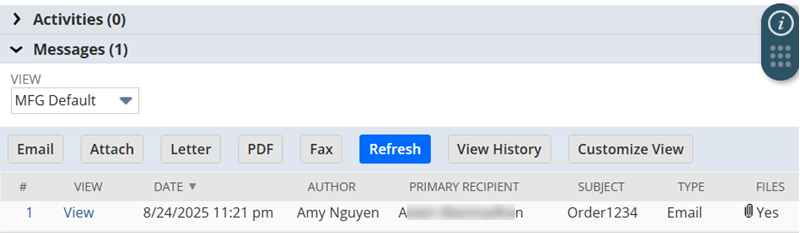
Before we get into the details about the solution, let's have a quick look at the final result. What we should be achieving is, after the designed package is executed, the Customer Messages section in NetSuite should display those emails retrieved from Exchange/Outlook, along with the corresponding attachments associated properly.
Now let’s break the flow into two parts for a detailed walkthrough.
Part 1: Lookup and Merge Emails and Attachments
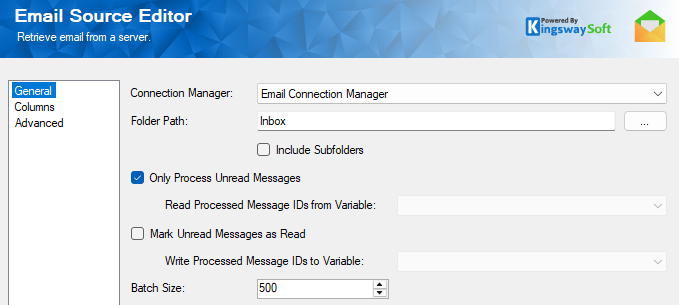
The Email Source Component is an SSIS source component that can be used to read email records from an Exchange server or a POP3/IMAP server. It can be configured to filter emails in various ways. In this example, we configure it to read only unread emails using the "Only Process Unread Messages" option in the component, as shown below.
It is very possible that your business requirements dictate that you should read those email records incrementally, so that only unprocessed email records are returned. To achieve so, you can parameterize the component's Search parameters. Refer to our blog post on dynamic component properties for guidance.
The email source component produces two outputs. The Primary Output will contain the list of retrieved email records, and is sent to a Premium Derived Column (PDC) Component, which is designed to get the cleaned email address from the email record using its From field - this is the information that we use to match NetSuite’s customer record in the downstream pipeline component. This is achieved using the following expression in the Premium Derived Column component:
Contains( [From], "<") && Contains( [From], ">") ? GetTokenAtPosition( GetTokenAtPosition( [From], "<", 2 ), ">", 1 ) : [From]
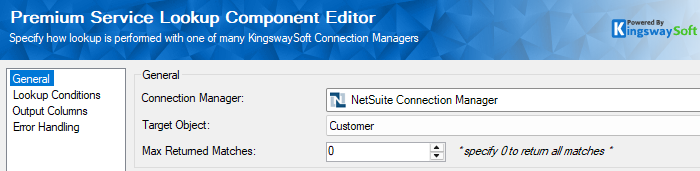
The cleaned email address is then used in a Premium Service Lookup (PSL) Component to find the matching NetSuite customer records. The lookup component will be working on the Customer object, with conditions defined to match on the email field in NetSuite, as shown below.

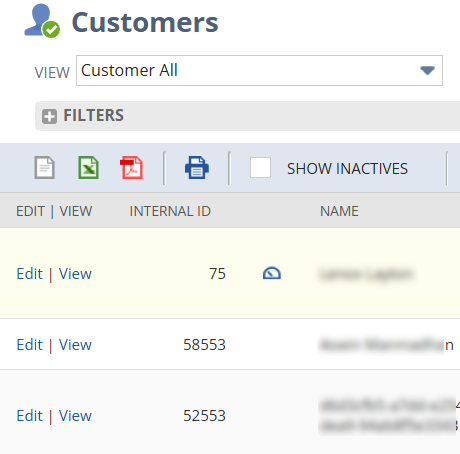
The Premium Service Lookup component will output the InternalId column for matched NetSuite Customer records, which is a unique identifier used to identify a particular NetSuite record, this is a column that can be seen in NetSuite UI as well.
Depending on whether a matching record is returned by the above Premium Service Lookup component, we can tell if the email address has a matching customer record in NetSuite. Our design is that we should only process those email records that have a matching customer. To achieve this, we use a Conditional Split Component to check whether the InternalId output column is empty (NULL) from the above PSL component. Based on that, we know whether there is a matching NetSuite customer record for the email address.

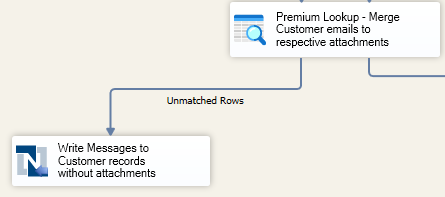
Next, we use a Premium Lookup Component to combine the matched Customer records with their respective Attachment records using the MessageId as the key. The Premium Lookup component produces two outputs. The Matched Rows output contains the email records that have an attachment, and the Unmatched Rows output contains those that have no attachments.

It should be noted that NetSuite only supports one attachment record per message, which is the reason that the Premium Lookup is used here. Otherwise, a Merge Join component might be necessary.
Part 2: Writing to NetSuite Customer Records
With the combined input ready, the flow proceeds to write data to NetSuite Customer records, split into three actions:

Step 1: Write to the File Object
The first action writes attachments to the NetSuite File object, a central repository for files accessible to NetSuite records. The configuration maps file-related metadata from the upstream flow.
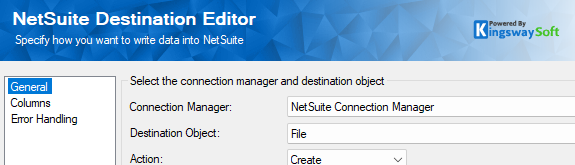
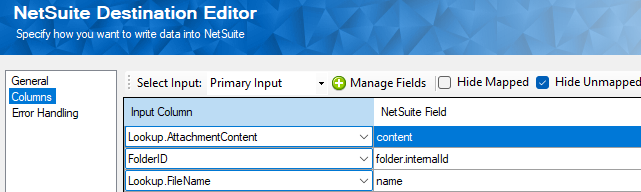
The folder.internalId field, typically a static value, is hardcoded in the upstream Premium Derived Column Component with the field FolderID.
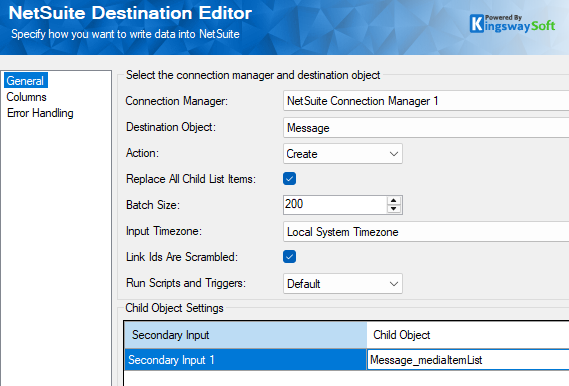
Step 2: Write to the Message Object
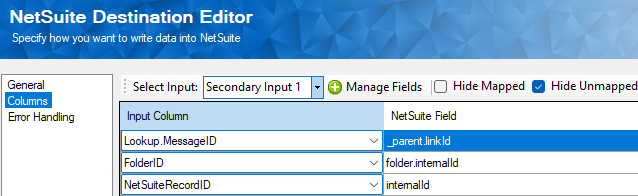
Successful File writes are multicast to provide inputs for the second NetSuite Destination Component, targeting both the Message endpoint and the Message_MediaItemList child endpoint to link attachments to the parent Message record.
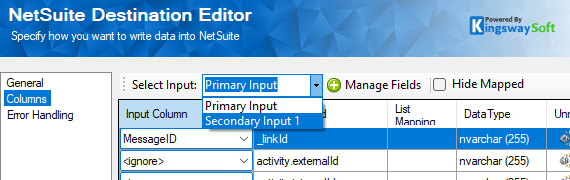
The _LinkId and _parent.LinkId fields link parent and child records, using the MessageId as the unique identifier. Learn more in our blog post on parent-child record linking. The internalId in the Message_MediaItemList metadata would be the ID of the File that was uploaded for its respective Message. And this is available in the default output from the upstream NetSuite Destination component, in the field called NetSuiteRecordID.
Step 3: Handle Emails Without Attachments
Emails without attachments are handled via the Unmatched Output of the Premium Lookup Component. This output connects to a third NetSuite Destination, writing to the Message object without the MediaItemList endpoint.
Conclusion
Using KingswaySoft's SSIS components, you can build a robust, automated workflow to seamlessly integrate Outlook emails and attachments with NetSuite. This visual, no-code approach not only saves significant development time but also makes the entire process robust and easy to manage.
We hope this guide has been helpful in demonstrating how to streamline your email integration workflow and unlock the full potential of your business data.