When working on integrations, it's common to receive notifications via emails from the process. These emails may include execution statuses, pipeline monitoring messages, execution failure notifications, or other communications. However, keeping these indefinitely in the inbox might not be desirable, as they can accumulate in both number and size over time. Therefore, moving selected emails to another folder to clear up space in the main inbox is an important step that may need to be done regularly. This would require a tool or process that can move/copy the emails (or archive them to another folder), validate the move/copy completion, and then delete them from the inbox, all of which can be easily accomplished using KingswaySoft.
In this blog post, we will demonstrate an integration flow using KingswaySoft components, enabling you to copy any processed emails to a subfolder and remove them from the original inbox. Also, for this example, we will use Exchange Web Services (EWS) to connect to Outlook mailboxes. Below are the components that we will use:
- Email Connection Manager
- Email Source component
- Email Destination component
- Premium Derived Column component
- Premium Lookup component
Process Emails - Read and Copy the Required Items
The email data flow process will perform the task of copying the emails from your main inbox to another folder, based on any filter that you provide. The general data flow will look as follows:

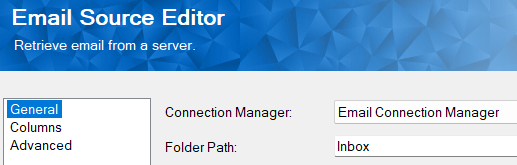
First, we will use the Email Source Component to read the emails and to define the filter. With the Email Source Component, we will be reading from the Inbox Folder. We will use the filter to see if the Subject contains a term called "Notification". If yes, then only those will be read.
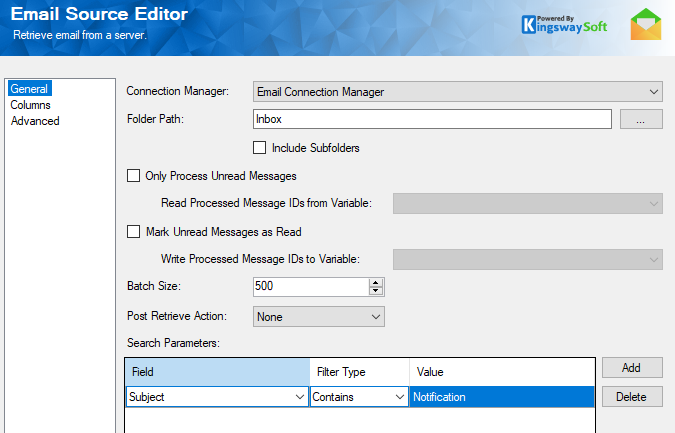
Please be aware that there is a "Post Retrieve Action" in the Email Source component that can be used to Soft Delete or Hard Delete the email after reading it. You could simplify the design by using that. However, it's important to note that this action does not verify whether the emails were actually moved to another folder, as it occurs immediately after the Source component reads them, regardless of whether the email was written to the Destination or not. Mind that failure at the Destination could lead to data loss and premature deletion of the emails read by the Source component.
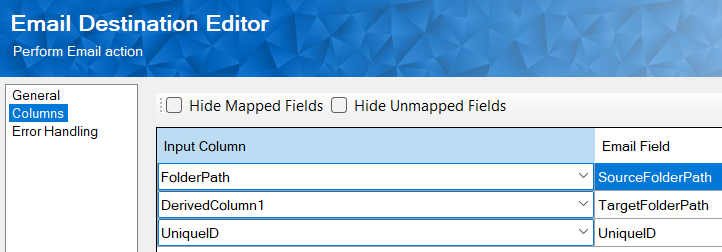
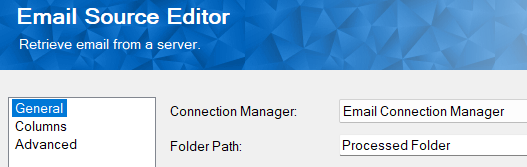
Continuing the data flow, in the Premium Derived Column component, we will create a new column with the name of the folder to which we want to move our messages. In our case, we have created a folder called "Processed Folder" in our mailbox and will be using that.
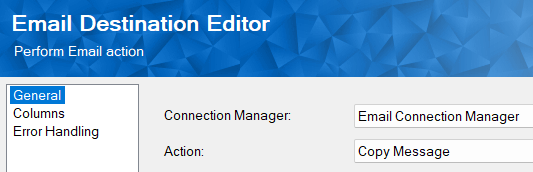
In the Email Destination component, we will use the action Copy Message to copy the email to the Processed Folder.
The Column mappings in the "columns" page will have the SourceFolderPath and the UniqueID from the Email Source component. The TargetFolderPath will then be the folder path that we have added in the Premium Derived Column Component. Map these as shown below:
With this first data flow complete, the email should be successfully copied over to the Target Folder. In the next data flow, we will be deleting the message we just copied from the original folder.
Delete Email - The Process of Validation and Deletion from Inbox
In this data flow, we will delete the message we just copied from the original folder. However a problem arises if one of the emails does not get copied over for any reason, such as network/memory/server-side issues; in such cases, we will end up deleting the email without it being copied over. This is why we added a Premium Lookup Component that allows us to validate if the email messages have been successfully copied over to the new folder.
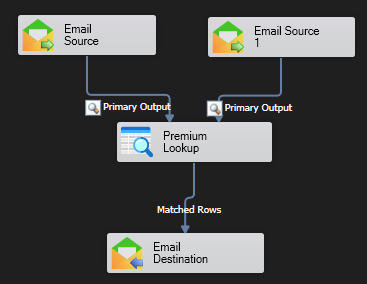
In the Delete Email data flow, we will have two Email Source Components. The firstEmail Source component will read from the Processed Folder, while the second Email Source Component will read from the original messages' location, namely, the Inbox.
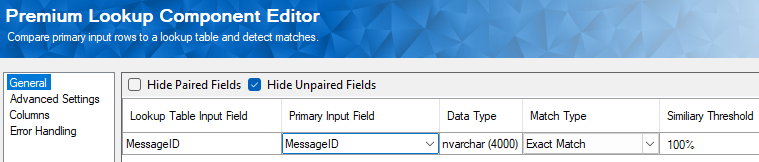
The Premium Lookup will be used to validate that the email has been successfully copied over to the Processed Folder. We will be performing a lookup on the MessageID. If there is an exact match between the Inbox and the Processed Folder, then it means that the message was successfully copied over.
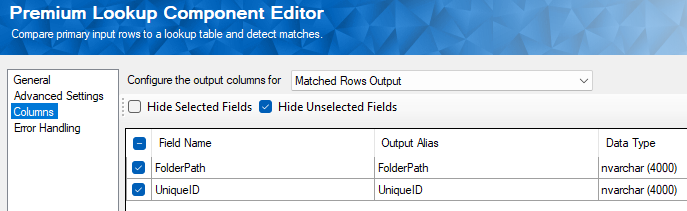
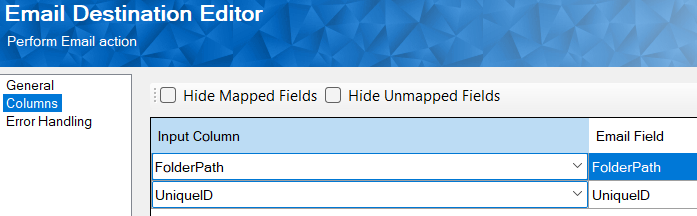
You can output the UniqueId and the FolderPath of the message. The output of the Matched Rows will be input into the Email Destination component. In the Destination component, you will perform the Delete action on the message. You can either choose a Soft Delete or a Hard Delete.
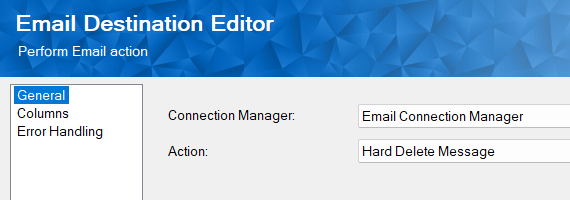
A soft-deleted message is moved to a user's Recoverable Items folder and retained until the deleted item retention period expires. On the other hand, hard-deleted messages are marked for permanent removal from the mailbox and will be deleted permanently the next time the mailbox is processed by the Managed Folder Assistant. Choosing a Soft or Hard Delete will be up to you, based on your business requirements. The Email Destination Component will then have the columns mapped accordingly.
The overall control flow design would look as below
Conclusion
By using the above strategy, you would be performing thorough validation of copied/moved emails before their deletion, ensuring that no data loss occurs during the process. This is an important aspect of any archival mechanism.
We hope this has helped!