Sending emails is a common scenario in integrations, whether for logging a process status, sending a periodic report, job monitoring, etc. Handling this within the SSIS package can be advantageous in many ways. Selecting the right way to do this depends on a few factors, such as which mail server you would like to use, what authentication it accepts, and, more importantly, whether it can accurately handle various other requirements.
One such requirement can be the dynamic composition of file attachments to be sent in the ETL process, which can be challenging to implement. With the KingswaySoft Email Destination component, we can simplify this process for efficiently sending emails and attachments.
In this blog post, we will look at a generic case that includes a JSON file (document) generated on time and sent as an email attachment, all while staying in the same data flow. We will use the following components for this demonstration:
- Data Spawner Component
- Premium Derived Column Component
- JSON Merge Component
- Email Destination Component
The above are all included in our SSIS Productivity Pack, which you can download from this link.
Setting Up the Source
The first part of the Data Flow involves setting up the source data and the contents of the file(s) that we need to include in our email upon creation. In our example, we utilized a Data Spawner as a data source, which generates dummy data for testing purposes. In a real-life business scenario, this could be any of your data reservoirs. Our objective here is to generate a JSON document from the source data, for which we will use the JSON Merge Component. The JSON Merge is an SSIS transformation component that accepts tabular data and generates a JSON document as a LongText. That is, the JSON structure generated using the input data will be retained in one output column within the SSIS pipeline in memory, rather than being saved to the local file system. This makes things easier and more efficient since you do not have to make provisions to have a local/shared path available for your integrations. Please find more details on how to work with the JSON Merge component in our Online Help Manual.
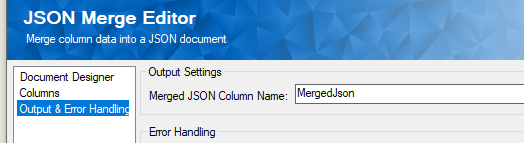
Once you have set up the document designer and connected the inputs, the 'MergedJSON' displayed below is the output column that contains the generated JSON document content in text format. You could change the column name to anything you deem appropriate.
Now, as mentioned above, the MergedJSONoutput column will have the JSON document in text/long text format to be used as the file attachment later in this blog post. For us to send it out as an email attachment, it needs to be in binary format. Along with that, we also need a few other configurations to be passed to our Email Destination component. Therefore, the next step in the flow would be to perform some transformations.
Transform Text Values to Binary Content
For this, we use the Premium Derived Column component, with the function shown below, to convert the text to Binary content.
StringToBytes( [MergedJson], 65001 )
Then, we will add a file name for our attachment. The rest of the required values would be the "To" and "From" fields. The "From" column is optional, and if not provided, it would pick the user/mailbox of the connection user from the Email Connection manager. For more on how to set up the Email Connection Manager, please see our Online Help Manual.
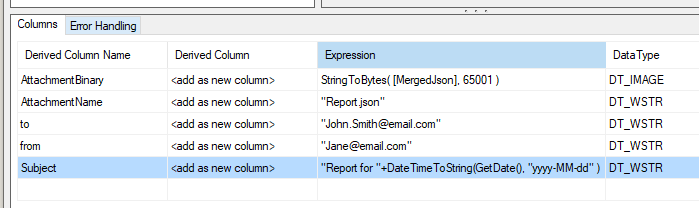
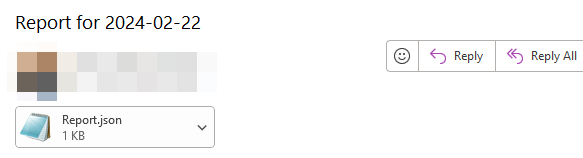
And then, we add a "Subject" which we provide as a function to pick and append the latest date (assuming that our case is to send a report once a day). Please note that you can modify the expression to add any date or datetime value to the string.
"Report for "+DateTimeToString(GetDate(), "yyyy-mm-dd" )
Once done, we move to the Email Destination component.
Destination Configuration
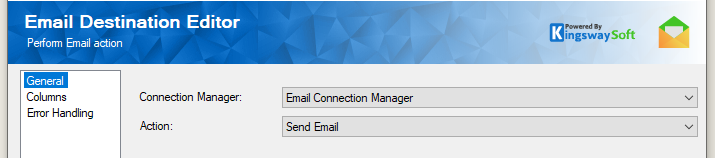
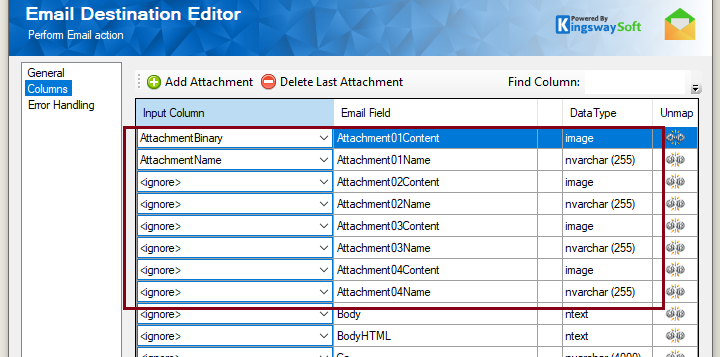
The Email Destination component supports a set of actions, out of which the one we are using today is the "Send Email" action. When this is selected (after selecting the appropriate connection manager), on the columns page, you will see a button "Add Attachment", which you can use to add additional metadata for an attachment body and attachment name.

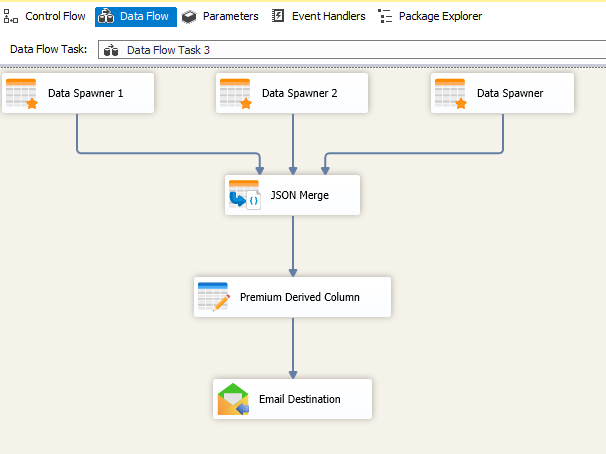
Once done, you can perform the mappings as required. There are other fields that we have not mapped for our case, but you could choose to do so if required. The data flow, as a whole, would look as shown below.
Once we execute this, the email that the recipient receives will contain the attachment, properly named and in the expected readable format.
Please note that you could also attach multiple files by clicking and adding more to the metadata.
Conclusion
By following the above data flow, or a similar one based on your business case, you could easily send out emails and attachments using our Email Destination component. This being a data flow component, makes it straightforward to manage and can be added as part of either scheduled or ad hoc processes.
We hope this has helped!