As you all know, Microsoft has announced the deprecation of their Data Export Service (DES). DES is an add-on feature made available via Microsoft AppSource that facilitates data replication from a Dynamics 365 instance. It is a service that has been used by many Dynamics 365 clients for data archiving purposes. As you can see from the announcement post, Microsoft has provided the Azure Synapse Link for Dataverse as the replacement for the deprecated DES service. However, Azure Synapse Link for Dataverse does not offer the same set of functionality, and there is no control over the database tables populated on the Synapse side. Because of such limitations, many Dynamics 365 clients who were relying on the DES service have been looking for a more appropriate replacement solution. In this blog post, we will discuss how you can use our SSIS components to efficiently achieve the same purposes, using the solution that we have previously discussed.
Before we begin, we will quickly list the main SSIS components that we will use to achieve the entire solution:
- CDS/Dynamics CRM Source component available in the SSIS Integration Toolkit for Microsoft Dynamics 365 product
- Premium ADO.NET Source Component available in the SSIS Productivity Pack product
- Premium ADO.NET Destination Component available in the SSIS Productivity Pack product
Now, let's dive a little closer into the solution and explain how it works and what changes you need to make so that the solution can be used for multiple entity synchronization.
- First of all, we want to mention that the entire solution demonstrated in this blog post is based on one of our previous blog posts, published under the subject of "How to Retrieve Incremental Changes from CRM in your ETL Process". You should have saved the package that we shared in that blog post and have it opened in your SSIS project. It is worth mentioning that the sample package that we shared was designed with one particular entity (which is the most popular account entity) in mind. There is some extra work to be done in order to make it work for multiple entities, which we will get into the details soon.
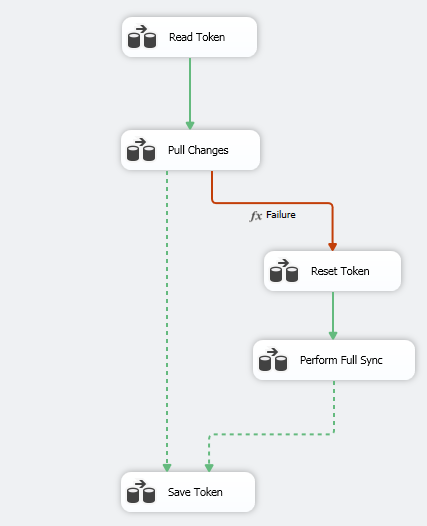
- Secondly, you need to build an ETL process for each entity as shown below by following the procedure that we have previously shared in our blog post. The ETL process consists of 5 data flow tasks; they have leveraged the CDS/Dynamics CRM Source component, Premium ADO.NET Source Component, and Premium ADO.NET Destination Component. We mainly use the CDS/Dynamics CRM Source component to extract Dataverse/CRM delta changes incrementally using the Entity Changes feature available in the source component and write them to the target database table. The writing is also done in an incremental manner by using the FullSync action available in the Premium ADO.NET Destination Component.
- Thirdly, this demonstrated ETL process is for one entity only, as we have mentioned before. If you have multiple entities to be sync'ed up with your database tables, you will need to have the same process built up for each entity. It is worth mentioning that the process of building the package for each entity should be relatively straightforward, all you should need to do is copy the same process and paste it into your new SSIS package. After everything is copied over, you should make a few changes:
- First of all, you should make the two connection managers work in the package by updating the connection information, which includes the Dynamics CRM/Dataverse connection (under the name of Dynamics CRM Connection Manager) and the DB connection (under the name of SampleDB).
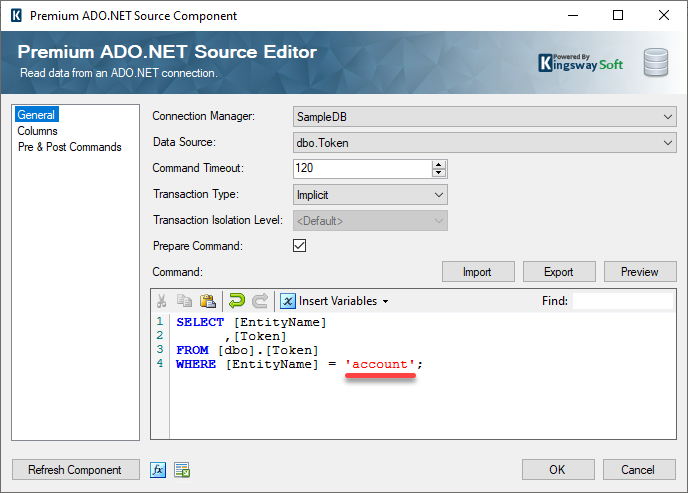
- Change the token variable name in the source component's query statement of the Read Token data flow task to use the actual entity name you are working with.
- You may want to change the InputToken and OutputToken variable names (the two variables are both package-level) to make them explicit about the entity they are working with. This is only necessary if you have multiple entity processes in the same package - as an alternative, you would create one package for each entity, in which case the SSIS variables would not interfere with each other so that you don't have to change those variable names unless you want to make them perfectly clear in terms of which entity they are supporting.

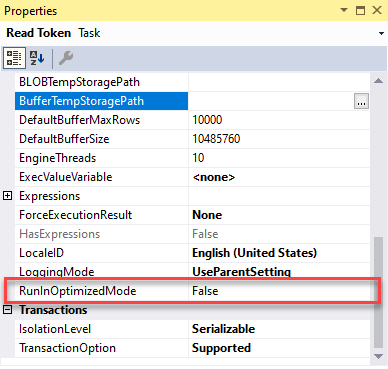
- If you are using the v2 sample package (we recommend you download the latest v3 sample package if you happen to have not done so yet), or if your implementation is based on our v2 sample package, you want to deploy the packages for scheduled execution, you should change the
RunInOptimizedMode property to
False for the following two data flow tasks, since they do not make any actual DB changes or perform any meaningful writing, in which case SSIS runtime would skip the execution of the data flow task for optimized performance.
- Read Token
- Reset Token
- For each entity, you need to make the following change:
- In the Pull Changes data flow, you should change the source component to select the actual entity that you should be working with.
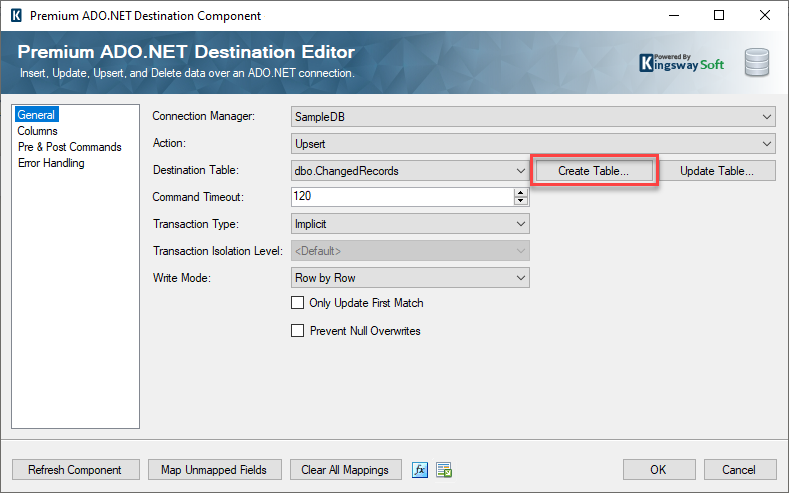
- In the same data flow, you should change the two destination components to use the target table that you should be writing to. It is very likely that you would use the Create Table function in the destination component to generate the table.
- Make the same changes to the Perform Full Sync data flow task.
Once you have done the above, you technically have a fully operational package that can be used to synchronize multiple entities to the desired database location, whether it is a SQL server database, MySQL, or even an Oracle database. It can be a database on the cloud or a local DB server. You can host the execution in an SSIS server that runs on an on-premises server or an Azure SSIS IR instance. Is that all about the conversion? Not really. There is one more important topic we need to address before we would consider this a complete solution, which is about handling CRM/CDS metadata changes on the source system side.
Handling Source System Metadata Changes Properly
As we have just discussed, a very important aspect of making full use of the demonstrated process is to handle source system metadata changes properly. From time to time, you may have the following metadata changes made to your source Dynamics 365 CE/Dataverse system. When that occurs, you want to use minimal efforts to keep the ETL jobs running.
- You might add more fields to the involved entity in your Dynamics 365 CE/Dataverse instance. In doing so, you would want the ETL process to pick up those new fields in the target table but not have to do a lot of manual editing or rework to the SSIS packages.
- You might have some fields removed in the source Dynamics 365 system, and you would want the SSIS packages to continue working after the removal. When this happens, your SSIS package would most likely fail if you don't perform any actions.
For both scenarios, the SSIS components in the two main data flow tasks (Pull Changes and Perform Full Sync) need to be updated. Otherwise, the synchronization becomes only partial and more likely could even get broken. These updates are absolutely necessary and crucial to the success of the project.
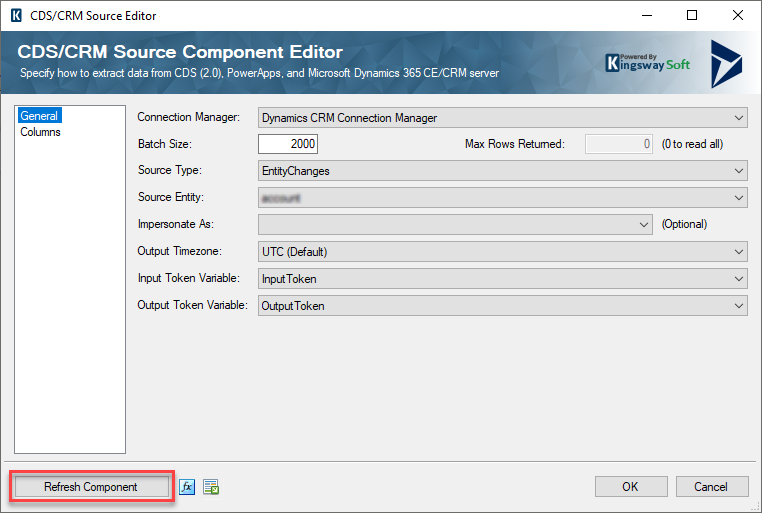
- The update of the CRM/CDS source component is easy. You only need to open the CDS/CRM source component and click the Refresh Component button. In doing so, the source component will be updated to the latest Dynamics metadata.
You can see from the following screenshot, in our case, there are a few new fields added to the source component and two fields removed as a result of recent CDS/CRM metadata changes.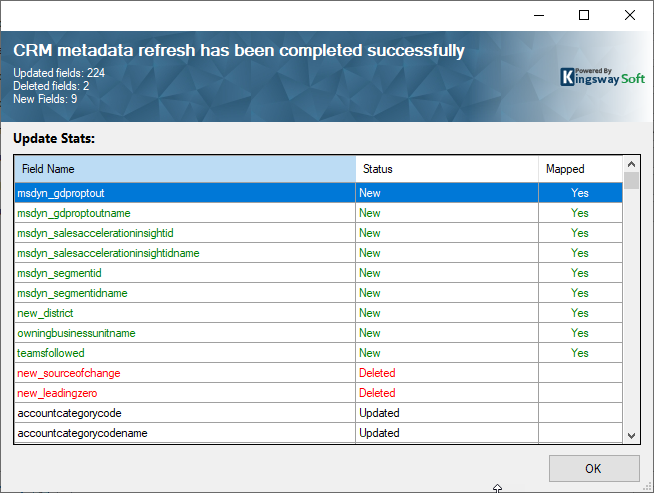
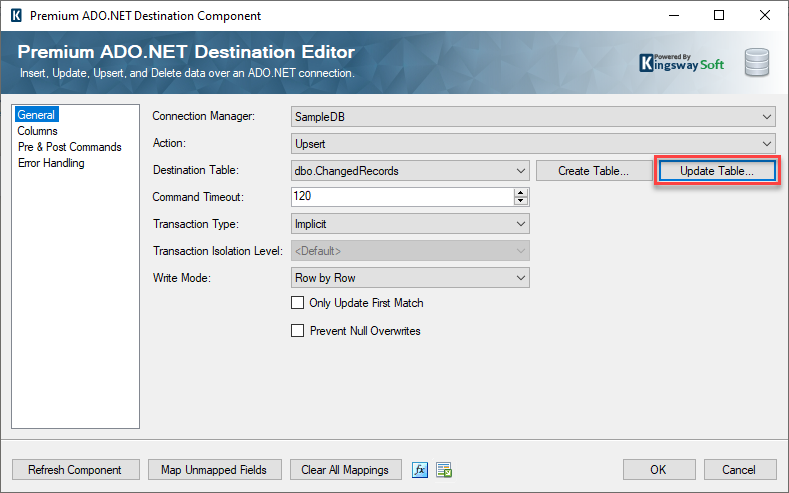
- The Premium ADO.NET destination needs to be updated in order to work with the newly introduced metadata (including the situation where a field has been deleted in the source system). Recognizing that this is not easy to achieve, we have recently added a new feature to our Premium ADO.NET Destination Component in our v22.1 release, which provides the ability to update the target database table to the upstream SSIS metadata with just a click in the destination component UI.
The function works by generating new SQL scripts that can be immediately executed against the target database table to have its metadata synchronized with the upstream source system metadata.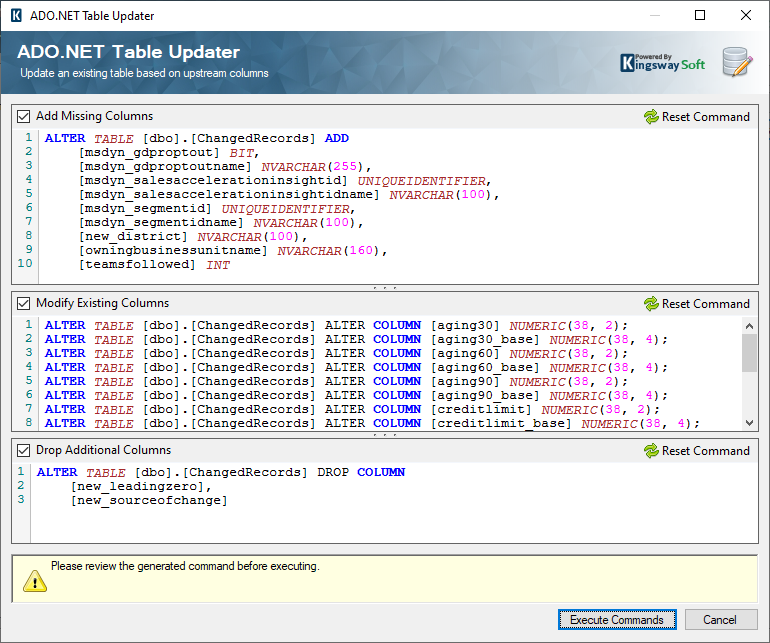
We should mention that we added this Update Table feature specifically for this purpose, but we hope that you find it useful in other use cases.
In summary, with the newly introduced Update Table feature, it only takes a few mouse clicks to have the full synchronization process updated to work with the new Dynamics 365 metadata. This is a manual process, which brings up a new topic on how to get the database schema promoted to a higher environment, assuming that you don't always connect to your Production DB instances from a development workstation computer. Let's briefly discuss the solutions below.
How to promote the schema changes of the target table across environments?
There are two options that you could use to promote the schema changes across environments.
- When using the Update Table feature, as shown above, you are provided with the generated SQL scripts, which you can save to be executed in a different process (such as running it from SQL Server Management Studio) as dictated by your change management process.
- Alternatively, you could use any DB schema synchronization tools, such as Redgate, to copy over the schema changes from your lower environment to the higher environment.
Closing Notes
Before we wrap up the blog post, here are a few quick notes for your reference.
- This entire process can replace DES (Data Export Service) very well, with some relatively insignificant ETL development work to be done for each entity.
- The maintenance of the solution mainly involves the manual refresh of the source component, and database table schema update using the Update Table feature (made available in our v22.1 release) for the target database table when there are metadata changes in your Dynamics 365/CRM server. The entire process takes a few clicks for each entity.
- Unlike DES, which is only offered to the Dynamics 365 online environment, the process that we have described in this blog post would work for both online and on-premises Dynamics 365 instances. When working with an on-premises environment, you need to make sure that your installation is at least v7.0 or above. For reference purposes, the current Dynamics 365 version as of this post is v9.2.
- Using the solution illustrated in this blog post, you have the flexibility of running the SSIS packages on an on-premises server, or otherwise, you can run it in an Azure SSIS IR instance, which is a fully managed cloud service supported by Microsoft.
- The approach that we have demonstrated in this blog post is based on the exactly same technology used by DES. In addition, the Entity Changes feature has been used by many of our clients for the last few years with great success, which makes us confident to say that the solution should work as close as you can get from using the deprecated DES service.
- Finally, we would like to extend our appreciation to our MVP Wayne Wilson for the input that he has provided to us with regards to how he would have expected the feature to work, which made this blog post possible.
We hope this has helped.