[Update - August 12, 2022]We have updated this blog post with some significant enhancements made to the provided sample package (v3) in order to provide a more robust and more resilient solution for data synchronization purposes.
When it comes to the data synchronization between two systems, it is very common to want to optimize the performance by focusing on the incremental changes and only sync the changed records since the last synchronization. Good news is that Microsoft has introduced a feature called Change Tracking since CRM Online 2015 Update 1 release, which is a reliable and efficient mechanism to retrieve delta changes from Microsoft Dynamics 365/CRM server.
Our SSIS Integration Toolkit for Microsoft Dynamics 365 provides the full support of this feature through a Source Type named EntityChanges, which allows you to make use of the change tracking feature to track the incremental changes for CRM entities. In this blog post, we will provide an example demonstration on how to work with this function in a step-by-step manner. We will also provide a sample package which you can use or customize to fit your integration needs.
Please note that in our example, we have attached a Dummy Destination component as a Destination in few data flows. The reason for this is because in SSIS, the transformation components require a Destination component to end the flow, or else, when deployed, it could cause unexpected behaviors. If not for a Dummy Destination component, you could set an option called RuninOptimizedMode in your SSIS package/Data flow as False, to avoid any SSIS validation errors when deployed.
1. EntityChanges Source Type
EntiyChanges is a function in the Dynamics 365/CRM Source component that can be used to retrieve incremental changes from CRM. In order to use this option, you need to have CRM 2015 Update 1 or later installed and have the Change Tracking option enabled for the entity you are working with. After enabling this option, you are ready to go to setup the EntityChanges function in the source component.
Below is the screenshot of the source component, you can simply choose the EntityChanges options in the Source Type drop-down list and specify the Source Entity you are going to be working with.
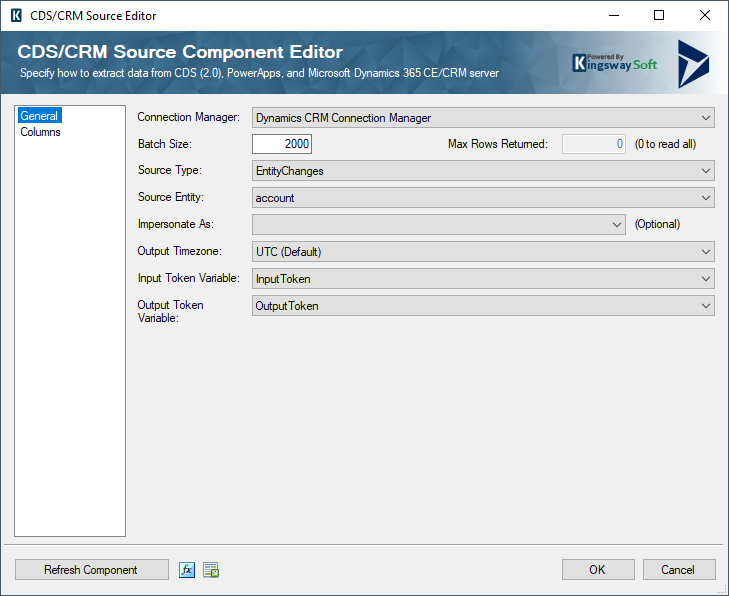
When this option is selected, you will see two parameters: Input Token Variable and Output Token Variable. The InputToken is required and can have a value of either NULL/empty or a valid token in string format from a previous pull. When it is NULL or empty, the component will do a full synchronization in which case all records of the specified entity will be returned. When the initial pull is done, CRM server will also return a new token, which you should store in the Output Token Variable and save this token somewhere so that it can be used as the InputToken for your next extraction. In this way, you are managing your incremental changes.
2. Example
In this section, we will give a detailed example to demonstrate the functionality of EntityChanges in our Dynamics 365/CRM Source component and how a typical data flow should look when working with this feature.
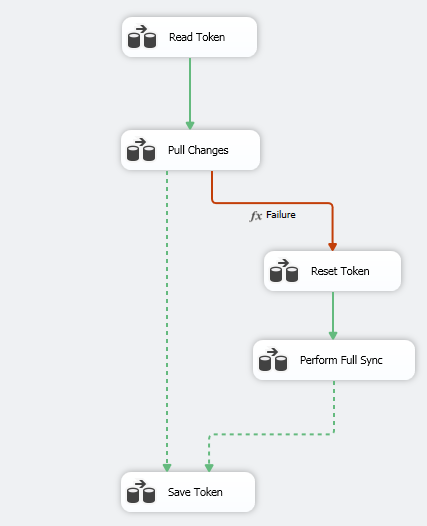
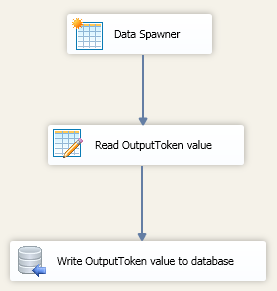
As shown below, the control flow of this example is very straight forward, it is composed of five data flow tasks including read token, pull entity changes, or save token to database, etc. The links between two tasks (precedence constraints) can have different conditions, such as success, failure, or expressions, which determine whether the next task runs. We will discuss these tasks and constrains separately in the following subsections.
2.1 Tables and Variables
Before we start to get into each data flow task, let us first take a look at the tables and variables that we used in this example. We created three tables in the database in order to save the incremental changes as well as the change token appropriately. You can have multiple tables corresponding to multiple entities created in your database to track their delta changes, however, we will only use account entity as an example in this blog post to demonstrate how our EntityChange option works.
- Token table: this table is used to store the latest change token each time we send the RetrieveEntityChangesRequest message to pull changes from CRM. It has two columns: EntityName and Token columns. The EntityName column can be considered as the identifier for each token so that we can update the token value correctly once we get a newer one from CRM server.
- ChangedRecords table: this table is used to save the newly added and updated records retrieved from CRM. Note that for the first time you run the package, CRM will return all records for this entity as the InputToken is empty. As we mentioned, you can have multiple tables in the database to store the newly added or updated records for different entities.
- DeletedRecords: this table is used to save the deleted records retrieved from CRM. Different from the PrimaryRecords table, it keeps all the records that have been deleted during a specific time period. Note that for the deleted records, only the ID field of each record will be returned, which is by-designed of the CRM web service API.
Note that in a typical integration project, you may not actually be using the last two tables. Most likely you would just push such changes to your target system directly. For instance, for all the changed records you may just push the changes to the target database system using an Update or Upsert action (we offer such actions in our Premium ADO.NET Destination component in our SSIS Productivity Pack product if you are targeting a database system). For all the deleted records, you would just mark them as deleted in the target system by performing a hard-delete or soft-delete depending on your integration requirements and how the target system is designed.
As for the variables, we created two SSIS variable to help us fetch entity changes data from CRM during the integration process.
- InputToken variable: stores the token value read from Token table, which should be set to Input Token Variable field in Dynamics 365/CRM Source component.
- OutputToken variable: stores the token value returned from CRM, which should be specified in Output Token Variable field in Dynamics 365/CRM Source component.
2.2 Data Flows
In this subsection, we will describe the functionality of each data flow task in detail. In the package, we include a common data flow to retrieve entity changes from CRM, which is [Read Token - Pull Changes - Save Token]. Apart from that, we also take a special scenario into our consideration where the InputToken is expired and a full sync with CRM is needed, thus the process should be [Read Token - Pull Changes - Reset Token - Full Sync - Save Token].
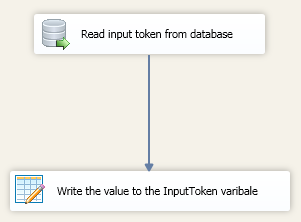
Read Token task: This task contains two steps. In the first step, we read token from the database table, the token will be empty if this is the initial run and we will get all records for this entity from CRM. The returned token is a string that is formed by the current version number in this entity and the timestamp when you retrieve the changes, e.g. 1034004!01/22/2017 20:44:09 (note that the format of the token is an internal mechanism, there is no guarantee it will always stay that way, so you should not try to decipher the token for any production purpose). In the second step, we used a function called WriteValueToVariable() in the Premium Derived Column component to pass the value to the InputToken variable.
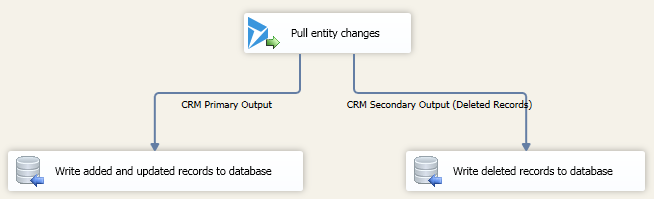
Pull Changes task: This is the main element within the whole package. We selected the EntityChanges as the Source Type and specified the corresponding input and output token variable in the source component. There are two outputs for this component:
- Primary Output: contains newly added or updated records
- Secondary Output: contains records that have been deleted since the last pull
Note that you can only get the current value of the record rather than the value before the update action using EntityChanges. If you want to find what the original values are before the change, you will need to use the AuditLogs source type, which allows you to retrieve CRM audits and audit details for the entity specified.
Save Token task: this task is used to update the token value stored in database. As shown in the figure below, a Premium ADO .NET Destination component is used to do the job. We used this component mainly because it supports Upsert action which can be used to update or insert records in/to a database as appose to the out-of-box one which only support Insert action. In some cases you may want to work with other entities, you can simply make some small changes on the package and the component will upsert the token value in the database for corresponding entities.
In this example, we also try to handle the situation when you have passed in an expired token to CRM (CRM server only maintains a certain number of tokens – we don’t have the exact details of what this number is – Microsoft has not shared anything to the public community about this number). In this case, you may get an exception from CRM telling you that a full sync is needed and the involved data flow task will fail. To minimize the effect of this exception, we applied an event handler to the package. We will give a more detailed description of the event handler in section 2.3.
Below are the two data flow tasks related to the token-expired situation:
Reset Token task: this task is used to reset the value of InputToken variable and we used the WriteValueToVariable() function here as well. With this being done, we will be able to perform a full sync with CRM in the next data flow task.
Perform Full Sync task: this task sends an empty token to CRM and retrieve all records of a specific entity. It behaves like an initial run of the whole package, while the returned records will not be saved as our main purpose is to refresh the token and save it for next execution.
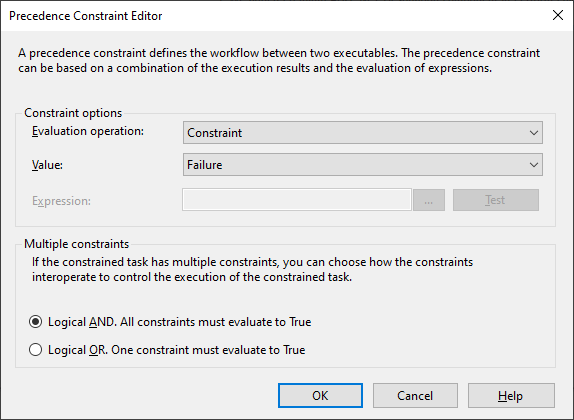
As for the precedence constraint (the red link), if the previous execution result is failure, the data flow will keep running and get a new token from CRM, then store the refreshed token into the database. Although the whole package would still fail if the token is expired, at least it will retrieve the latest token, so you can simply re-run the job right away instead of spending extra time fixing it.
3. Sample Package
A sample SSIS package as well as the database schema are available for download here (v3, last updated on August 12, 2022). The sample package was prepared in a SQL Server 2008 R1 format, and it should automatically upgrade if you are using any newer version of SSIS.
Once your package has been deployed, you can schedule it as a SQL Agent Job in SQL Server Management Studio. Here you will be able to run the job and retrieve the changes as frequently as you would like.