Using the EDI Destination Component
The EDI Destination component is an SSIS data flow component that can be used to write to EDI files. The component includes the following four pages to configure how you want to read data.
The component includes the following four pages to configure how you want to write data.
- General
- Document Designer
- Input Columns
- Error Handling
General Page
The General page of the EDI Destination Component allows you to specify the general settings of the component.
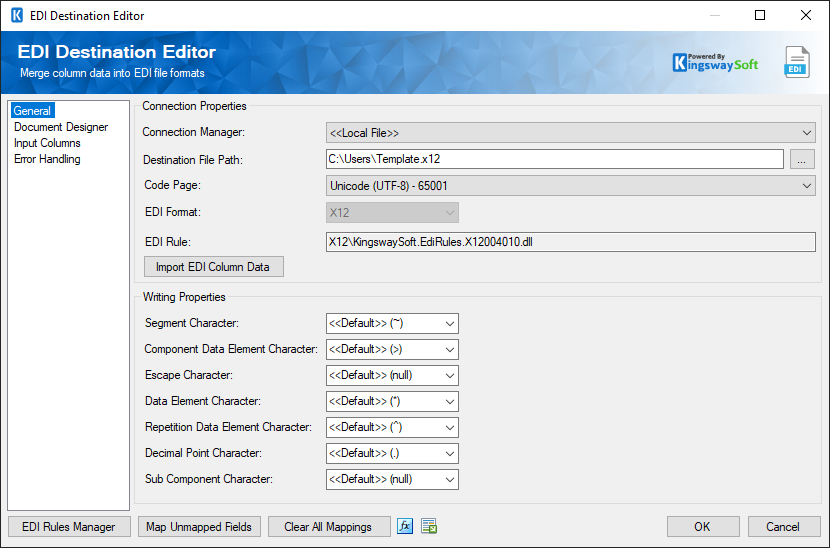
- Connection Manager
-
The EDI Destination Component requires a connection in order to connect to the EDI file. The Connection Manager drop-down will show a list of all connection managers that are available to your current SSIS package.
This component will support the following connection managers:
- Local File
- FTPS Connection Manager
- SFTP Connection Manager
- Amazon S3 Connection Manager
- Azure Blob Connection Manager
- Azure Data Lake Storage Connection Manager
- Box Connection Manager
- Dropbox Connection Manager
- Hadoop Connection Manager
- OneDrive Connection Manager
- WebDAV Connection Manager
- Google Cloud Storage Connection Manager
- SharePoint Connection Manager (offered with the SSIS Integration Toolkit for Microsoft SharePoint)
- Destination File Path
-
The Destination File Path specifies the location of the file that you wish to write to.
- EDI Document Metadata Importer
-
The EDI Document Metadata Importer dialog will automatically open if an EDI file has been selected from the Destination File Path, which is used to import the EDI design.
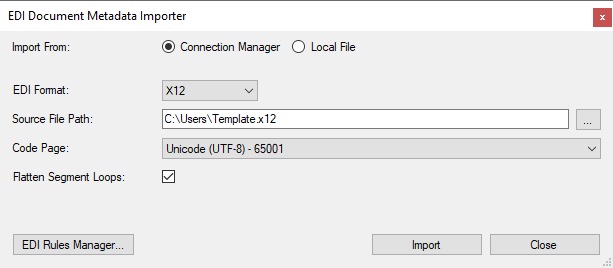
- Import From
-
You can choose to import the EDI Design from either the file available through the Connection Manager, or from local EDI file(s).
- EDI Format
-
This option allows you to choose the Format of the EDI File. Available formats are:
- X12
- EDIFACT
- EANCOM
- VDA
- HIPPA
- HL7 (since v21.1)
- NCPDP Script (since v21.1)
- NCPDP Telco (since v21.1)
- Source File Path
-
This option can be used in order to specify the file path to import the EDI Document Metadata Design from. When Local File is selected as the Import From option, multiple files can be selected to import.
- Code Page
-
Specify the Code Page of the file.
- Flatten Segment Loops
-
If the Flatten Segment Loops checkbox is checked the component will look at the EDI file and determine which segment loops in the structure are empty, or have 1 entry. These segment loops will be changed to the 'Segment' type in the tree. Using this option can significantly reduce the number of inputs in the EDI Destination. When multiple local files are imported into EDI Document Metadata Designer, a combined EDI design will be generated.
- EDI Format
-
This option shows the format of the destination EDI File, which is inherited from the EDI Document Importer. Available formats are:
- EANCON
- EDIFACT
- HIPAA
- X12
- VDA
- Flatten Segment Loops checkbox
-
If the FlattenSegment Loops checkbox is checked when the Refresh Columns button is clicked the component will look at the input EDI file and determine which segment loops in the structure are empty, or have 1 entry. These segment loops will be changed to the 'Segment' type in the tree, and will be output as columns of an existing output instead of creating a new output. Using this option can significantly reduce the number of outputs in the EDI Source.
- EDI Rule
-
This field shows the EDI rule that has been autodetected based on the imported file from EDI Document Importer.
- Segment Character(since v21.2)
-
Specify a delimiter character for the EDI segment.
- Component Data Element Character(since v21.2)
-
Specify a delimiter character for the component data element.
- Escape Character(since v21.2)
-
Specify a delimiter character for the escape property.
- Data Element Character(since v21.2)
-
Specify a delimiter character for the data element.
- Repetition Data Element Character(since v21.2)
-
Specify a delimiter character for the repetition data element.
- Decimal Point Character(since v21.2)
-
Specify a delimiter character for the decimal point.
- Sub Component Character(since v21.2)
-
Specify a delimiter character for the sub component.
- AS2 Subject(since v21.2)
-
Specify the Subject for outbound AS2 message header. Available when the AS2 Connection Manager is used.
- AS2 Content Type(since v21.2)
-
Specify the Content Type for the AS2 message. Available when the AS2 Connection Manager is used.
- EDI Rules Manager
-
The EDI Rules Manager button is available on every page of the Destination editor. Clicking it will launch the EDI Rules Manager dialog.
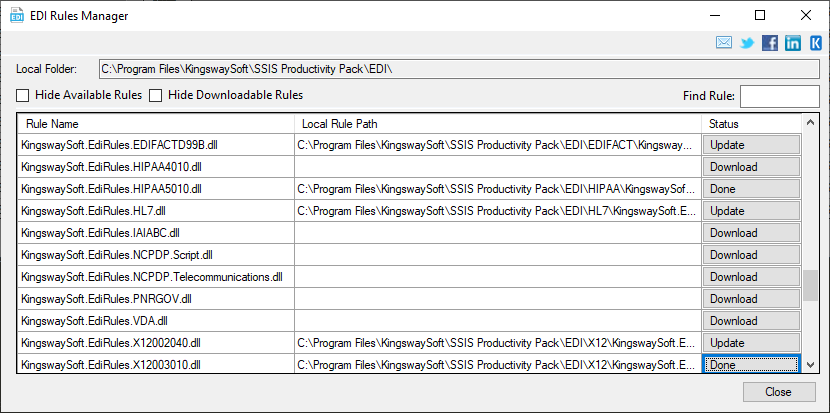
Because of the quantity and size of EDI Rules, the component is not shipped with the rules for every EDI format and version. The EDI Rules Manager makes it easy to download additional EDI Rules. When the EDI Rules Manager dialog is opened it features a grid of all supported EDI rules with the following columns:
- Rule Name
- The name of the EDI rule.
- Rule Relative Path
- The relative path to the EDI rule.
- Local Rule Path
- The local path where the EDI rule is stored.
- Hide Available Rules checkbox
- This checkbox will hide any EDI rules from the grid with the 'Available' status.
- Hide Downloadable Rules checkbox
- This checkbox will hide any EDI rules from the grid with the 'Download' status.
- Find Rule
- This field can be used in order to enter a key term which will be used in order to filter the displayed list of EDI rules.
Document Designer
The Document Designer page of the EDI Destination Component displays a tree that represents the structure of the EDI document that the component will write to. The Document Designer page includes the following tabs:
- Details View
- Diagram View
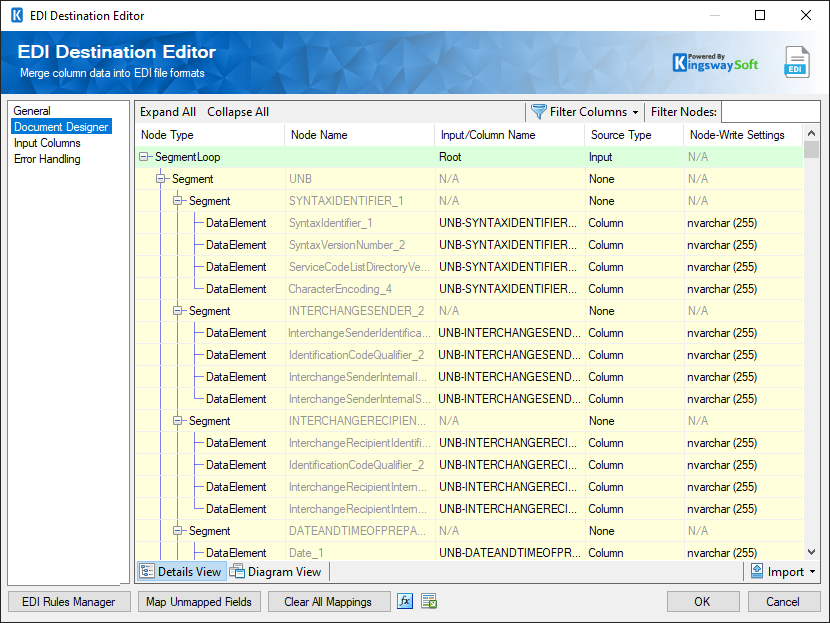
The Details View grid consists of:
- Node Name
-
This column displays the name of the EDI element. This is a read-only field.
- Input/Column Name
-
This is the column name that will be used in order to map columns from an upstream dataflow component in the Input Columns page.
- Source Type
-
The type of input for a node depending on the Node Type. Available options are:
- Column
- Static
- Variable
- Node-Write Settings
-
This option allows you to specify the settings of each node such as the datatype or the Variable Name based on the selected Source Type.
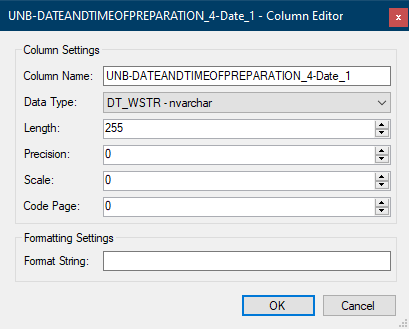
- Column Name: The name of the column.
- Data Type: The data type of the field that can be changed accordingly.
- Length: This option allows you to specify the length of the fields. If the data type specified is a string, the length specified here would be the maximum size. If the data type is not a string, the length will be ignored.
- Precision: This option allows you to specify the number of digits in a number.
- Scale: This option allows you to specify the number of digits to the right of the decimal point in a number.
- Code Page: This option allows you to specify the Code Page of the field.
- Format String: This option allows you to specify the target output format for a string when converting datetime/number values to a string. It follows the same .NET formatting function found at this link.
- Diagram View
-
In the Diagram View tab, you can view the document design as a diagram where you can link different inputs with each other in order to create the hierarchy of your document and establish relationships between the different inputs.
Input Columns
The Input Columns page of the EDI Destination Component allows you to map the columns from upstream components to the defined nodes for the designed document.
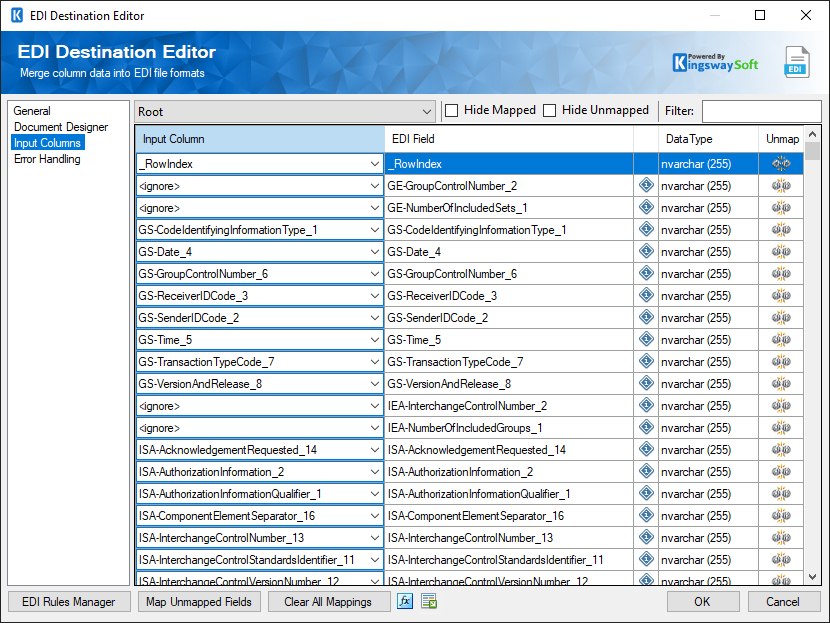
The drop-down menu lists all of the available inputs (defined on the Document Designer page). “Hide Unmapped” or “Hide Mapped” options can be enabled to filter the fields that are either mapped or unmapped.
- Input Column
-
Select an Input Column from an upstream component to be mapped to an EDI field.
- EDI Field
-
This is the EDI field you are writing data to.
- Datatype
-
The datatype for the EDI fields.
- Unmap
-
This can be used to map/unmap any specific field.
- Map Unmapped Fields
-
Any unmapped fields, with a similar field name, can be mapped using this option.
- Clear all mappings
-
All mappings would be cleared.
Error Handling
The Error Handling page allows you to specify how errors should be handled when they happen.

There are three options available.
- Fail on error
- Redirect rows to error output
- Ignore error
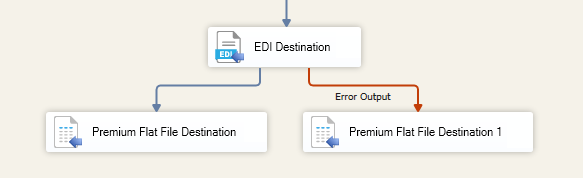
When the Redirect rows to error output option is selected, rows that failed to write to the File will be redirected to the ‘Error Output’ output of the Destination Component. As indicated in the screenshot below, the blue output connection represents rows that were successfully written, and the red ‘Error Output’ connection represents rows that were erroneous. The ‘ErrorMessage’ output column found in the ‘Error Output’ may contain the error message that was reported by the server or the component itself.