When working with web service endpoints in SSIS, the first challenge that needs to be overcome is establishing the connection to the API. OAuth 2.0 is commonly used in order to authorize the connection.
As you may know, OAuth 2.0 offers a great flexibility in terms of authorization process. It includes a number of grants for a Client to get access to application resource in a secure way. The most common OAuth 2.0 grant types are:
- Authorization Code
- Password
- Implicit
- Client Credentials
In a previous post, we discussed how to cope with Authorization Code Grant by utilizing our OAuth 2 Token Generator. For this blog post, we are going to describe the remaining grant types which you may encounter during SSIS package development.
Password Grant
This grant type usually needs the user to provide their authorization credentials when requesting an access token, such as username and password. This type of grant can be easily handled using the OAuth 2 Token Generator (note that this is a new feature that we added in SSIS Production Pack v7.0, a new option called Password was added in the General Settings page).
To demonstrate, we will work with Zendesk endpoint in this section in order to show you the process of how to configure OAuth 2 Token Generator with Password Grant Type.
First of all, let’s take a look at the Zendesk documentation, the Password grant flow requires the grant_type query parameter to be set to password.
Documentation (Link)
- Endpoint: https://{subdomain}.zendesk.com/oauth/tokens
-
Query Parameters:
- username: The username of Zendesk user that is going to be used to build the connection.
- password: The password of Zendesk user that is going to be used to build the connection.
- client_id: The unique identifier you obtained when you registered your application with Zendesk.
- client_secret: The secret value you received when you registered your application with Zendesk.
- grant_type: The type of the grant flow. In this case, it must be set to password.
- scope: A space-separated list of scopes that control access to the Zendesk resources.
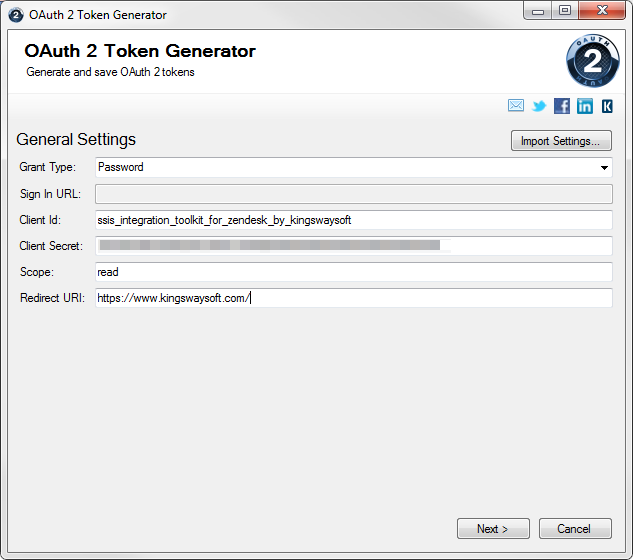
Once we have the application registered in Zendesk, we are able to get all the required information and put it into OAuth2 Token Generator as shown below:
Click Next to go to the next page and click the Edit Body to edit the Request Body in order to specify the additional parameters – scope, username, and password.
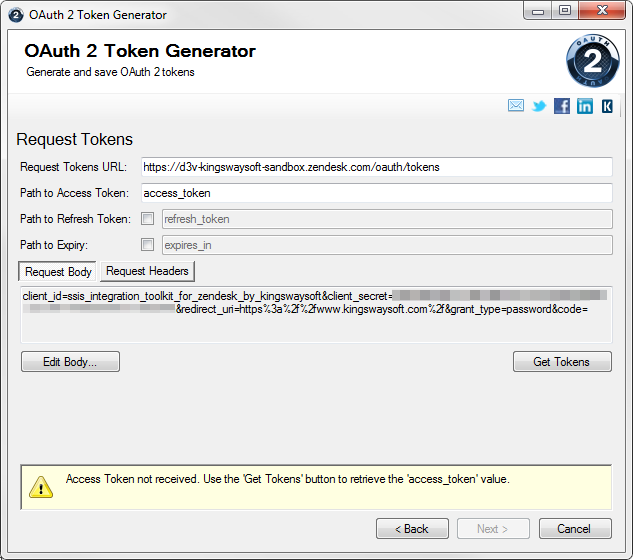
After we have modified the Request Body, check the Body text field and compare with the sample request provided by Zendesk.
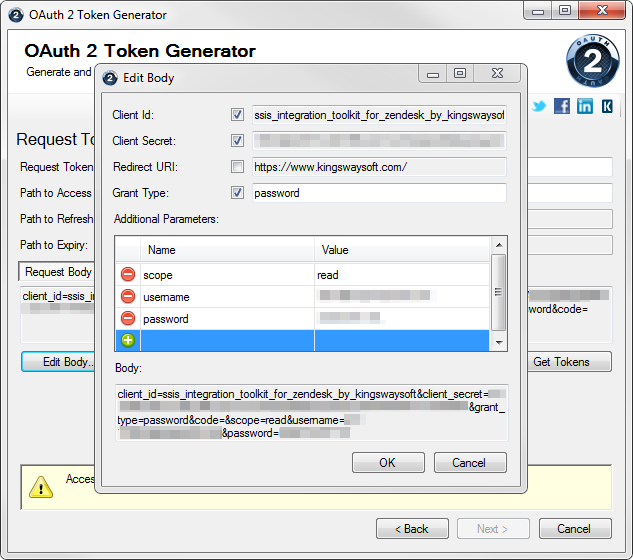
In this step, we add scope, username and password query parameters as shown in the screenshot above. Once this is done, click the Get Tokens button to get access token from Zendesk.
Quick Tip
Some endpoints may require you to include credentials in the request header. In this case, you can click the Request Headers tab and edit the headers from there.
In some cases, access_token may expire after a period of time so when you issue the access token exchanging request, the target endpoint may return a JSON object containing some other properties – refresh_token and expires_in. You can specify the JPath of each property here and our component will automatically get new access token once it expires.
- Path to Refresh Token
- Path to Expiry
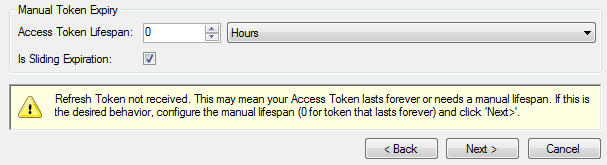
Zendesk doesn’t return any expiry value in the get token response so the OAuth 2 Token Generator will pop-up couple options which allows you to configure the manual lifespan:
- Access Token Lifespan: This option allows you to manually specify the token expiration time. Default is set to 0, which means token lasts forever.
- Is Sliding Expiration: to indicate is the access token is sliding expiration.
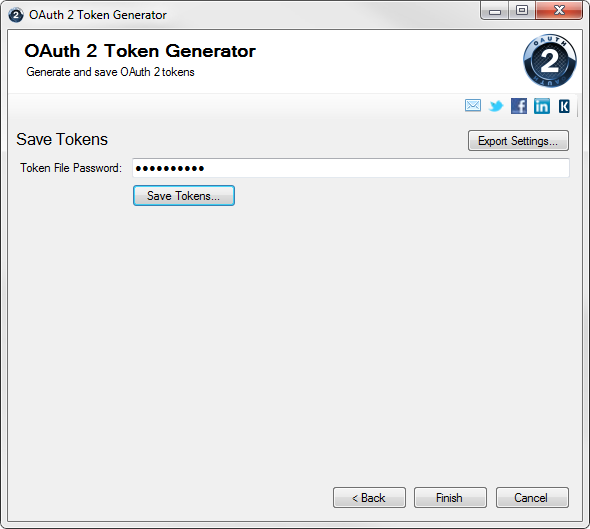
Click Next to save the token file, you would need to save the token file to a location in which it can be used in the HTTP Connection Manager correctly. You may need to enter a password to secure the token file, specify a Token File Password and click Save Tokens….
Note that you can also export the settings of the token generating process so next time you don’t need to provide the configuration when generating a token. Clicking the Export Settings… will generate a JSON file that contains all the settings.
We have now finished the token generating process for password grant flow, you should be able to specify the Token File in the HTTP Connection Manager’s Authentication page and start to create your data flow to interact with Zendesk system.
Implicit Grant
The Implicit Grant is intended to be used for user-agent-based clients, since this is not a desirable approach for SSIS integration we currently do not support this grant type in OAuth 2 Token Generator.
Client Credential Grant
In this section, we used Marketo as our target application to demonstrate the process of retrieving access token and complete the authentication process with the server. Marketo’s REST APIs are authenticated with OAuth 2.0 using Client Credential Grant type, so we believe it is be a good example to demonstrate the process when working with this type of grant flow.
The Client Credential grant usually needs the user to provide client_id and client_secret when requesting an access token. This type of grant can be handled by our OAuth 2 Token Generator with the option called Client Credential in the General Settings page.
Same as above, let’s take a look at the Marketo documentation, the Client Credential grant flow requires the grant_type query parameter to be set to client_credential.
Documentation (Link)
- Endpoint: <Identity URL>/oauth/tokens
-
Query Parameters:
- grant_type: The type of the grant flow. In this case, it must be set to client_credential.
- client_id: The unique identifier you obtained when you registered your application with Marketo.
- client_secret: The secret value you received when you registered your application with Marketo.
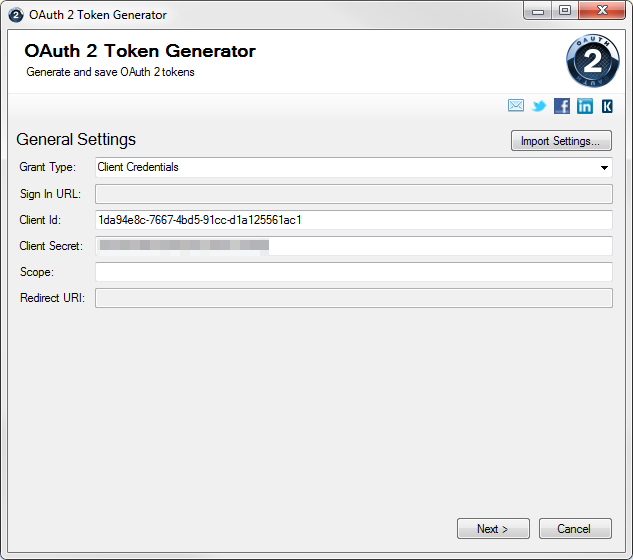
Once you have Service registered in Marketo’s LauchPoint, you would be able to get all the required information to put into the OAuth2 Token Generator as shown below:
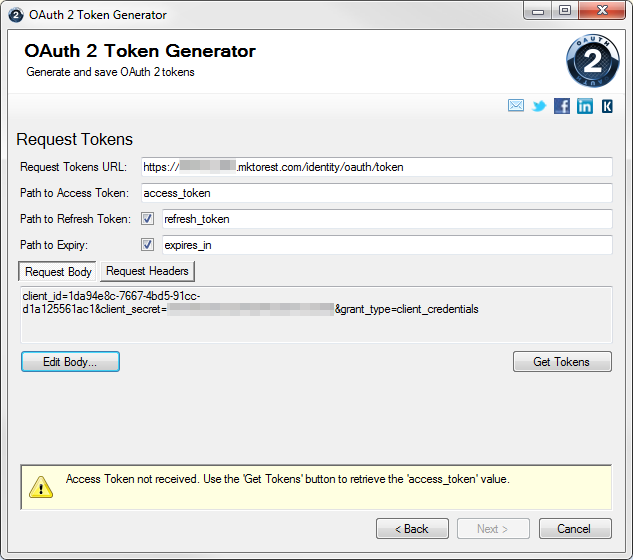
Click Next to go to the next page and you will find the request body has been constructed and shown in the Request Body tab.
Quickly check the Body text field and compare with the sample request provided by Marketo. Once this is done, click the Get Tokens button to get access token from Marketo.
Click Next to save the token file, you would need to save the token file to a location so it can be used in the HTTP Connection Manager correctly. You may need to enter a password to secure the token file, specify a Token File Password and click Save Tokens….
As we’ve mentioned above, you can also export the settings so next time you do not need to provide the configuration when generating a token. You can click the Export Settings… which will generate a JSON file that contains all the settings.

Now, we have successfully retrieved the OAuth 2 token from Marketo via Client Credential grant.
Conclusion
In this blog, we went through different OAuth 2 grants and demonstrated the processes of how to work with OAuth 2 Token Generator to cope with different grant types. We hope this blog can help you speed up your SSIS development when working with OAuth 2 authentication. If you have any further comments or suggestions, please feel free to let us know. Our team is always open to any possibilities to make your SSIS development easier.