OAuth has become the modern standard for secure application authentication, providing a robust and flexible alternative to traditional credential-based authentication methods. As organizations move toward centralized identity management and tightened security policies, OAuth is increasingly becoming the required approach for connecting to cloud platforms. This shift is more than just a best practice; it is rapidly becoming a hard requirement.
Specifically, Snowflake is rolling out mandatory Multi-Factor Authentication (MFA) requirements for all password-based authentications, with the final phase for existing accounts expected to take effect between August and October 2026 (note that timelines are subject to change). While traditional password authentication might still work during the initial design and testing phases of your integrations, once deployed, the new MFA mandate will halt your scheduled SSIS jobs by requiring manual user interaction, which is not practical for the unattended SSIS job executions. Transitioning to the OAuth Authorization Code flow now will eliminate such integration disruptions. For complete details on this timeline, please refer to Snowflake's MFA Rollout Documentation.
In this blog post, we will walk you through registering a Security Integration within Snowflake, gathering the required client credentials, and configuring those OAuth settings inside the KingswaySoft Snowflake Connection Manager to establish an automated, secure connection. This guide serves as a practical companion to our online OAuth documentation page, demonstrating how easily this transition can be achieved.
Registering the Security Integration in Snowflake
To begin, you must create a Security Integration inside Snowflake. To execute this step, ensure your active role is set to ACCOUNTADMIN, or that your role possesses at least the CREATE INTEGRATION privilege.
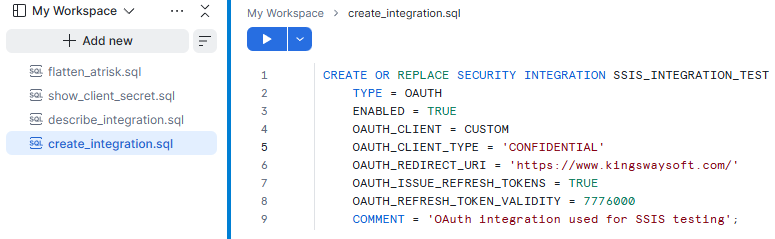
As illustrated above, the SQL script below creates a Snowflake OAuth security integration specifically tailored for a confidential client application. It configures a Custom OAuth Client, enables OAuth authentication, defines the secure redirect URI, and explicitly permits Snowflake to issue refresh tokens for long-term, unattended connectivity. The refresh token validity parameter defines how long (in seconds) the refresh token remains valid before manual reauthorization is required.
CREATE OR REPLACE SECURITY INTEGRATION SSIS_INTEGRATION_TEST
    TYPE = OAUTH
    ENABLED = TRUE
    OAUTH_CLIENT = CUSTOM
    OAUTH_CLIENT_TYPE = 'CONFIDENTIAL'
    OAUTH_REDIRECT_URI = 'https://www.kingswaysoft.com/'
    OAUTH_ISSUE_REFRESH_TOKENS = TRUE
    OAUTH_REFRESH_TOKEN_VALIDITY = 7776000
    COMMENT = 'OAuth integration used for SSIS testing';
You can copy and execute the script above directly within your Snowflake worksheet. When you do so, you may modify the integration name or the descriptive comment as needed. Note three key configuration parameters from this script:
- OAUTH_CLIENT_TYPE: Can be set to either
CONFIDENTIALorPUBLIC, as both options are fully supported by our connection manager. Choose the type that best aligns with your internal security policies. Note that if you need to change this type later, it cannot be modified via anALTER SECURITY INTEGRATIONcommand; aCREATE OR REPLACEstatement must be executed, which will generate a new Client ID and Client Secret. - OAUTH_ISSUE_REFRESH_TOKENS: Must be set to
TRUEto support automated, unattended SSIS packages. Without a refresh token, the standard access token will expire after 600 seconds, requiring an interactive user login to resume data flows. Enabling refresh tokens allows the KingswaySoft Snowflake Connection Manager to automatically handle the background token exchange without interrupting scheduled operations. - OAUTH_REDIRECT_URI: This can be any URL (such as your organization's homepage) provided it is accessible and protected by TLS/HTTPS. It acts purely as a routing endpoint during the initial token generation handshake.
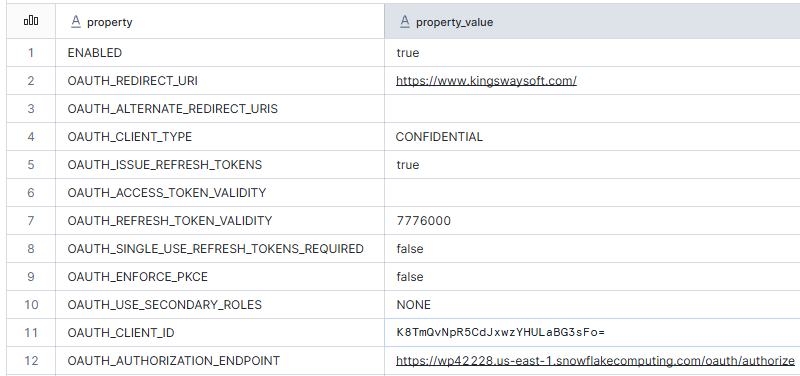
Once the integration is created, you will need to retrieve the generated Client ID and Client Secret. First, verify the integration structure and locate the Client ID by running a DESCRIBE command:
DESC SECURITY INTEGRATION SSIS_INTEGRATION_TEST;
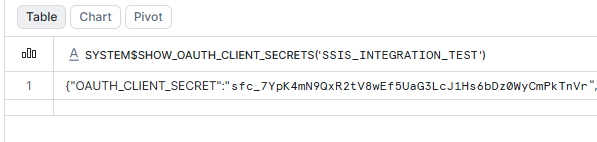
Because the Client Secret is highly sensitive, Snowflake excludes it from the general description properties. To reveal it, you must explicitly query it using the following system function:
SELECT SYSTEM$SHOW_OAUTH_CLIENT_SECRETS('SSIS_INTEGRATION_TEST');
Securely document both the Client ID and Client Secret from these outputs, as they will be required in the next step to complete the SSIS environment setup.
Configuring the KingswaySoft Snowflake Connection Manager
With your Snowflake Security Integration confirmed and your credentials gathered, you may now switch over to your SSIS development environment (Visual Studio) to finalize the connection setup.
If you are updating an existing SSIS package, open your Snowflake Connection Manager and change the Authentication Type dropdown from Basic to OAuth 2. For new packages, simply create a new connection manager in your project. Ensure the Account property contains the unique identifier of your Snowflake instance. Depending on your configuration, this might be just the account name or may include the account region (e.g., wp42228.us-east-1).
After selecting OAuth 2, click the Get New Token button to open the integrated OAuth token generator window.
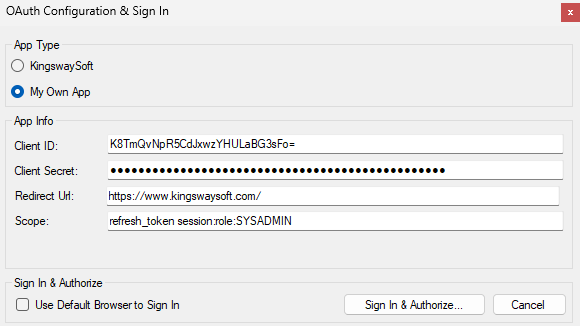
Input the Client ID, Client Secret, and Redirect URL that you retrieved from Snowflake into their respective fields. The component pre-populates a default scope for ease of use, but this can be customized based on your business requirements. For example, you can replace the default SYSADMIN role with a custom, least-privileged SSIS role created within Snowflake. For detailed scoping rules, see the Snowflake Scope Documentation.
Once your parameters are populated, click Generate Token to launch the authorization flow. You will be redirected to the Snowflake login portal via your browser to authenticate and authorize the application. Once authorized, an authorization code is returned via the redirect URI, which our component automatically captures and exchanges for an access token and a long-lived refresh token. You will then be prompted to save this token information securely into a physical token file (.tok).
Finally, click the Test Connection button on the connection manager UI to confirm that your integration successfully authenticates and establishes a secure connection to your Snowflake instance.
Closing Notes
Transitioning to OAuth 2.0 authentication offers a highly secure, modern approach to data integration that aligns directly with Snowflake's strict operational guidelines. By leveraging Snowflake Security Integrations alongside the KingswaySoft SSIS Connection Manager, organizations can eliminate dependencies on static passwords, satisfy compliance requirements, and ensure automated ETL pipelines run without manual intervention.
We hope this guide streamlines your infrastructure updates as you prepare for upcoming security deadlines. For advanced configuration options or specialized deployment scenarios, be sure to explore our extensive online Help Manual.