Data integration landscapes are becoming increasingly complex. As organizations move data between various platforms, data lakes, and analytical tools, the need for a standardized language to describe that data has never been greater. This is where the Common Data Model (CDM) comes into play. In this blog post, we will take a deep dive into what CDM is, how it is structured, and how you can leverage the KingswaySoft CDM components to build a versatile, high-performance data architecture.
What is the Common Data Model?
The Common Data Model (CDM) is a metadata standard developed to organize data within a storage account or data lake. While traditionally associated with the Microsoft ecosystem, it has evolved into a powerful standard for interoperability across various systems. The core concept of CDM is the separation of the Data Schema (definitions) from the Data Records (files). By decoupling the two, CDM provides a standard format that allows multiple applications to read and interpret the same data files without the need for manual re-mapping or complex transformations. To work effectively with CDM, it is helpful to understand the structure of a compliant CDM folder. It generally consists of three technical layers:
- Manifest (*.manifest.cdm.json): This JSON file acts as the entry point or master directory. It contains a list of all entities (tables) in the folder and provides links to their specific definition files.
- Entity Definition (*.cdm.json): These files define the schema for a specific entity, specifying column names and data types.
- Data Partitions: These are the actual data records, usually stored in CSV format. The manifest references these files by path, allowing the reading application to stitch the data together seamlessly.
While the CDM structure is straightforward in theory, implementing it manually can be an overwhelming task involving complex JSON scripting. The KingswaySoft CDM Source and CDM Destination components streamline this process, removing the complexity of metadata management, and offering several advantages.
- Metadata Automation: Creating and maintaining the manifest and entity JSON files is arguably the most difficult part of working with CDM. The KingswaySoft CDM Destination component automates this entirely. As you configure the component in SSIS, it intelligently generates the necessary .cdm.json entity files and updates the manifest. This removes the need to manually write or edit complex metadata files, allowing you to focus purely on your data logic.
- Storage Versatility: While many native CDM tools are rigid, our components offer the flexibility to implement the CDM standard across a wide range of storage options. For this guide, we focus on Azure Data Lake Storage (ADLS).
- API Performance and Offloading: Cloud-based applications like Microsoft Dynamics 365 have service protection limits and API throttling. By using our components to extract data into an ADLS CDM storage layer, you significantly reduce the load on the source API. Once the data is in the CDM format, downstream reporting tools and integrations can read directly from the storage layer at high speeds without consuming additional API calls.
Initializing the CDM Manifest
Because CDM is a folder-based metadata standard, your environment requires a "Root Manifest" file to act as the master directory for your entities. When starting with a brand-new storage location, you must provide a base manifest file so the KingswaySoft CDM Destination component can register new entities and manage the folder structure. To initialize your storage, create a file named default.manifest.cdm.json locally using the template below. Then, use Azure Storage Explorer or the Azure Portal to upload it to the root of your ADLS Container.
{ "entities": [] }
Writing to CDM objects
Moving data from a source system (such as Dynamics 365, Salesforce, or a database) to your data lake involves the CDM Destination component. Here is how to configure the flow:
-
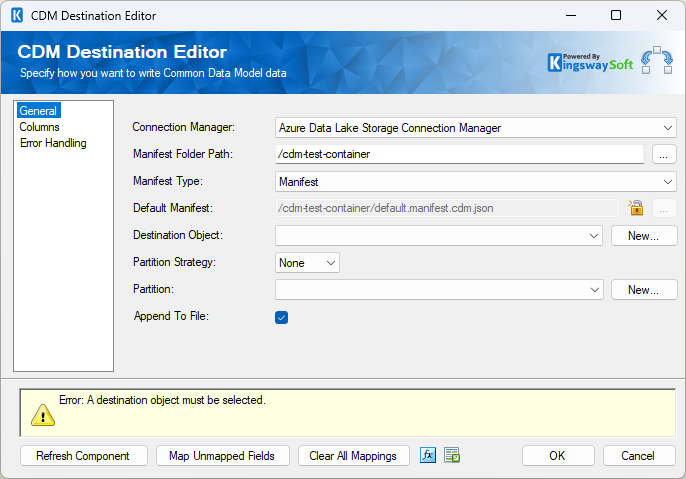
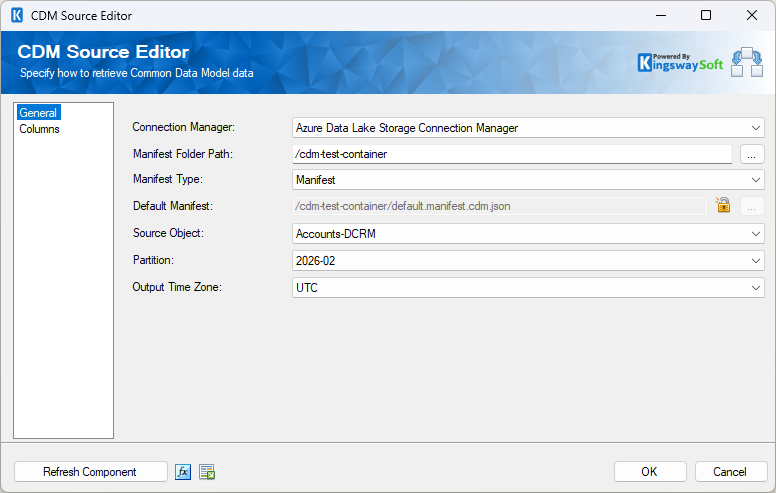
Connection and Manifest Setup: Open the CDM Destination component. First, select your Azure Data Lake Connection Manager. Next, specify the Manifest Folder Path pointing to the ADLS Container and point the Default Manifest field to your initialized default.manifest.cdm.json file.
-
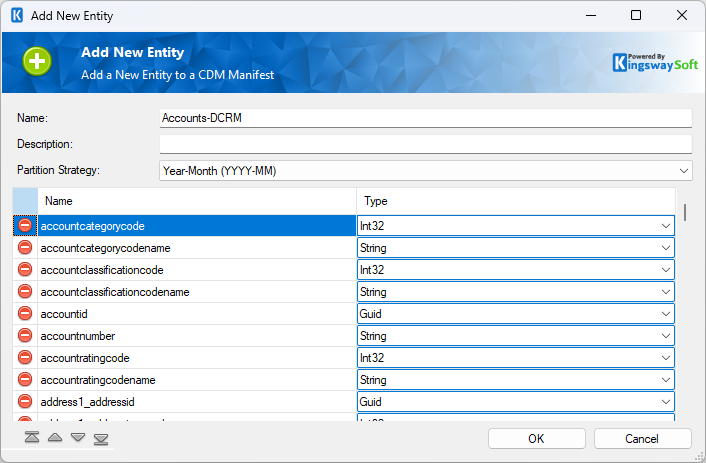
Defining the Entity and Logical Structure: With the manifest connected, you need to define the target Entity. Click the [New] button next to the Destination Object field.
This opens the Add New Entity window. Here, you provide a Name for your entity. The grid below automatically populates with column names and data types based on your upstream SSIS data flow. Crucially, this is where you define the Partition Strategy for the Entity itself. This setting dictates the folder structure pattern within your ADLS container for this specific data type.
- YYYY: Data will be organized into folders by Year.
- YYYY-MM: Data will be organized into folders by Year and Month.
-
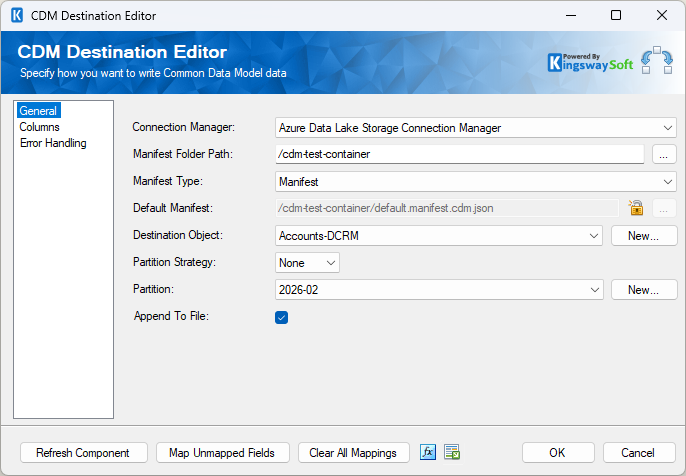
Configuring the Write Behavior: Back on the General page, you must now tell the component how to handle partitions for this specific execution. This is controlled by the Partition Strategy dropdown on the main screen:
- Inherit: The component will automatically generate the file path and folder name in ADLS based on the strategy you defined in the Entity.
- None: You manually specify the exact partition name you wish to write to.
-
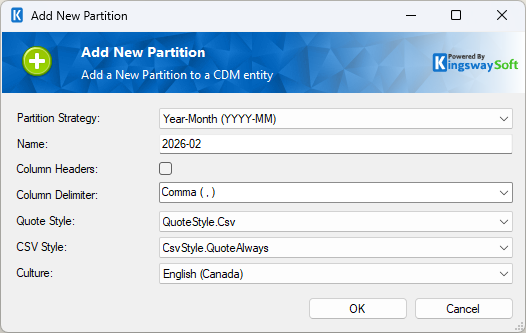
Defining File Format: Next, click the [New] button next to the Partition field. This opens the Add New Partition window. While the previous step handled where the file goes, this step handles what the data file itself looks like. Here you can toggle the Column Headers option, set the Column Delimiter (e.g., Comma), and define the Quote and CSV Styles. This is also where you specify the Encoding (such as UTF-8), which ensures your data remains consistent and readable across different cloud platforms and global systems.
-
Verifying Mappings: Finally, navigate to the Columns page. Since the Entity was created based on the input columns, the mapping is usually done automatically. However, it is best practice to verify that the Input Column maps correctly to the CDM Field and that the data types are aligned.
Once configured, the component is ready to run. It will write the data to the specified partition file (CSV) in your Data Lake and automatically update the manifest to include the new entity references.
Reading from CDM objects
The true value of a CDM-based architecture isn't just in how you store the data, but in how effortlessly it can be consumed later. Because the metadata was already defined and automated during the write process, reading that data back into SSIS requires almost no manual configuration. Here is how to configure this:
-
Configure the Source: Open the CDM Source component and select the same Azure Data Lake Connection Manager used in the previous flow.
-
Select the Manifest: Point the component to your ADLS Manifest Folder Path. The component will automatically discover the default.manifest.cdm.json file, which now contains the registry of the entities you just created.
-
Select the Account Entity: From the Source Object dropdown, select the entity you wish to read. In our example, we select the entity that we previously extracted from a Dynamics 365 CRM/Dataverse connection. You can then select a specific partition (like a specific year) or read from all partitions.
-
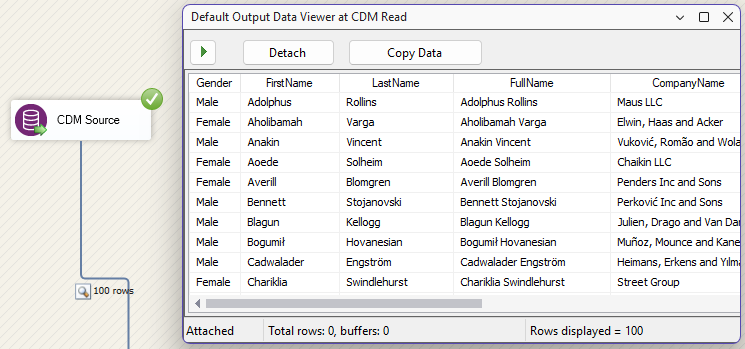
Automatic Schema Discovery: Navigate to the Columns page. You will notice that you didn't have to define a single column length or data type. The component has already "read" the definition file from ADLS. Every field is already assigned its explicit data type. This removes the need for "Data Conversion" transformations, as the component knows exactly what the data is before it even begins reading the records.
-
Connect to the Target Destination: Finally, connect the output of the CDM Source to your desired downstream destination. Because the fields are already assigned their correct data types, you can map your records to the target system without the need for manual data conversion transformations.
Conclusion
The Common Data Model provides a robust standard for data interoperability, but the complexity of managing metadata files can be a barrier to entry. By using the KingswaySoft CDM components within the SSIS Productivity Pack, part of our SSIS Integration Toolkit product family, you can automate metadata management, deploy directly to Azure Data Lake Storage, and build a standardized, high-performance data lake while using the familiar SSIS development workflow.