As a trusted partner in your data integration journey, our goal has always been to provide powerful, reliable, and seamless connections for your integration needs. For years, our SSIS Integration Toolkit for QuickBooks product has included a pre-configured ISV app to make connecting to your QuickBooks data as simple as possible. This was a convenience we were happy to offer.
Unfortunately, there is an upcoming change from Intuit that will become effective on November 3, 2025, which could affect your QuickBooks connection when using our software. For this reason, we have put together this blog post that will walk you through why this change is necessary and provide a clear, step-by-step guide to ensure your integration continues to run without a hitch.
The "Why" Behind the Change: Intuit's New Pricing Model
Historically, our QuickBooks product provides two options when creating a connection to your QuickBooks instance:
- You can connect via your own app
- Otherwise, you might be using the shared KingswaySoft Connector app to connect. This helps streamline your connection setup and saves you the time to create the app yourself
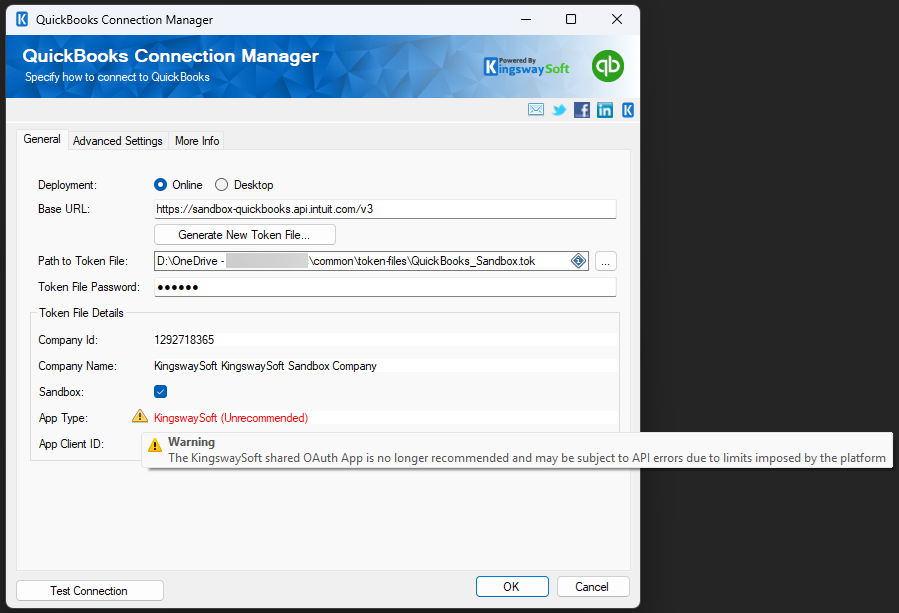
If it happens that you are connecting via your own app, then congratulations, what we have discussed in this blog post is not relevant to you, and you may skip the rest of this blog post. A way to tell whether your connection manager is using the shared KingswaySoft app is to upgrade your QuickBooks toolkit to the latest v25.2 release (Full version number: v25.2.0.27601), open your SSIS packages with the new version, then you can open your QuickBooks connection manager. If you see the warning like something below, you should implement the changes discussed below. If you don't see the triangle warning, then you must be using your own app, in which case you are safe, you can stop reading further.
As mentioned, if you happen to be using the shared KingswaySoft Connector app to connect, you will be impacted by the changes that were introduced by the the platform under the name of a new tiered pricing model for ISV partners. Further details on the changes with regard to the new tiered pricing model are available on the Intuit's partner benefits page. This new structure bases its pricing on the total volume of API calls made through an app such as the connection app shipped in our SSIS Integration Toolkit for QuickBooks product. The challenging part is that the API call volume for our shared ISV app is the cumulative total of all our clients using the toolkit. This creates two significant problems that are entirely outside of our control:
- Unpredictable Cost: We cannot predict or control the collective number of API calls our clients will make. The cost will keep increasing when we bring in more clients. We are unable to support this model.
- Service Interruptions for You: As mentioned, our app has a shared limit. When it is reached, any clients running an integration at that time will receive an error, and their process will fail. The service will be interrupted for everyone until the API quota resets.
What Do You Need to Do?
To continue using the SSIS Integration Toolkit for QuickBooks, you will need to create your own free developer app within the Intuit QuickBooks platform. This will give you direct control over your application and its API usage, ensuring that you are not affected by the usage of other clients. After creating your app, you will simply update the connection manager within our toolkit with your new app credentials.
We have outlined the necessary steps for you below.
Procedure for a Seamless Transition
Part 1: Registering Your Own QuickBooks Application
Creating your own application in the Intuit Developer Portal is a straightforward process. Here are the steps:
-
Create an Intuit Developer Account:
- Navigate to the Intuit Developer Portal.
- Click on "Sign Up" and create a free account. If you already have an account, simply sign in.
-
Create a New App:
- Once logged in, go to the "Dashboard" and click on "Create an app".
- Select "QuickBooks Online and Payments".
- Give your app a name (e.g., "[Your Company Name] SSIS Integration") and select the appropriate scope. For most integrations, the
com.intuit.quickbooks.accountingscope is sufficient.
-
Get Your App Credentials:
- After creating the app, you will be taken to your app's dashboard.
- In the development section, find the "Keys and credentials" tab.
- Here you will find your Client ID and Client Secret. These are the credentials you will need for the next step.
- You will also need to add a Redirect URI. This is a security measure. For the purposes of our toolkit, you can typically add
https://localhost.
Part 2: Updating the QuickBooks Connection Manager in the SSIS Integration Toolkit
Once you have your Client ID and Client Secret, you will need to update the QuickBooks Connection Manager in your SSIS package.
-
Open Your SSIS Package:
- Open your project in SQL Server Data Tools (SSDT) or Visual Studio.
- In your SSIS package, locate the QuickBooks Connection Manager.
-
Edit the Connection Manager:
- Right-click on the QuickBooks Connection Manager and select "Edit...".
- In the connection manager settings, click the "Generate New Token File..." button, which launches the QuickBooks Token Generator window. You are prompted to enter your app credentials.
-
Enter Your App Credentials:
- In the QuickBooks Token Generator window, make sure that you first select the "My Own App" option.
- You should then enter "Client ID" and "Client Secret" by copying and pasting the credentials you obtained from the Intuit Developer Portal in the previous section.
- Then you would enter the "Redirect URI" using the redirect URL specified above.
- You would leave the Scope option as default, which is
com.intuit.quickbooks.accountingas specified above - Then you would click the "Sign In & Authorize..." button, and follow the prompts to continue
- You will be redirected to the Redirect URI that you have specified above. The URL should come with an authorization code appended. If you have the "Use Default Browser to Sign In" option selected, the process should be finished now. You should be able to save the token file with a password specified.
-
Test Your Connection:
- After you have the token file created, you should be back to the connection manager's main UI, from where you can use the "Test Connection" button to ensure that everything is configured correctly.
- Save your updated connection manager and redeploy your SSIS package.
We understand that this change introduces an extra step in your setup process, and we sincerely apologize for any inconvenience this may cause. Please be assured that we stand behind our solution, and we will do everything we can to help you make the transition a success. Having said that, our support team is available to provide you with the assistance that might be needed. Please do not hesitate to contact us if you have any questions or require assistance.
Thank you for your understanding and continued partnership.