Introduction: From Over-Privileged to Perfectly Precise
When integrating with SharePoint Online, security should always be a top priority. A common pitfall when setting up an integration is granting overly broad permissions that go beyond what’s actually required. This increases your exposure surface unnecessarily and may violate related security policies.
Applying the Principle of Least Privilege - granting only the minimum access necessary - helps ensure your SharePoint integration is both functional and secure. In this article, we’ll discuss why this approach matters, what to watch for in the Azure AD application setup, and how to implement it using KingswaySoft's SharePoint Connection Manager.
Living by the principle of Least Privilege, our integration development typically avoids granting a service account `sysadmin` rights on an SQL Server just for the purpose of reading from a single table in your ETL process. The same principle applies to our SharePoint data, where you might be prone to take the easy approach of setting up your SharePoint connection using a Microsoft Entra ID application with AllSites.Manage permission. While this setup is straightforward and can get the connection working quickly, it poses significant security risks, as AllSites.Manage essentially gives the application access to every site collection in the entire tenant, putting your SharePoint environment at risk.
Fortunately, there is a much more secure and precise method. By using Microsoft's Resource-Specific Consent (RSC) framework, we can authorize an application to only have access to the specific SharePoint sites it needs. This granular approach dramatically reduces the application's attack surface and ensures your integration has access to the bare minimum required to do its job. It's also the modern, recommended replacement for the legacy Azure Access Control (ACS) model.
Note: It should be noted that Microsoft is retiring Azure ACS. The option is no longer offered to new tenants as of November 1st, 2024, and will be fully retired for all tenants as of April 2nd, 2026. For more details, please see the official Microsoft announcement.
With this in mind, this blog post will walk you through the complete process of creating a dedicated Entra ID application, using PowerShell to grant it access to a specific site, and finally, connecting everything within the KingswaySoft SharePoint Connection Manager.
Step 1: Create a Microsoft Entra ID Application
First, we need to register an application in Entra ID. The required API permissions depend on your chosen authentication method.
For Authorization Code Grant Type (Delegated Permissions)
If you are using a delegated flow where a user signs in:
- Create a new Entra ID Application Registration.
- Under Authentication, add a Web platform and set the Redirect URI to a proper URL that can be used to receive the authorization code after authentication.
- Under Certificates & secrets, create a new client secret and securely save the value.
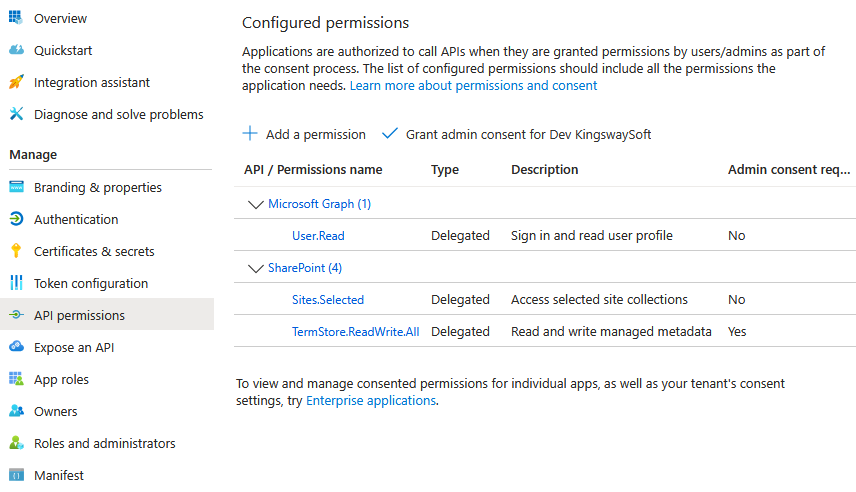
- Under API permissions, add the Sites.Selected permission from the SharePoint API. Grant admin consent for your organization.
For Client Credentials Grant Type (Application Permissions)
If you are using an automated flow without user interaction:
- Create a new Entra ID Application Registration.
- Under Certificates & secrets, upload the public key of a certificate you will use for authentication.
- Under API permissions, add the Sites.Selected permission from the SharePoint API. Grant admin consent for your organization.

Once created, be sure to copy the Application (client) ID and your Directory (tenant) ID from the application's overview page. You will need them later.
Step 2: Prepare PowerShell to Manage Site Permissions
To grant our new application access to a specific site, we'll use the PnP.PowerShell module. This requires a one-time setup to allow PnP.PowerShell to authenticate and manage your SharePoint environment.
-
Install PowerShell 7.x: If you don't have it, open a terminal with administrator privileges and run:
winget install --id Microsoft.Powershell --source winget -
Install the PnP.PowerShell Module: Open a PowerShell 7 terminal with administrator privileges and run:
Install-Module PnP.PowerShell -
Register the PnP Management Application: This step registers an Entra ID application that PnP.PowerShell will be used for interactive logins. You must have permissions such as
Application Developer or
Global Administrator to perform this action. Replace
[yourtenant]with your actual tenant name.Register-PnPEntraIDAppForInteractiveLogin -ApplicationName "PnP.PowerShell" -Tenant [yourtenant].onmicrosoft.com - Save the PnP Client ID: The output of the command will include a Client ID. Copy and save this
PnP.PowerShell Client IDfor the next step.
Step 3: Grant the Application Access to a Specific Site
Now we will use PnP.PowerShell to assign permissions to our application for a single SharePoint site collection. For the commands below, please replace the placeholder values with your actual information:
[yourtenant]: Your SharePoint tenant name (e.g., 'contoso').[PNP.PowerShellClientId]: The Client ID you saved from the previous step.[SharePoint App Client ID]: The Application (client) ID of the Entra ID app you created in Step 1.[sites/SelectedSiteTest]: The relative URL of your target SharePoint site.
Run the following commands in your PowerShell 7 terminal:
1. Connect to your SharePoint Admin Center:
Connect-PnPOnline -Url https://[yourtenant]-admin.sharepoint.com -Interactive -ClientId [PNP.PowerShellClientId]This will open a browser window for you to authenticate.
2. Grant the Permission:
This command grants FullControl to your application on the specified site. You can also use other permission levels like Read, Write, or Manage.
Grant-PnPAzureADAppSitePermission -AppId "[SharePoint App Client ID]" -DisplayName "My SharePoint Integration App" -Permissions FullControl -Site "https://[your-tenant].sharepoint.com/[sites/SelectedSiteTest]"After running this, your Entra ID application now has Full Control over the specified SharePoint site and no access to any others.
Step 4: Configure the KingswaySoft SharePoint Connection
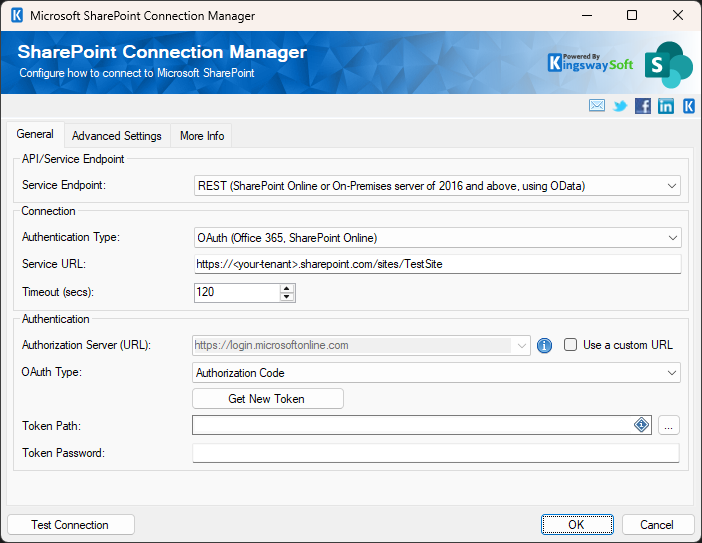
Finally, you can configure your KingswaySoft SharePoint Connection Manager to use this secure, fine-grained permission setup. Open your SSIS project and add a new SharePoint connection and choose "REST" as the Service Endpoint option, "OAuth" as the Authentication Type. From within the SharePoint connection manager user interface, click the "Get New Token" option to launch the authentication information window.
From within the authentication information window, you would need to fill out all necessary information.
- Client ID: Paste the Application (client) ID of your Entra app from Step 1.
- Client Secret: Provide the client secret of the Entra app.
- Azure AD Tenant: Paste your Azure tenant ID or your tenant domain name.
- Scope: You can select or enter
offline_access https://<your-tenant>.sharepoint.com/.default, or otherwiseoffline_access https://<your-tenant>.sharepoint.com/Sites.Selected https://<your-tenant>.sharepoint.com/TermStore.ReadWrite.Allas the option. - Redirect Uri: Enter the redirect URL that has been defined in the Azure Entra portal.

After you have filled out everything, you can click the OK button to complete the sign-in process before you receive the authorization code returned to the redirect URL you have specified. Then you can copy/paste the full URL, including the returned code in the pop-up window, to complete the entire process. You will be prompted to save the token file. Once the token file has been saved, you can test the connection; it should now authenticate successfully. With all the authorization procedures that we have done above, the access will be restricted to operating only within the site collection that was explicitly granted, thus achieving the Least Privilege goal.
Conclusion
By leveraging Resource-Specific Consent and PnP.PowerShell, you can significantly enhance the security of your SharePoint data integrations. This method allows you to move away from overly broad permissions and adopt a more secure model where applications have access only to the specific sites they need. This aligns with modern security best practices and ensures your KingswaySoft integration projects are both powerful and secure.