Change Data Capture (also referred to as CDC) is a valuable feature for tracking incremental changes in QuickBooks Online. It enables efficient data synchronization by extracting only newly added or updated records, avoiding full dataset loads and reducing overhead. QuickBooks Online supports CDC through its API using the ChangedSince parameter. When records are modified, their LastUpdatedTime is updated, making them eligible for the next sync. Using KingswaySoft’s QuickBooks components, implementing CDC in SSIS is simple and effective. In this blog post, we’ll demonstrate a CDC setup using the Invoice entity, an ideal choice due to its frequent changes. This use case can be applied across most QuickBooks entities, with some exceptions (refer to QuickBooks' documentation for any specific limitations).
The components that we will use in this demonstration may be found in our SSIS Integration Toolkit for QuickBooks and SSIS Productivity Pack product offerings.
- QuickBooks Connection Manager + QuickBooks Source Component: We will use the connection manager to establish a connection with our QuickBooks Online environment, and the source component to read incremental changes from an object.
- SQL Server Connection Manager + Premium SQL Server Command Task: We will use our SQL Server Connection Manager to connect to an SQL Server database and read/write to CDC related timestamp values using the Premium SQL Server Command Task.
- Premium Expression Task: Will be used at the Control Flow level to manipulate the timestamp we intend to store.
Design Overview in SSIS
Within our Sequence Container, our design will consist of the following steps:
- An initial Premium SQL Server Command Task will read the previously saved timestamp.
- The second dataflow will pull the incremental data from the QuickBooks instance based on the timestamp.
- The third control flow task will use the Premium Expression Task to convert the job start time to a timezone-specified datetime string.
- The fourth control flow task, which utilizes the Premium SQL Server Command Task again, will take the above-converted zoned job start time string value and save the new CDC timestamp value for the next run.

Let's look at each part in detail.
Retrieve Last Synchronization Time to SSIS Variable
In the first Premium SQL Command Task, we write a query to retrieve the LastExecutionTime value that was previously saved in our synchronization/integration control table, named SynchronizationControl. Note that the column is saved as a DateTimeOffset type. We need to format the DateTimeOffset value to an ISO 8601 UTC format (yyyy-MM-DDTHH:MM:SSZ or yyyy-MM-DDTHH:MM:SSzzz) in order to provide it as input for QuickBooks' Capture Change Data feature. To achieve this, we leverage the FORMAT function. It is worth mentioning that we use a 10-second backoff value in the query to make sure that we always get fully-committed data from the service call.

SELECT FORMAT(DATEADD(SECOND, -10, [LastExecutionTime]), 'yyyy-MM-ddTHH:mm:ss') + 'Z' AS LastExecutionTime
FROM [dbo].[SynchronizationControl]
WHERE [ProcessName]='QB CDC Invoice';
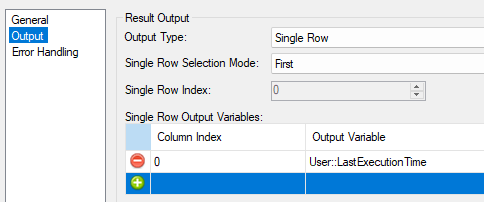
As previously mentioned, the Premium SQL Server Command Task is designed to save the timestamp into a String variable that can later be used. To do so, we set the Output Type option to Single Row, and since this is the first and only value that we are reading, we need to set the Column Index to 0.
QuickBooks CDC Invoice Dataflow
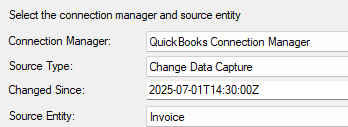
In our second data flow, we will add a QuickBooks Source component so we can perform the pull from our chosen source entity. To work with QuickBooks' CDC feature, we will select Change Data Capture as the Source Type option in the QuickBooks source component. An initial hardcoded value can be entered in the ChangedSince property in order to have the component fully configured. Later on, we will show you how this can be easily replaced with a dynamic value during runtime with minimal setup (Don't worry! The majority of the hard work was already done in the Premium SQL Server Command Task). As a note, the ChangedSince property also accepts a simple date value, such as '2025-07-01'. However, it is preferred to use a full datetime that includes an offset, such as '2025-07-01T14:30:00Z', as this gives you greater precision in how the incremental changes are retrieved.
For an initial run, the Change Since value should be a datetime that precedes the time when any records were entered into the system, which works like a full sync. The initial run will take longer in most cases, as there is more data to be extracted. After the initial sync, subsequent runs will likely be faster as only the changes captured since our last interval will be received. A common use case when working with incremental data extraction is to make the ChangedSince property dynamic, ensuring that we always read the deltas from the previous extraction. This provides significant benefits in making the process more efficient. To achieve so, we will use the Expression Editor feature made available in the QuickBooks Source Component. The following screenshot shows the button that you can click to launch the Expression Editor window for the data flow task.

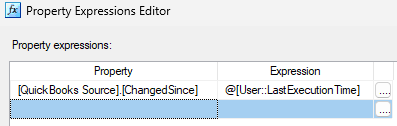
Now, in the Expression Editor window, we will first select the source component's [ChangedSince] property from the Property dropdown list and assign it to the User Variable User::LastExecutionTime, in the Expression field.
With the above configuration, we can now send the rows to a downstream pipeline component that facilitates writing to the target system. An upsert operation might be the best option in this case. Many of our SSIS components support the Upsert action, which makes this extremely straightforward to achieve. Here are a few SSIS components in our SSIS toolkit family:
- Dataverse/Dynamics CRM/CDS Destination Component
- Dynamics NAV (Business Central) Destination Component
- Dynamics AX (Finance & Operations) Destination Component
- Premium SQL Server Destination Component
- Premium ADO.NET Destination Component
- PostgreSQL Destination Component
- and many more
Save Current Execution Time to Table
Once the data synchronization is completed using the previous data flow task, we now have to preserve the cut-off time of the CDC process so that it can be used in the next execution after the scheduled interval. To do so, we will use the Premium SQL Server Task to convert the cut-off time value, which in this case is the package/job start time, into an offset datetime format and save it to the LastExecutionTime field in the SynchronizationControl table. This process cannot be easily done in one step, so we will break it down into the following two steps that leverages the System::StartTime and User::LastExecutionTime variables.
First, we will use a Premium Expression Task to convert the System::StartTime variable into a formatted datetime string value with the system local timezone details included and save it in the same SSIS variable (User::LastExecutionTime) that we have been using throughout the ETL process. Timezone information is important to be part of the variable value in order for the CDC process to work reliably. The following is the expression that we use in the expression task.
DateTimeToString((DT_DBTIMESTAMPOFFSET, 1)@[System::StartTime], "yyyy-MM-ddTHH:mm:sszzz")

With the zoned cut-off time value available in the user variable now, we can save the value back to the same LastExecutionTime column in SynchronizationControl table. To be consistent, we will convert the cut-off datetime into UTC timezone (from local timezone) before saving so that the LastExecutionTime column always has the UTC-zoned datetime values saved. In theory, we could save the local datetime value to the database table, which should work the same since QuickBooks CDC works with local time values as well (provided the SQL script in the first task is modified to work with local time accordingly instead of UTC), but we feel that consistency is important.
UPDATE SynchronizationControl2
SET [LastExecutionTime] = FORMAT(
    SWITCHOFFSET(CAST(@[User::LastExecutionTime] AS DATETIMEOFFSET), '+00:00'),
    'yyyy-MM-ddTHH:mm:ssZ'
)
WHERE [ProcessName] = 'QB CDC Invoice';

Conclusion
By leveraging QuickBooks' CDC capabilities with KingswaySoft, you can streamline your data workflows and maintain accurate, up-to-date records with ease. We’ve explored how CDC helps track incremental data changes and how our components simplify the process, allowing you to easily work with the Change Data Capture feature in QuickBooks and accomplish reliable incremental reading and synchronization from the QuickBooks application. We hope this blog has helped you understand the benefits of working with QuickBooks CDC and provided you with first-hand experience on how to achieve this using KingswaySoft components.
Happy sync'ing!