Batch-based data integration has been the recommended approach to data integration thanks, in part to being easy to implement and allows a business to schedule integration runs during times when resources are less utilized. It is quite common to have information collected throughout the day and then processed within fixed time intervals, or batches, as the name suggests. This approach is quite useful when working with time-insensitive data such as archiving or data that does not need to be always up-to-date. It would unlikely be a significant nuisance if the data were updated every five minutes, every hour or even once a day, for instance, nor would it have any detrimental effect on the running of the business. However, with the business environment changing and immediate decisions required, companies need access to the latest data to support their decision-making process.
Real-time data integration, as the name alludes to, allows for data to be replicated in another system instantaneously, in theory. Practically, there are delays, no matter how slight, from when data is first entered into the source system, and it then appears in the destination. However, such delays are usually nothing more than fractions of a second instead of the minutes or hours generally experienced with batch integrations. The idea behind real-time is that data is immediately processed when entered in the source versus storing the data until a certain number is collected or a specific duration has passed, as done in batch. Traditionally, batch integration jobs usually involve querying the source data with a filter condition to detect newly created or updated records. Thanks to modern cloud-based applications and webhooks, this querying isn’t required, and this opens the door to real-time integration. A webhook is a web callback URL that is generally triggered by an event or an action in the source system, and it can deliver data to any target system as soon as a change occurs. This is where our newest product, KingswaySoft Integration Gateway, can significantly benefit your business. With our software, you can monitor online applications for any change in data and publish them to one or more message queues or file systems. From there, developers can trigger further integrations by pushing the data to its final destination, such as using an SSIS task, or anything that can receive messages from a queue and further process them.
One such cloud-based service where real-time integration is not only possible but essential for key decision-making purposes is Salesforce. Combining our Integration Gateway solution with any of our SSIS Integration Toolkits provides businesses with the ability to integrate Salesforce, in real-time, with virtually any application or database system. In this blog post, we demonstrate how to configure webhooks in Salesforce, send data changes to the KingswaySoft Integration Gateway, and finally design an SSIS package for listening for these new changes and integrating them into our target system.
Configuring Webhooks on Salesforce
Our first step towards real-time integration from Salesforce is to configure the webhooks. There are currently two main approaches to configure a webhook in Salesforce to send newly created or updated records. The first approach involves a Workflow Rule, while the second approach requires an Apex Trigger. However, you need to first allow connections from Salesforce to your Integration Gateway Server by adding it as a Remote Site. To do this, open Salesforce Setup, and under Settings, Navigate to Security -> Remote Site Settings, then click on the “New Remote Site” button to add a new Remote Site. In the Remote Site Edit screen, add the full URL of your integration gateway server (in our case, we are using https://<ServerName>/salesforce) and give a name to the new remote site.
Webhook Configuration using Workflow Rule
Once done, it is time to start configuring the webhooks. Let’s begin with the first approach – using a Workflow Rule. Open Salesforce Setup, and under Administration, navigate to Process Automation -> Workflow Rules and click on the “New Rule” button to create a new Rule. In Step 1 of creating a new rule, choose the Salesforce object you are going to be working with. Then in Step 2, specify a name for the new rule and select an Evaluation Criteria, which determines when the rule will be fired. Finally, add additional Rule Criteria to specify which conditions should be met first before running this rule. In Step 3, under Immediate Workflow Actions, click on the “Add Workflow Action” button and choose New Outbound Message.
In the New Outbound Message screen, specify a name for the new message, and for the Endpoint URL, enter your full Integration Gateway URL (https://<ServerName>/salesforce). Then under the “fields to send” option, select the fields which you are concerned with to send it to the Integration Gateway. Finally, Save the configuration, which redirects you back to Step 3. Click Done.
Now that the Workflow Rule is created click on the “Activate” button for the rule to take effect. This way, whenever the rule is fired based on the defined criteria, an outbound message is sent to the Integration Gateway, including the data of all the fields previously selected. For more details regarding creating Workflow Rules in Salesforce, please refer to this link, while for more details regarding Outbound Message Actions, please refer to this link.
Webhook Configuration using Apex Triggers
When it comes to using the Apex Trigger approach, start by creating a new Apex Class to serialize a JSON document which will include the data of a Salesforce object and send it through an HTTP call to the specified endpoint. To create a new class, open Salesforce Setup and under Administration, navigate to Custom Code -> Apex Classes and click on the “New” button. Enter the code of the webhook class which can be found in the example below:
public class Webhook implements HttpCalloutMock {
    public static HttpRequest request;
    public static HttpResponse response;
    public HTTPResponse respond(HTTPRequest req) {
        request = req;
        response = new HttpResponse();
        response.setStatusCode(200);
        return response;
    }
    public static String jsonContent(List<Object> triggerNew, List<Object> triggerOld) {
        String newObjects = '[]';
        if (triggerNew != null) {
            newObjects = JSON.serialize(triggerNew);
        }
        String oldObjects = '[]';
        if (triggerOld != null) {
            oldObjects = JSON.serialize(triggerOld);
        }
        String userId = JSON.serialize(UserInfo.getUserId());
        String content = '{"new": ' + newObjects + ', "old": ' + oldObjects + ', "userId": ' + userId + '}';
        return content;
    }
    @future(callout=true)
    public static void callout(String url, String content) {
        if (Test.isRunningTest()) {
            Test.setMock(HttpCalloutMock.class, new Webhook());
        }
        Http h = new Http();
        HttpRequest req = new HttpRequest();
        req.setEndpoint(url);
        req.setMethod('POST');
        req.setHeader('Content-Type', 'application/json');
        req.setBody(content);
        h.send(req);
    }
}
Once the class is created, create an Apex Trigger to send any data changes to your Integration Gateway server as soon as it occurs. To create a new trigger, open Salesforce Setup then under Administration, navigate to Custom Code -> Apex Triggers and click on the “Developer Console” button. This opens the Developer console in a new window. Click on File -> New -> Apex Trigger, and give a name to the new trigger and select an object which this trigger is associated with. Now specify the code of the trigger in the developer console. For example, if you are going to create a trigger that fires on any account record changes or creation, use the following code, which uses the Apex Class we have created in the previous step.
trigger accountWebhookTrigger on Account (after insert, after update) {
    String url = 'https://<ServerName>/salesforce';
    String content = Webhook.jsonContent(Trigger.new, Trigger.old);
    Webhook.callout(url, content);
    }
For more details regarding creating Apex Classes in Salesforce, please refer to this link, while for more details regarding Apex Triggers, please refer to this link.
Configuring KingswaySoft Integration Gateway
With the Salesforce webhooks configured, let’s move on to configuring the Integration Gateway to receive requests from the webhooks and send them to a Message Queue Server. First, from the Integration Gateway Console, configure the HTTP server settings in the HTTP Server tab as the KingswaySoft Integration Gateway uses an HTTP server to listen to incoming webhook calls.
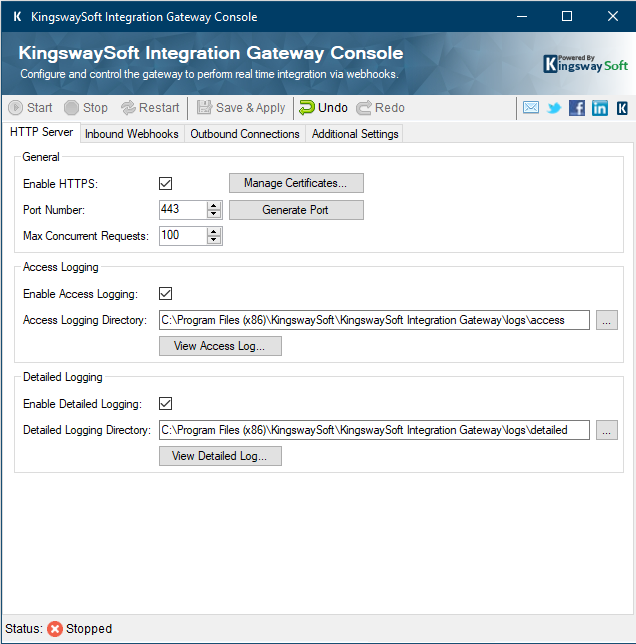/Image%2001%20-%20Configuring%20KingswaySoft%20Integration%20Gateway%20-%20HTTP%20Server.png "Configuring KingswaySoft Integration Gateway - HTTP Server")
Based on the screenshot shown above, the Base URL of our Integration Gateway listener is https://<ServerName>/ as 443 is the default port number for the HTTPS protocol.
Next, in the Outbound Connection tab, configure the connection to your preferred Message Queue server, which the Integration Gateway redirects the data from the Webhooks callback requests to. Our Integration Gateway solution currently supports 7 different Message Queue servers:
- Amazon SQS Connection
- AMQP Connection
- Azure Service Bus Connection
- File Connection
- IBM MQ Connection
- MSMQ Connection
- RabbitMQ Connection
In this example, we are using Azure Service Bus as our target message queue server.
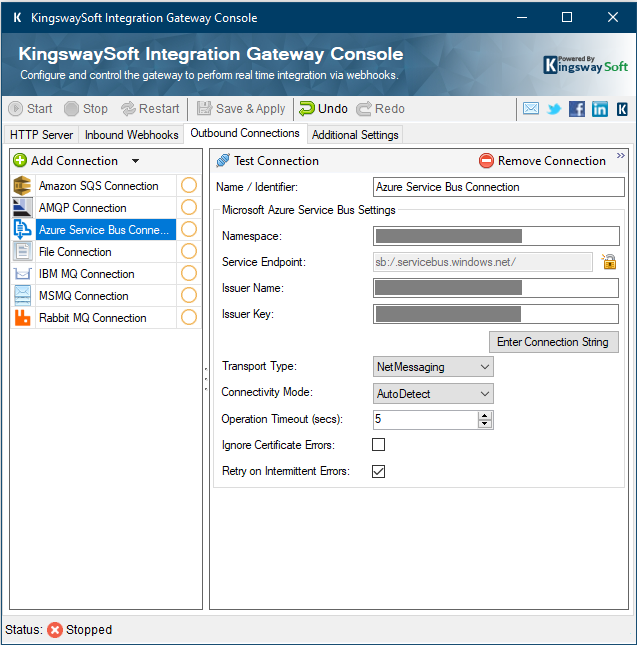/Image%2002%20-%20Configuring%20KingswaySoft%20Integration%20Gateway%20-%20Outbound%20Connections.png "Configuring KingswaySoft Integration Gateway - Outbound Connections")
Once the connection information is entered, click on Test Connection to verify that a connection is established with the message queue server.
Finally, configure a new webhook in the Inbound Webhook tab. For Salesforce, add a Custom webhook and set the Route to “Salesforce” with the following URL https://<ServerName>/salesforce.
Choose a destination and select the message queue server connection created in the second step. After selecting the outbound connection, provide a queue name where the webhook messages are sent. In the following example, we are sending the received data to “Salesforce-queue”.
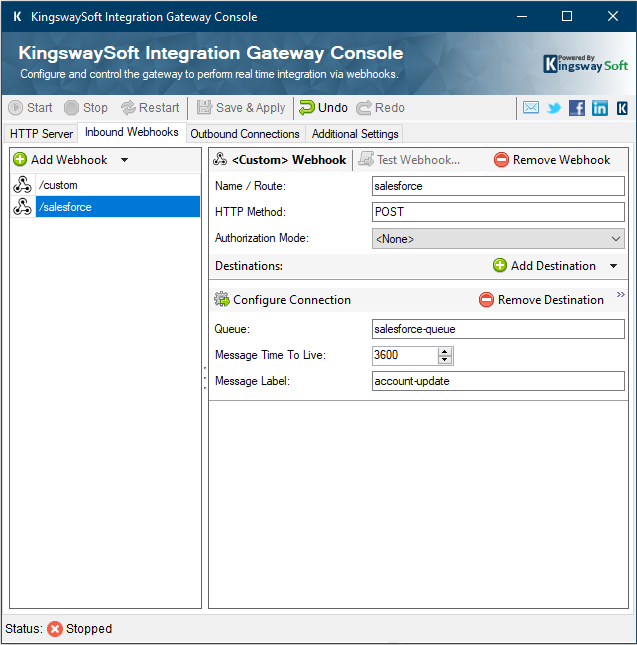/Image%2003%20-%20Configuring%20KingswaySoft%20Integration%20Gateway%20-%20Inbound%20Webhooks.png "Configuring KingswaySoft Integration Gateway - Inbound Webhooks")
Once completed, click the ‘Start’ button in Integration Gateway to allow the application to run as a Windows Service to continually listen for webhook messages and push the messages to the Azure Service Bus message queue.
Capture Real-Time Changes in SSIS
Now with the Salesforce webhooks configured and Integration Gateway set up and running, it’s time to create an SSIS package that would pick up the messages from the Message Queue server and perform real-time integration.
We are using our Premium Message Queue Task component offered in our SSIS Productivity Pack, which listens for new messages in the queue, and then invokes a data flow task which would process this message. Our Premium Message Queue Task is a versatile component that can send or receive messages to or from message queues. When in Receive Mode, there are two types of actions available: Peek and Receive And Delete. With Peek, messages are read but not deleted, whereas the “Receive Messages and Delete” option, messages are retrieved and deleted from the queue. For real-time integration, we recommend the latter as once the Premium Message Queue Task has processed the data, there is no need for it to remain with the component.
Additionally, the Premium Message Queue Task has four Listener Mode options to choose: Fixed Time mode, Wait Until mode, Wait Until Variable mode, and Until Service is Stopped mode. In our scenario, we require the component to listen in for new messages that may arrive continuously, so therefore we have set it to Until Service is Stopped, which allows the user to decide when to stop the service manually.
/Image%2004%20-%20Capture%20Real-Time%20Changes%20in%20SSIS%20-%20Premium%20Message%20Queue%20Task.png "Capture Real-Time Changes in SSIS - Premium Message Queue Task")
As shown in the screenshot above, we are listening to the Azure Service Bus queue and writing the message to an SSIS variable.
The next step is to link a Data Flow Task to the Premium Message Queue to write the Salesforce captured record to the target system. In our example, we are using Trello as the target system for our integration. You can connect to practically any other application or database system, including Microsoft SharePoint, Microsoft Dynamics 365, Slack, WordPress, and even Facebook.
As the Salesforce webhook payload is JSON formatted, use our JSON Source component to read from the SSIS variable and parse the JSON document into columns and rows. In our example, we are retrieving the newly created accounts from Salesforce, and we are creating Trello Cards using our REST Destination Component:
/Image%2005%20-%20SSIS%20Data%20Flow%20Design%20-%20Salesforce%20Webhook.png "SSIS Data Flow Design - Salesforce Webhook")
As Premium Message Queue Task works with one message at a time, use a For Loop Container in the SSIS package so that the package design would look like this:
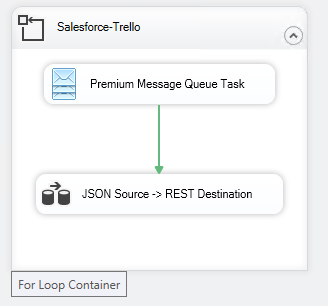/Image%2006%20-%20SSIS%20For%20Loop%20Container%20-%20Salesforce%20Real-Time%20Integration.png "SSIS For Loop Container - Salesforce Real-Time Integration")
Create two datetime type variables in SSIS:
- User::CurrentDateTime: GETDATE()
- User::EndTime: (DT_DBTIMESTAMP) ((DT_WSTR,20)(DT_DBDATE)GETDATE()+ " 11:59:59 PM")
These two variables are used in For Loop EvalExpression to specify when the loop stops.
- @[User::CurrentDateTime]<@[User::EndTime]
In our sample package, we have set the For Loop to stop daily at 11:59:59 PM. Deploy the package and run the package on schedule every day at 12:00:00 AM so that the SSIS package is always listening for the message queue messages.
Sample SSIS Package
Our sample SSIS package can help you get started with setting up the SSIS integration portion of your project, allowing you to connect with any business application or database. The sample SSIS package can be downloaded here.
The sample package was prepared in an SQL Server 2012 format, and should automatically upgrade if you are using a newer version of SSIS.
Closing Notes
With Integration Gateway, the opportunities are endless in terms of bringing real-time integration to your ETL projects. Any application or service that supports webhooks can be configured to provide real-time integration solutions to your business. In addition to the custom webhook configuration found in our Integration Gateway solution, our software comes with 10 pre-installed webhook setups for popular services such as Asana, Dropbox, Facebook, HubSpot, Shopify, Slack, Square, SurveyMonkey, Trello, and Xero.
Are you interested in more information about our Integration Gateway product? Check out this portion of our 2020 Release Wave 1 webinar on YouTube for a demo of it in action.