When designing an integration package, it is expected to run into errors that may break the execution of one of the tasks or even the entire package. Therefore, these errors should be taken into consideration and handled within the package whenever possible. While for any unexpected errors, or errors that require manual intervention to address, your package should be able to log these error messages and send a notification to the concerned parties to take action accordingly.
In this blog post, we will discuss the different approaches of handling and logging error messages while sending notifications for either a record-level or a package-level failure.
Record-Level Error Handling
When attempting to write records to a target system, certain records might fail due to invalid references or due to data validation errors. By default, the destination component will fail as soon as it encounters an error, and it will not continue processing the rest of the input records. However, by selecting the “Redirect rows to error output” option as the error handling mechanism in your destination component, you can prevent the destination component from failing in case of an error, and it will redirect the failed records to the component’s Error Output instead. In the error output, the error message will be re-tuned along with each input record so that you can quickly identify which records have failed.
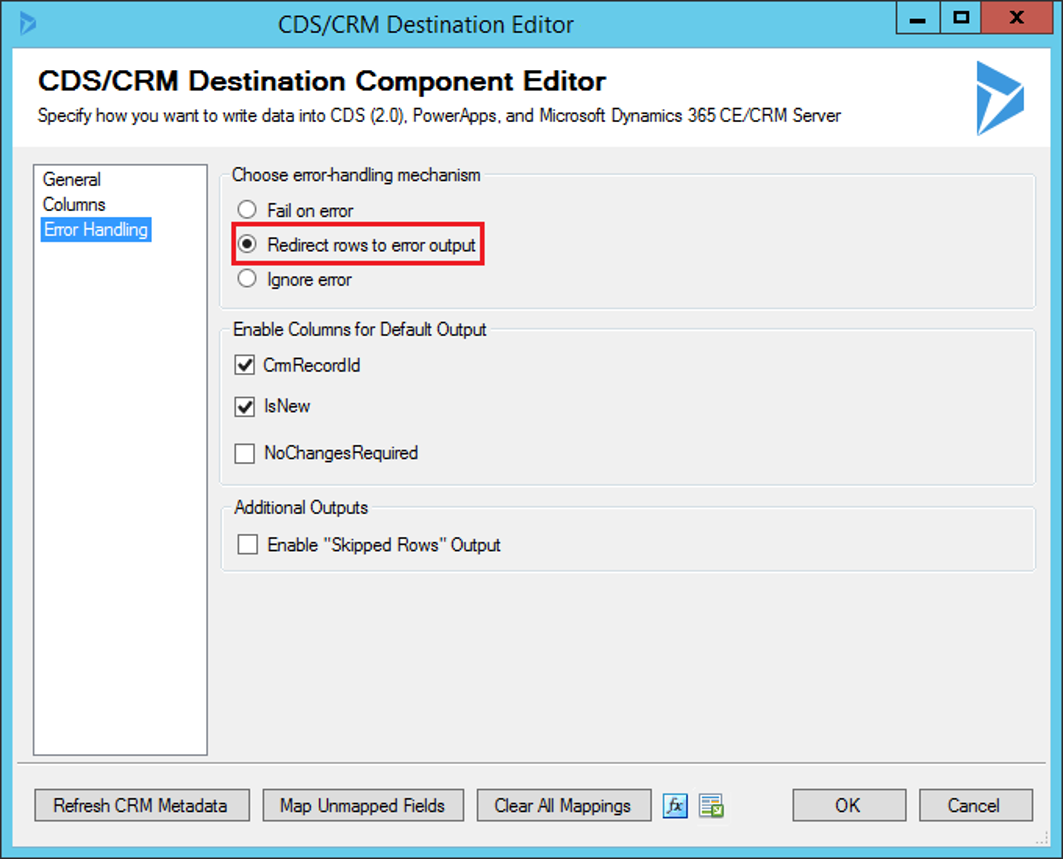
You can then use this Error Output to implement a retry mechanism in case of specific expected errors, or you can log them to a database table where you can take further actions if required.
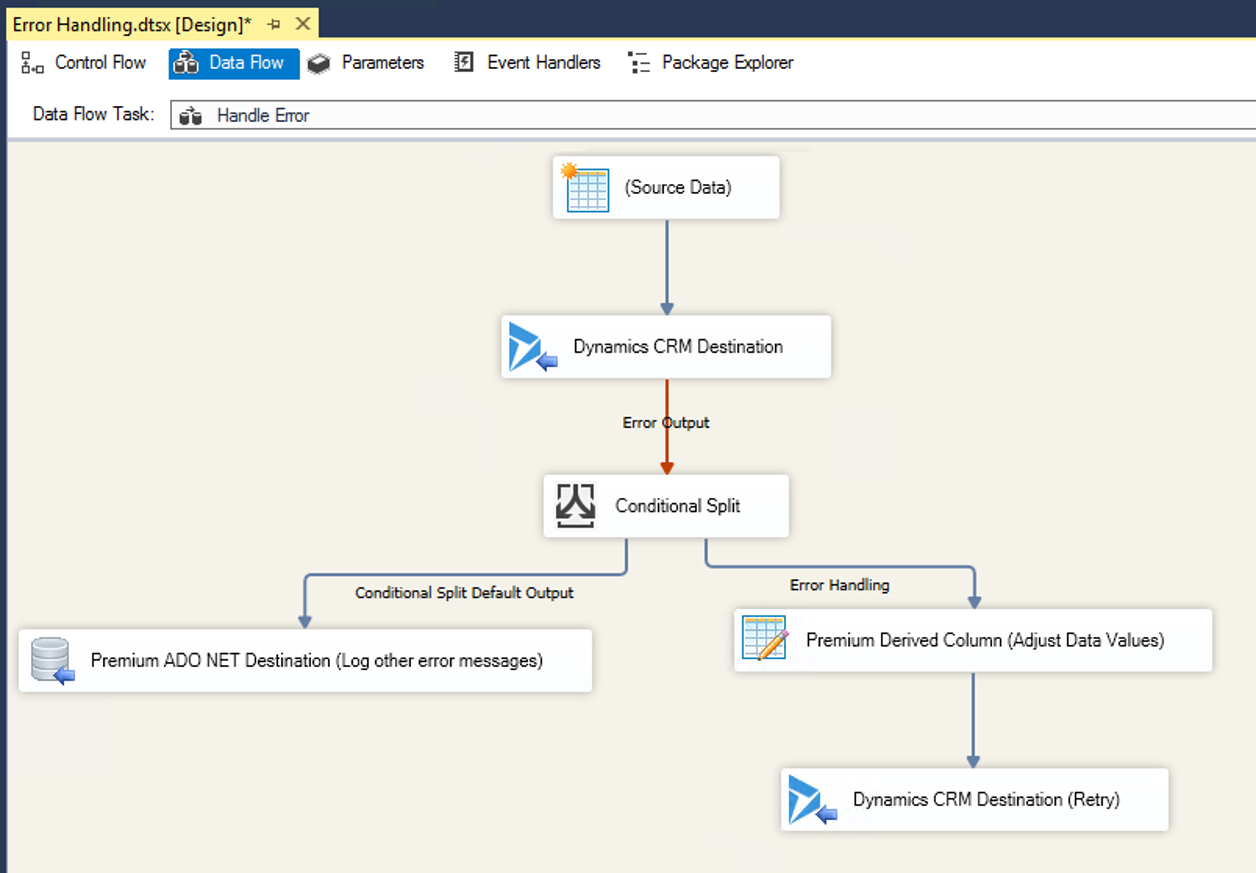
In the example above, we are retrieving Data from a Source component, and pushing this data to a CRM Destination component. Then after the “Redirect rows to error output” option was enabled, we have attached the error output to a Conditional split component where we are filtering by the CrmErrorMessage column to look for a specific message. When this error message is found, it will be redirected to the Error Handling output of the Conditional Split component, where we can use a Derived Column component to perform any necessary changes on the input data to fix the root cause of the error. Then, we use another CRM Destination component to retry writing the record to the CRM instance. While other failed records will be redirected to the default output of the Conditional Split Component which will be logged to a Database table.
Record-Level Error Reporting
Another common requirement is to send an email with a list of all the failed records with their corresponding error message so that an action can be taken immediately to address the cause of these failed records. In this case, we can use the Error Output to redirect the records to an SMTP Destination component which is designed to send Emails to the specified recipients. However, attaching the Error output directly to the SMTP Destination component will cause it to send an email for each input record. This action may result in receiving a large number of emails when multiple records fail.
Therefore, to group all the failed records in one single Email, we can utilize a Text Merge component which can be used for this purpose by defining the HTML table structure of the email body and inserting the input columns as the data values for this HTML Table. While in the Headers & Footers tab, we would define the opening tags for the HTML Table as the Header, and the closing tags as the Footer.
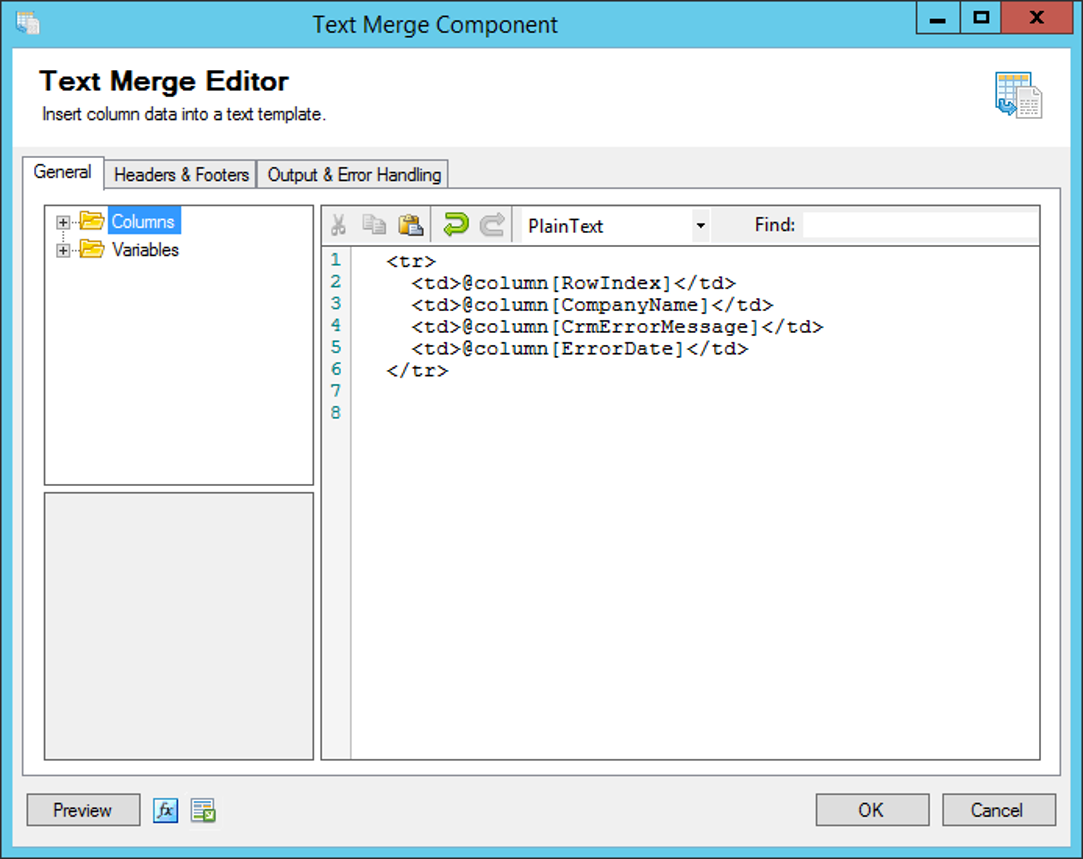
Once this has been done, we can use a Derived Column component to create the required input columns for the SMTP Destination component such as the subject, recipient, etc. While we would use the MergedText output column of the Text Merge component as the Body of the email that will be sent. Therefore, the Data Flow Design should be as follows:
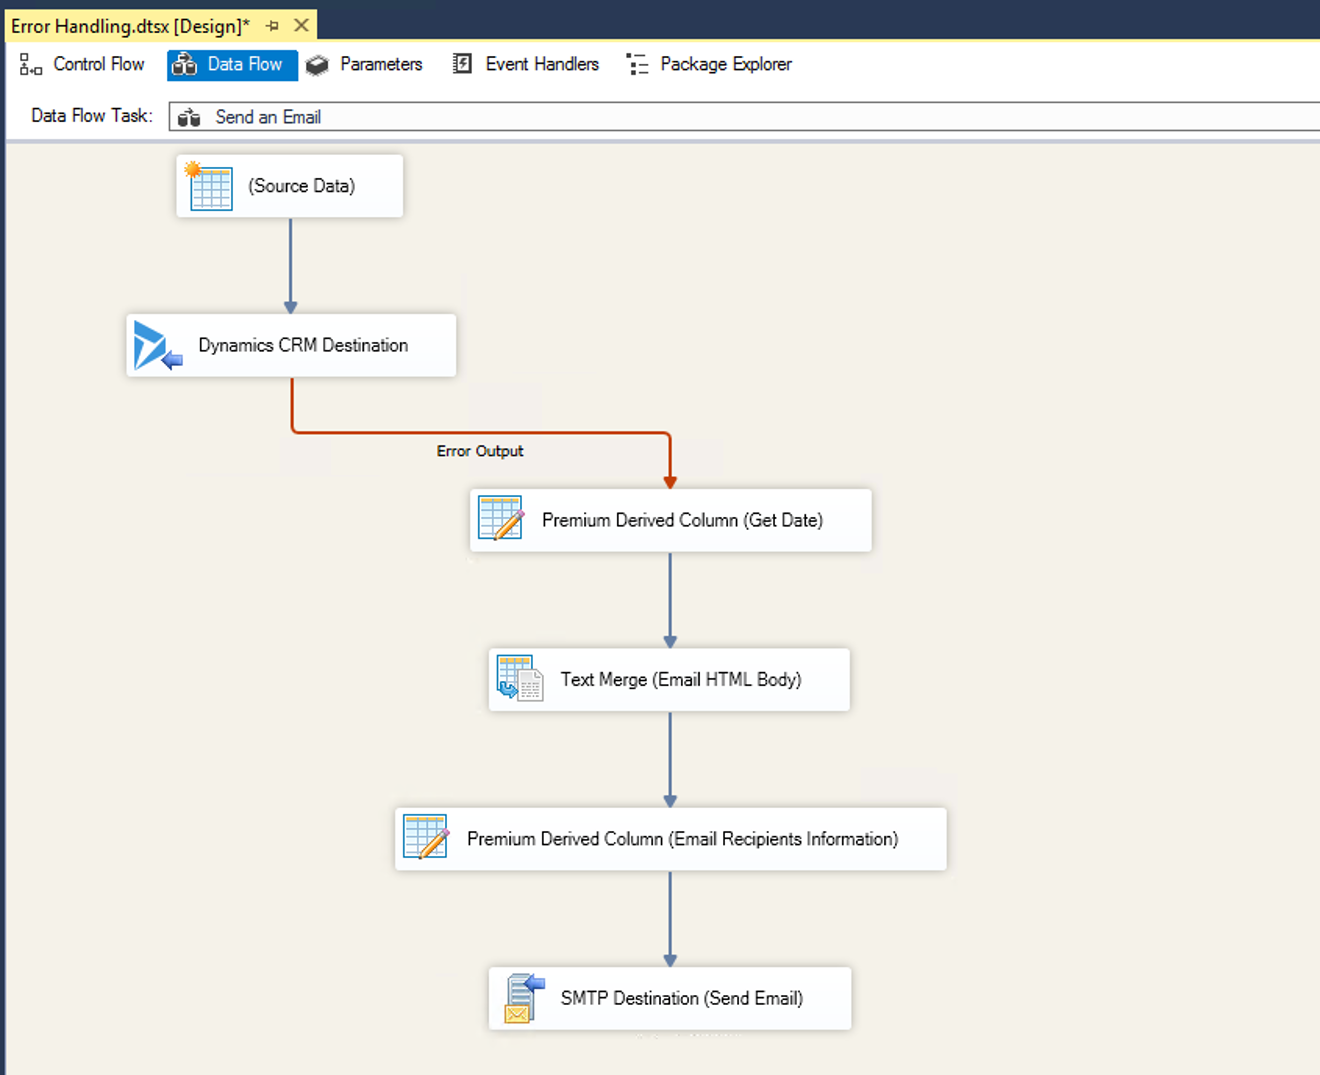
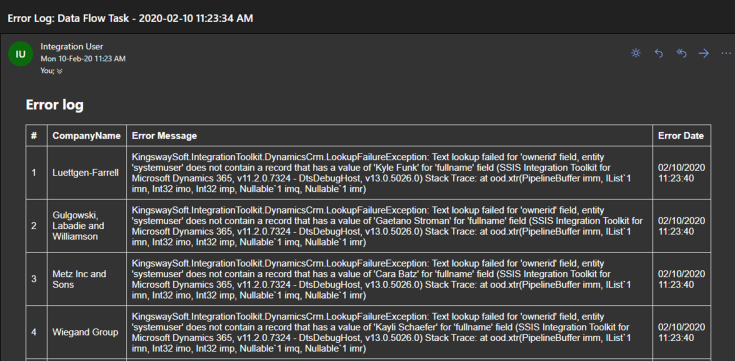
This way, all the failed records will be listed in a table which we have defined the structure for, and the received email can look something similar to the following:
Task-Level Errors
There are also other types of errors that could fail one of your Tasks in the Control Flow. Additionally, for Source and Transformation components in Data Flow task, not all of them provide an Error Output like the Destination component, so if an error occurs in one them, it will result in the failure of the entire Data Flow task. In these types of scenarios, we can utilize the Event Handlers of the SSIS package, where we can select the specific task that we want to work with and select the event which would trigger our error handling implementation. It is also worth mentioning that another approach would be to use Precedence Constraints, which can be used to trigger an execution of a task if the previous task has failed by setting the constraint value to Failure.
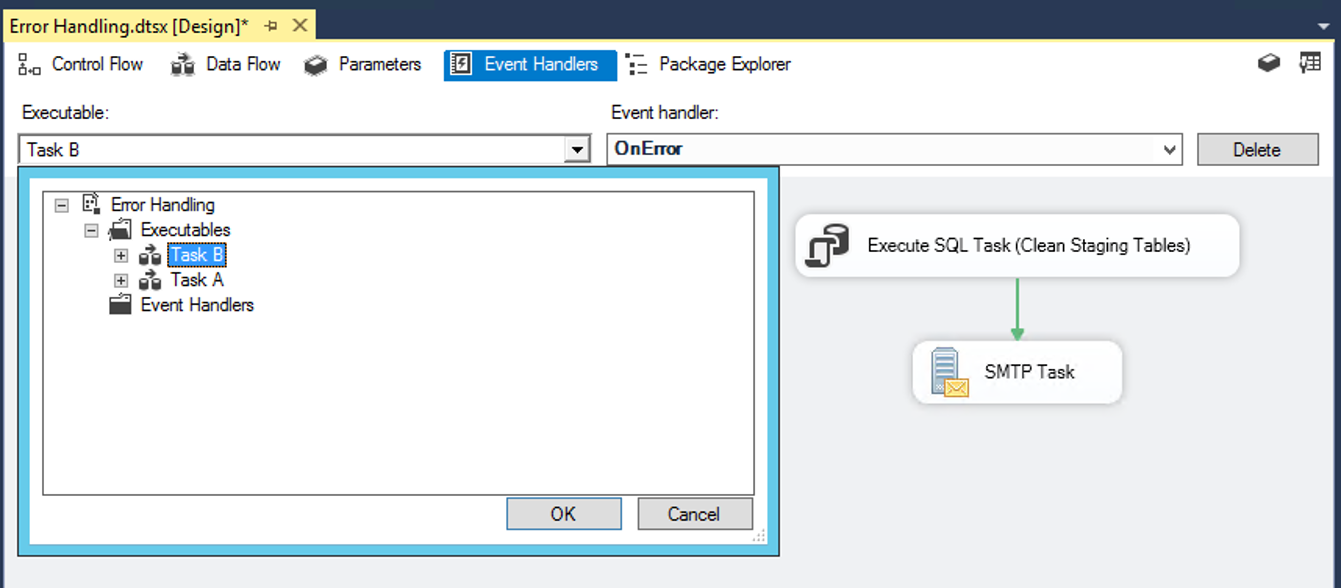
In our case, we chose the OnError Event Handler, so that if the selected task fails, it will trigger the components in the Event Handlers page that we have created. In the following example, we select the OnError event for Task B which if it fails, we are going to Clean the staging tables by using an Execute SQL Task to run a SQL Script. Then we would send a notification email for this Data Flow task failure using an SMTP Task.
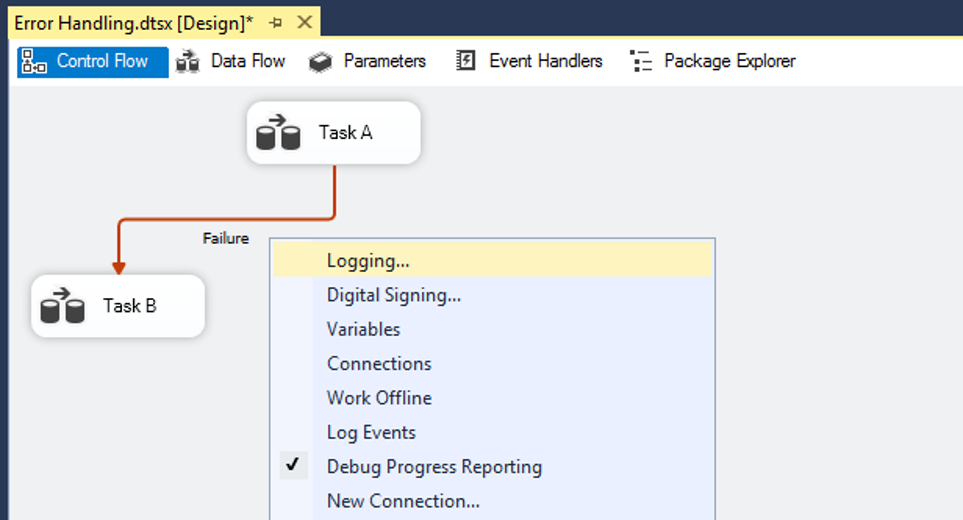
On the other hand, for Task-Level error logging, we can utilize the Logging capabilities of SSIS by configuring SSIS Logs. To do so, you would right-click on an empty area in the control flow and then select Logging from the context menu.
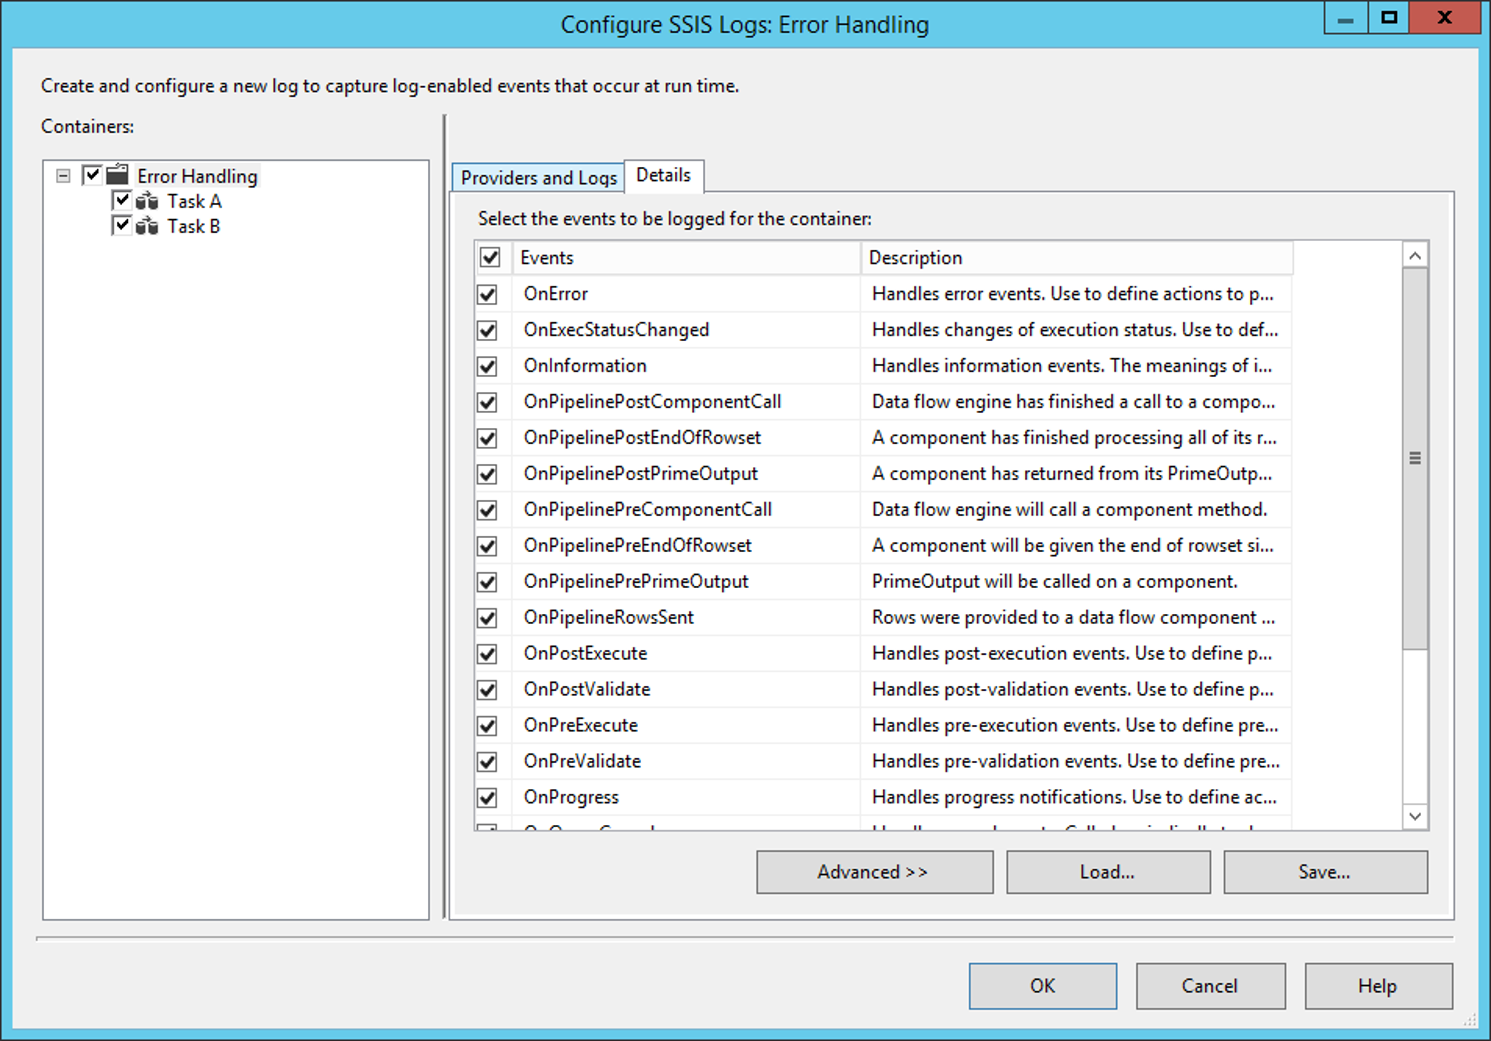
In the SSIS Logs configurations window, you can select the tasks you want to enable logging for from the pane on the left, then based on where you want the logs to be written, you select the appropriate provider type from the drop-down menu and click Add.
In our example, we have chosen the provider for Windows Event Log to write any error messages there, as many organizations rely on a Security Event & Incident Management system (SEIM) to consolidate their error reporting into one system. These systems often support collecting errors from Windows Event Logs right out-of-the-box.
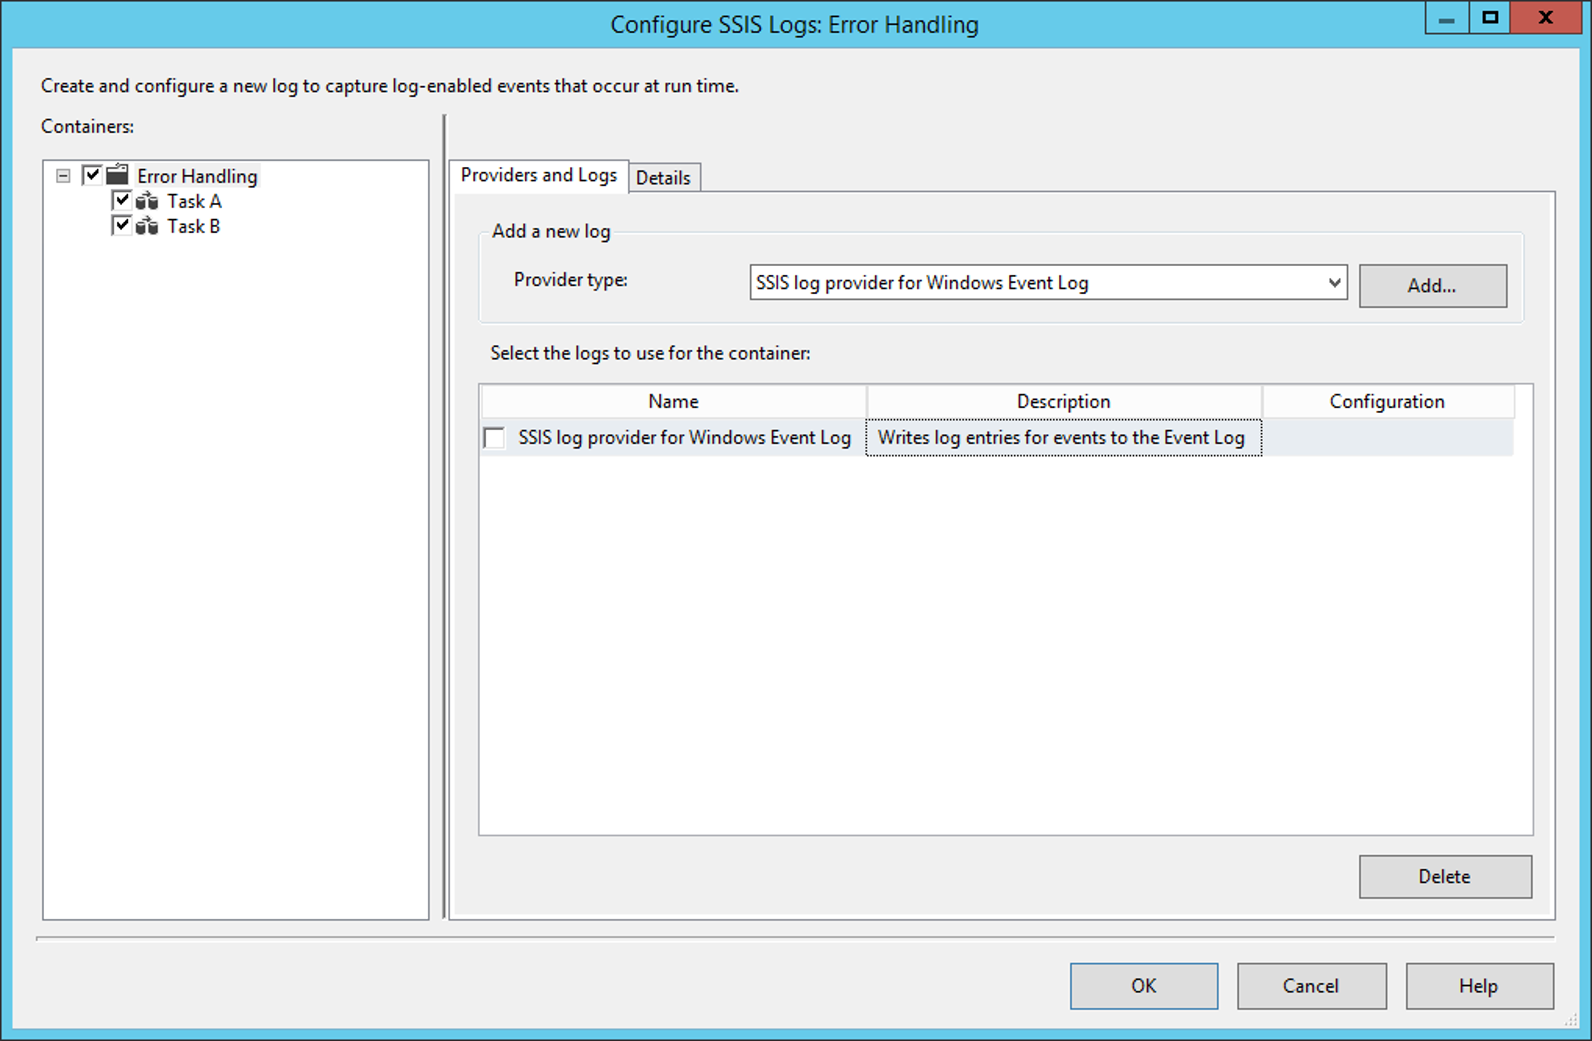
Once done, we can select the specific events to be logged in the Details tab of the configuration window. If you are only interested in logging error messages, then you would only select the OnError Events.
SQL Server Agent Jobs Error Reporting
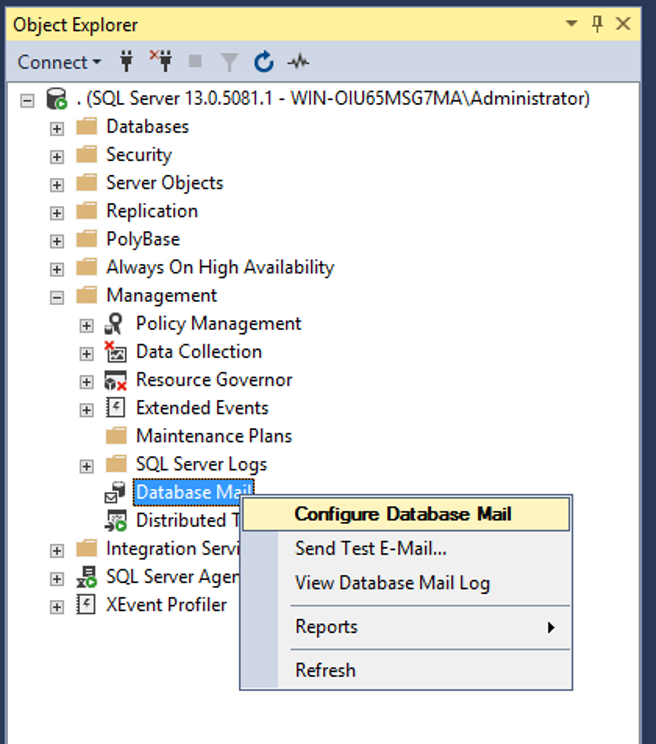
The most common scheduler used to run SSIS Packages is the SQL Server Agent. However, in some cases, you may encounter an error message related to the execution of your Job which causes it to fail. In these types of cases, we should be able to receive a notification for the failed job to take action immediately. To do so, we would first have to set up a Database Mail in SQL Server which can be done by right-clicking on Database Mail under the SQL Server Management folder then selecting Configure Database Mail:
Then we will follow the wizard to enter our mail server and account information. Once done, we send a test email to make sure that our configurations are correct.
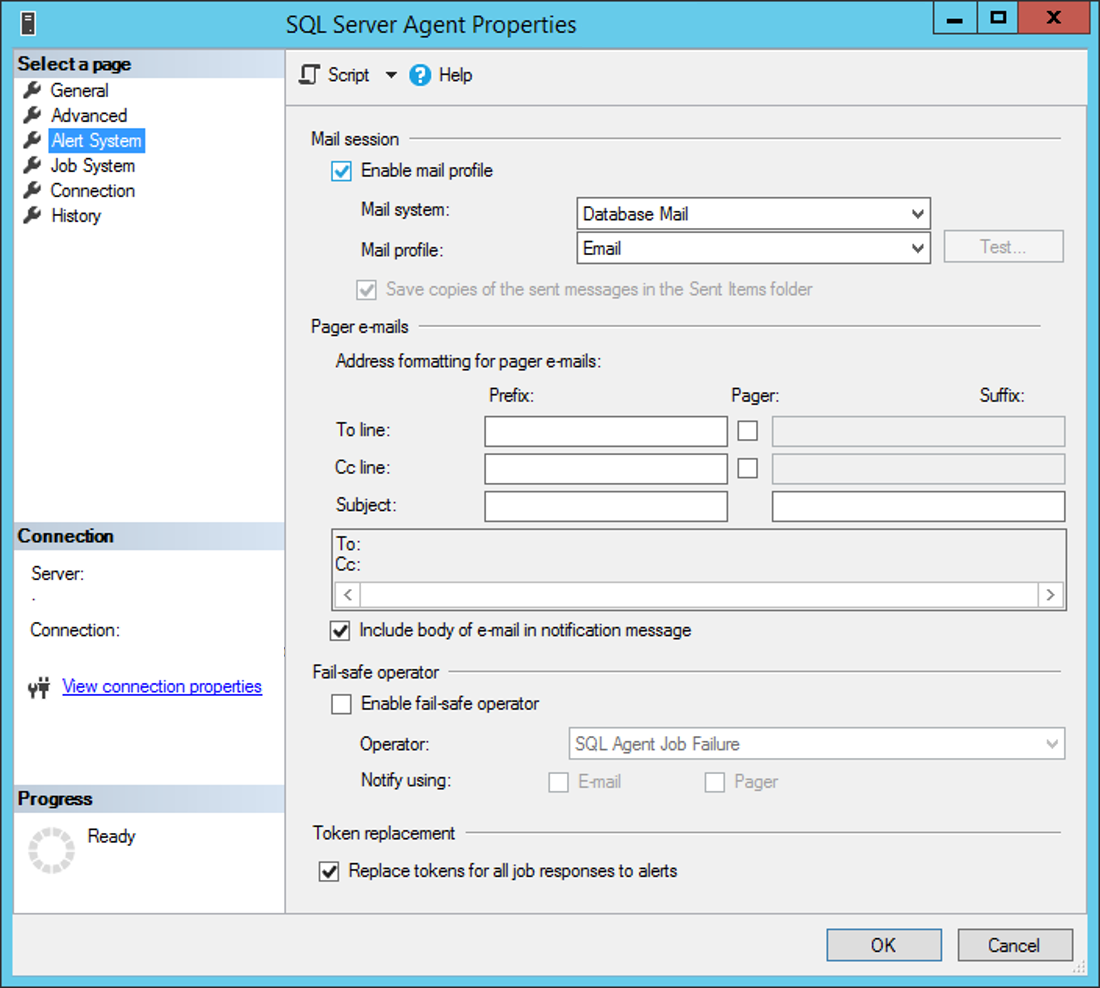
The next step would be to Configure the SQL Server Agent to enable Alerts and utilize the Database Mail we have just created. To do so, in the SQL Server Agent Properties window, we select Alert System, then click on Enable mail profile, which will allow us to select the email profile we have available in our SQL Server.
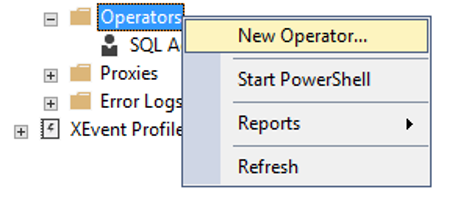
Once completed, we create a New Operator under SQL Server Agent and name it “SQL Agent Job Failure”, for example.
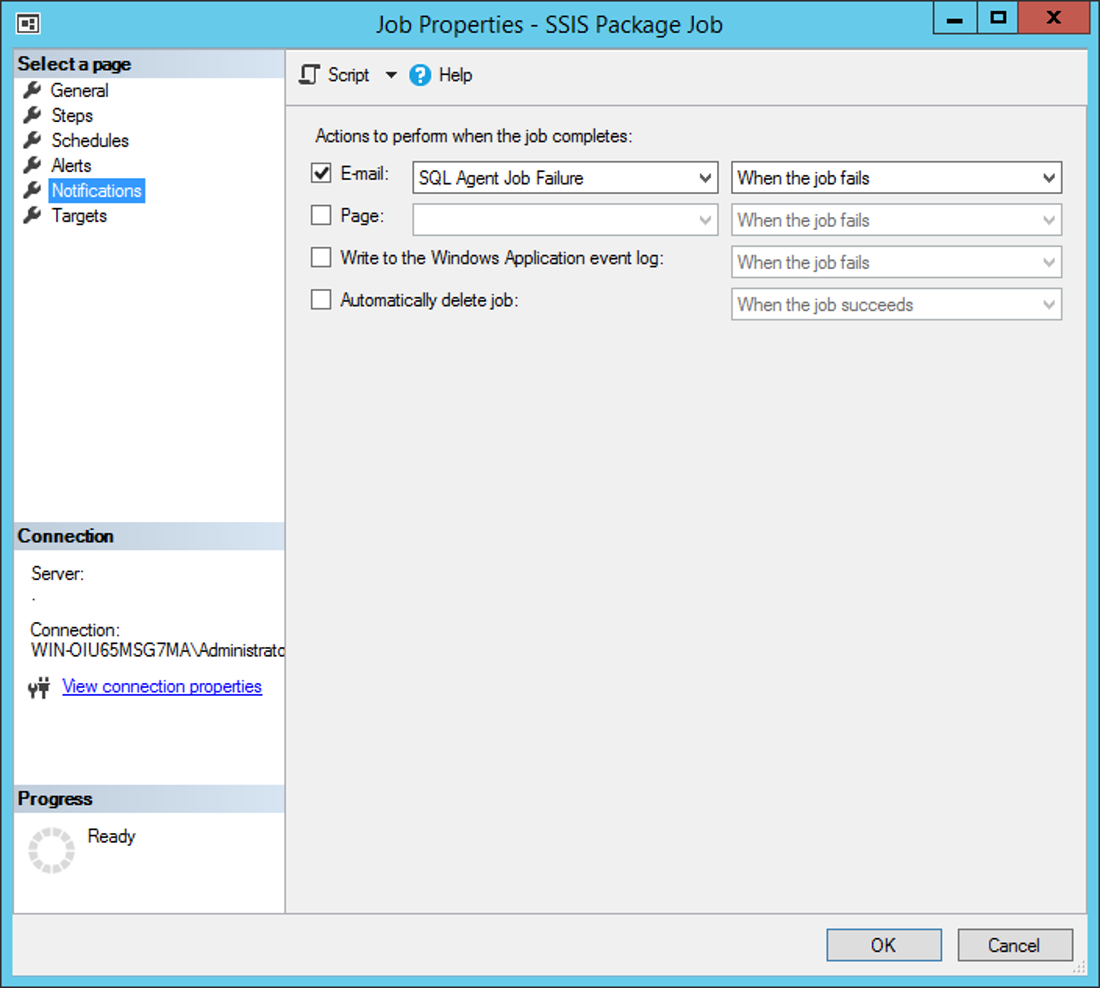
Once the operator has been created, we open the Properties of the Job we want to configure, and in the Notifications page, we enable E-mail, and select the Operator we have just created. This action will allow you to choose when to receive an email from the Job; we have selected (When the Job fails) as shown below:
Closing Notes
In conclusion, we have discussed some of the possible error types that you can encounter and how to implement Error Handling/Logging for them, depending on where they have occurred. This way, you would have total visibility of the scheduling and execution of your SSIS packages to take immediate actions to mitigate any issues that arise.

