A CDS/CRM Connection Manager is used to connect to a single CDS/CRM instance in order to integrate data via CRM Source/Destination Components in an SSIS integration package. However, it is common to use the same integration package with different CDS/CRM instances such as DEV, UAT, and PROD CRM environments. In this case, you could open your Integration Service Project in Visual Studio, and manually change the CDS/CRM Connection Manager settings to connect to a new environment, then re-deploy your SSIS package to an integration server, but you might end up managing three versions (or more) of the same package. Also, in most cases, the deployed integration packages are administrated by a Database Administrator, who doesn’t necessarily use Visual Studio to do any required changes manually in the integration package to connect to a different CDS/CRM instance.
Therefore, parameterizing your CDS/CRM Connection Manager would be a better approach in these scenarios, as by doing so, you would be able to pass the connection information before the execution of the deployed SSIS package directly from SQL Server Management Studio (SSMS) without the need to manually open the package in Visual Studio. In this blog post, we explore the recommended approach of parameterizing KingswaySoft’s CDS/CRM Connection Manager in detail.
ConnectionString Syntax
Each connection manager or component in SSIS has a set of properties. These properties define the settings of the component’s configuration through the component’s editor (UI). Changing a property of a particular component would also affect the value shown in the editor and vice versa. Therefore, to change the connection information of your CDS/CRM Connection Manager, we recommend working with the ConnectionString property. First, you would need to get the format to use from an already configured CDS/CRM Connection Manager by following the steps below:
- Configure the CDS/CRM Connection Manager via UI.
- Save the component by clicking the OK button.
- Right-click the
Connection Manager and choose
Properties.
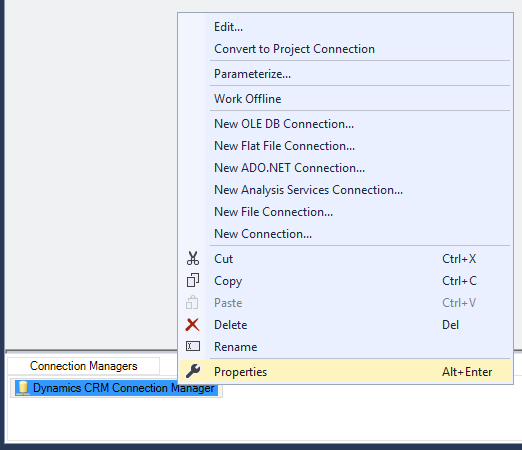
- You should be able to get the correct syntax of the ConnectionString property from the Properties window (bottom-right corner) under the Misc category.
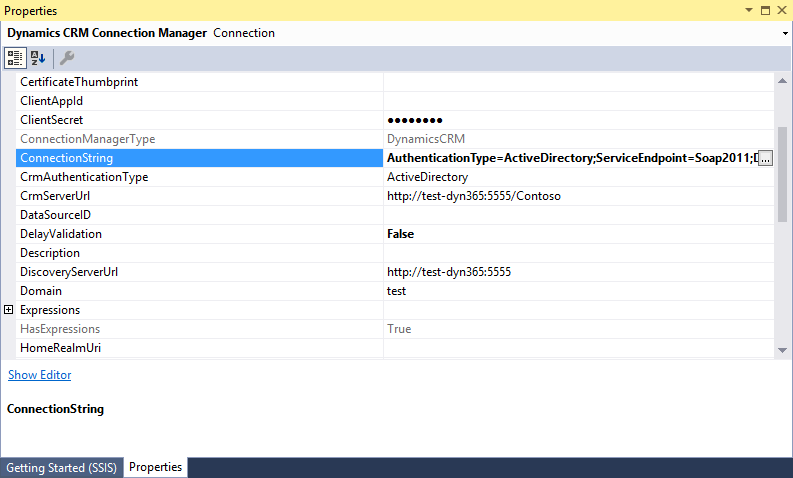
In this example, we are connecting to an on-premises instance of CRM; therefore, the ConnectionString would be:
AuthenticationType=ActiveDirectory;ServiceEndpoint=Soap2011;DiscoveryServerUrl=http://test-dyn365:5555;UserName=test.admin;Domain=test;OrganizationName=Contoso;CrmServerUrl=http://test-dyn365:5555/Contoso;ProxyUsername=;ProxyMode=NoProxy;ProxyServer=;ProxyServerPort=0;BypassProxyOnLocal=False;HomeRealmUri=;ApiVersion=;ServiceTimeout=120;RetryOnIntermittentErrors=True;IgnoreCertificateErrors=False
Create SSIS Parameters
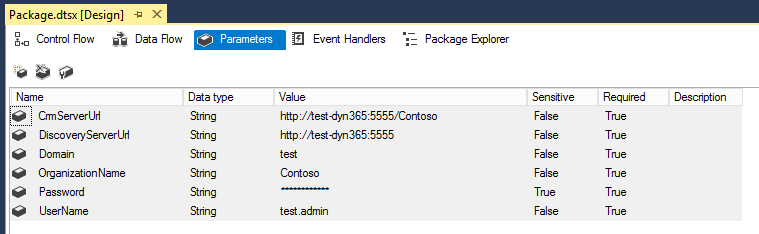
Once you have obtained a sample of the ConnectionString property, you need to determine which parts of the string you need to parameterize and to create SSIS parameters for them that will be used to become part of the ConnectionString.
In our example, we have created all the required parameters to establish a connection to a CRM instance (as shown in the screenshot below), and we have assigned default values to them, which will be replaced later when trying to execute the package from SSMS.
Assign SSIS Parameters to the ConnectionString Property
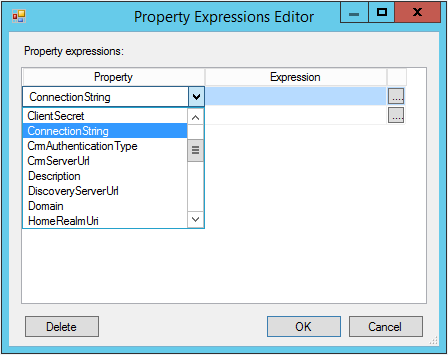
At this point, we have the exact syntax for the ConnectionString we will be using, and we have created all the required SSIS parameters, which we will embed in the ConnectionString. The next step would be to assign an SSIS expression to ConnectionString property. To do so, right-click on the CDS/CRM Connection Manager and select Properties. In the Properties window, click on the ellipsis button next to Expressions.
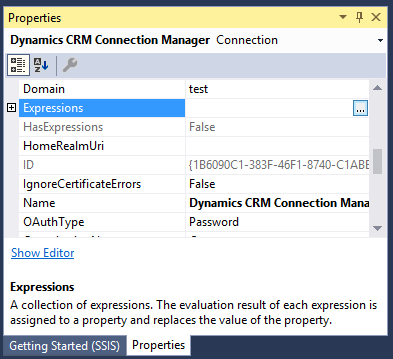
This will open the Property Expression Editor, where you can select the ConnectionString Property. Then click on the ellipsis button next to it to open the Expression Builder.
In the Expression Builder, write an SSIS expression to concatenate your SSIS parameters in your ConnectionString, as shown in the example below:
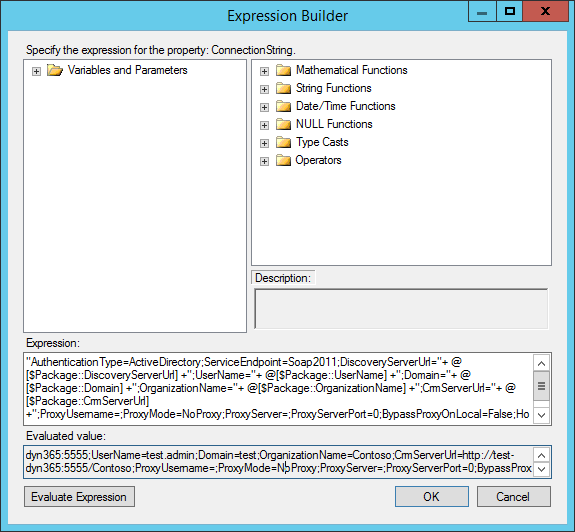
"AuthenticationType=ActiveDirectory;ServiceEndpoint=Soap2011;DiscoveryServerUrl="+ @[$Package::DiscoveryServerUrl] +";UserName="+ @[$Package::UserName] +";Domain="+ @[$Package::Domain] +";OrganizationName="+ @[$Package::OrganizationName] +";CrmServerUrl="+ @[$Package::CrmServerUrl] +";ProxyUsername=;ProxyMode=NoProxy;ProxyServer=;ProxyServerPort=0;BypassProxyOnLocal=False;HomeRealmUri=;ServiceTimeout=120;RetryOnIntermittentErrors=True;IgnoreCertificateErrors=False"
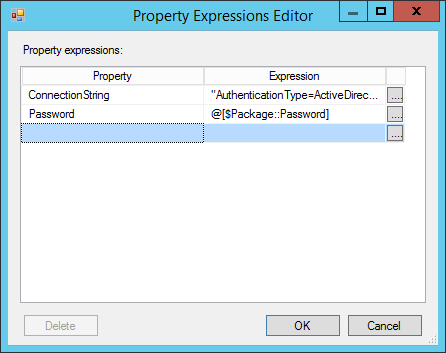
Note that when you are parameterizing the ConnectionString property, the password value is not included in ConnectionString by default. You can work with the Password property separately, or you can add it to your ConnectionString. If you choose to include the password in your ConnectionString, The format would be Password=myPassword; (make sure you have a semicolon as the last character), and it can be placed anywhere in the ConnectionString.
.png)
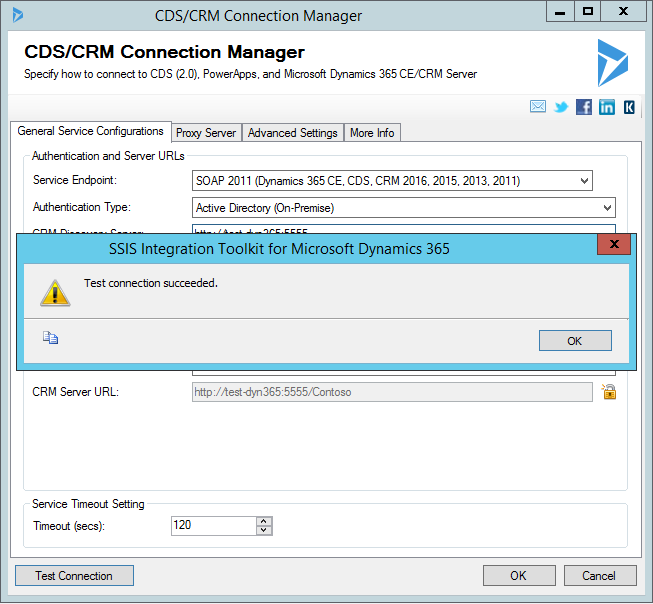
Once completed, reopen the CDS/CRM Connection Manager and click on Test Connection to verify that the parameters are correct.
Working with SSIS Environment Variables
The CDS/CRM Connection Manager in the SSIS package is now parameterized. After deploying this package to an integration server, you can now assign different SSIS environments to it.
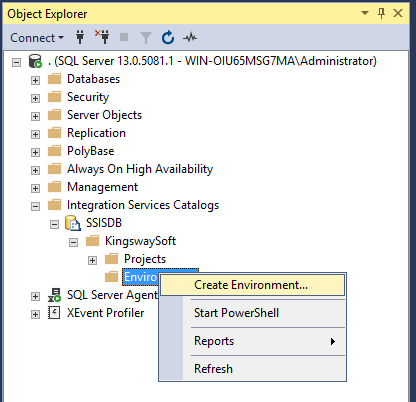
To do so, begin by creating an environment for each CDS/CRM instance, you will be connecting. First, under the Folder in your SSISDB catalogue, right-click on Environments and click on Create Environment.
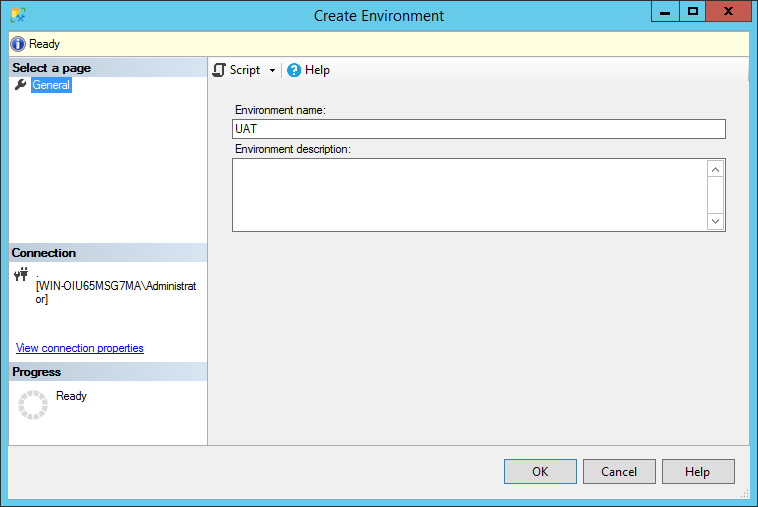
Proceed to give this new environment a name and a description.
Once done, double click on the newly created environment under the Environments folder, and navigate to the Variables page to create SSIS environment variables and assign values to them as shown in the screenshot below:
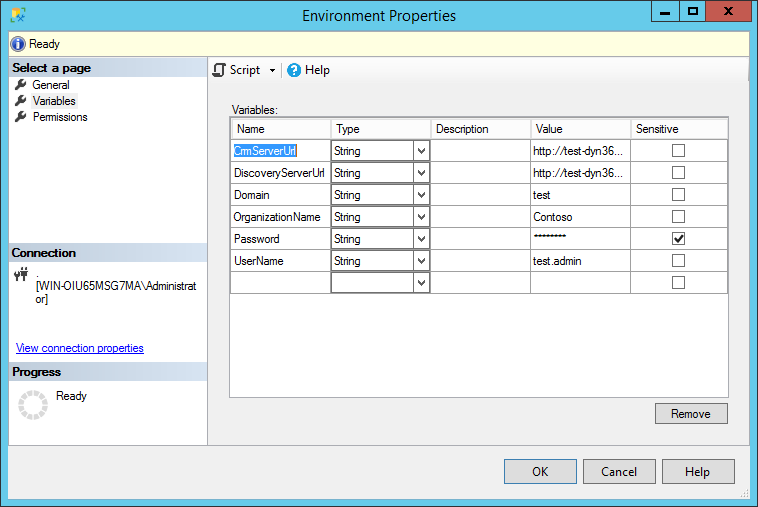
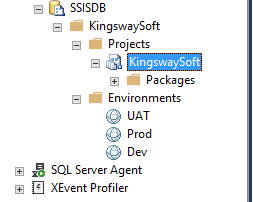
Repeat this process for each environment available, creating Dev, UAT and Prod environments where each one of them will have their own set of variables.
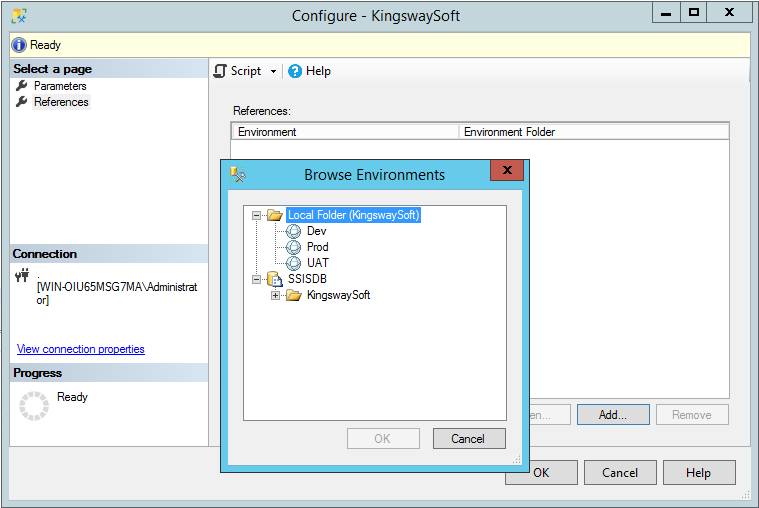
Next, configure the SSIS project to access the environments created. To do so, right-click Project name and click on Configure. The Project Configuration Editor will open; navigate to the References page and click Add.
Browse the environments you have available in your server and add them to your SSIS project.
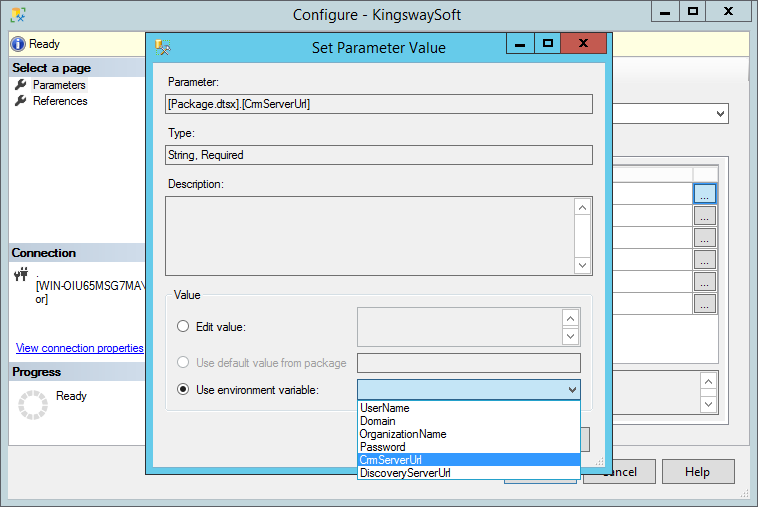
Once done, navigate to the Parameters page to find a list of all the parameters in your package. Click on the ellipsis button next to each parameter, and map it to its corresponding SSIS environment variable as shown in the screenshot below:
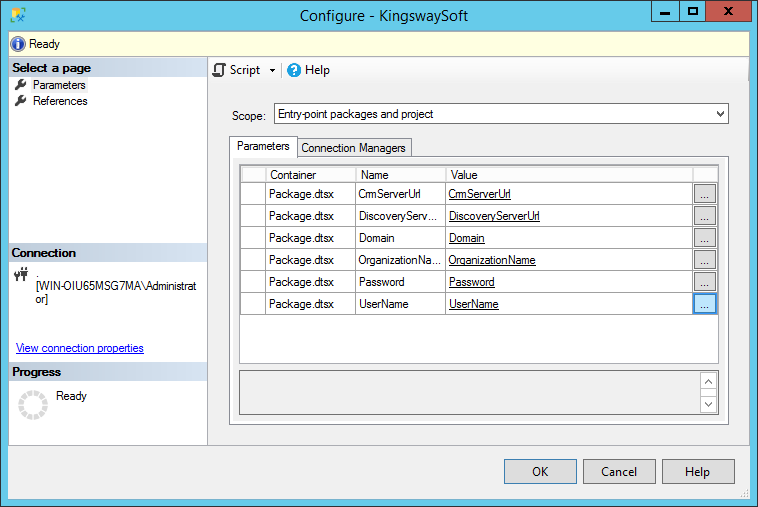
Once configured correctly, you should end up with all the Parameters mapped to their relevant SSIS environment variables.
Executing SSIS Packages under Different Environments
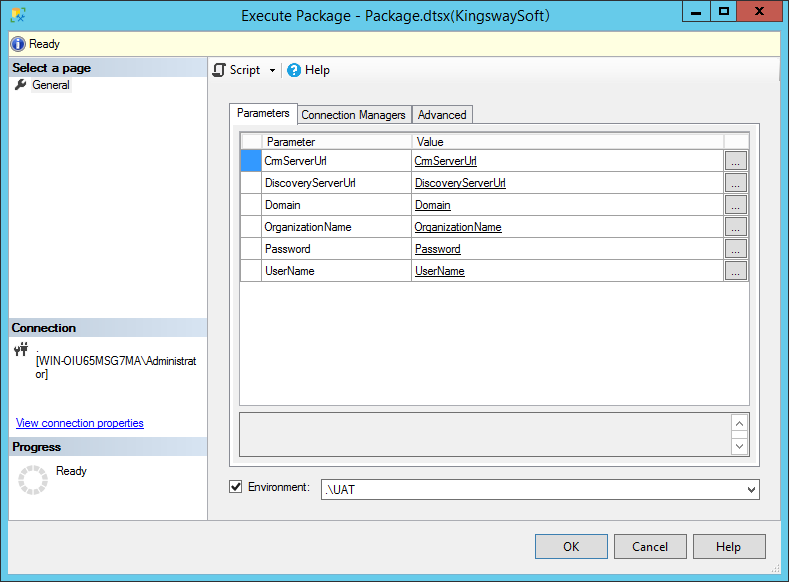
You are now ready to switch easily between the different environments whenever required. To change to a different environment while running the package directly from your SSISDB catalogue, choose the Environment from the dropdown menu; it will automatically set all the SSIS environment variables to their corresponding parameters.
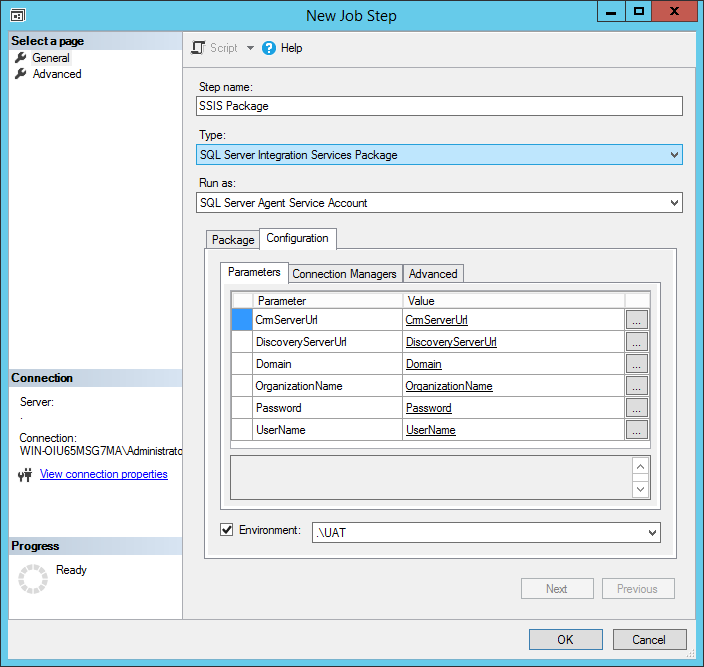
Alternatively, when creating a SQL Server Agent Job, choose the environment your package will be running under by selecting the required Environment from the dropdown menu in the Configuration tab of your SQL Server Agent Job Step.
Closing Notes
In conclusion, after parametrizing your CDS/CRM Connection Manager, and creating the necessary environments on your integration server, you should be able to execute the same SSIS package deployed to your SSISDB catalogue to integrate different CDS/CRM instances. Also, you can quickly switch to another environment without the need to open your integration package in Visual Studio and change your connection settings manually. Instead, you can directly assign new values for your parameters before attempting to execute your SSIS package directly from SSMS.
Finally, the same approach can be used to assign SSIS package variables to your ConnectionString, which can be used to dynamically connect to a different CDS/CRM instance during the runtime of your SSIS package.