Using the WordPress REST Destination Component
The REST Destination Component is an SSIS data flow pipeline component that can be used to write data to WordPress REST services.
See WordPress Rest Connection Manager for how to connect to WordPress and see WordPress REST Source Component for how to retrieve data from WordPress.
There are three configuration pages:
- General
- Columns
- Error Handling
General Page
The General page allows you to specify general settings for the REST Destination component.
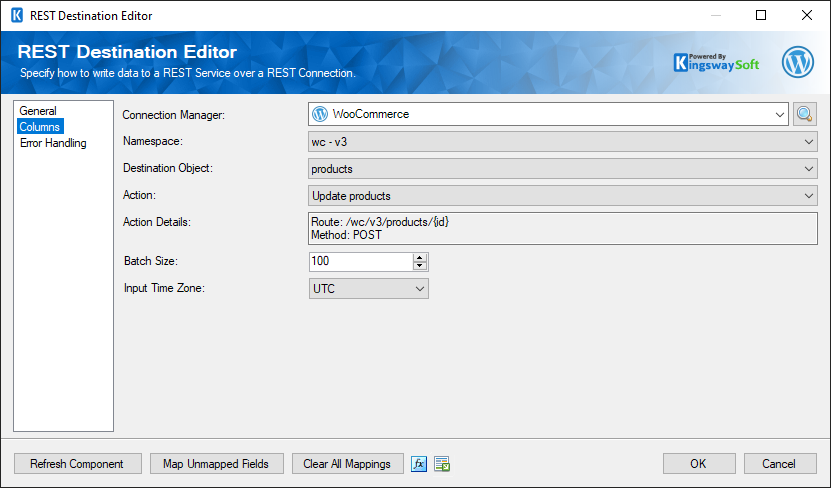
- Connection Manager
-
The destination component requires a REST connection to WordPress. The Connection Manager drop-down will show a list of all connection managers that are available to your current SSIS package.
- Search
-
Click the search button (or press Ctrl + F on your keyboard) to launch the Search Objects & Actions dialog. This dialog will open to the side of the destination editor and allows you to search for an object or action. Results are ordered by relevance. Clicking on a result will select that object or action in the destination editor.
- Namespace
-
The Namespace drop-down lists available namespaces in the WordPress instance you are connecting to. Namespaces categorize objects and actions available from various plugins installed on the WordPress instance. For example, the WooCommerce plugin has a namespace of "wc - v3".
Note: If you plan to use any of the WooCommerce Namespaces (wc - v#) you should make sure the Connection Manager selected is using one of the WooCommerce Authentication Modes.
- Destination Object
-
The Destination Object drop-down lists all available objects for the selected Namespace that you can write data to.
- Action
-
The Action option allows you to specify how data should be written to WordPress.
Note: Only Actions under the wp - v# and wc - v# (WordPress and WooCommerce) namespaces are fully supported. Others may work if the plugin implements discovery correctly.
- Action Details
-
This is a read-only property that displays the Route and HTTP Method of the currently selected Action.
- Batch Size
-
The Batch Size lets you specify how many records to send per service call to WordPress.
Note: Some objects do not support batch size, so this option will become disabled.
- Input Time Zone
-
The Input Time Zone option specifies the timezone of all incoming datetime fields. Available options are:
- UTC
- Local
- Refresh Component Button
-
Clicking the Refresh Component button causes the component to retrieve the latest metadata and update each field to its most recent metadata.
- Map Unmapped Fields Button
-
By clicking this button, the component will try to map any unmapped attributes by matching their names with the input columns from upstream components.
- Clear All Mappings Button
-
By clicking this button, the component will reset (clear) all your mappings in the destination component.
- Expression fx Icon
-
Click the blue fx icon to launch SSIS Expression Editor to enable dynamic updates of the property at run time.
- Generate Documentation Icon
-
Click the Generate Documentation icon to generate a Word document that describes the component's metadata including relevant mapping, and so on.
Utilizing the Child Input of the Destination Component
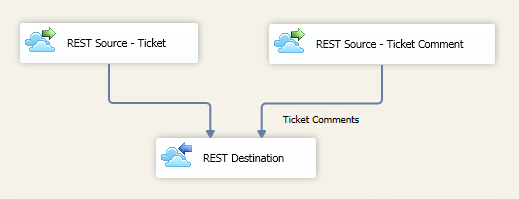
If you want to write child objects data to a parent object, you can connect an inbound component containing child objects data to the secondary inputs. Once you have made a connection to a secondary input, you must specify the REST Object you are adding in the Inputs grid on the General page.
When a child is mapped in the Inputs grid on the General page, it will be available in the select input drop-down on the Columns page. This allows for selecting input for both parent and child fields. The parent input will have a field called _LinkId which can be any string and is used to link the parent to its child object. All child inputs will have a field called _{parentObjectName}._LinkId. This field should have a value that matches the value used for the _LinkId of the parent.
Columns Page
The Columns page of the REST Destination Component allows you to map the columns from upstream components to the REST Fields. On this page, you can select the object whose columns you wish to configure in the top left drop-down.
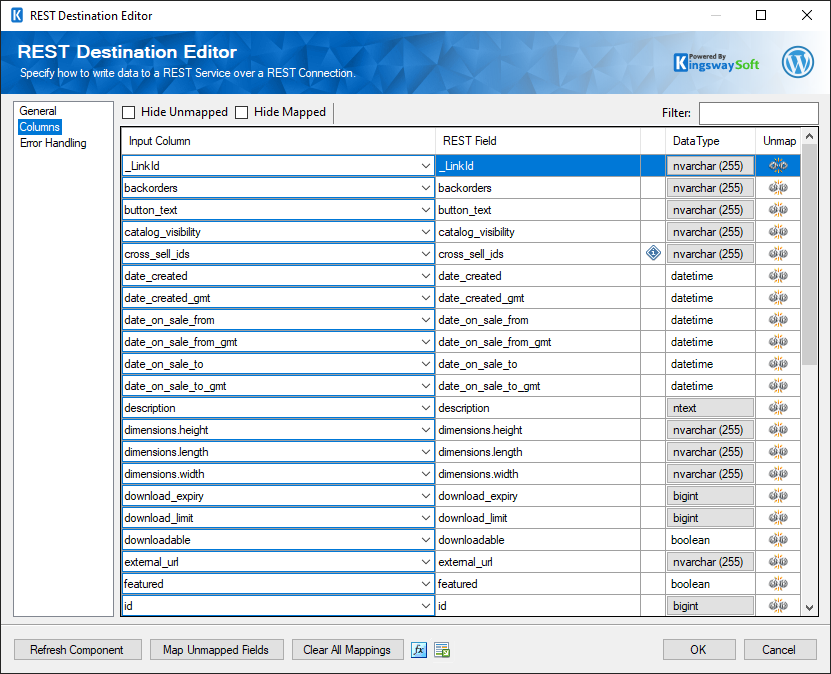
The Columns Page grid consists of:
- Input Column: You can select an input column from an upstream component for the corresponding REST Field.
- REST Field: The field that you are writing data to.
- Additional Field Details: An information icon will appear here if the column is special. Hover over the icon to see what makes the column special.
- Data Type: This column indicates the type of value for the current field.
- Unmap: This column can be used to unmap the field from the upstream input column, or otherwise it can be used to map the field to an upstream input column by matching its name if the field is not currently mapped.
Error Handling Page
The Error Handling page allows you to specify how errors should be handled when they happen.
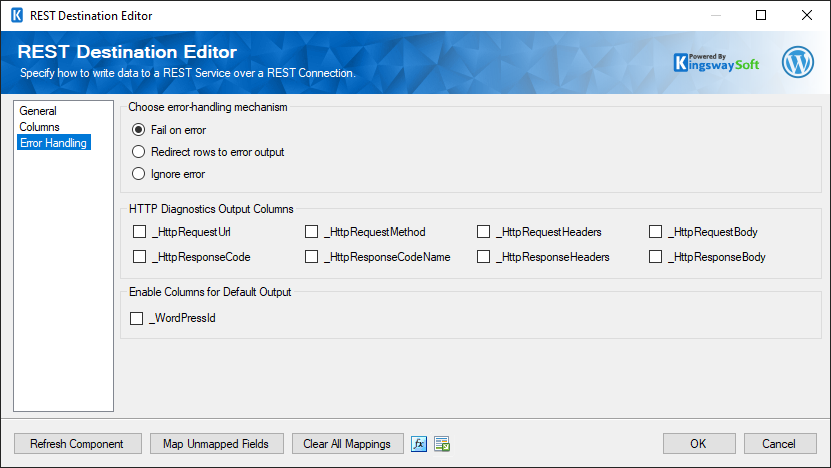
There are three options available:
- Fail on error
- Redirect rows to error output
- Ignore error
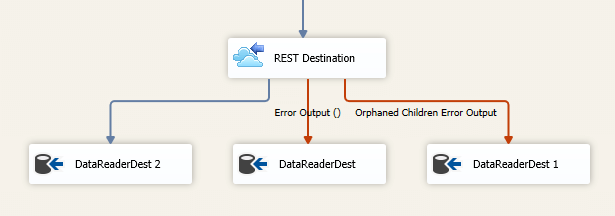
When the Redirect rows to error output option is selected, rows that failed to write to the target REST service will be redirected to the 'Error Output({PrimaryInputName})' output of the Destination Component; rows from the Child Input that failed to find the parent records will be redirected to the 'Orphaned Children Error Output' output of the Destination Component. As indicated in the screenshot below, the blue output connection represents rows that were successfully written, and the red 'Error Output{PrimaryInputName}' and 'Orphaned Children Error Output' connection represent erroneous rows.
- Error Output({PrimaryInputName})
- ErrorCode: Contains the error code that is reported by the target service or the component itself
- ErrorColumn: Contains the name of the column that is causing the error. Note that this column is not always populated
- ErrorMessage: Contains the error message that is reported by the target service or the component itself
- Orphaned Children Error Output
- ErrorCode: Contains the error code that is reported by the target service or the component itself from the Child Inputs
- ErrorColumn: Contains the name of the column that is causing the error from the Child Inputs. Note that this column is not always populated
- Input Name: Contains the name of the Child Input that is having an issue.
- Column Name: Contains the name of the column that is having an issue in the specific Child Input.
- Column Value: Contains the value of the column that is having an issue in the specific Child Input.
- Parent Input Name: Contains the Parent Input name of the specific Child Input.
- Parent Column Name: Contains the name of the column that is having an issue in the specific Parent Input.
On the Error Handling page, there is also an option that can be used to enable or disable the following output field for the destination component.
- _WordPressId: Contains the newly created WordPress record's ID, which you can use to write to log or further process using additional data flow components.
Note: If you don't plan to use this field for any further processing it is recommended to disable it. This is so you don't get any warning from SSIS complaining that the field is never used and it will also provide slightly better performance.
- HTTP Diagnostics Output Columns
-
The below columns are available on the Error Handling page in the default output in order to view and work with the HTTP requests sent by our component and the response received so that these could be used in the downstream data flow.
- _HttpRequestUrl: The URL of the request
- _HttpRequestMethod: The HTTP method of the request
- _HttpRequestHeaders: All of the HTTP headers of the request
- _HttpRequestBody: The text body of the request
- _HttpResponseCode: The HTTP status code of the response
- _HttpResponseCodeName: The name of the HTTP status code of the response
- _HttpResponseHeaders: All of the HTTP headers of the response
- _HttpResponseBody: The text body of the response