Using the XML Source Component
The XML Source Component is an SSIS source component that can be used to retrieve XML documents from an HTTP URL or a local file, break up the structure of the documents and produce column data which can then be consumed by a downstream SSIS pipeline component.
Data Source Page
The data source page determines where your XML documents are coming from. The connection manager property can either be set to an HTTP Connection Manager, a local file, or an SSIS variable.
- Connection: Local File
-
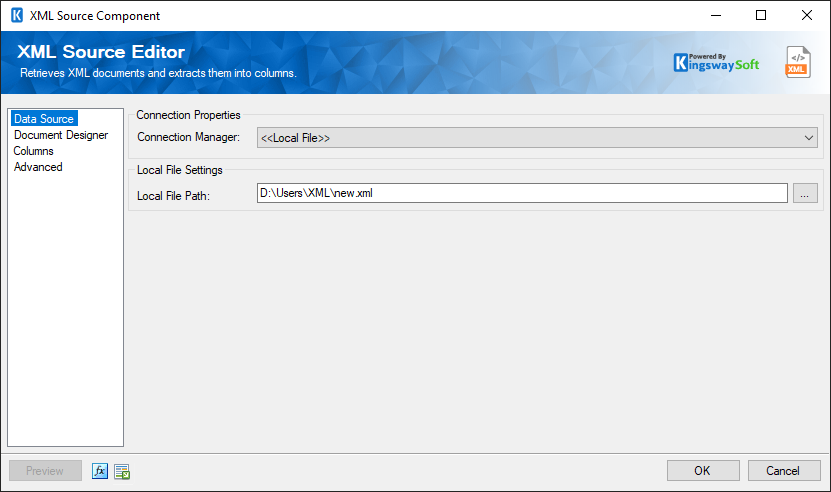
- Local File Path
-
The path on the file system to the XML document that will be extracted.
- Connection: File Content in Variable
-
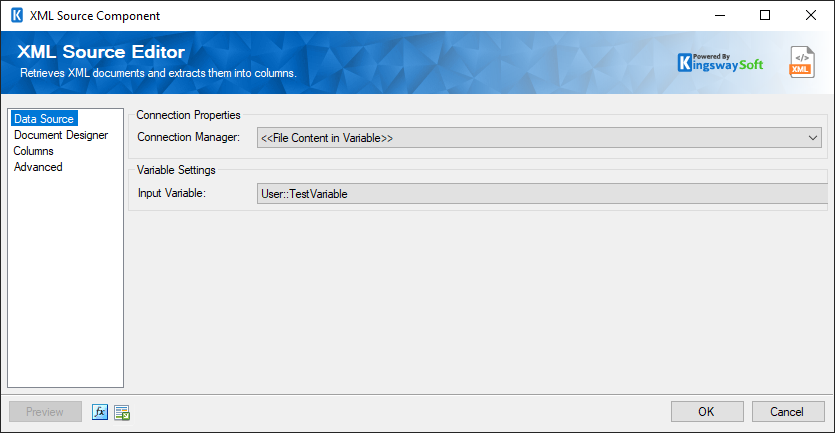
- Input Variable
-
This option allows you to select from a drop-down list an SSIS variable or parameter to which your package has access.
- Connection: HTTP Connection Manager
-
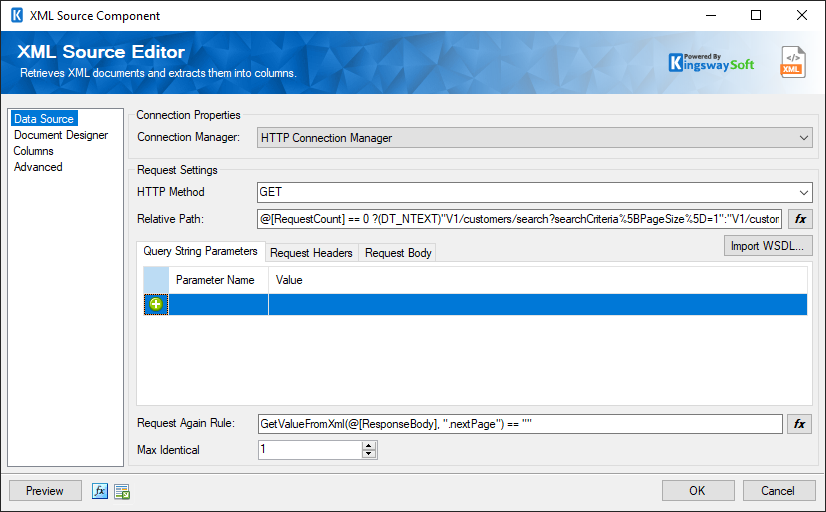
If an HTTP connection manager is selected, the UI will display request settings that are used to determine the content of HTTP requests.
- HTTP Method
-
The HTTP Method that will be used to send requests. Default methods include:
- GET
- POST
- PUT
- DELETE
- PATCH
- Relative Path
-
The Relative Path is the second part of the URL that will be used to make the HTTP request. It is combined with the base path from the connection manager to form the full path. The relative path can contain query string parameters, but they can also be added individually in the grid below.
- Query String Parameters
-
Query String Parameters that will be appended to the full path when sending HTTP requests.
- Request Headers
-
Request Headers that will be combined with the headers in the connection manager and included with HTTP requests.
- Request Body
-
The body of the HTTP request. The Request body will be disabled for GET HTTP Method.
- Import WSDL
-
Since v7.0, the XML Source component supports importing WSDL to generate SOAP requests. Clicking the Import WSDL to load the WSDL file and build your SOAP request.
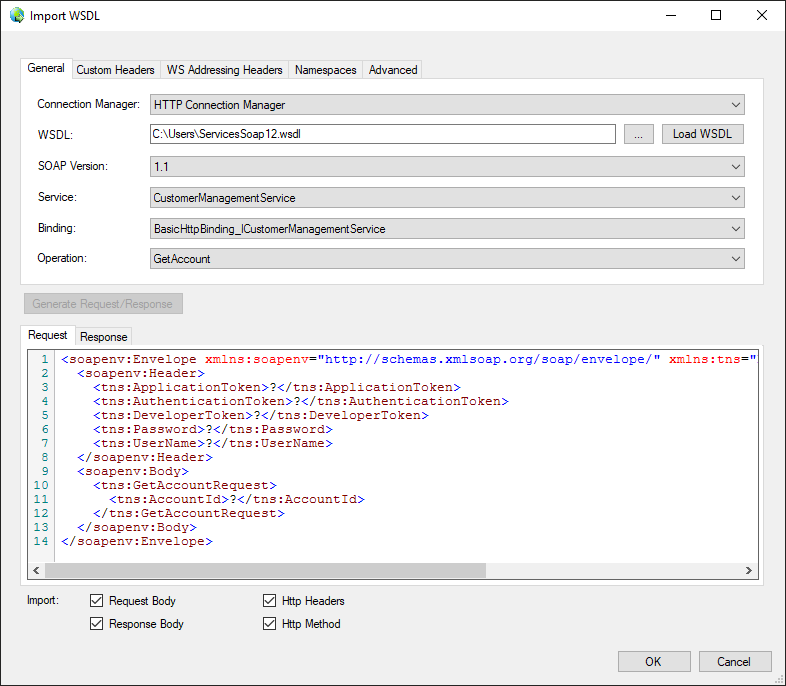
- WSDL
-
The WSDL specifies the location of the WSDL that you are trying to read from. This location can be either a location on the file system, or a URL. For example, a value of c:\wsdl\mathservice.wsdl or http://localhost:28854/MathService.svc?wsdl will both work. There is a button labeled "..." beside the source WSDL field that will launch a dialog and let you select a file from the file system. If you select a WSDL file using the open file dialog provided by the "..." button the WSDL file will automatically be loaded upon clicking OK.
- Load WSDL
-
The Load WSDL button will try to load a WSDL file from the location specified in the Source WSDL field, and it will populate the other fields in the editor with information from the loaded WSDL file. Use this button after you have entered the path of a WSDL file into the source WSDL field. If you select a WSDL file from the open file dialog provided by the "..." button the WSDL file will automatically be loaded upon clicking OK.
- SOAP Version
-
The SOAP Version option indicates the SOAP version that the target web service uses. Our component will automatically detect the SOAP version while loading the WSDL file.
- Service
-
Select a Service from the list of services contained in the web service.
- Binding
-
Select a Binding from the list of bindings contained in the service.
- Operation
-
Select an Operation from the list of operations contained in the binding.
- Custom Header
-
Custom headers can be specified in the Custom Headers grid.
- WS Addressing Headers
-
WS-Addressing Headers can be used to specify message routing data within SOAP request header per the target web service requirements. The following options are available:
- Unique Message ID (MessageID)
- Message Destination (To): Message destination URI.
- Source Endpoint (From): Source endpoint that dispatched this message
- Reply Endpoint (ReplyTo): Reply endpoint to which reply messages should be dispatched
- Fault Endpoint (FaultTo): Fault endpoint to which fault messages should be dispatched
- Action (Action): Required action.
- Relationship (RelatesTo): Message ID to which the message relates
- Namespaces
-
The namespace can be specified in the Namespaces grid. An XML namespace is a URI-based identifier used to uniquely qualify element and attribute names so they don’t conflict with similarly named elements from other schemas in the same document.
- Generate Request/Response button
-
The Generate Request/Response button allows you to populate the SOAP request/response based on the latest changes you have made in the above settings.
- Request
-
The body of the SOAP request is generated by the above settings.
- Response
-
The body of the SOAP response is generated by the above settings.
- Import
-
The Import option allows you to determine which part is going to be imported to the XML Source component. There are five options available:
- Request Body
- Response Body (Design Page)
- Http Headers
- Http Method
- Namespaces
- Request Again Rule
-
The request again rule allows paged data to be retrieved. After each request the request again rule is evaluated and if it evaluates to 'True', another request will be sent. If the rule evaluates to false or is left blank, no more requests will be sent.
- Max Identical
-
The Max Identical property will raise an error if a certain number of identical requests are sent. The purpose of this feature is to prevent accidentally sending the same request in a never-ending loop. If 0 is selected the feature will be disabled and an unlimited of identical requests can be sent.
- Preview Button
-
The Preview Button launches the Preview dialog which will send the first request based on the current settings of the component and shows a preview of the response. If there are more requests based on the value of the request again rule they can be sent and the response previewed by clicking the 'Next' button. The Preview dialog is a good way to identify HTTP configuration problems without running the package.
- Expression fx Icon
-
Click the blue fx icon to launch SSIS Expression Editor to enable dynamic updates of a property at run time.
- Generate Documentation Icon
-
Click the Generate Documentation icon to generate a Word document that describes the component's metadata including relevant mapping, and so on.
- Expression Editor
-
Many of the properties on this page can be set as either a text-merged field or an expression. Properties default to text merge mode, but can be changed to expression mode in the Expression Editor. The expression editor for a property can be launched by clicking the fx button. The expression editor has some predefined tokens:
- RequestCount
-
The number of requests that have been sent. This will be 0 on the first request and incremented by 1 after each request.
- ResponseBody
-
This is the body of the response from the previous request. On the first request it will be empty.
- GetValueFromPreviousResponseHeaders
-
This is a function that is used to the value of HTTP headers from the previous response. This function is only available in expression mode.
- ValueExistsFromPreviousResponseHeaders
-
This function returns a boolean specifying if a value of the header with a specified name exists from the response of the preceding request.
-
- AccessToken
-
Returns the access token for sending requests. The token file needs to be generated by OAuth 2 Token Generated and specified in the HTTP Connection Manager's Authentication page.
-
Returns the status code of the preceding request's response as an Integer.
- Expression Editor : Text Merge Mode
-
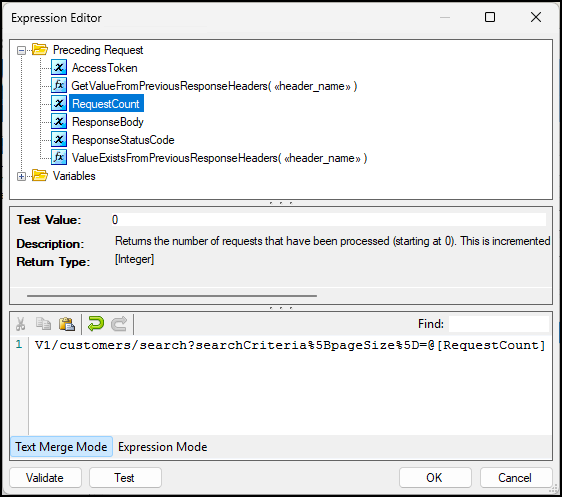
In text merge mode, property values will be whatever text was entered, but with any variables or special tokens replaced with their actual values before each HTTP request is sent.
- Expression Editor : Expression Mode
-
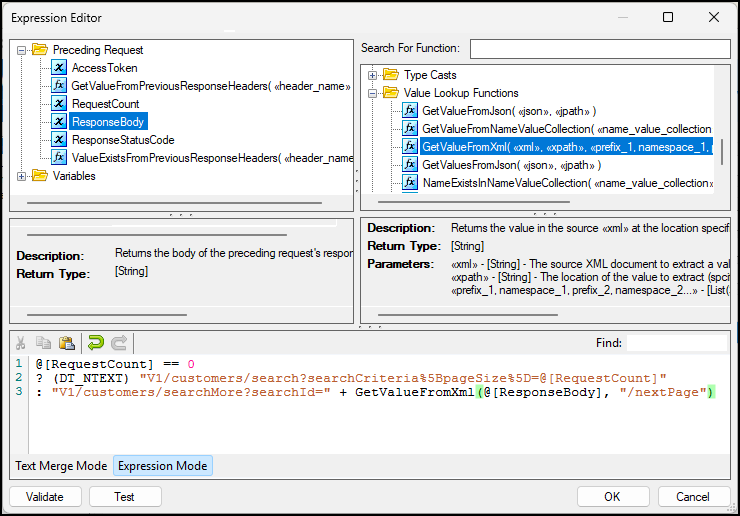
In expression mode the property is set to an expression which is evaluated before each request to determine the value of the field. Expressions can contain variables and special tokens, but also functions and conditional logic. The functions in the Value Lookup Functions category may be particularly useful for this component, as they can be used to look up values and JSON documents and HTTP headers.
Document Designer Page
The Document Designer page allows you to build the design of the document you are trying to read, or import the design from an existing document.
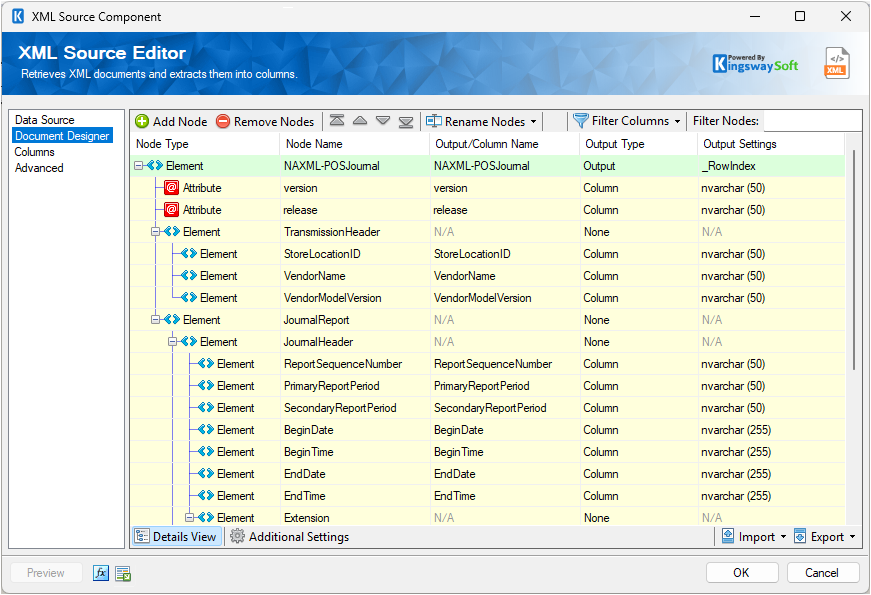
The Document Designer includes the following tabs:
- Details View
- Additional Settings
In the Details View tab, the top part of the page is used to manually configure the nodes in the design:
- Add Node: This button will add a new node to your Document design.
- Remove Nodes: This button will remove a node from your Document design.
- Direction buttons: These buttons can be used to rearrange the position of the nodes.
- Rename Nodes: This option allows you to specify how the node name should be represented.
-
- Use Qualified Names: When this option is selected, the output/column name will be set to the full qualified node name based on the node location in the document.
- Use Short Names: When this option is selected, the output/column name will be set to the given Node Name directly.
-
Filter Columns: This option allows you to show or hide certain Columns in the grid.
- Show Basic Columns: When this option is selected, only basic columns will be shown in the grid.
- Show All Columns: When this option is selected, all available columns will be shown in the grid.
- Filter Nodes: This option allows you to filter the list of nodes shown in the grid by typing a keyword in the textbox.
The Details View grid consists of:
-
Node Type: This option allows you to specify the type of the Node in your document design, there are three options available:
- Element.
- Attribute
- Raw: This type can be used when trying to retrieve data under a node exactly as it is in the document.
- Node Name: The Name of the Node in the document.
- Namespace: This option allows you to specify the Namespace to which a node belongs (Available when Show All Columns is selected).
- Output/Column Name: The name which will be set for the output or the column of a node.
- Is Repeated: This option allows you to specify if a node is repeated within a document (Available when Show All Columns is selected).
-
Output type: The type of output for a node, available options are:
- Column
- Variable
- Key Value Pivot (since v20.1)
- Output Settings: This option allows you to specify the settings of each output such as the datatype of Value Node Types.
In the Additional Settings tab, you would find the following options:
- Encoding: Specify the Encoding of the document based on the XML declaration to ensure characters are interpreted consistently.
-
Null Mode: This option allows you to specify the handling of Null values. There are 3 options:
- Don't Show
- Empty String
- xsi:nil
-
'Is Repeated' Text Qualifier: This option allows you to specify the
Text Qualifier used in a document when the
Is Repeated property is set to
True for one or more nodes. There are four options available:
- Double-quote(“)
- Single-quote (‘)
- Tick (`)
- None
-
'Is Repeated' Text Delimiter: This option allows you to specify the
Text
Delimiter used in a document when the
Is Repeated property is set to
True for one or more nodes. There are seven options available:
- Newline (\n)
- Carriage Return (\r)
- Semicolon (;)
- Colon (:)
- Comma (,)
- Tab (\t)
- Vertical Bar (|)
- Namespaces: Add and remove namespaces (by clicking the '+' and '-' buttons) and assign them prefixes. Note, the prefix does not need to match that of the incoming XML. It is simply used as an alias in XPaths that use this namespace.
- Import Namespaces...: Import Namespaces that are defined in an XML file on your local file system.
- Import
-
This option allows you to import the design of your document from one of the following sources:
- Designer Settings: Import the design from an existing .designer.settings file.
- WSDL (Local File): Import the design based on a WSDL file on your local file system.
- XML (Local File): Import the design based on an XML file on your local file system.
- XML (Web): Import the design based on the retrieved document from the connection manager.
- XSD (Local File): Import the design based on an XML Schema file on your local file system.
- Export
-
Designer Settings: This option allows you to export the current document design to a designer.settings file which can be used later to import the same design and document designer configuration.
Columns Page
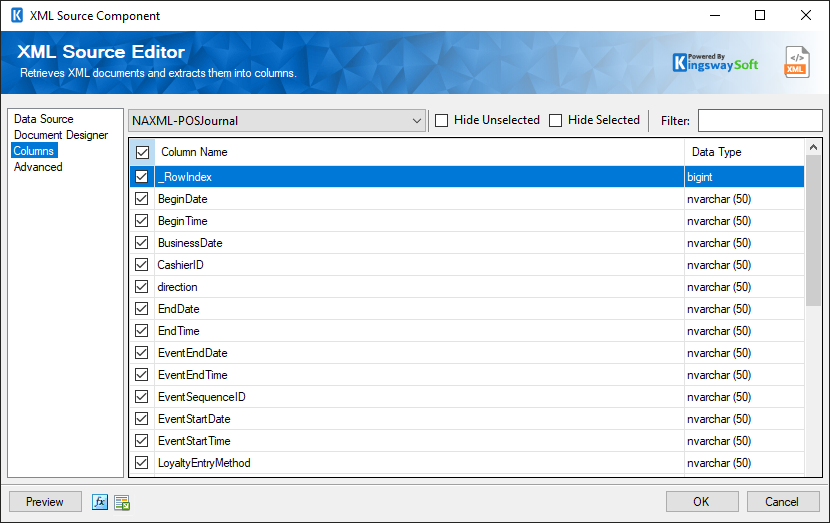
The Columns page of the XML Source Component shows you the available columns based on the settings on the Document Designer page.
-
On the top left of the grid, you can see a checkbox, which can be used to toggle the selection of all available fields. This is a productive way to check or uncheck all available fields. The Columns Page grid consists of:
- Include Field Checkbox: A checkbox that determines if the field will be available as an output column.
- Column Name: Column that will be retrieved from the document.
- Data Type: The data type of this field.
- Hide Unselected Fields
-
When the Hide Unselected Fields checkbox is checked unselected output columns will be hidden.
- Hide Selected Fields
-
When the Hide Selected Fields checkbox is checked used selected columns will be hidden.
- Filter
-
The output columns that are visible can be filtered by entering text in the Filter text box.
There are a couple of special columns to take note of:
- _RowIndex: This column contains the current count of this output node.
- _ParentKeyField: This column contains the value of this record's parent key field.
Advanced Page
The Advanced page of the XML Source Component shows you additional options when retrieving data from an XML.
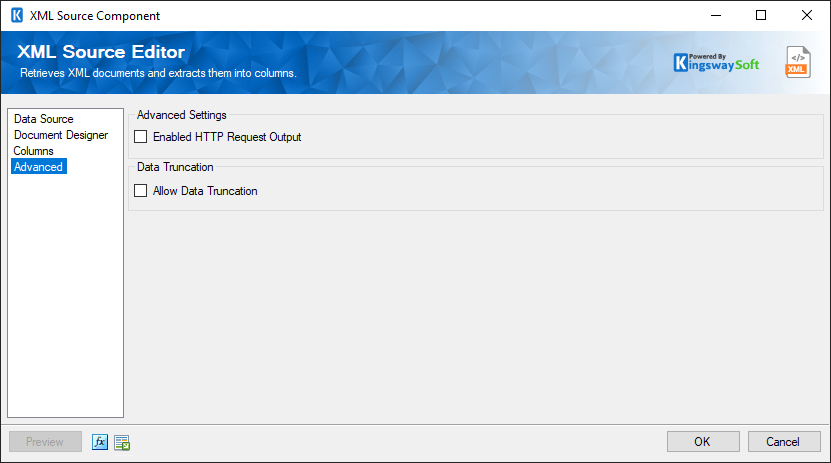
- Enable HTTP Request Output
-
This option allows you to enable the "HttpRequests" Secondary output of the component in order to return the following fields which would include all the information for each request sent and received a response:
- _HttpRequestIndex: An sequence number that indicates the order of the requests being sent.
- RequestMethod: The HTTP Method of the request.
- RequestUrl: The URL of the request.
- RequestHeaders: All the Headers defined in the sent request.
- RequestBody: The complete body of the sent request.
- ResponseCode: The HTTP Code of the received response.
- ResponseCodeName: The HTTP Code Name of the received response.
- ResponseHeaders: All the Headers returned in the received response.
- ResponseBody: The complete body of the received response.
- Allow Data Truncation
-
This option will apply to all output columns. However, in order to enable data truncation on a certain column, then you would disable this option and enable data truncation in the column's properties using the component's Advanced Editor.

