Using the Snowflake Connection Manager
The Snowflake Connection Manager is an SSIS connection manager component that can be used to establish connections with Snowflake.
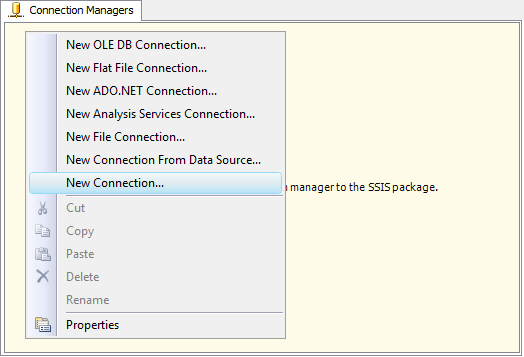
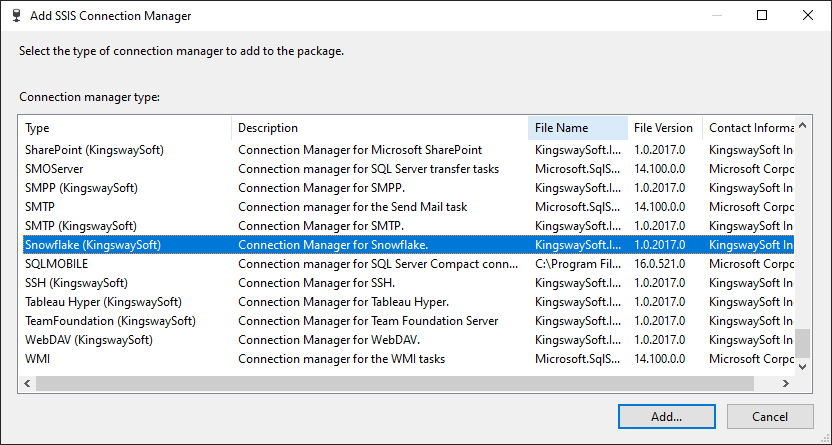
To add a Snowflake connection to your SSIS package, right-click the Connection Manager area in your Visual Studio project, and choose "New Connection..." from the context menu. You will be prompted the "Add SSIS Connection Manager" window. Select the "Snowflake" item to add the new Snowflake connection manager.
The Snowflake Connection Manager contains the following pages, which configure how you want to connect to Snowflake.
- General
- Advanced Settings
General Page
The General page on the Snowflake Connection Manager allows you to specify general settings for the connection.
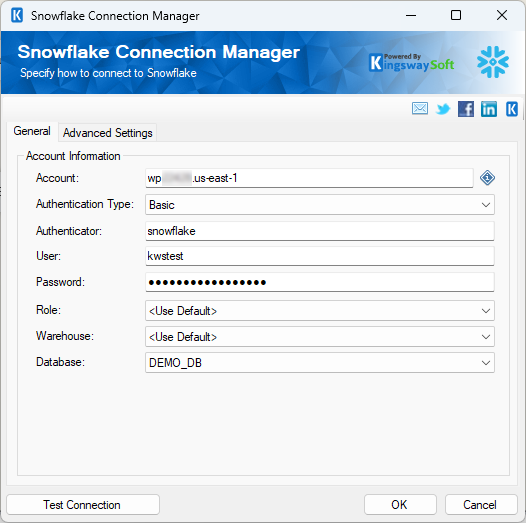
- Account Information
-
- Account
-
The Account option allows you to specify the Snowflake account you will be connecting to.
- Authentication Mode
-
There are three Authentication Modes available:
- Basic
- OAuth 2 (since v21.1)
- JWT (since v21.1)
- Basic Authentication Mode
- Authenticator
-
The authenticator option allows you to specify the Okta URL you may have, that is used to connect to your Snowflake instance.
- User
-
The User option allows you to specify the username you will be using to connect to your Snowflake instance.
- Password
-
The Password option allows you to specify the password of your user account.
- OAuth 2 Authentication Mode
- Generate Token File...
-
The Generate Token File... button completes the OAuth authentication. After you click this button simply follow the steps in the dialog to generate your token.
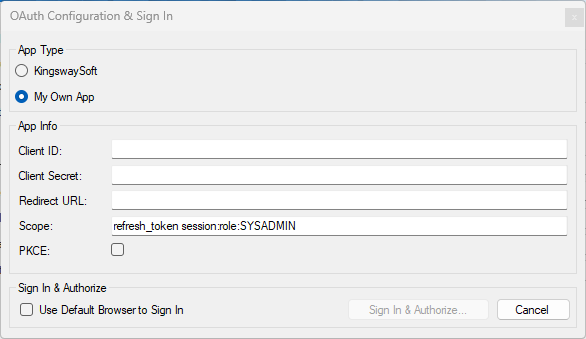
- App Type
-
- KingswaySoft App (since v25.1):
-
KingswaySoft OAuth app is a publicly shared app; it is provided so that you can test our software without going through the process of creating an app. However, it is not recommended for any production use, as we cannot guarantee that our app is always available.
- My Own App
-
Selecting this option will allow you to use your own Client ID and Secret to connect to Snowflake.
-
- Client ID: The Client ID option allows you to specify the unique ID that identifies the application making the request.
- Client Secret: The Client Secret option allows you to specify the client secret belonging to your app.
- Redirect URL: The Redirect URL option allows you to specify the Redirect URL to complete the authentication process.
- PKCE (Proof Key for Code Extension) (since v25.1.1): Ensures that the client that initiates the OAuth flow is the same client that completes the flow. This option would need to be set in the Snowflake connected app or as an org-wide option.
Path To Token File
-
The path to the token file on the file system.
Note: By default, you are using the authorization information (Client ID and Client Secret) provided by KingswaySoft for your convenience when setting up the connection; it should NEVER be used for production purposes.
Token File Password
-
The password to the token file.
-
- JWT Authentication Mode
- Path to Key File
-
The path to the private key file to use for key-pair authentication.
- Key File Password
-
The passphrase to use for decrypting the private key, if the key is encrypted.
- Role
-
The Role option allows you to specify the role to which your user will be connected.
-
- Warehouse
-
The Warehouse option is a drop-down list that allows you to pick one of the Snowflake warehouses available in your Snowflake instance.
-
You may select the database your current Snowflake session is operating in.
- Test Connection
-
After all the connection information has been provided, you may click the Test Connection button to test if the connection settings entered are valid.
Advanced Settings Page
The Advanced Settings page on the Snowflake Connection Manager allows you to specify some advanced and optional settings for the connection.

- Proxy Server Settings
-
- Proxy Mode
-
The Proxy Mode option allows you to specify how you want to configure the proxy server settings. There are three options available.
- No Proxy
- Auto-detect (Using system-configured proxy)
- Manual
- Proxy Server
-
Using the Proxy Server option allows you to specify the name of the proxy server for the connection.
- Port
-
The Port option allows you to specify the port number of the proxy server for the connection.
- Username (Proxy Server Authentication)
-
The Username option (under Proxy Server Authentication) allows you to specify the proxy user account.
- Password (Proxy Server Authentication)
-
The Password option (under Proxy Server Authentication) allows you to specify the proxy user's password.
Note: The Proxy Password is not included in the connection manager's ConnectionString property by default. This is by design for security reasons. However, you can include it in your ConnectionString if you want to parameterize your connection manager. The format would be ProxyPassword=myProxyPassword; (make sure you have a semicolon as the last character). It can be anywhere in the ConnectionString.
- Pooling (Since v25.2)
-
- Allow Connection Pooling
-
The checkbox can be used to allow a connection pooling mechanism while using the connection manager.
- Maximum Pool Size
-
The maximum pooling size can be set to specify the maximum number of connections allowed in the pool.
- Minimum Pooling Size
-
The minimum pooling size is set to specify the minimum number of connections to be maintained in the pool.
- Misc
-
- Timeout (secs)
-
The Timeout (secs) option allows you to specify a timeout value in seconds for the connection. The default value is 120 seconds.
- Ignore Certificate Errors
-
This option can be used to ignore those SSL certificate errors when connecting to the target server.
Warning: Enabling the "Ignore Certificate Errors" option is generally NOT recommended, particularly for production instances. Unless there is a strong reason to believe the connection is secure, such as the network communication is only happening in an internal infrastructure, this option should be unchecked for best security.
- Retry on Intermittent Errors
-
This is an option designed to help recover from possible intermittent outages or disruption of service, so the integration does not have to be stopped because of such temporary issues. Enabling this option will allow service calls to be retried upon certain types of failure. A service call may be retried up to 3 times before an exception is fired. Retries occur after 0 seconds, 15 seconds, and 60 seconds. Warning: although we have carefully designed this feature so that such retries should only happen when it is deemed to be safe to do so, in some extreme occasions, such retried service calls could result in the creation of duplicate data.