OAuth is a modern application authentication and authorization infrastructure that provides secure access to your application data. This is achieved through various mechanisms, one of which involves generating an access token. The token-based authentication is more secure than sharing user credentials directly with an application. A compromised token can be revoked at any time, and a new one can be created. Users can each have their own token with different access levels for each user. Another major benefit from an administration perspective is that, instead of keeping track of credentials, you can send the token file directly while providing the token password through a separate secure communication if needed.
Setting up an OAuth connection can be an involved process, as numerous steps that can be slightly confusing if you have not worked with the concept before. This blog post will walk you through the process of creating a Salesforce app for OAuth, obtaining any necessary information, and setting up a Salesforce Connection Manager to connect to your Salesforce application for integration purposes.
Note: This blog post highlights the critical transition away from legacy Salesforce authentication, specifically the SOAP API login() method and the retirement of legacy Connected Apps. To maintain secure and uninterrupted data synchronization, it is essential to move toward modern OAuth2.0 authentication as soon as possible by implementing External Client Apps as recommended by Salesforce. External Client Apps (ECA) securely connect integrations to Salesforce using standardized protocols like OAuth and SAML. If you had previously configured the Salesforce connection manager using legacy basic authentication, your connection will immediately fail when you upgrade to our recent 2026 release wave 1 (v26.1), it will throw the below error.
System.Web.Services.Protocols.SoapException: INVALID_OPERATION:The SOAP Login operation is not available in the API version specified (66.0).
If you continue to use an earlier release of our software (v25.2 or before), you will have some additional time until 2027 to update your integration connection. However, the clock is clicking, it is important to make the changes the sooner the better. The good news is, our Salesforce integration components support modern OAuth authentication in both SOAP and REST connections, there is no additional effort required in your SSIS packages, otherwise simply changing the connection to use the new OAuth option.
There are two kinds of OAuth client apps that you can create within Salesforce:
- External Client App (also referred to as ECA)
- Connected App - This has been deprecated, but it might still be available in your Salesforce instance
In the sections below, we will talk about both options, but you should always go for the External Client App option if you can.
Creating Salesforce External Client App
-
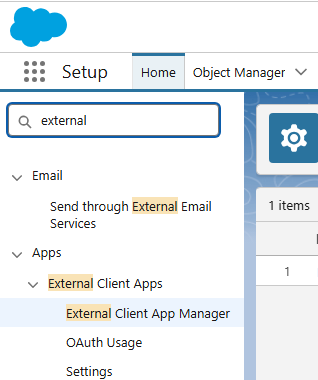
Login to your Salesforce instance, and search in "Quick Find" for External Client App Manager.
-
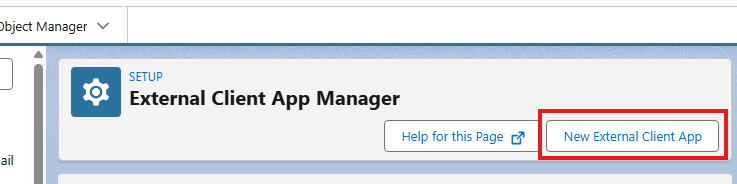
In the External Client App Manager page, click on "New External Client App". This is where you would create the new ECA credentials and other settings associated with it.
-
In the Setup page, under the Settings Tab, you can fill in the basic information such as the External Client App Name, API Name, Contact Email, etc. There is also optional information that you could provide as required.

-
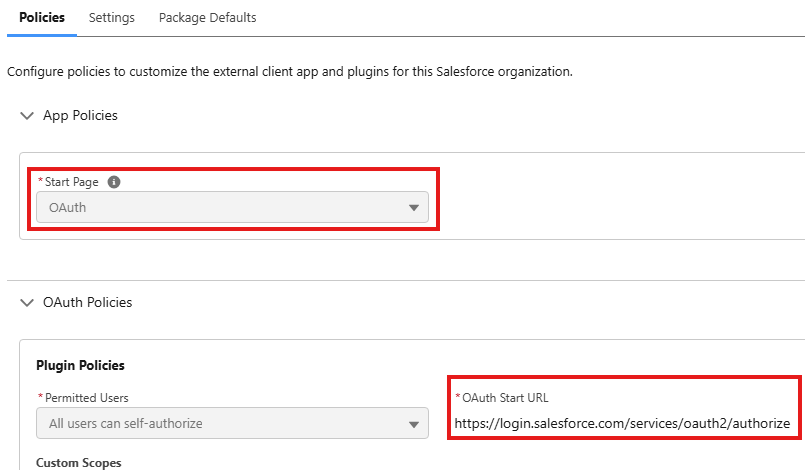
Prior to the Settings tab, there is a Policies tab, in which you can choose your Start Page. In our case, for OAuth authentication, you would choose OAuth. And under OAuth Policies, provide the Permitted Users from the drop down, along with the OAuth Start URL (which would generally be the authorization URL).
-
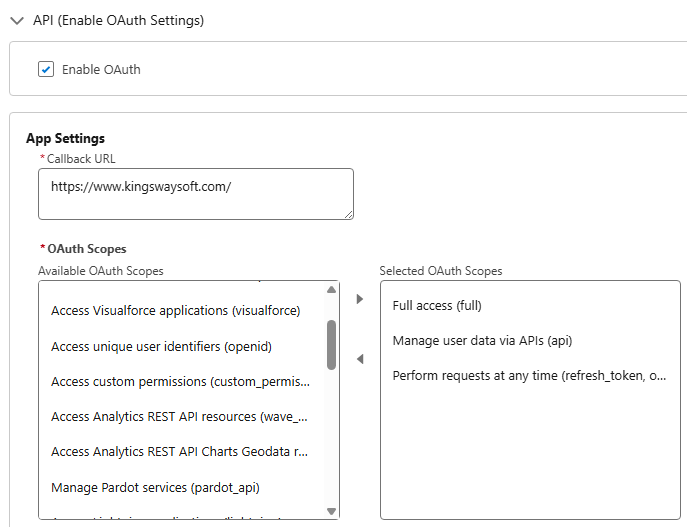
Back in Settings tab, under OAuth Settings section, check 'Enable OAuth". And then under App Settings, define the Callback URL. The Callback URL (or Redirect URL) would be generally a generic/standalone HTTP(s) URL that you would provide in OAuth flow to receive the issued access authorization code. The general recommendation of the URL is that it should be a URL that you can trust since it will receive the authorization code when the authentication process is completed, and you want to ensure the URL does not perform any redirection on its own when reached, as doing so the authorization code will likely get lost after the redirection. In addition to the redirect URL option, you need to specify the required Scopes accordingly, as shown below.
-
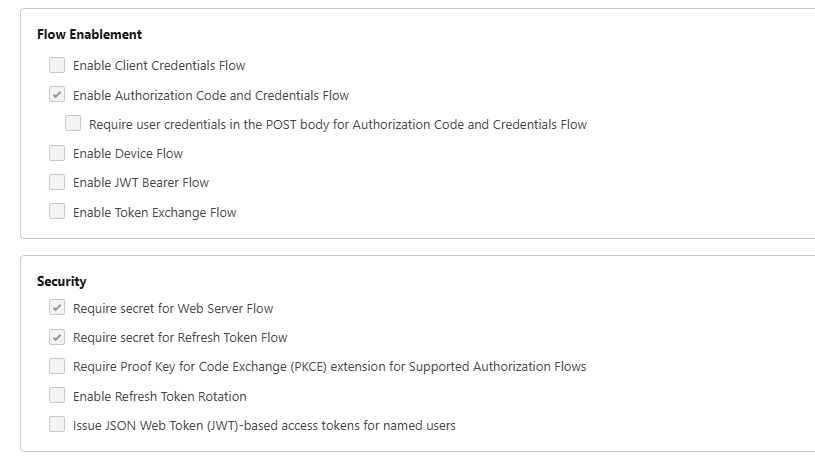
Under the Flow Enablement section, check the option "Enable Authorization Code and Credentials Flow". And for Security section, you can enable PKCE (Proof Key for Code Exchange) option for enhanced security, if it is desired as per your security standard.
-
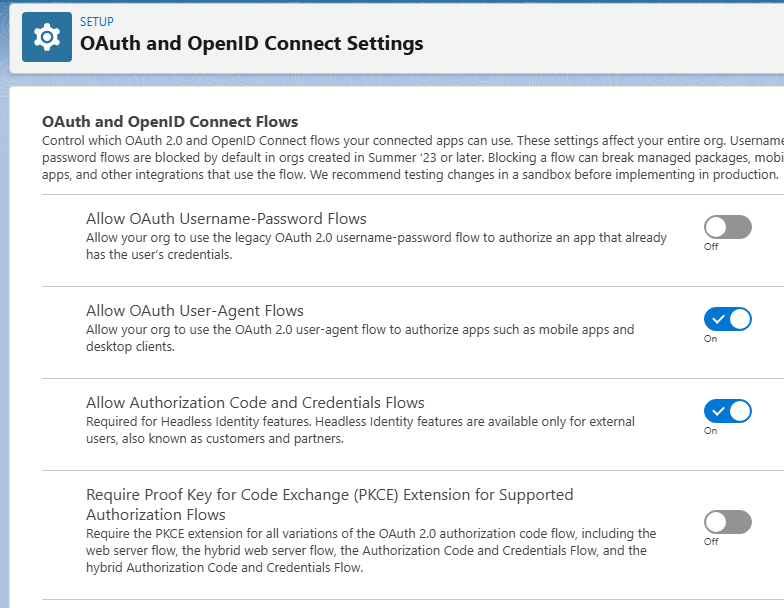
As an important note, at this point, in order to verify if PKCE is required in your Organization level, OR if you wish to enable it, you can navigate to "OAuth and OpenID Connect Settings" from the Quick Find search, and either verify or enable/disable the options.
-
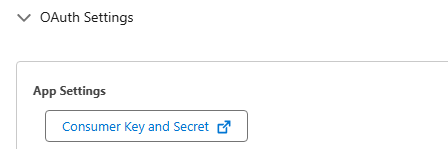
Back in the External Client App page, now that you are done with the ECA setup, you can click on "Consumer Key and Secret" under App Settings.
-
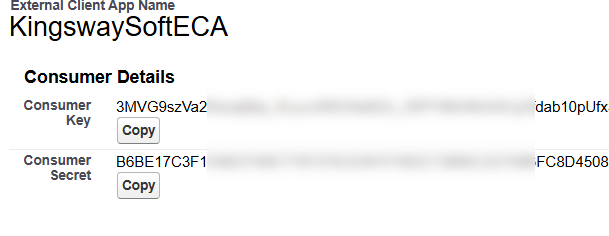
This will open a new window and show the Key and Secret which you can copy. This is what you would be using as Client ID and Client Secret, respectively, in our SSIS Salesforce connection manager later on.
Creating Salesforce Connected App (Deprecated)
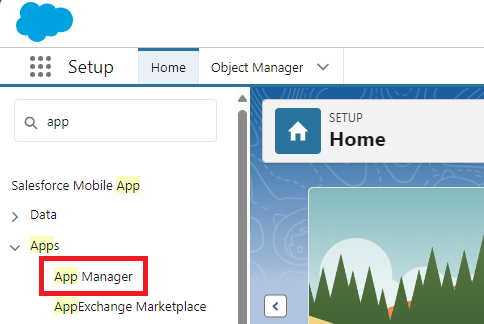
- Log in to your Salesforce account and search for your App Manager in the Quick Find Box.
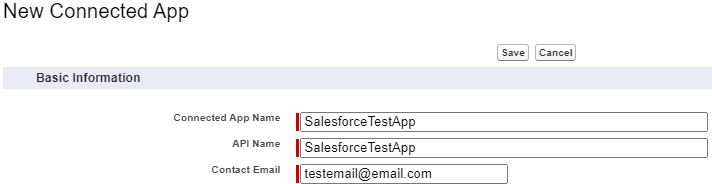
- In the App Manager, click on the “New Connected App” button.

- Give your app a name and a contact email. The name will be displayed in the App Manager. Please ensure that the name is unique within your organization.
- Next, under the API Tab, check the
Enable OAuth Settings. Make sure that you enter a callback URL. The callback URL is the same as the OAuth redirect URI. The callback URL is the URL to which the user is redirected after successful authorization. You can provide any valid HTTPS URL; however, ensure it is a URL without redirects.
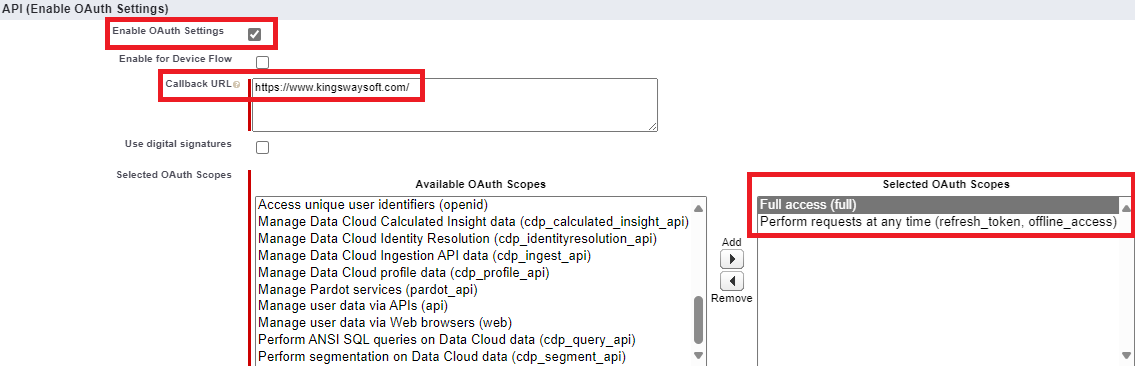
- After this, you need to select the OAuth scopes to apply for the app. You can do this by selecting the available OAuth scopes and adding them to the right side. Make sure you are adding the appropriate OAuth scopes, as the OAuth scopes define the permissions that are granted for the app. In this example, we have given “Full access” and "Perform requests on your behalf at any time" scopes. The "Perform requests on your behalf at any time" scope is used to get a refresh token. The refresh token will help refresh your access automatically, so you don't have to re-authenticate every time.
- Lastly, click Save. You have successfully created your Salesforce app.
- To get your client credentials, you need to go back to your App Manager. You can then go to the App that you just created. Click on the drop-down menu and select "
View".
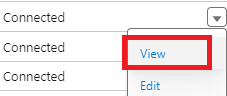
- This will allow you to open the app and view all its settings and configurations.

It will show the Scopes that you have given the app and the Callback URL.
- Next, press the Manage Consumer Details; it will take you to another page showing the Consumer Key and Secret. You may be required to validate your identity. Salesforce will send a verification code to your email.

Configuring Salesforce Connection Manager In SSIS
After creating either of the app above, you may now head to your SSIS development environment to create your Salesforce Connection.
Our Salesforce Connection Manager supports both SOAP and REST Service Endpoints to connect with the Salesforce API using OAuth. However, in this example, we will be using REST. You will then need to provide the Instance Type. There are three options available:
- Production
- Sandbox
- Other: this Instance Type would be used when the Service URL we generate in the Service URL window does not fully match the instance you want to connect to. In this case, the field is unlocked for editing.
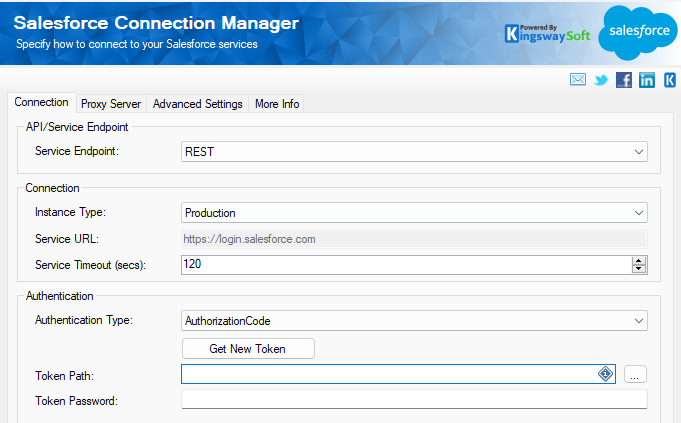
Finally, we will set the authentication type to AuthorizationCode.
You will then click "Get New Token" and enter the details from the previous steps to authorize and generate the token.
Since we created a Salesforce App earlier in the blog post, we will use the option My Own App. The KingswaySoft App is a publicly shared app that we provide for testing purposes; we don't generally recommend using our shared app for production use.
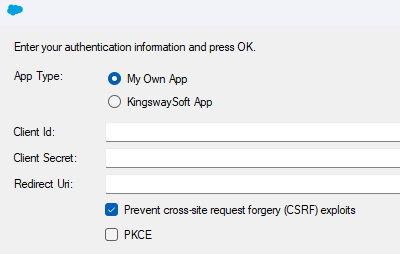
- Client ID: You can find the client ID in step 9 as the Consumer Key.
- Client Secret: You can find the Client Secret in step 9 as the Consumer Secret.
- Redirect URl: The URI was provided in step 4 as the Callback URL.
Please note that your Salesforce Administrator has enabled the Require Proof Key for Code Exchange (PKCE) Extension on an Org-wide level, or you can select the Require Proof Key for Code Exchange (PKCE) extension when creating the Salesforce app.
After clicking OK, you will be prompted to log into your Salesforce account, which will then redirect you to your redirect URL. The URL will contain a code. You need to copy the entire URL and paste it into the component.

Finally, you will be prompted to set a password for the token file before it is saved. After this, the process will be completed. You can test the connection using the "Test Connection" button to verify if you can access the instance. Press OK to save the configuration you have created.
In addition to the Authorization Code authentication option, we also support the following additional OAuth authentication options.
- Client Credentials with Certificate
- Client Credentials (Server-to-Server Authentication
- Client Credentials with Username and Password
The use of those options is covered in our online help manual page.
Closing Notes
We hope this has been helpful. In this blog post, we have covered the setup for the app required in Salesforce, along with obtaining your client ID, client secret, and generating the token file in the Salesforce Connection Manager. We have also explained how OAuth works and the benefits of using it as an authentication method over legacy authentication. In this blog post, our focus was on the Authorization Code authentication type for OAuth; however, our component also supports the Certificate OAuth type. You can take a look at our help manual for more information.