Using the SharePoint Destination Component
The SharePoint Destination Component is an SSIS data flow pipeline component that can be used to write data to a destination Microsoft SharePoint server. You may Create, Update, Delete, CreateFolder, CheckIn, CheckOut, or Moderate SharePoint list items using the SharePoint Destination Component.
The SharePoint Destination Component includes the following three pages to configure how you want to write data to Microsoft SharePoint server.
- General
- Columns
- Error Handling
The General page is used to specify general settings for the SharePoint destination component. The Columns page allows you to map the columns from upstream components to SharePoint list fields in the destination entity. The Error Handling page allows you to specify how errors should be handled when they occur.
General Page
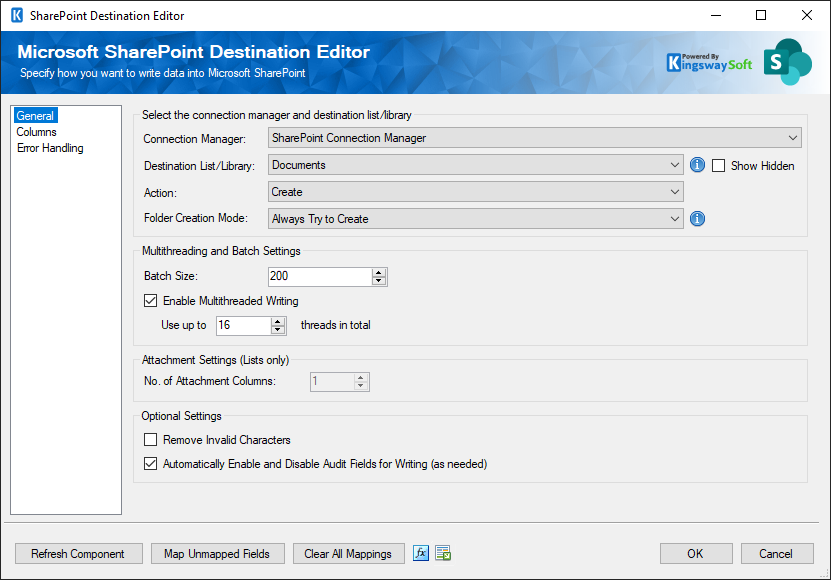
The General page of the SharePoint Destination Component allows you to specify general settings for the component.
- SharePoint Connection Manager
-
The SharePoint destination component requires a SharePoint connection in order to be able to connect to the Microsoft SharePoint server. The SharePoint Connection Manager option will show all SharePoint connection managers that have been created in the current SSIS package.
- Destination List
-
The SharePoint List option allows you to specify which SharePoint list or document library to write data to.
- Show Hidden
-
The Show Hidden checkbox, when checked, allows you to see hidden SharePoint lists and document libraries.
- Use Recycle Bin (Soft Delete) - Available since v26.1
-
The checkbox allows the deleted records will be sent to the recycle bin, which makes the items or files recoverable.
- Actions
-
The Action option allows you to specify how data should be written to the Microsoft SharePoint server. There are currently seven (7) supported action types available.
- Create: Create new record(s) in SharePoint
- Update: Update existing record(s) in SharePoint
- Delete: Delete record(s) from SharePoint
- CreateFolder: Creates folder structure without writing any records or documents in SharePoint
- CheckIn: Check in record(s) in SharePoint
- CheckOut: Check out record(s) in SharePoint
- Moderate: Perform content approval in SharePoint.
- Input Timezone
-
The Input Timezone option lets you specify how all datetime fields should be written. Available options are:
- Local System Time
- UTC
- Folder Creation Mode (since v21.1)
-
The Folder Creation Mode option allows you to choose the mode for creating folders on-the-fly while processing the incoming rows.
-
- Always Try to Create: default option. Will attempt to create the folder structure for each record received using a try-and-error approach and a local cache.
- Create Based on Full Cache: recommended option if the folder structure has not been created in the target list or library. This option will populate the full cache for the folder structure in the target list or library, and the overhead can be substantial if the target contains a significant number of records.
- Create Based on Folder-level Cache: this option will build the folder structure cache on an individual folder level instead of the entire list or library. Strength: performant option compared with “Create based on Full Cache” option. Weakness: this option may cause “list view threshold” error when a particular folder contains a significant number of records. If the error is ever encountered, switch to one of the above two options.
- No Folder Creation: recommended option when you are certain that your folder structure has already been populated in the target list or library, in which case it will offer the best writing performance.
- Batch Size
-
The Batch Size option allows you to specify how many records you want to submit to the SharePoint web service each time.
- Enable Multithreaded Writing (since v6.1)
-
Since the v6.1 release, we added support for the Multi-threading feature, which allows you to perform multi-threading when writing data to SharePoint. To configure the Multi-threading feature, you can check the Enable Multithreaded Writing option in the SharePoint Destination Component. The default number is 16.
Note: This option supports a maximum number of 100 threads when writing to SharePoint. We generally recommend 20 or lower to avoid potential server errors. However, you can adjust these settings based on your environment in order to get the best performance.
Note: When this option is enabled, the record order may not be maintained from the upstream pipeline component.
- No. of Attachment Columns
-
If you wish to upload attachments to the SharePoint list items that you create, you can specify the maximum number of attachments per list item to create. SSIS input columns will be created based on the number specified here. Each attachment column will be named KWS_Attachment_#, where # is a number. A column called KWS_Attachment_#_FileName will also be created to let you specify the file name of the file that you want to upload. If you specified a SharePoint document library, this value defaults to 1. SSIS input columns created can be used as input for upstream components.
- Remove Invalid Characters
-
When enabled, the Remove Invalid Characters option will remove any invalid characters from the input which can avoid an XML exception when the components try to construct the SOAP request to be sent to SharePoint. Those invalid characters are usually not accepted by SharePoint even posted.
- Automatically Enable and Disable Audit Fields for Writing (since v7.1)
-
When enabled, the destination component will automatically enable those applicable audit fields (if any are selected) for writing before the process. As soon as all the records have been processed, the component will automatically disable them for writing - this way we keep the user behavior impact to a minimum. Note that when you depend on this feature, you should not use multiple SharePoint destination components to write to the same SharePoint list or library simultaneously with this option enabled, as there is no way to guarantee that all components finish the process at exactly the same time.
- Refresh Component Button
-
Clicking the Refresh Component button causes the component to retrieve the latest metadata and update each field to its most recent metadata.
- Map Unmapped Fields Button
-
By clicking this button, the component will try to map any unmapped fields by matching their names with the input columns from upstream components. This is useful when your source component has recently added more columns, in which case you can use this button to automatically establish the association between input columns and unmapped fields.
- Clear All Mappings Button
-
By clicking this button, the component will reset all your mappings in the destination component.
Columns Page
The Columns page of the SharePoint Destination Component allows you to map the columns from upstream components to SharePoint list fields for the destination entity.
On the Columns page, you would see a grid that contains three columns as shown below.
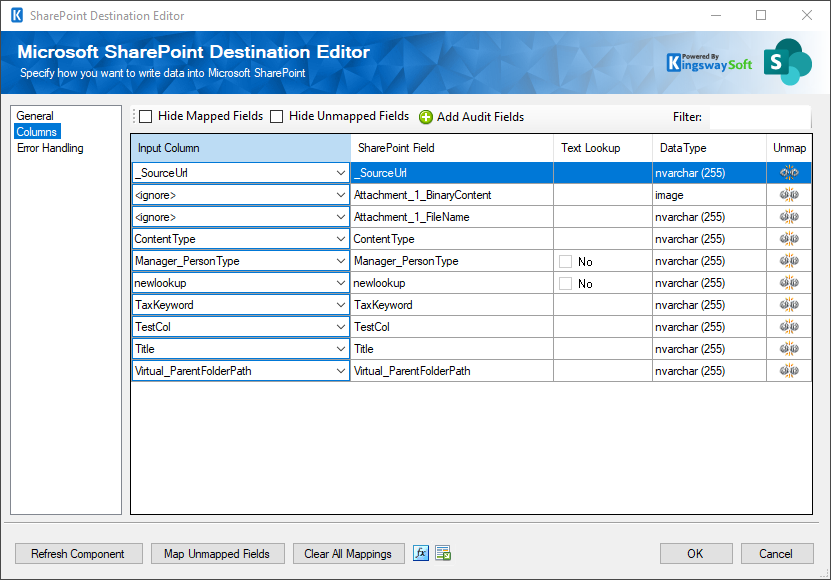
- Input Column: You can select an input column from an upstream component for the corresponding SharePoint field.
- SharePoint Field: The SharePoint list field that you are writing data to.
- Data Type: This column indicates the type of value for the current SharePoint list field.
Working with Special Fields
There are some special fields in our software that require special attention when writing to them.
- Virtual_LocalRelativePath Field: this is a special field we added in our software that allows you to specify a local path when writing to the destination list or document library. This is mostly been used for SharePoint document libraries to facilitate writing hierarchical data. To specify the root level of the Destination List, write '/' to this field. This replaces the FileRef field in version 2.x and below.
- Attachment_x_FileName: this is the name field of the attachments for Document Libraries and Lists. The x represents the number of attachments you are trying to create. You would specify the number of attachments in the General page of the SharePoint Destination Component in the Attachment Settings (Lists only) option. For Document Library, you may only specify one.
- Attachment_x_BinaryContent: this is the image file field of the attachments for Document Libraries and Lists. The x represents the number of attachments you are trying to create. You would specify the number of attachments in the General page of the SharePoint Destination Component in the Attachment Settings (Lists only) option.
- Taxonomy Field: this managed metadata field is a special lookup field in SharePoint. When writing to this field, you can pass in the text value of the taxonomy item, and our software will perform an implicit lookup.
Writing to Audit Fields
It is possible to write data to audit fields in SharePoint. Since our v5.1 release, we have added the support of enabling those auditing fields for writing. To do this, you would click the "Add Audit Fields" button i the destination component's Columns page, which will bring you to the following screen.
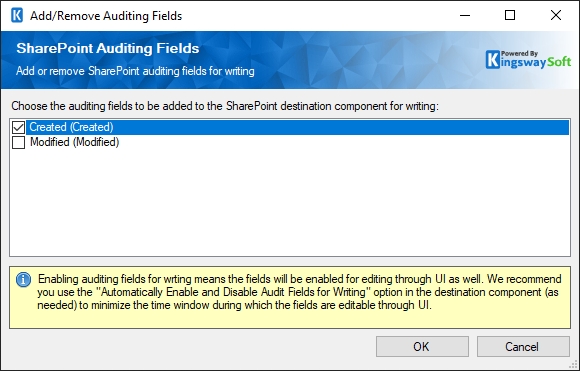
Depending on the chosen destination list, the available fields in the list can be different. If the destination list is a document library, only the fields will be available.
- Created
- Modified
Working with Text Lookup Feature
The Text Lookup Feature allows you to perform lookup based on the text values of the target object. To configure the Text Lookup feature, click the ellipse button in the Text Lookup column which is available on SharePoint Destination Component's mapping page. You will be presented with the following screen:
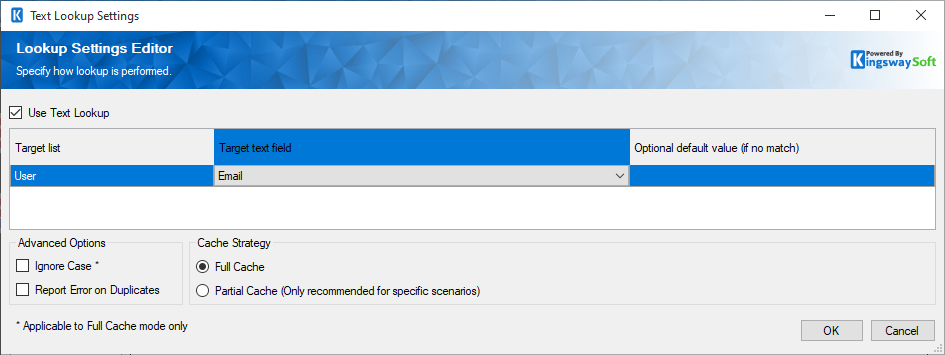
You can configure the Text Lookup setting by toggling the Use Text Lookup option. When you have checked the Use Text Lookup option, you will see a list of the target objects for the involved lookup field.
By using the Text Lookup option, you can specifically choose which text field should be used for the lookup purpose. You will be presented with a list of the target object for the lookup field. In this list, you will be able to see the following options.
- Target text/integer field: You can choose a text or integer field that will be used for the lookup purpose.
- Optional default value (if no match): When specified, the component will use this default value to perform the lookup should the input value lookup fail.
Note: In order for the Text Lookup feature to work efficiently, we populate an internal cache when a lookup is first requested. The cache is created by querying data from the target object, which would consume some SharePoint API calls.
In addition to the above settings, the Text Lookup feature also offers the following additional advanced options.
- Ignore case: When chosen, the Text Lookup will perform a case-insensitive lookup. For instance, "ABC Company" will be treated the same as "abc company".
- Report error on duplicates: When chosen, the Text Lookup feature will report an error when a duplicate is encountered at the time the lookup cache is populated.
-
Cache Strategy: You can choose from one of the two options:
- Full Cache: When chosen, the component will populate a full cache of all records from the lookup object before the lookup. This is generally the preferred option for the text lookup feature, particularly when the number of records in the lookup entity is small. This option is the default mode.
- Partial Cache: When chosen, the component will gradually build up lookup cache as the data load progresses. This is the preferred option when the number of records in lookup objects is significantly large. For instance, if you have more than a few hundred thousand records in the lookup entity, and you are only processing a few dozen records for your primary object, Partial Cache mode would provide better performance in this kind of case.
Note: If duplicates are found when populating the lookup cache, the first one will be chosen.
Note: Since the v7.0 release, we added support for the multi-value lookup column in the SharePoint Destination Component, which allows you to write to the SharePoint lookup column with the "Allow multiple values" option enabled. To write to this type of field, just separate the lookup values with a semi-colon ";". For example, value1;value2;value3.
Error Handling page
The Error Handling page allows you to specify how errors should be handled when they happen.
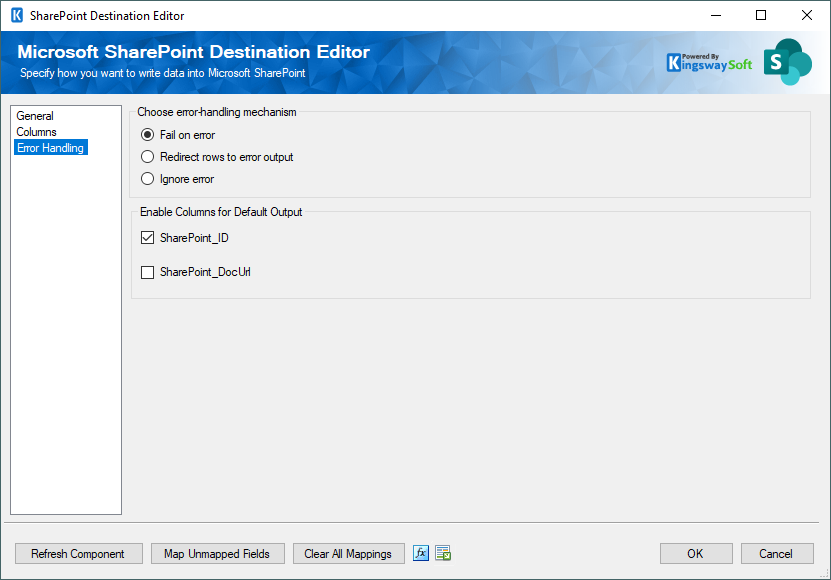
There are three options available.
- Fail on error
- Redirect rows to error output
- Ignore error
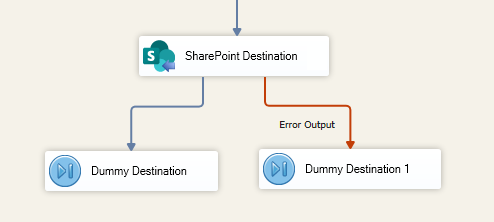
When the Redirect rows to error output option is selected, rows that failed to write to SharePoint will be redirected to the 'Error Output' of the Destination Component. As indicated in the screenshot below, the green output connection represents rows that were successfully written, and the red 'Error Output' connection represents erroneous rows. The 'SPErrorMessage' output column found in the 'Error Output' may contain the error message that was reported by SharePoint or the component itself.
Note: Use extra caution when selecting Ignore error option, since the component will remain silent for any errors that have occurred.
Additional Components - Premium File Pack
In addition to the SSIS SharePoint Components listed above, the SSIS Integration Toolkit for Microsoft SharePoint software is also shipped with the support of some common functionalities of our Premium File Pack from the SSIS Productivity Pack, which includes additional SSIS components and tasks:
- Premium Excel Source Component
- Premium Excel Destination Component
- Premium File System Source Component
- Premium File System Destination Component
- Premium Flat File Source Component
- Premium Flat File Destination Component
- Premium File Transfer Task Component