Using the SharePoint Connection Manager
SharePoint Connection Manager is an SSIS connection manager that can be used to establish connections with Microsoft SharePoint's Web Services. The SharePoint connection manager allows you to specify how you want to connect to your SharePoint server.
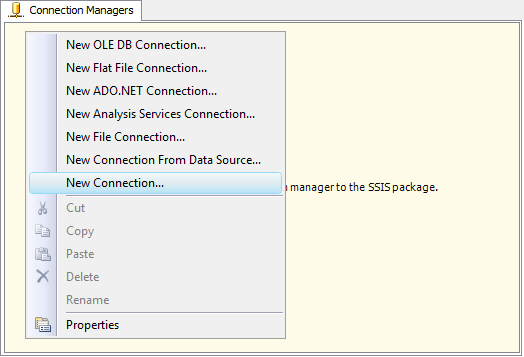
To add a SharePoint connection to your SSIS package, right-click in the Connection Manager area, and choose "New Connection..." from the context menu.
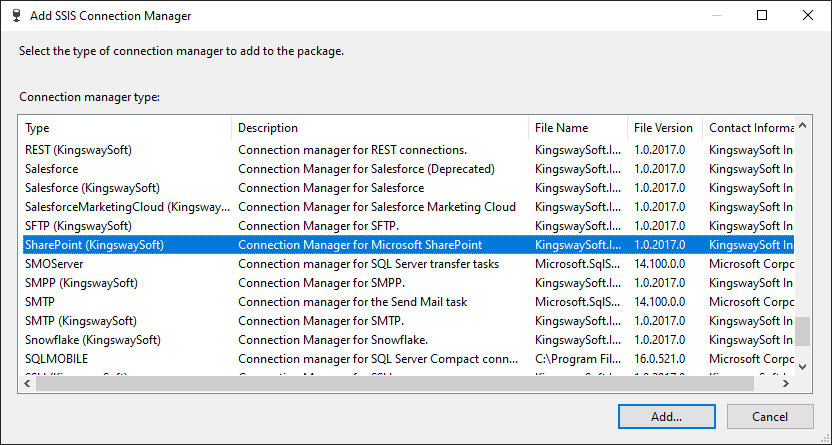
You will be prompted the "Add SSIS Connection Manager" window where you can select the "SharePoint (KingswaySoft)" item to add.
The SharePoint Connection Manager contains the following three pages which configure how you want to connect to the Microsoft SharePoint server:
- General
- Advanced Settings
- More Info
General page
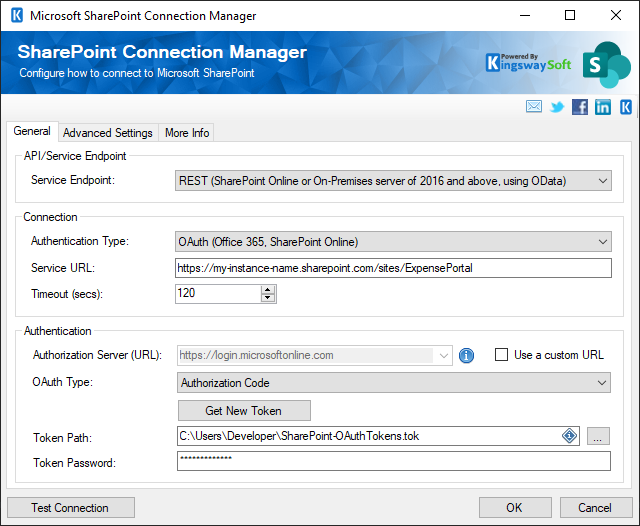
The General page on the SharePoint Connection Manager allows you to specify general settings for the connection. Please note that we support two Service Endpoints as follows:
- REST (SharePoint Online or On-Premises server of 2016 and above, using OData)
- SOAP (Most SharePoint Online, On-Premises, and Federated Server Installations)
It is worth noting that REST should be the preferred option for the connection. Between the two service endpoints, there are some subtle metadata differences, so if you make a change to the connection manager, you should ideally refresh each component that uses the connection manager.
Depending on the service endpoint that you have chosen, the General page will show some different configurations as explained below.
REST Service Endpoint
- Connection
-
- Authentication Type
-
The Authentication Type option allows you to specify the deployment type of your SharePoint server and what authentication is used. The following options are available:
- Active Directory (On-Premises)
- OAuth (Office365, SharePoint Online)
- Service URL
-
Using the Service URL option, you should provide your SharePoint site URL which you use to access the site.
- Timeout (secs)
-
The Timeout (secs) option allows you to specify a timeout value in seconds for the connection. The default value is 120 seconds.
- Authentication
-
- Use Integrated Authentication (Only for Active Directory authentication type)
-
This checkbox specifies whether you want to use Integration Authentication or provide separate login credentials.
- User Name (Only for Active Directory authentication type)
-
The User Name option allows you to specify the user account that you want to use to connect to your SharePoint server. Depending on how the SharePoint connection is used, the user account needs to have proper privileges in your SharePoint system.
- Password (Only for Active Directory authentication type)
-
The Password option allows you to specify the password for the above user account in order to log in to your SharePoint server.
Note: The Password is not included in the SharePoint connection manager's ConnectionString property by default. This is done by design for security reasons. However, you can include it in your ConnectionString if you want to parameterize your connection manager. The format would be Password=myPassword; (make sure you have a semicolon as the last character). It can be anywhere in the ConnectionString.
- Domain (Only for Active Directory authentication type)
-
The Domain option allows you to specify the domain (e.g. Active Directory) of the above user account.
- Authorization Server (URL) (Only for OAuth authentication type)
-
Using the Authorization Server (URL) option, you can provide an alternative region-specific base Azure AD authorization server endpoint.
- OAuth Type (Only for OAuth authentication type)
-
This option allows you to specify the preferred type of OAuth you want to use when connecting to the SharePoint REST API. There are the following options available:
- AuthorizationCode:
-
- Get New Token
-
This button completes the OAuth authentication process in order to generate a new token.

- Client ID: The Client ID option allows you to specify the unique ID which identifies the application making the request.
- Client Secret: The Client Secret option allows you to specify the client secret belonging to your app.
- Azure AD Tenant: Specify the Azure AD Tenant ID.
- Scope: The Scope from SharePoint allows you to set the permissions required for your app.
- Redirect URL: The Redirect URL option allows you to specify the Redirect URL to complete the authentication process.
- PKCE: The PKCE(Proof Key for Code Exchange) option may be enabled for PKCE App Type.
- Token Path
-
The path to the token file on the file system.
- Token Password
-
The password to the token file.
- Certificate:
-
- Client ID
-
The Client ID option allows you to specify the unique ID which identifies the application making the request.
- Certificate Thumbprint
-
The Certificate Thumbprint option is only available when the Certificate OAuth Type has been chosen, it allows you to specify the thumbprint of the certificate created for the application you have created.
- Client Credentials Using Custom App
-
This option involves the use of a custom app created within the SharePoint site collection. Note that Microsoft deprecates this option as of April 2nd, 2026. Please make sure that you switch to the above two options before the deadline.
- Client App ID
-
The Client App ID option allows you to specify the unique ID which identifies the custom application making the request.
- Client Secret
-
The Client Secret option is available when the Custom App OAuth Type has been chosen. It allows you to specify the client secret created for the application you have created.
- Tenant
-
Specify the tenant created for the application you have created.
- Test Connection
-
After all the connection information has been provided, you may click the "Test Connection" button to test if the user can successfully log in to the SharePoint server.
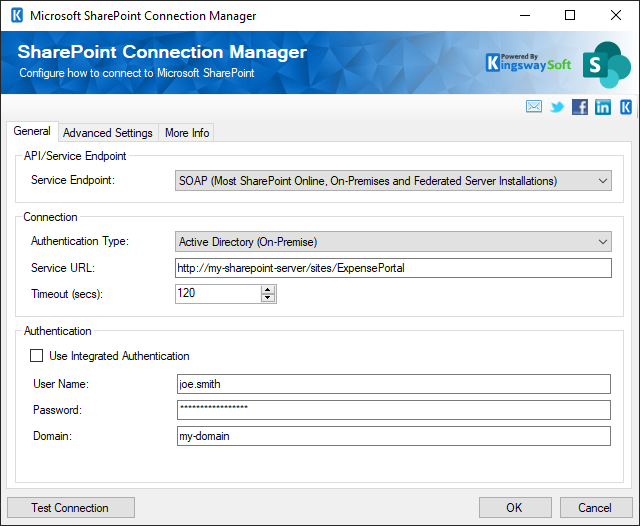
SOAP Service Endpoint
- Connection
-
- Authentication Type
-
The Authentication Type option allows you to specify the deployment type of your SharePoint server and what authentication is used. There are three options available:
- Active Directory (On-Premises)
- Federation (Claim-based Authentication)
- Online Federation (Office 365, SharePoint Online)
- Service URL
-
Using the Service URL option, you can provide an alternative SharePoint web service URL which you might have set up in a way that's different from the default.
- Timeout (secs)
-
The Timeout (secs) option allows you to specify a timeout value in seconds for the connection. The default value is 120 seconds.
- Authentication
-
- Use Integrated Authentication
-
This checkbox specifies whether you want to use Integration Authentication or provide separate login credentials.
- Authorization Server (URL)
-
Using the Authorization Server (URL) option, you can provide an alternative region-specific base Azure AD authorization server endpoint.
- User Name
-
The User Name option allows you to specify the user account that you want to use to connect to your SharePoint server. Depending on how the SharePoint connection is used, the user account needs to have proper privileges in your SharePoint system.
- Password
-
The Password option allows you to specify the password for the above user account in order to log in to your SharePoint server.
Note: The Password is not included in the SharePoint connection manager's ConnectionString property by default. This is done by design for security reasons. However, you can include it in your ConnectionString if you want to parameterize your connection manager. The format would be Password=myPassword; (make sure you have a semicolon as the last character). It can be anywhere in the ConnectionString.
- Domain
-
The Domain option allows you to specify the domain (e.g. Active Directory) of the above user account.
- Home Realm Uri (Only available for Federation and Online Federation authentication types)
- This option applies to the Federation and Online Federation authentication types, and it may only be required for certain federated environments. It’s important to note that the Home Realm Uri option is case-sensitive. In the case that this option is required, it should typically be in the following format.
https://adfs-server-name.mycompany.com/adfs/services/trust
Note that the Home Realm Uri option is case-sensitive.
- Test Connection
-
After all the connection information has been provided, you may click the "Test Connection" button to test if the user can successfully log in to the SharePoint server.
Advanced Settings Page
The Advanced Settings page of SharePoint Connection Manager allows you to specify some advanced settings of the connection.
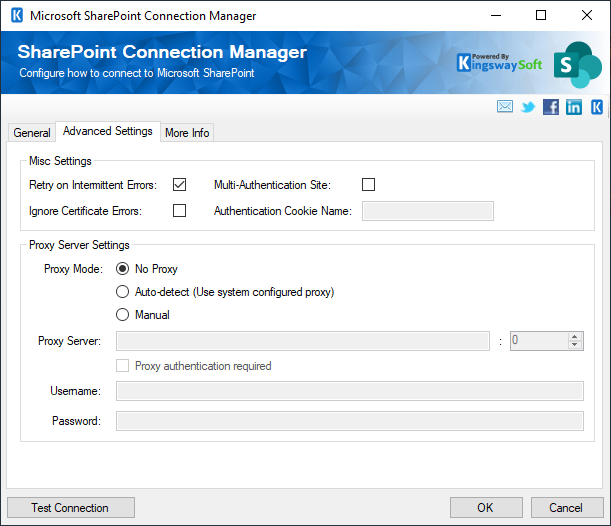
- Retry on Intermittent Errors
-
This is an option designed to help recover from possible intermittent outages or disruption of service. It prevents the integration process from stopping due to temporary issues. Enabling this option will allow service calls to be retried upon certain types of failure. A service call may be retried up to 3 times before an exception is fired. Retries occur after 0 seconds, 15 seconds, and 60 seconds.
Warning: We have designed our retry feature carefully such that the retry should only occur when it is deemed safe to do so; however, on some occasions, such retry service calls could result in the creation of duplicate data.
- Multi-Authentication Site
-
This option should be enabled if it is a multi-authentication SharePoint site.
- Ignore Certificate Errors
-
This option can be used to ignore those SSL certificate errors when connecting to SharePoint Server, in case your SharePoint server is using a temporary SSL certificate.
Warning: Enabling the "Ignore Certificate Errors" option is generally NOT recommended, particularly for a production instance. Unless there is a strong reason to believe the connection is secure, such as the network communication is only happening in an internal infrastructure, this option should be unchecked for best security.
Note: When this option is enabled, it applies to all HTTP-based SSL connections in the same job process; it is not just limited to SharePoint connections.
- Proxy Mode (since v5.0)
-
The Proxy Mode option allows you to specify how you want to configure the proxy server settings. There are three options available.
- No Proxy
- Auto-detect (Using system-configured proxy)
- Manual
- Proxy Server
-
Using the Proxy Server option, you can provide a proxy server to connect to the SharePoint server.
- Port
-
The Port option allows you to specify the port number of the proxy server for the connection.
- Username (Proxy Server Authentication)
-
The Username option (under Proxy Server Authentication) allows you to specify the proxy user account.
- Password (Proxy Server Authentication)
-
The Password option (under Proxy Server Authentication) allows you to specify the proxy user's password.
Note: The Proxy Password is not included in the SharePoint connection manager's ConnectionString property by default. This is done by design for security reasons. However, you can include it in your ConnectionString if you want to parameterize your connection manager. The format would be ProxyPassword=myProxyPassword; (make sure you have a semicolon as the last character). It can be anywhere in the ConnectionString.
More Info Page
The More Info page shows some basic information about the toolkit. On this page, you can find the version information of the toolkit.
Add SharePoint Components to SSIS Toolbox
The SSIS Integration Toolkit for Microsoft SharePoint includes two data flow components. They must be shown in the SSIS toolbox before you can use (drag and drop) them in the SSIS data flow task.
If you are using SQL Server 2012 or later, you should not need to do so, as SQL Server 2012 (or a later version) automatically lists all available pipeline components by scanning the system. Under certain circumstances, your SSIS toolbox might appear empty, in which case, you should click the SSIS Toolbox button (shown below) on the top-right corner of your Control Flow or Data Flow view.
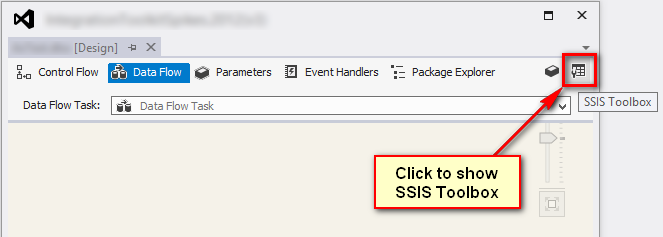
Both data flow components should now appear in your SSIS Toolbox, where you can drag and drop any of them to the design surface of your SSIS data flow task.