Dynamics 365 CE/CRM/Dataverse
Building the JDBC URL
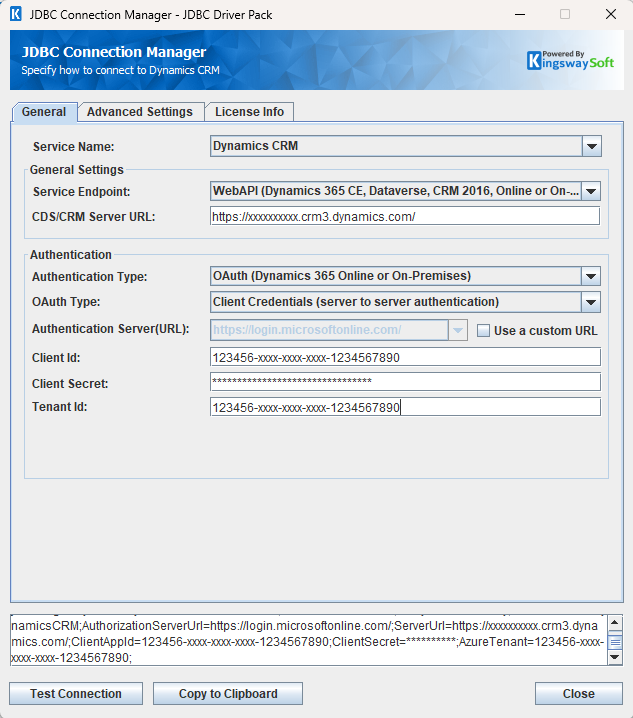
After installing the license, access the connection management page by executing the command java -jar kingswaysoft.jdbc.jar. Enter the necessary details, and the program will automatically generate the JDBC connection URL. Users can click Test Connection to test the generated URL and Copy to Clipboard to copy the connection string for use within the application where the JDBC driver is being used.
Note: If the license is not installed, you can still use the connection manager to generate a JDBC URL; however, the 'Test Connection' feature will be disabled.
General Page
The Generic Service Configuration page of the CRM/CDS Connection Manager allows you to specify general settings for the connection.
General Settings
- General Settings
-
- Service Endpoint
-
The Service Endpoint option allows you to specify the service endpoint that you want to use in order to connect to the Microsoft Dynamics 365CE/CRM server.
Currently, the only available option is WebAPI. - CDS/CRM Server URL
-
The CDS/CRM Server URL is the actual URL that is utilized by the connection manager to make service calls to Microsoft Dynamics 365 CRM, CDS, or Dataverse. This field should be prepopulated for you after using the Select Organization feature. This URL is generally your CRM, CDS tenant URL. For Dynamics CRM 4.0, this should be the URL with your organization name.
Authentication
-
- Authentication Type
-
The Authentication Type option allows you to specify the deployment type of your CRM server and what authentication will be used. There are two options available:
- Active Directory (On-Premises)
- OAuth (Dynamics 365 Online or On-Premises)
- OAuth Type
-
The OAuth Type option allows you to specify the OAuth type when you use OAuth (Dynamics 365 Online or On-Premises) authentication. There are four options available:
- Authorization Code
- Client Credentials (Server to Server authentication)
- Certificate
- Password (Not recommended for security reasons)
- Authorization Server (URL)
-
This option only available when OAuth is used. When connecting to Dynamics 365 CE/CRM online, we use
https://login.microsoftonline.com/as the default authorization server, which you don't generally need to make a change to unless there is a specific reason in the case that your CDS/CRM online instance is using some special authentication flow. This is more often used for Dynamics 365 on-premises installation with a particular authorization server. To enable the option for editing, you must first click on the "Use a Custom URL" checkbox next to the option.The custom Authorization Server URL can be provided in the following format.
https://servername- when the value is provided this way, our software will automatically append common/oauth2/token after the server URL.https://servername/<TenantId>/oauth2/token- when the value is provided this way with /oauth2/token at the end, our software will authenticate against the URL as it is. This is useful for the case when working with GCC or GCC high environment, your authorization URL is likely to behttps://login.microsoftonline.us/<TenantId>/oauth2/token. You can find out your tenant Id by logging into your Azure Portal.
Authentication Methods for Dynamics CRM
Active Directory
Enter User Name, Password, Domain, and Server URL to establish a connection.
General Settings
- General Settings
-
- Select Organization
-
Clicking this button will open a dialog box that allows you to discover and select from the available organizations in your CDS or Dynamics CRM instance.
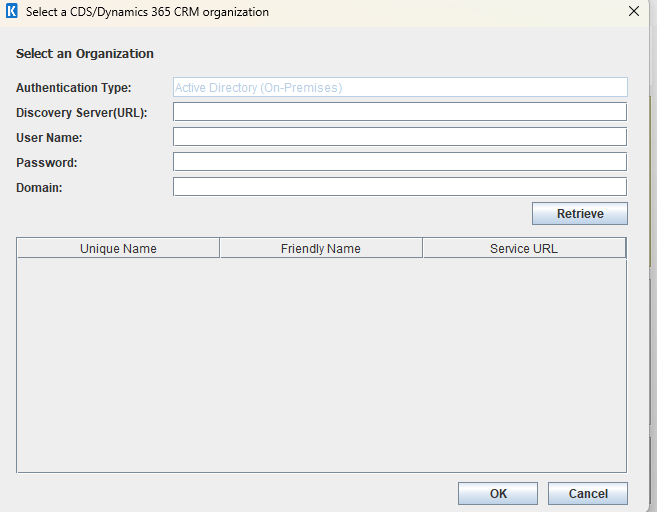
- Discovery Server (URL)
-
The Discovery Server option allows you to specify the CRM discovery server URL which you can use to discover your CDS/CRM organizations and their web service URLs. The CRM discovery server can be found in the CRM system from Settings | Customizations | Developer Resources after you have logged in to your CRM application.
Please ensure to enter the full URL of your CRM discovery server, the path after the server name is not needed.
When working with a Dynamics 365/CRM on-premises environment, the URL should typically be in one of the following formats, depending on your CRM server's setup.
http://CrmServerName/https://CrmServerName/http://CrmServerName:800/https://CrmServerName:8443/
Authentication
- User Name
-
The User Name option allows you to specify the user account that you want to use when connecting to your Dynamics 365 CE/CRM server. Depending on how the connection is used, the user account needs to have proper privileges in your CDS/CRM system.
Note: This option is only available when the{" "} Password OAuth type is selected.
- Password
-
The Password option allows you to specify the password for the above user account to log in to your CDS/CRM server.
Note: This option is only available when the{" "} Password OAuth type is selected.
- Domain
-
The Domain option is used to specify the active directory domain of the CRM user account. This option is only available when the Authentication Type is "Active Directory (On-Premises)".
OAuth
Client Credentials
Enter Authentication Server, Server URL, and the Client ID, Client Secret, and Tenant configured in the portal to establish a connection.
-
Authentication
-
- Client ID
-
The Client ID option allows you to specify the unique ID which identifies the application making the request.
- Client Secret
-
The Client Secret option allows you to specify the client secret that you have requested from Microsoft Azure Active Directory (AAD), which will be used to authenticate using the Azure Web application.
To create a client secret for a specific Web App / API application:
- Log in Azure Portal
- Navigate to Azure Active Directory | App registrations and select the Web App / API application
- Click Settings | Keys and fill out the required fields
- Click Save to display the Client Secret
Note: This option is only required when working with a Web App / API application.
- Tenant Id
-
Specify the tenant when establishing the connection to your Dynamics CRM server. This is usually an optional parameter.
Authorization Code
A saved token file and token password can be used to establish a connection. If you wish to generate a new token file, click Generate Token File to go through the token generation process, save the token file locally, and use the set token password to connect.
-
Authentication
-
- Token Path
-
The path where the token file is saved.
- Generate Token File
-
This button completes the OAuth authentication process in order to generate a new token.
- Client Id: The Client Id option allows you to specify the unique ID which identifies the application making the request.
- Client Secret: The Client Secret option allows you to specify the client secret belonging to your app.
- Azure AD Tenant: Specify the Azure AD tenant in this option.
- Redirect Url: The Redirect Url option allows you to specify the Redirect Url to complete the authentication process.
- PKCE (Enhanced Security): The PKCE (Proof Key for Code Exchange) option may be enabled for PKCE App Type. Ensures that the client that initiates the OAuth flow is the same client that completes flow.
- Token Password
-
The password to the token file.
Certificate
Users can choose to use a saved certificate file and certificate password to establish a connection. Alternatively, to create a new certificate, click Generate New Certificate to go through the certificate process, generate a keystore, save it locally, and use the set certificate password to connect.
Note: The certificate file only supports the PFX format. For newly generated certificates, the simultaneously generated PEM file needs to be configured in the portal.
-
Authentication
-
- Certificate Path
-
The path to an existing certificate file.
- Certificate Password
-
The password for the specified certificate file.
- Client App Id
-
The Client App Id option is available when the OAuth (Dynamics 365 Online or On-Premises) Authentication Type is selected, and it allows you to specify the ID (in GUID format) of the Azure Active Directory (Azure AD or AAD) application you have created for application authentication.
To create an application in Azure Active Directory (AAD):
- Log in Azure Portal
- Navigate to Azure Active Directory | App registrations | New registration
- Give a name to the application and choose an appropriate application type using the
Redirect URI option on the page.
- Password: Public client (mobile & desktop), or Web
- Certificate: Web
- Client Credentials (server-to-server authentication): Web
In order to work with Certificate and Client Credentials (server-to-server authentication) OAuth Type, it is also required to have an Application User created in your Dynamics 365 CE/CRM instance. To create an Application User:
- Log in to Dynamics 365/CRM
- Navigate to Settings | Security | Users and switch to the Application Users view. Please make sure you are in this view otherwise the user you create would not be an App User.
- Click "New" and fill out the form to create an Application User. Please ensure that the user type is set to "USER: APPLICATION USER" and that the Application ID is the Client App Id we created in the previous step.
- Tenant Id
-
Specify the tenant when establishing the connection to your Dynamics CRM server. This is usually an optional parameter.
Password
Enter Authentication Server, Server URL, User Name, Password, Client ID, Client Secret, and Tenant ID configured in the portal to establish a connection.
-
Authentication
-
- User Name
-
The User Name option allows you to specify the user account that you want to use when connecting to your Dynamics 365 CE/CRM server. Depending on how the connection is used, the user account needs to have proper privileges in your CDS/CRM system.
Note: This option is only available when the{" "} Password OAuth type is selected.
- Password
-
The Password option allows you to specify the password for the above user account to log in to your CDS/CRM server.
Note: This option is only available when the{" "} Password OAuth type is selected.
- Client ID
-
The Client ID option allows you to specify the unique ID which identifies the application making the request.
- Client Secret
-
The Client Secret option allows you to specify the client secret that you have requested from Microsoft Azure Active Directory (AAD), which will be used to authenticate using the Azure Web application.
To create a client secret for a specific Web App / API application:
- Log in Azure Portal
- Navigate to Azure Active Directory | App registrations and select the Web App / API application
- Click Settings | Keys and fill out the required fields
- Click Save to display the Client Secret
Note: This option is only required when working with a Web App / API application.
- Tenant Id
-
Specify the tenant when establishing the connection to your Dynamics CRM server. This is usually an optional parameter.
- Test Connection
After all the connection information has been provided, click the "Test Connection" button to test if the user credentials entered can successfully connect to the selected service.
Advanced Settings Page
The Advanced Settings page allows you to specify advanced settings for the connection.
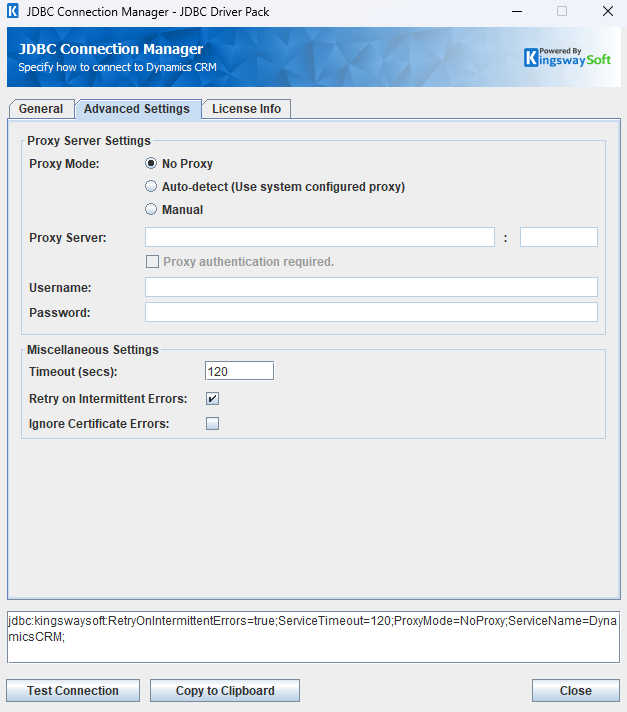
Proxy Server Settings
- Proxy Server Settings
-
- Proxy Mode
-
The Proxy Mode option allows you to specify how you want to configure the proxy server setting. There are three options available.
- No Proxy
- Auto-detect (Use system configured proxy)
- Manual
- Proxy Server
-
Using the Proxy Server option allows you to specify the name of the proxy server for the connection.
- Port
-
The Port option allows you to specify the port number of the proxy server for the connection.
- Username (Proxy Server Authentication)
-
The Username option (under Proxy Server Authentication) allows you to specify the proxy user account.
- Password (Proxy Server Authentication)
-
The Password option (under Proxy Server Authentication) allows you to specify the proxy user's password.
Miscellaneous Settings
- Miscellaneous Settings
-
- Timeout (secs)
-
The Timeout (secs) option allows you to specify a timeout value in seconds for the connection. The default value is 120 seconds. Specify 0 for infinite timeout.
- Retry on Intermittent Errors
-
The retry on intermittent errors determines if requests will be retried when there is an error. If this option is checked requests will be retried up to 3 times.
- Ignore Certificate Errors
-
This option can be used to ignore those SSL certificate errors when connecting to the target server.
Warning: Enabling the "Ignore Certificate Errors" option is generally NOT recommended, particularly for production instances. Unless there is a strong reason to believe the connection is secure - such as the network communication is only happening in an internal infrastructure, this option should be unchecked for best security.
Note: When this option is enabled, it applies to all HTTP-based SSL connections in the same job process.
- Concurrent Writing Threads
-
This option can be used to set the number of threads to be used during write operations. This can improve performance during large-volume write operations.
- Suppress Empty Result Error
-
This option can be used to suppress the error received when batch writing returns no records from the API.
Using the JDBC Driver
Explore detailed examples in this section that demonstrate the application of JDBC classes such as Connection, Statement, and ResultSet to effectively manage interactions with Dynamics data. This section covers the use of regular statements and prepared statements for executing complex or frequently executed queries.
Executing Statements
Once you've connected from your code (see Connecting with DriverManager and Connecting with DataSource), you can execute SQL statements using the Statement class. Refer to the Executing Prepared Statements section for information on how to execute parameterized statements.
To improve performance when executing multiple write queries, utilize the batch feature. For more information, review Batch Writing with PreparedStatement.
SELECT
Use the Statement class's generic execute method or the executeQuery method to execute SQL statements that return data. To retrieve the results of a query, you would then call the getResultSet method of the Statement.
Statement statement = connection.createStatement();
String sql = "SELECT contactid, firstname, lastname FROM contact WHERE lastname = 'test'";
ResultSet resultSet = statement.executeQuery(sql);
while (resultSet.next()) {
    for (int i = 1; i <= resultSet.getMetaData().getColumnCount(); i++) {
      LOGGER.info(resultSet.getMetaData().getColumnLabel(i) + "=" + resultSet.getString(i));
    }
}
INSERT
Use either the generic execute method or the executeUpdate method of the Statement class to execute an INSERT operation.
The results of SQL queries are saved in a ResultSet. You can retrieve the ResultSet after execution to view the inserted data's ID, exceptions raised during execution, and details of the affected data.
String sql = "INSERT INTO contact (firstname, lastname) VALUES ('test first', 'test last')";
try {
    Statement statement = connection.createStatement();
    statement.executeUpdate(sql);
    LOGGER.info(statement.getResultSet().toString());
} catch (SQLException e) {
    LOGGER.error(e);
}
id,errorcode,errormessage,processdata,haserrors,relatederrorcode,relatederrormessage
ba9374d2-9508-ef11-9f89-000d3af33381,null,null,{"firstname":"test first","lastname":"test last"},false,null,null
In Dynamics CRM, when performing write operations on certain entities, you also need to synchronize updates to the State of the entity. In an invalid state is provided, the driver will output the error details in the result set, using the fields relatederrorcode and relatederrormessage.
String sql = "INSERT INTO account (name, statecode) VALUES ('testInactive', '4')";
try {
    Statement statement = connection.createStatement();
    statement.executeUpdate(sql);
    LOGGER.info(statement.getResultSet().toString());
} catch (SQLException e) {
    LOGGER.error(e);
}
id,errorcode,errormessage,processdata,haserrors,relatederrorcode,relatederrormessage
a81dbe3e-95ed-f011-8406-7c1e52064f61,null,null,{"name":"testInactive"},true,2147779592,State code is invalid or state code is valid but status code is invalid for a specified state code.
UPDATE
Use either the generic execute method or the executeUpdate method of the Statement class to execute an UPDATE operation.
The MatchHandling property will effect how UPDATE operations perform when multiple records are found that match the search criteria.
The results of SQL queries are saved in a ResultSet. You can retrieve the ResultSet after execution to view the updated data's ID, exceptions raised during execution, and details of the affected data.
String sql = "UPDATE contact SET firstname = 'test first1' WHERE lastname = 'test last'"try {
    Statement statement = connection.createStatement();
    statement.executeUpdate(sql);
    LOGGER.info(statement.getResultSet().toString());
} catch (SQLException e) {
    LOGGER.error(e);
}
id,errorcode,errormessage,processdata,haserrors,relatederrorcode,relatederrormessage
50d691b8-bf08-ef11-9f89-000d3af33381,null,null,{"firstname":"test first1"},false,null,null
DELETE
Use either the generic execute method or the executeUpdate method of the Statement class to execute a DELETE operation.
The MatchHandling property will effect how DELETE operations perform when multiple records are found that match the search criteria.
The results of SQL queries are saved in a ResultSet. You can retrieve the ResultSet after execution to view the deleted data's ID, exceptions raised during execution, and details of the affected data.
String sql = "DELETE FROM Contact WHERE lastname = 'test last'";
try {
    Statement statement = connection.createStatement();
    statement.executeUpdate(sql);
    LOGGER.info(statement.getResultSet().toString());
} catch (SQLException e) {
    LOGGER.error(e);
}
id,errorcode,errormessage,processdata,haserrors,relatederrorcode,relatederrormessage
50d691b8-bf08-ef11-9f89-000d3af33381,null,null,null,false,null,null
UPSERT
Using the UPSERT operation, you can either insert or update an existing record in one call. The following matching methods are supported to perform the lookup of the target system in order to determine whether it is a new record to be created or an existing record to be updated.
Alternate Key Method
The Alternate Key method uses a system-defined alternate key as the matching criterion to locate or identify records in the target system for writing purposes. If the specified alternate key does not match any existing records, a new object record will be created. If a match is found, the outcome depends on the number of matches:
- If the key is matched once, the existing object record is updated.
- If the key is matched multiple times, an error is generated and the object record is not inserted or updated.
The Upsert SQL statement must end with ON DUPLICATE KEY UPDATE UPSERTFIELDS = key, where key refers to the field specified by the user as the upsert key.
The results of SQL queries are saved in a ResultSet. You can retrieve the ResultSet after execution to view the upserted data's ID, exceptions raised during execution, and details of the affected data.
String sql = "UPSERT INTO contact (firstname, lastname, emailaddress1, creditlimit) VALUES
    ('testFirst1', 'testLast1', '[email protected]', 100),
    ('testFirst2', 'testLast2', '[email protected]', 200)
    ON DUPLICATE KEY UPDATE UPSERTFIELDS = (firstname, lastname, emailaddress1)";

try {
    Statement statement = connection.createStatement();
    statement.executeUpdate(sql);
    LOGGER.info(statement.getResultSet().toString());
} catch (SQLException e) {
    LOGGER.error(e);
}
id,errorcode,errormessage,processdata,haserrors,isnew,relatederrorcode,relatederrormessage
155abd78-ed1e-f011-998a-7ced8d058096,null,null,{"creditlimit":100.00},true,true,null,null
185abd78-ed1e-f011-998a-7ced8d058096,null,null,{"creditlimit":200.00},false,true,null,null
Manually Specified Key Method
The Manually Specify method allows you to define one or more CDS/CRM fields to be used as the matching key(s) to locate or identify target records in the CDS/CRM system.
- If the specified combination of fields matches exactly one record, that record is updated.
- If no match is found, a new record is inserted.
- If the key is matched multiple times, an error is generated and the object record is not inserted or updated.
To use this method, append the following to your SQL query: USING OPTIONS ('ManualMatchingUpsert')
The results of SQL queries are saved in a ResultSet. You can retrieve the ResultSet after execution to view the upserted data's ID, exceptions raised during execution, and details of the affected data.
String sql = "UPSERT INTO contact (firstname, lastname, emailaddress1, creditlimit) VALUES
    ('JtestFirst3', 'JtestLast3', '[email protected]', 100),
    ('JtestFirst2', 'JtestLast2', '[email protected]', 200)
    ON DUPLICATE KEY UPDATE UPSERTFIELDS = (firstname, lastname) USING OPTIONS ('ManualMatchingUpsert')";

try {
    Statement statement = connection.createStatement();
    statement.executeUpdate(sql);
    LOGGER.info(statement.getResultSet().toString());
} catch (SQLException e) {
    LOGGER.error(e);
}
id,errorcode,errormessage,processdata,haserrors,isnew,relatederrorcode,relatederrormessage
320ac724-c41b-f011-998a-7ced8d058096,null,null,{"creditlimit":100.00,"emailaddress1":"[email protected]"},false,false,null,null
baf43a1c-e61e-f011-998a-7ced8d058096,null,null,{"firstname":"JtestFirst2","creditlimit":200.00,"lastname":"JtestLast2","emailaddress1":"[email protected]"},false,true,null,null
Executing Prepared Statements
Using a PreparedStatement can improve performance when you need to execute a SQL statement multiple times with different parameters. Unlike a Statement object, a PreparedStatement object is provided with a SQL statement when it is created, which can then be executed with different values each time. This special type of statement is derived from the more general class, Statement.
Below are the steps outlining how to execute a prepared statement:
Creating and Executing a Prepared Statement
- Create a PreparedStatement
-
-
Use the
prepareStatementmethod of theConnectionclass to instantiate aPreparedStatement.Refer to Connecting with DriverManager or Connecting with DataSource for information related to establishing connections.
-
- Set Parameters
-
- Declare parameters by calling the corresponding setter method of the
PreparedStatement. - NOTE: The parameter indices start at 1.
- Declare parameters by calling the corresponding setter method of the
- Execute the PreparedStatement
-
- Use the generic
executeorexecuteUpdatemethod of thePreparedStatement.
- Use the generic
- Retrieve Results
-
- Call the
getResultSetmethod of thePreparedStatementto obtain the query results, which will be returned as a ResultSet.
- Call the
- Iterate Over the Result Set
-
- Use the
nextmethod of the ResultSet to iterate through the results. To obtain column information, utilize theResultSetMetaDataclass. Instantiate aResultSetMetaDataobject by calling thegetMetaDatamethod of the ResultSet.
- Use the
SELECT
Use the PreparedStatement class's generic execute method or the executeQuery method to execute SQL statements that return data.
The results of SQL queries are saved in a ResultSet. You can retrieve the ResultSet after execution to view the retrieved data.
String sql = "SELECT * FROM contact WHERE firstname = ?";
try {
    PreparedStatement ps = connection.prepareStatement(sql);
    ps.setString(1, "test first");
    ps.execute(sql);
    while (ps.getResultSet().next()) {
        for (int i = 1; i <= ps.getResultSet().getMetaData().getColumnCount(); i++) {
            LOGGER.info(ps.getResultSet().getMetaData().getColumnLabel(i) + "="
            + ps.getResultSet().getString(i));
        }
    }
} catch (SQLException e) {
    LOGGER.error(e);
}
INSERT
Use either the generic execute method or the executeUpdate method of the PreparedStatement class to execute an INSERT operation.
The results of SQL queries are saved in a ResultSet. Users can retrieve the ResultSet after execution to view the ID of inserted data, exceptions raised during execution, and the data affected by the insertion.
String sql = "INSERT INTO contact (firstname, lastname) VALUES (?, ?)";
try {
    PreparedStatement ps = connection.prepareStatement(sql);
    ps.setString(1, "first");
    ps.setString(2, "last");
    ps.executeUpdate();
    LOGGER.info(ps.getResultSet().toString());
} catch (SQLException e) {
    LOGGER.error(e);
}
id,errorcode,errormessage,processdata,haserrors,relatederrorcode,relatederrormessage
89f1fde0-c008-ef11-9f89-000d3af33381,null,null,{"firstname":"first","lastname":"last"},false,null,null
In Dynamics CRM, when performing write operations on certain entities, you also need to synchronize updates to the State of the entity. In an invalid state is provided, the driver will output the error details in the result set, using the fields relatederrorcode and relatederrormessage.
String sql = "INSERT INTO account (name, statecode) VALUES (?, ?)";
try {
    PreparedStatement ps = connection.prepareStatement(sql);
    ps.setString(1, "testInactive");
    ps.setString(2, "4");
    ps.executeUpdate();
    LOGGER.info(ps.getResultSet().toString());
} catch (SQLException e) {
    LOGGER.error(e);
}
id,errorcode,errormessage,processdata,haserrors,relatederrorcode,relatederrormessage
a81dbe3e-95ed-f011-8406-7c1e52064f61,null,null,{"name":"testInactive"},true,2147779592,State code is invalid or state code is valid but status code is invalid for a specified state code.
UPDATE
Use either the generic execute method or the executeUpdate method of the PreparedStatement class to execute an UPDATE operation.
The MatchHandling property will effect how UPDATE operations perform when multiple records are found that match the search criteria.
The results of SQL queries are saved in a ResultSet. Users can retrieve the ResultSet after execution to view the ID of updated data, exceptions raised during execution, and the data affected by the update.
String sql = "UPDATE contact SET Firstname = ? WHERE lastname = ?";
try {
    PreparedStatement ps = connection.prepareStatement(sql);
    ps.setString(1, "first1");
    ps.setString(2, "last");
    ps.executeUpdate();
    LOGGER.info(ps.getResultSet().toString());
} catch (SQLException e) {
    LOGGER.error(e);
}
id,errorcode,errormessage,processdata,haserrors,relatederrorcode,relatederrormessage
89f1fde0-c008-ef11-9f89-000d3af33381,null,null,{"firstname":"first1"},false,null,null
DELETE
Use either the generic execute method or the executeUpdate method of the PreparedStatement class to execute a DELETE operation.
The MatchHandling property will effect how DELETE operations perform when multiple records are found that match the search criteria.
The results of SQL queries are saved in a ResultSet. You can retrieve the ResultSet after execution to view the deleted data's ID, exceptions raised during execution, and details of the affected data.
String sql = "DELETE FROM contact WHERE lastname = ?";
try {
    PreparedStatement ps = connection.prepareStatement(sql);
    ps.setString(1, "last");
    ps.executeUpdate();
    LOGGER.info(ps.getResultSet().toString());
} catch (SQLException e) {
    LOGGER.error(e);
}
id,errorcode,errormessage,processdata,haserrors,relatederrorcode,relatederrormessage
89f1fde0-c008-ef11-9f89-000d3af33381,null,null,null,null,false,null,null
UPSERT
Using the UPSERT operation, you can either insert or update an existing record in one call. The following matching methods are supported to perform the lookup of the target system in order to determine whether it is a new record to be created or an existing record to be updated.
Alternate Key Method
The Alternate Key method uses a system-defined alternate key as the matching criterion to locate or identify records in the target system for writing purposes. If the specified alternate key does not match any existing records, a new object record will be created. If a match is found, the outcome depends on the number of matches:
- If the key is matched once, the existing object record is updated.
- If the key is matched multiple times, an error is generated and the object record is not inserted or updated.
The Upsert SQL statement must end with ON DUPLICATE KEY UPDATE UPSERTFIELDS = key, where key refers to the field specified by the user as the upsert key.
The results of SQL queries are saved in a ResultSet. You can retrieve the ResultSet after execution to view the upserted data's ID, exceptions raised during execution, and details of the affected data.
String sql = "UPSERT INTO contact (firstname, lastname, emailaddress1, creditlimit) VALUES (?, ? '[email protected]', 100) ON DUPLICATE KEY UPDATE UPSERTFIELDS = (firstname, lastname, emailaddress1)";
try {
    PreparedStatement ps = connection.prepareStatement(sql);
    ps.setString(1, "testFirst1");
    ps.setString(2, "testLast1");
    ps.executeUpdate();
    LOGGER.info(ps.getResultSet().toString());
} catch (SQLException e) {
    LOGGER.error(e);
}
id,errorcode,errormessage,processdata,haserrors,isnew,relatederrorcode,relatederrormessage
155abd78-ed1e-f011-998a-7ced8d058096,null,null,{"creditlimit":100.00},false,false,null,null
Manually Specified Key Method
The Manually Specify method allows you to define one or more CDS/CRM fields to be used as the matching key(s) to locate or identify target records in the CDS/CRM system.
- If the specified combination of fields matches exactly one record, that record is updated.
- If no match is found, a new record is inserted.
- If the key is matched multiple times, an error is generated and the object record is not inserted or updated.
To use this method, append the following to your SQL query: USING OPTIONS ('ManualMatchingUpsert')
The results of SQL queries are saved in a ResultSet. You can retrieve the ResultSet after execution to view the upserted data's ID, exceptions raised during execution, and details of the affected data.
String sql = "UPSERT INTO contact (firstname, lastname, emailaddress1, creditlimit) VALUES
    (?, ?, '[email protected]', 100)
    ON DUPLICATE KEY UPDATE UPSERTFIELDS = (firstname, lastname) USING OPTIONS ('ManualMatchingUpsert')";
try {
    PreparedStatement ps = connection.prepareStatement(sql);
    ps.setString(1, "testFirst1");
    ps.setString(2, "testLast1");
    ps.executeUpdate();
    LOGGER.info(ps.getResultSet().toString());
} catch (SQLException e) {
    LOGGER.error(e);
}
id,errorcode,errormessage,processdata,haserrors,isnew,relatederrorcode,relatederrormessage
155abd78-ed1e-f011-998a-7ced8d058096,null,null,{"creditlimit":100.00},false,false,null,null
Query Options
The driver provides several query‑level options that let you fine‑tune execution for better performance and accuracy.
Append USING OPTIONS (...) to your SQL statement to enable one or more optimizations. Separate multiple options with commas.
The following options are available for use:
| Option Name | Description |
|---|---|
| BypassCustomSyncBusinessLogicExecution | The synchronous plug-ins and real-time workflows will be disabled when the driver performs the write operations to the platform. Using the option, the bypass behavior would only applied to the current service calls. |
| BypassCustomAsyncBusinessLogicExecution | The asynchronous plug-ins and real-time workflows will be disabled when the driver performs the write operations to the platform. Using the option, the bypass behavior would only applied to the current service calls. |
| EnableSystemDuplicateDetection | The Enable System Duplicate Detection option specifies whether CDS/CRM duplicate detection rules should be fired when writing data to CDS, Dataverse, or Microsoft Dynamics CRM. Note: The Enable System Duplicate Detection option is not available when the Action is Delete. Note: In order for the System Duplicate Detection option to take effect, you must set up proper duplicate detection rules for the target CDS/CRM entity in your system. You must also enable duplicate detection, which is a system-wide configuration setting available in Settings -> Data Management -> Duplicate Detection Settings. Note: There is a special behavior that you should be aware of if you want to use the Enable System Duplicate Detection option. CDS/CRM duplicate detection relies on an Asynchronous service job called the Matchcode Update job, which is not executed in real time. For this reason, any records that have been recently (for example, the last couple of minutes) added or updated in the system, will not have a matching code in the system until the Matchcode Update job kicks in next time, which usually happens every few minutes. Therefore, duplication detection would not take them into account. Due to the mentioned reason, we do not usually recommend relying on duplicate detection on large data load processes. A better option would be using the Upsert action, and selecting a combination of manually-selected matching fields. This is a more reliable solution since it performs a real-time duplicate check during the data load. |
| IgnoreUnchangedFields | The Ignore Unchanged Fields option allows you to ignore any fields that have not been changed in the target CRM system. This feature is useful when your CRM system has workflows or plugins to be fired when certain field value changes. With this option selected, the CRM destination component will check the target CRM system and compare each field to see if there are any changes for them. The component will only post the fields that have actual changes. All unchanged fields will be skipped and therefore, not posted to CRM. This component can prevent firing unnecessary CRM workflows or plugins. Note: "Ignore Unchanged Fields" option does not apply to CRM partylist (activityparty) fields because partylist fields store complex values which are not always practical to compare. This does not have any negative impacts on your data integrity or anything in that regard, the only side effect is, all partylist fields will be posted to the CRM server regardless of whether there is a change or not. |
| ManualMatchingUpsert | The Manually Specify option allows you to choose one or more CDS/CRM fields to be used as the matching key(s) in order to locate or identify the matching record(s) in the target CDS/CRM system. Uses fields listed in ON DUPLICATE KEY UPDATE UPSERTFIELDS (…) to match for UPSERTs instead of the alternate key |
String sql = "UPSERT INTO contact (firstname, lastname, emailaddress1, creditlimit) VALUES "
        + "('testFirst', 'testLast', '[email protected]', 100)"
        + "ON DUPLICATE KEY UPDATE UPSERTFIELDS = (firstname, lastname) USING OPTIONS ('ManualMatchingUpsert','IgnoreUnchangedFields')";
try {
    Statement statement = connection.createStatement();
    statement.executeUpdate(sql);
    LOGGER.info(statement.getResultSet().toString());
} catch (SQLException e) {
    LOGGER.error(e);
}
String sql = "UPDATE contact SET emailaddress1 = '[email protected]' WHERE lastname = 'testLast' "
        + "USING OPTIONS ('IgnoreUnchangedFields')";
try {
    Statement statement = connection.createStatement();
    statement.executeUpdate(sql);
    LOGGER.info(statement.getResultSet().toString());
} catch (SQLException e) {
    LOGGER.error(e);
}
Metadata Discovery
This section provides examples on how to retrieve table and column metadata using the getTables, getColumns, and getPrimaryKeys methods from the DatabaseMetaData interface. These are essential for discovering database structures.
Tables
The getTables method from the DatabaseMetaData interface can be used to retrieve a list of tables.
This method only retrieves tables that are not write-only.
To get a list of tables which include write-only tables, query the table system.tables.
Class.forName("com.kingswaysoft.jdbc.Drivers");

Properties connectionProps = new Properties();
connectionProps.put("user", "username");
connectionProps.put("password", "password");

Connection connection = DriverManager.getConnection("jdbc:ServiceName=DynamicsCrm;kingswaysoft:url=https://test.crm3.dynamics.com;", connectionProps);

ResultSet resultSet = connection.getMetaData().getTables(null, null, null, null);
LOGGER.info(resultSet.toString());
TABLE_CAT,TABLE_SCHEM,TABLE_NAME,TABLE_TYPE,REMARKS
null,null,aaduser,Table,
null,null,account,Table,
null,null,accountleads,Table,
null,null,aciviewmapper,Table,
......
The getTables method returns the following metadata columns:
| Column Name | Data Type | Description |
|---|---|---|
| TABLE_CAT | String | The catalog that contains the table, usually null for Dynamics. |
| TABLE_SCHEM | String | The schema of the table, also typically null for Dynamics. |
| TABLE_NAME | String | The name of the table. |
| TABLE_TYPE | String | The type of the table (e.g., TABLE or VIEW). |
| REMARKS | String | An optional description of the table. |
Columns
Use the getColumns method of the DatabaseMetaData interface to retrieve detailed information about database columns. To narrow the results to a specific table, specify the table name using the parameter table_name.
This method returns columns only for tables that are not write-only.
To get columns for tables which are write-only, query the table system.columns.
Class.forName("com.kingswaysoft.jdbc.Drivers");

Properties connectionProps = new Properties();
connectionProps.put("user", "username");
connectionProps.put("password", "password");

Connection connection = DriverManager.getConnection("jdbc:kingswaysoft:url=https://test.crm3.dynamics.com;", connectionProps);

ResultSet resultSet = connection.getMetaData().getColumns(null, null, "Contact", null);
LOGGER.info(resultSet.toString());
TABLE_CAT,TABLE_SCHEM,TABLE_NAME,COLUMN_NAME,DATA_TYPE,TYPE_NAME,COLUMN_SIZE,BUFFER_LENGTH,DECIMAL_DIGITS,NUM_PREC_RADIX,NULLABLE,COLUMN_DEF,SQL_DATA_TYPE,SQL_DATETIME_SUB,CHAR_OCTET_LENGTH,ORDINAL_POSITION,IS_NULLABLE,SCOPE_CATALOG,SCOPE_SCHEMA,SCOPE_TABLE,SOURCE_DATA_TYPE,IS_AUTOINCREMENT,IS_GENERATEDCOLUMN,CRM_TYPE
null,null,account,accountcategorycode,4,java.lang.Integer,null,null,null,null,null,null,null,4,null,null,2,null,null,null,PicklistType
null,null,account,accountcategorycodename,12,java.lang.String,null,null,null,null,null,null,null,12,null,null,147,null,null,null,VirtualType
null,null,account,accountclassificationcode,4,java.lang.Integer,null,null,null,null,null,null,null,4,null,null,11,null,null,null,PicklistType
null,null,account,accountclassificationcodename,12,java.lang.String,null,null,null,null,null,null,null,12,null,null,140,null,null,null,VirtualType
null,null,account,accountid,12,java.lang.String,null,null,null,null,null,null,null,12,null,null,1,null,null,null,UniqueidentifierType
null,null,account,accountnumber,12,java.lang.String,20,null,null,null,null,null,null,12,null,null,23,null,null,null,StringType
The getColumns method returns the following columns:
| Column Name | Data Type | Description |
|---|---|---|
| TABLE_CAT | String | The database name. |
| TABLE_SCHEM | String | The table schema. |
| TABLE_NAME | String | The table name. |
| COLUMN_NAME | String | The column name. |
| DATA_TYPE | Integer | The data type represented by a constant value from java.sql.Types. |
| TYPE_NAME | String | The data type name used by the driver. |
| COLUMN_SIZE | Integer | The length in characters of the column or the numeric precision. |
| BUFFER_LENGTH | Integer | The buffer length. |
| DECIMAL_DIGITS | Integer | The column scale or number of digits to the right of the decimal point. |
| NUM_PREC_RADIX | Integer | The radix, or base. |
| NULLABLE | Integer | Whether the column can contain null as defined by the following JDBC DatabaseMetaData constants: columnNoNulls (0) or columnNullable (1). |
| COLUMN_DEF | String | The default value for the column. |
| SQL_DATA_TYPE | Integer | Reserved by the specification. |
| SQL_DATETIME_SUB | Integer | Reserved by the specification. |
| CHAR_OCTET_LENGTH | Integer | The maximum length of binary and character-based columns. |
| ORDINAL_POSITION | Integer | The position of the column in the table, starting at 1. |
| IS_NULLABLE | String | Whether a null value is allowed: YES or NO. |
| SCOPE_CATALOG | String | The catalog of the table referenced by a reference attribute (null if DATA_TYPE is not REF). |
| SCOPE_SCHEMA | String | The schema of the table referenced by a reference attribute (null if DATA_TYPE is not REF). |
| SCOPE_TABLE | String | The name of the table referenced by a reference attribute (null if DATA_TYPE is not REF). |
| SOURCE_DATA_TYPE | Short | The source type of a distinct type or user-defined REF type (null if DATA_TYPE is neither DISTINCT nor a user-defined REF). |
| IS_AUTOINCREMENT | String | Whether the column value is assigned by Dynamics in fixed increments. |
| IS_GENERATEDCOLUMN | String | Whether the column is generated: YES or NO. |
| DTS_TYPE | String | Dynamics DTS attribute type. |
Primary Keys
The getPrimaryKeys method in the DatabaseMetaData interface is used to retrieve metadata about primary keys for a given table in Dynamics.
Class.forName("com.kingswaysoft.jdbc.Drivers");

Properties connectionProps = new Properties();
connectionProps.put("user", "username");
connectionProps.put("password", "password");

Connection connection = DriverManager.getConnection("jdbc:kingswaysoft:ServiceName=DynamicsCrm;url=https://test.crm3.dynamics.com;", connectionProps);

ResultSet resultSet = connection.getMetaData().getPrimaryKeys(null, null, "email");
LOGGER.info(resultSet.toString());
TABLE_CAT,TABLE_SCHEM,TABLE_NAME,COLUMN_NAME,KEY_SEQ,PK_NAME
null,null,email,activityid,1,null
The getPrimaryKeys method returns the following columns:
| Column Name | Data Type | Description |
|---|---|---|
| TABLE_CAT | String | The catalog name. |
| TABLE_SCHEM | String | The schema name. |
| TABLE_NAME | String | The name of the table that contains the primary key. |
| COLUMN_NAME | String | The name of the column that serves as the primary key for the table. |
| KEY_SEQ | Short | The sequence number within the primary key. |
| PK_NAME | String | The primary key name. |
Connection Settings
| Connection Setting | Data Type | Default Value | Description |
|---|---|---|---|
| AuthorizationServerUrl | String | "https://login.microsoftonline.com/" | The AuthorizationServerUrl verifies identities, grants access based on permissions, issues secure tokens, and ensures compliance with security standards. |
| AzureTenant | String | "" | The Azure Tenant ID used to access Dynamics. |
| CacheExpirationTime | Integer | 30 | Defines the expiration time for cache. A value of 0 disables caching. |
| CertificatePassword | String | "" | The password used to access the key store file. |
| ClientAppId | String | "" | The ID (in GUID format) of the Azure Active Directory application you have created for application authentication. |
| ClientSecret | String | "" | The client secret you have selected or created in Microsoft Azure Active Directory. |
| ConcurrentWritingThreads | Integer | 16 | The number of threads for executing operations in parallel. A value of 0 will disable multi threading. |
| ConnectionTimeout | Integer | 30 | ConnectionTimeout is the maximum amount of time the program will wait to set up a connection to the Dynamics API. |
| Domain | String | "" | The domain used for Active Directory login authentication. |
| IgnoreCertificateErrors | Boolean | false | Specifies whether to verify the certificate when connecting to Dynamics. If no certificate verification is required, you can set this value to 'true'. Note: This property only applies to RESTful calls. |
| IgnoreError | Boolean | false | Determines if the program continues executing SQL statements after encountering an error. |
| LogFileSize | String | "10485760" | A string specifying the maximum size in bytes for a log file. |
| LogLevel | String | "INFO" | The logging level for the JDBC driver. |
| LogPath | String | "./jdbcLogs" | The directory where log files are stored. |
| MatchHandling | String | "writeOne" | The strategy employed to address situations where multiple records meet the search criteria. Strategies are case-sensitive and include "writeAll" which will affect all matches, "writeOne" which will affect the first match, "ignoreAll" which will ignore all matches, and "raiseError" which will raise an error when multiple matches are found. By default, it is set to 'writeOne'. |
| OemKey | String | "" | The OEM license key. |
| Password | String | "" | The password used to authenticate the user. |
| PathToCertificate | String | "" | The file path where the keystore file for connecting to the Dynamics. |
| ProxyPassword | String | "" | The password to be used to authenticate to the proxy. |
| ProxyServer | String | "" | The host of the proxy server. |
| ProxyServerPort | Integer | 0 | The port of the proxy server. |
| ProxyUserName | String | "" | The username to be used to authenticate to the proxy. |
| ReadBatchSize | Integer | 1000 | ReadBatchSize is used to set how many records can be read from Dynamics in a single call. |
| RedirectUri | String | "" | The redirect URI used to obtain the Dynamics authentication URL. |
| ResultPath | String | "" | The path where the execution result files are saved. |
| RetryOnIntermittentErrors | Boolean | true | The RetryOnIntermittentErrors parameter indicates whether to retry the connection when it might occasionally fail due to temporary issues. |
| SaveResult | Boolean | false | The SaveResult parameter indicates whether to save the execution results to a file. |
| ServerUrl | String | "" | The URL for connecting to Dynamics. |
| ServiceTimeout | Integer | 120 | ServiceTimeout is the timeout to receive the full response from Dynamics API. |
| Ssl | Boolean | false | SSL indicates whether the connection is SSL-enabled or supports SSL encryption. |
| Suppress404NotFoundError | Boolean | true | When set to true, if a query results in an HTTP 404 error, a result set will still be created. When set to false, an error is logged instead and no result set is created. |
| SuppressEmptyResultError | Boolean | false | When set to true, if the result of a batch write action results in an empty result set, no error will be output. When set to false and an empty result set is created from a batch writing actions, it will cause an error to be output. |
| TokenPassword | String | "" | The password used to read the token file. |
| TokenPath | String | "" | The tokenPath specifies the file path where the token for connecting to Dynamics is located. |
| UserName | String | "" | The user account used to connect to the server. |
| WriteBatchSize | Integer | 200 | WriteBatchSize is used to set how many records can be written to Dynamics in a single call. |