GraphQL
Building the JDBC URL
After installing your license, launch the connection management page by navigating to the directory containing the driver JAR and running the command java -jar kingswaysoft.jdbc.jar.
Once launched, select JDBC Connection Manager. Enter the required details, and the program will automatically generate your JDBC connection URL. You can then use the Test Connection button to verify the URL and the Copy to Clipboard button to easily use the connection string in your application.
Note: If no license is installed, the connection manager can still generate a JDBC URL, but the Test Connection feature will be disabled.
General Page
The General page on the GraphQL Connection Manager allows you to specify the general settings for the connection.
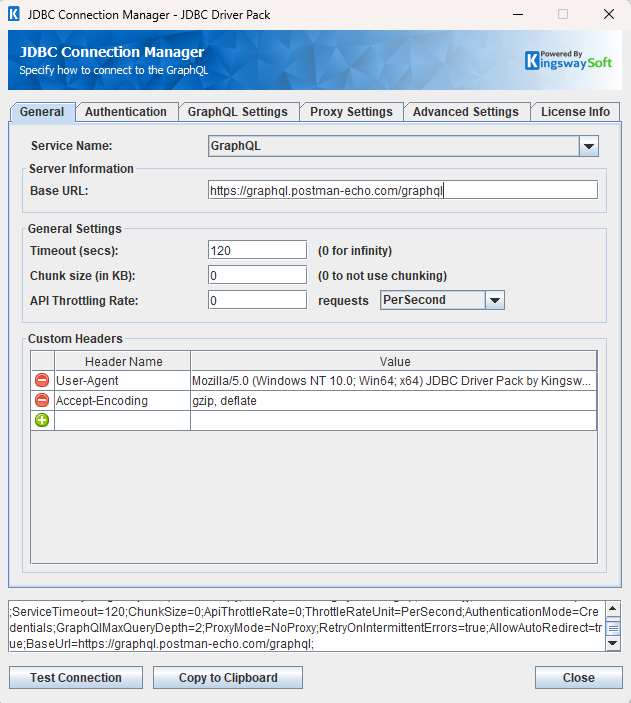
- Server Information
-
- Base URL
-
The URL field represents the address of the web service to connect to.
- General Settings
-
- Timeout (secs)
-
The Timeout (secs) option allows you to specify a timeout value in seconds for the connection. The default value is 120 seconds. Specify 0 for infinite timeout.
- Chunk Size (in KB)
-
The chunk size to use when sending web requests. If a size of 0 is used chunking will not be used.
- API Throttling Rate
-
The API Throttling Rate will limit the number of requests that can be sent per the unit of time selected. This is useful when accessing APIs with request limits. The Requests{" "} drop-down will allow you to specify whether the API Throttling Rate should be per second, minute or hour.
- Custom Headers
-
The Custom Headers grid will allow HTTP headers to be entered that will be used for each request.
Authentication Methods for GraphQL
AWS Signature
- AWS Signature Settings
-
- Signature Version
-
Specify between Version 4 and Version 2.
-
Version 4
Provide an Access Key, Access Secret, Session Token, Service Name, and select an AWS region to establish a connection.
- AWS Signature Settings
-
- Access Key
-
The Access key to be used for authentication.
- Access Secret
-
Provide the Access secret to be used for authentication.
- Session Token
-
The Session Token option allows you to specify a temporary security token, known as temporary security credentials. Note this property is optional.
- AWS Region
-
The AWS Region for the web service endpoint.
- Service Name
-
The AWS service name to be provided.
Version 2
Provide an Access Key, Access Secret, Session Token, and select a Signature Method to establish a connection.
- AWS Signature Settings
-
- Access Key
-
The Access key to be used for authentication.
- Access Secret
-
Provide the Access secret to be used for authentication.
- Session Token
-
The Session Token option allows you to specify a temporary security token, known as temporary security credentials. Note this property is optional.
- Signature Method
- Choose between available Signature Methods
- HMAC-SHA1
- HMAC-SHA256
Azure OAuth
-
Authentication Mode: Azure OAuth
-
- OAuth Type
-
The OAuth Type can be chosen between the below.
- Certificate
- Client Credentials
-
Certificate
Use a Tenant ID, Client ID, and Scope together with a saved Certificate File and Certificate Password to establish a connection.
NOTE: Only PFX format is supported for the certificate file. When certificates are newly generated, a PEM file is also created; configure this PEM file in the portal.
-
Authentication
-
- Tenant ID
-
Provide tenant identifiers such as the tenant ID or domain name for your Microsoft organization. A default value “common” is used when no value is provided.
- Client ID
-
The Application ID of the Azure Active Directory App.
- Path to Certificate
-
Provide the path to the certificate file to use for authentication. Click the ellipses button to browse their file system for the certificate.
- Certificate Password
-
Provide the password to the certificate file.
- Scope
-
Set Scope to identify the set of resources and operations that the selected certificate permits. The value passed for the scope parameter in this request should be the resource identifier (Application ID URI) of the resource you want, affixed with the .default suffix.
Client Credentials
Use a Tenant ID, Client ID, and Scope with a Client Secret to establish a connection.
- Azure OAuth
-
- Tenant ID
-
Provide tenant identifiers such as the tenant ID or domain name for your Microsoft organization. A default value “common” is used when no value is provided.
- Client ID
-
The Application ID of the Azure Active Directory App.
- Client Secret
-
The Application Secret that you generated for your app in the app registration portal.
- Scope
-
Set Scope to identify the set of resources and operations that an access token permits. The value passed for the scope parameter in this request should be the resource identifier (Application ID URI) of the resource you want, affixed with the .default suffix.
-
Basic
Use your instance URL with a Username and Password to establish a connection.
-
Authentication Mode: Basic
-
Basic authentication adds a basic authentication header to web requests. The HTTP Connection Manager will append the Base64 encoded string value representing your username and password to the text “Basic” in the request Authorization header.
- Credentials
-
- Username
-
The Username to use when accessing the web service.
- Password
-
The Password to use when accessing the web service.
Bearer Token
Use a Bearer Token to establish your connection. This token lets you authenticate requests using a static access key.
-
Authentication Mode: Bearer Token
- Bearer Token
-
The Bearer Token allows requests to authenticate using a static access key. HTTP Connection Manager will append the token value to the text "Bearer " in the required format to the request Authorization header.
Credentials (Basic, Digest, NTLM)
Use your instance URL along with your Domain, Username, and Password to establish a connection.
- Authentication Mode: Credentials
-
- Domain
-
The domain or host to authenticate against.
- Username
-
The Username option allows you to specify the user account that you want to use when connecting to the specified server.
- Password
-
The Password option allows you to specify the password for the above user account in order to log in to the specified server.
Custom Token
Use a custom token obtained via a CURL command. The CURL command sends a request and returns a response. The TokenStrategy and TokenExpression define the path to the desired value. Click the Test Custom Token button to open a window where you can inspect the CURL file and test the token request. The token can then be used by specifying @Connection[AccessToken] in the supported connection properties.
- Custom Access Token Settings
-
- CURL Source
-
The CURL Source contains two allows options:
- File: Provide a local file for the curl command.
- Manually Enter: Fill in the command text.
- CURL File
-
Provide the location to a file that contains a token request CURL command.
- CURL Command Text
-
Provide the CURL command to get the authorization token.
- Find Token Strategy
-
Provide the find token strategy by specifying one from the below.
- JPath
- XPath
- Regex
- Header
- Find Token Expression
-
Provide the JPath, XPath, expression, etc. that can be used to extract the token value from the response.
- Token Expiry
-
Manually specify the token expiry in seconds.
- Test Custom Token
-
Click on this button to open up the below screen in which you can parse through the CURL File and test the token request.
-
Note: The Custom Access Token works by making a web request to retrieve an authorization token using a CURL command from a file. After the request is made the token is extracted from the response using one of the 'Find Token Strategies' and a 'Find Token Expression'. Once the token is extracted from the response it will be available for use by specifying '@Connection[AccessToken]' in supported connection properties or supported component properties. The token is re-retrieved after the specified expiry time in seconds.
Google Service Account
Use a JSON Key File Path along with a Scope to establish a connection.
- Google Service Account
-
The Service Account option allows you to specify the account which will be used to connect to your Google service.
-
- Certificate Location (Only for Certificate type OAuth type)
-
The certificate location can be either of the below.
- Store
- File System
- Path to File System
-
Provide the path to the certificate file to use for authentication. Click the ellipses button to browse their file system for the certificate. This option is available when you choose File System as Certificate Location.
Note: The component supports Azure Blob Shared Access Signature (SAS) URL in the certificate path.
- Certificate Password
-
Provide the password to the certificate file. This option is available when you choose File System as the Certificate Location.
- Certificate Thumbprint
-
This option allows you to specify the thumbprint of the selected certificate in order to authenticate using your Google Service Account.
- Scope
-
Set Scope to identify the set of resources and operations that an access token permits.
JWT
Use a JWT (JSON Web Token) to establish a connection. You can import the token using the Import Claims From Existing JWT button or enter it manually in the provided table.
- Authentication Mode: JWT
-
- Import Claims from Existing JWT…
-
Clicking on this button will open up the below page to import claims from existing JWT.
- JWT Claims
-
The grid contains the following columns
- Claim Name
- Claim Value
- Header (checkbox)
- JWT Secret
-
Provide the JWT Secret.
Kerberos
Use your instance URL along with your Domain, Username, and Password to establish a connection.
- Authentication Mode: Kerberos
-
- Domain
-
The domain or host to authenticate against.
- Username
-
The Username option allows you to specify the user account that you want to use when connecting to the specified server.
- Password
-
The Password option allows you to specify the password for the above user account in order to log in to the specified server.
None
Use this option when your request does not require authorization.
OAuth 1
Establish a connection using the OAuth 1.0 method by selecting a signature method and entering the required credentials.
- For HMAC signature methods, provide a Consumer Key, Consumer Secret, Access Token, and Token Secret.
- For RSA signature methods, provide a Consumer Key, Access Token, and Private Key.
- Authentication Mode: OAuth 1
-
- Generate Token file…
-
The Generate Token File... button takes you to the OAuth token generator.
- Path to Token File
-
The path to the token file on the file system.
- Token File Password
-
The password to the token file.
OAuth 2
Use a saved token file along with its token password to establish a connection. To generate a new token file, click Generate Token File and follow the on-screen process. After saving the token file locally, enter the token password to connect. A dropdown menu allows you to customize where the access token appears in your request.
- Authentication Mode: OAuth 2
-
- Generate Token file…
-
The Generate Token File... button directs you to the OAuth token generator.
- Path to Token File
-
The path to the token file on the file system.
- Token File Password
-
The password to the token file.
- Put Access Token In
-
In the part of the web request where the token should go, the below options available:
- HTTP Header
- Query String
- Custom
Note: The “Custom” access token location option is designed to work for advanced scenarios where the injection of the access token received from the OAuth authentication flow needs to be managed in a very particular way, such as inserting it in your HTTP request body, or using it in a different HTTP header or query string parameter (other than the standard OAuth Authorization HTTP header or query string parameter). Note that when using this option, where the access token is actually placed will depend on your implementation at the component level by using the @Connection[AccessToken] variable; otherwise, the token will be simply ignored. Supported components includes Web Service/XML/JSON components.
OAuth Client Credentials
Use your ClientId, ClientSecret, Scope, and TokenUrl to establish an OAuth connection. A dropdown menu lets you customize the placement of the access token in the request.
- Authentication Mode: OAuth Client Credentials
-
-
- Client Id
-
The Client Id OAuth parameter.
- Client Secret
-
The Client Secret OAuth parameter.
-
- Scope
-
The Scopes may be set optionally for the level of access an application will have for a resource.
- Request Tokens URL
-
The base URL to request tokens from.
-
- Basic Authentication
-
The Basic Authentication can be enabled to send client credentials over authorization header rather than request body.
- Put Access Token In
-
In the part of the web request where the token should go, the below options available:
- HTTP Header
- Query String
- Custom
Note: The “Custom” access token location option is designed to work for advanced scenarios where the injection of the access token received from the OAuth authentication flow needs to be managed in a very particular way, such as inserting it in your HTTP request body, or using it in a different HTTP header or query string parameter (other than the standard OAuth Authorization HTTP header or query string parameter). Note that when using this option, where the access token is actually placed will depend on your implementation at the component level by using the @Connection[AccessToken] variable; otherwise, the token will be simply ignored. Supported components includes Web Service/XML/JSON components.
-
Static Token
Use your Token Name and Token Value to establish a connection. You can also use the dropdown to customize where the access token appears in the request.
- Authentication Mode: Static Token
-
-
- Static Token authentication uses a fixed predefined token or API Key that is expected to remain the same for continuous authentications.
-
- Put Access Token In
-
In the part of the web request where the token should go, there are three options available:
- HTTP Header
- Query String
- Custom
Note: The “Custom” access token location option is designed to work for advanced scenarios where the injection of the access token received from the OAuth authentication flow needs to be managed in a very particular way, such as inserting it in your HTTP request body, or using it in a different HTTP header or query string parameter (other than the standard OAuth Authorization HTTP header or query string parameter). Note that when using this option, where the access token is actually placed will depend on your implementation at the component level by using the @Connection[AccessToken] variable; otherwise, the token will be simply ignored. Supported components includes Web Service/XML/JSON components.
- Token Name
-
The Token Name is the unique identifier to reference the authentication token.
- Token Value
-
The Token Value is the secret key or string used for authentication.
-
Windows Integrated Authentication
No credential input is required. This method automatically uses the credentials of the currently signed-in user.
WSSE
Use your Username and Password to establish a connection using WSSE.
- Username
-
The Username to use when accessing the web service.
- Password
-
The Password to use when accessing the web service.
- Test Connection
-
After all the connection information has been provided, click the "Test Connection" button to test if the user credentials entered can successfully connect to the selected service.
GraphQL Settings
The GraphQLSettings page on the GraphQL Connection Manager allows you to specify some specific and optional settings for the connection.
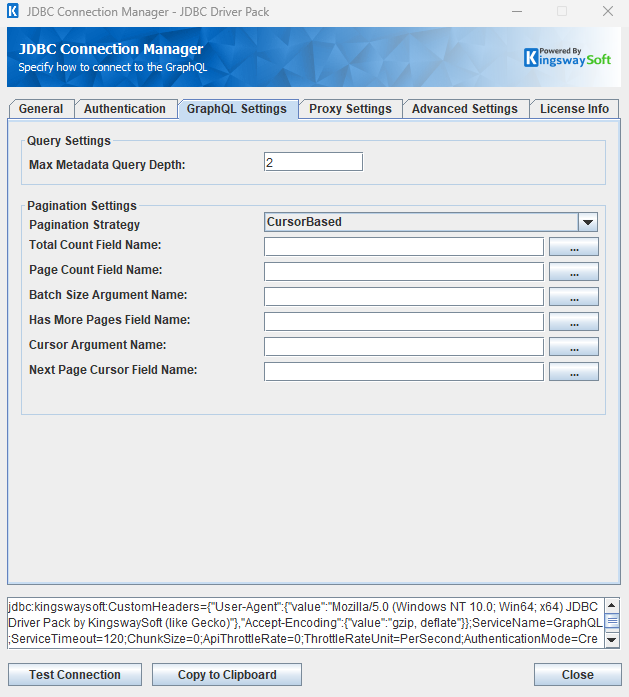
Query Settings
-
- Max Metadata Query Depth
-
The Max Metadata Query Depth option allows you to specify how deep you would like to go to discover the metadata fields.
Pagination Settings
-
- Pagination Strategy
- The
Pagination Strategy can be picked out of the three options:
- CursorBased
- None
- OffsetBased
- Based on the Pagination Strategy chosen, properties specific to that strategy can now be set.
-
- Total Count Field Name
- Page Count Field Name
- Batch Size Argument Name
- Has More Pages Field Name
- Cursor Argument Name{" "} (Only with CursorBased pagination strategy)
- Next Page Cursor Field Name (Only with CursorBased pagination strategy)
- Record Offset Start Argument Name (Only with OffsetBased pagination strategy)
- Record Offset End Argument Name (Only with OffsetBased pagination strategy)
- Page Argument Name (Only with OffsetBased pagination strategy)
Proxy Settings Page
The Proxy Settings page on the GraphQL Connection Manager allows you to specify some advanced and optional settings for the connection.
Proxy Server Settings
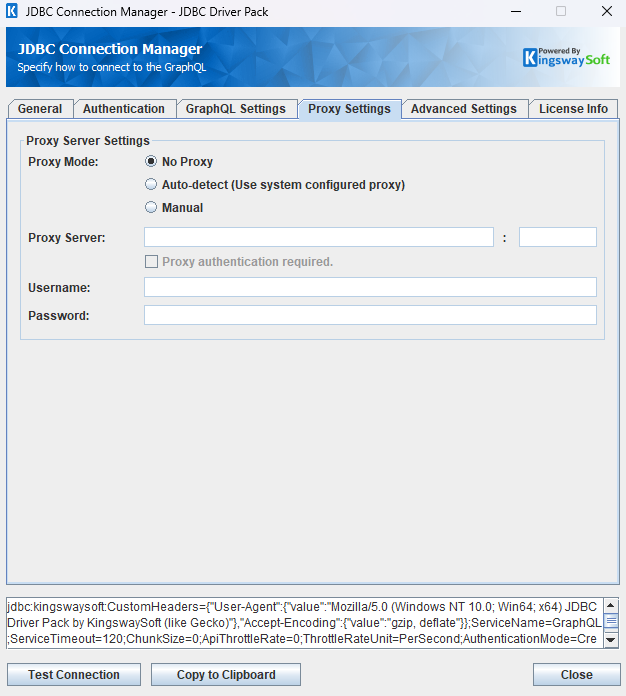-
- Proxy Mode
-
The Proxy Mode option allows you to specify how you want to configure the proxy server setting. There are three options available.
- No Proxy
- Auto-detect (Using system-configured proxy)
- Manual
- Proxy Server
-
Using the Proxy Server option allows you to specify the name of the proxy server for the connection.
- Port
-
The Port option allows you to specify the port number of the proxy server for the connection.
- Username (Proxy Server Authentication)
-
The Username option (under Proxy Server Authentication) allows you to specify the proxy user account.
- Password (Proxy Server Authentication)
-
The Password option (under Proxy Server Authentication) allows you to specify the proxy user's password.
Advanced Settings Page
The Advanced Settings page allows you to specify advanced settings for the connection.
Proxy Server Settings
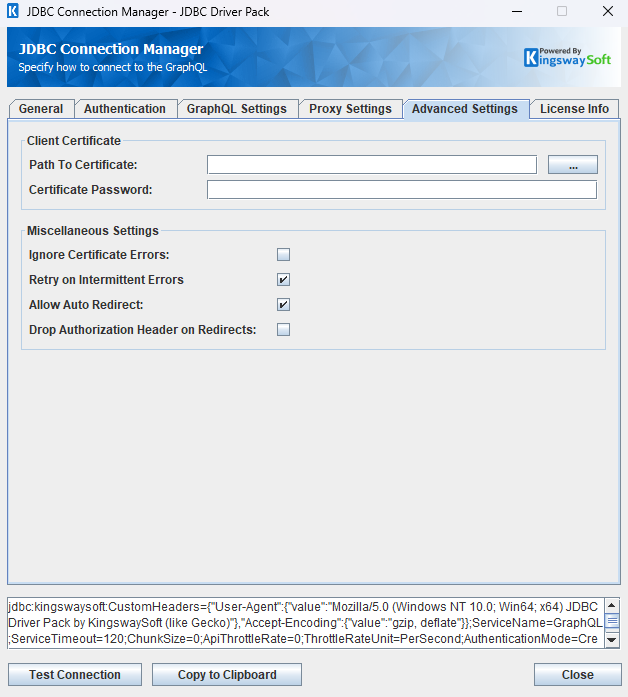- Client Certificate
-
- Path to Certificate
-
Provide the path to the certificate file to use for authentication. Click the ellipses button to browse their file system for the certificate.
- Certificate Password
-
Provide the password to the certificate file.
- Miscellaneous Settings
-
- Ignore Certificate Errors
-
This option can be used to ignore those SSL certificate errors when connecting to the target server.
Warning: Enabling the "Ignore Certificate Errors" option is generally NOT recommended, particularly for production instances. Unless there is a strong reason to believe the connection is secure - such as the network communication is only happening in an internal infrastructure, this option should be unchecked for best security.
Note: When this option is enabled, it applies to all HTTP-based SSL connections in the same job process.
- Concurrent Writing Threads
-
This option can be used to set the number of threads to be used during write operations. This can improve performance during large-volume write operations.
- Retry on Intermittent Errors
-
The retry on intermittent errors determines if requests will be retried when there is an error. If this option is checked requests will be retried up to 3 times.
- Allow Auto Redirect
-
The allow auto redirect option determines if requests will be automatically redirected when receiving a server-side redirect.
- Drop Authorization Header on Redirects
-
Allows you to specify whether to drop the authorization header on any redirects.
Using the JDBC Driver
This section provides detailed examples of how to use JDBC classes (like Connection, Statement, and ResultSet) to interact with GraphQL data. You’ll find examples for both regular and prepared statements to handle complex or frequently executed queries.
Executing Statements
Once you've connected from your code (see Connecting with DriverManager and Connecting with DataSource), you can execute SQL statements using the Statement class. Refer to the Executing Prepared Statements section for information on how to execute parameterized statements.
SELECT
Use the executeQuery (or generic execute) method of the Statement class to run SQL statements that returns data. After executing the query, retrieve the results by calling the getResultSet method.
String sql = "SELECT * FROM app";
try {
    ResultSet resultSet = statement.executeQuery(sql);
    LOGGER.info(resultSet.toString());
} catch (SQLException e) {
    LOGGER.severe(e.toString());
}
INSERT
Use the Statement class’s executeUpdate (or generic execute) method to perform an INSERT operation. After execution, retrieve the results from the getResultSet method to view the inserted record’s ID, any errors, and details of the affected data.
String sql = "INSERT INTO customer (input-email, input-firstName, input-lastName) VALUES ('[email protected]', 'John', 'Smith')";
try {
    statement.executeUpdate(sql);
    LOGGER.info(statement.getResultSet().toString());
} catch (SQLException e) {
    LOGGER.severe(e.toString());
}
id,errorcode,errormessage,processdata,haserror
gid://shopify/Customer/7559639957617,null,null,{"var1":{"email":"[email protected]","firstName":"John","lastName":"Smith"}},false
UPDATE
Use the executeUpdate (or generic execute) method of the Statement class to perform an UPDATE operation. After the update, retrieve the results with the getResultSet method to view the updated record’s ID, any errors encountered, and details of the changes made.
String sql = "UPDATE customer SET input-firstName = 'nameUpdate' WHERE input-id = 'gid://shopify/Customer/7559639957617'";
try {
    statement.executeUpdate(sql);
    LOGGER.info(statement.getResultSet().toString());
} catch (SQLException e) {
    LOGGER.severe(e.toString());
}
id,errorcode,errormessage,processdata,haserror
gid://shopify/Customer/7559639957617,null,null,{"var1":{"id":"gid://shopify/Customer/7559639957617","firstName":"nameUpdate"}},false
DELETE
Use the executeUpdate (or generic execute) method of the Statement class to run a DELETE operation. Then, use the getResultSet method to check the deleted record’s ID, any errors, and information on what was removed.
String sql = "DELETE FROM customer WHERE input-id = 'gid://shopify/Customer/7559639957617'";
try {
    statement.executeUpdate(sql);
    LOGGER.info(statement.getResultSet().toString());
} catch (SQLException e) {
    LOGGER.severe(e.toString());
}
id,errorcode,errormessage,processdata,haserror
gid://shopify/Customer/7559639957617,null,null,{"var1":{"id":"gid://shopify/Customer/7559639957617"}},false
UPSERT
Use the UPSERT operation to either insert a new record or update an existing one in a single call.
Not all tables support upsert operations; query the system.tables table to identify which tables support upsert operations.
If the key isn't matched, then a new object record is created.
If the specified key is matched, the action taken will depend on if there were multiple matches or not.
- If the key is matched once, the existing object record is updated.
- If the key is matched multiple times, an error is generated and the object record is not inserted or updated.
The Upsert SQL statement must end with ON DUPLICATE KEY UPDATE UPSERTFIELDS = key, where key refers to the field specified by the user as the upsert key.
After executing the statement, use getResultSet to view the upserted record’s ID, any errors, and details of the changes.
String sql = "UPSERT INTO customers (store_id, customer_id, email_address, first_name, last_name, id, opt_in_status) VALUES ('357822853', '123', '[email protected]', 'testF', 'testL', '123', true) ON DUPLICATE KEY UPDATE UPSERTFIELDS = (email_address)";
try {
    statement.executeUpdate(sql);
    LOGGER.info(statement.getResultSet().toString());
} catch (SQLException e) {
    LOGGER.severe(e.toString());
}
id,errorcode,errormessage,processdata,haserror
null,null,null,{"var2":false,"var4":1,"var3":"gid://shopify/Location/19550830705","var1":"UTC"},false
CallMutation
Use the Statement class’s executeUpdate (or executeQuery) method to run a CallMutation query. CallMutation statements resemble INSERT statements but must include the full mutation name, and output fields are specified with an OUT parameter (prefixed with "OUT"). If the mutation has output fields, you can optionally specify these fields as an OUT parameter. If no OUT parameter is specified, all output fields will be output. Refer to system.functions to determine available mutations. To determine if a field is supported as an input/output field, refer to system.functions.columns for more information.
For instance, the CallMutation statement for INSERT INTO customer (input-email) VALUES ('email') would be: CallMutation customerCreate (input-email, OUT customer-id) VALUES ('email')
After executing the statement, retrieve the results with getResultSet to see the mutation’s record ID, any errors, and related details. Any fields specified as output fields will also be displayed in the result set.
String sql = "CallMutation commentSpam (id, OUT comment-id) VALUES ('gid://shopify/Comment/20430717041')";
try {
    statement.executeUpdate(sql);
    LOGGER.info(statement.getResultSet().toString());
} catch (SQLException e) {
    LOGGER.severe(e.toString());
}
comment-id,errorcode,errormessage,processdata,haserror
gid://shopify/Comment/20430717041,null,null,{"var1":"gid://shopify/Comment/20430717041"},false
Executing Prepared Statements
PreparedStatements can boost performance when running the same SQL statement multiple times with different parameters. Unlike a regular Statement, a PreparedStatement is created with a SQL statement that you can execute repeatedly with dynamic values. This special type of statement is derived from the more general class, Statement.
Below are the steps outlining how to execute a prepared statement:
Creating and Executing a Prepared Statement
- Create a PreparedStatement
-
-
Use the
prepareStatementmethod of theConnectionclass to instantiate aPreparedStatement.Refer to Connecting with DriverManager or Connecting with DataSource for information related to establishing connections.
-
- Set Parameters
-
- Declare parameters by calling the corresponding setter method of the
PreparedStatement. - NOTE: The parameter indices start at 1.
- Declare parameters by calling the corresponding setter method of the
- Execute the PreparedStatement
-
- Use the generic
executeorexecuteUpdatemethod of thePreparedStatement.
- Use the generic
- Retrieve Results
-
- Call the
getResultSetmethod of thePreparedStatementto obtain the query results, which will be returned as a ResultSet.
- Call the
- Iterate Over the Result Set
-
- Use the
nextmethod of the ResultSet to iterate through the results. To obtain column information, utilize theResultSetMetaDataclass. Instantiate aResultSetMetaDataobject by calling thegetMetaDatamethod of the ResultSet.
- Use the
SELECT
Use the executeQuery (or generic execute) method of the PreparedStatement class to run SQL statements that returns data. After executing the query, retrieve the results by calling the getResultSet method.
String sql = "SELECT * FROM companies WHERE names IN (?, ?)";
try {
    PreparedStatement ps = connection.prepareStatement(sql);
    ps.setString(1, "name1");
    ps.setString(2, "name2");
    ps.execute(sql);
    while (ps.getResultSet().next()) {
        for (int i = 1; i <= ps.getResultSet().getMetaData().getColumnCount(); i++) {
            LOGGER.info(ps.getResultSet().getMetaData().getColumnLabel(i) + "="
            + ps.getResultSet().getString(i));
        }
    }
} catch (SQLException e) {
    LOGGER.error(e);
}
INSERT
Use the PreparedStatement class’s executeUpdate (or generic execute) method to perform an INSERT operation. After execution, retrieve the results from the getResultSet method to view the inserted record’s ID, any errors, and details of the affected data.
String sql = "INSERT INTO customer (input-email, input-firstName) VALUES (?, ?)";
try {
    PreparedStatement ps = connection.prepareStatement(sql);
    ps.setString(1, "[email protected]");
    ps.setString(2, "name");
    ps.executeUpdate();
    LOGGER.info(ps.getResultSet().toString());
} catch (SQLException e) {
    LOGGER.error(e);
}
id,errorcode,errormessage,processdata,haserror
gid://shopify/Customer/7559659028593,null,null,{"var1":{"email":"[email protected]","firstName":"firstNameInsert"}},false
UPDATE
Use the executeUpdate (or generic execute) method of the PreparedStatement class to perform an UPDATE operation. After the update, retrieve the results with the getResultSet method to view the updated record’s ID, any errors encountered, and details of the changes made.
String sql = "UPDATE customer SET input-firstName = ? WHERE input-id = ?";
try {
    PreparedStatement ps = connection.prepareStatement(sql);
    ps.setString(1, "nameUpdate");
    ps.setString(2, "gid://shopify/Customer/7559659028593");
    ps.executeUpdate();
    LOGGER.info(ps.getResultSet().toString());
} catch (SQLException e) {
    LOGGER.error(e);
}
id,errorcode,errormessage,processdata,haserror
gid://shopify/Customer/7559659028593,null,null,{"var1":{"id":"gid://shopify/Customer/7559659028593","firstName":"nameUpdate"}},false
DELETE
Use the executeUpdate (or generic execute) method of the PreparedStatement class to run a DELETE operation. Then, use the getResultSet method to check the deleted record’s ID, any errors, and information on what was removed.
String sql = "DELETE FROM customer WHERE input-id = ?";
try {
    PreparedStatement ps = connection.prepareStatement(sql);
    ps.setString(1, "gid://shopify/Customer/7559659028593");
    ps.executeUpdate();
    LOGGER.info(ps.getResultSet().toString());
} catch (SQLException e) {
    LOGGER.error(e);
}
id,errorcode,errormessage,processdata,haserror
gid://shopify/Customer/7559659028593,null,null,{"var1":{"id":"gid://shopify/Customer/7559659028593"}},false
UPSERT
Use the UPSERT operation to either insert a new record or update an existing one in a single call.
Not all tables support upsert operations; query the system.tables table to identify which tables support upsert operations.
If the key isn't matched, then a new object record is created.
If the specified key is matched, the action taken will depend on if there were multiple matches or not.
- If the key is matched once, the existing object record is updated.
- If the key is matched multiple times, an error is generated and the object record is not inserted or updated.
The Upsert SQL statement must end with ON DUPLICATE KEY UPDATE UPSERTFIELDS = key, where key refers to the field specified by the user as the upsert key.
After executing the statement, use getResultSet to view the upserted record’s ID, any errors, and details of the changes.
String sql = "UPSERT INTO deliveryPromiseProviderUpsert (active, fulfillmentDelay, locationId, timeZone) VALUES "
    + "(?, ?, ?, ?) ON DUPLICATE KEY UPDATE UPSERTFIELDS = (locationId)";
try {
    PreparedStatement ps = connection.prepareStatement(sql);
    ps.setBoolean(1, false);
    ps.setInt(2, 1);
    ps.setString(3, "gid://shopify/Location/19550830705");
    ps.setString(4, "UTC");
    ps.executeUpdate();
    LOGGER.info(ps.getResultSet().toString());
} catch (SQLException e) {
    LOGGER.error(e);
}
id,errorcode,errormessage,processdata,haserror
null,null,null,{"var2":false,"var4":1,"var3":"gid://shopify/Location/19550830705","var1":"UTC"},false
CallMutation
Use the PreparedStatement class’s executeUpdate (or executeQuery) method to run a CallMutation query. CallMutation statements resemble INSERT statements but must include the full mutation name, and output fields are specified with an OUT parameter (prefixed with "OUT"). If the mutation has output fields, you can optionally specify these fields as an OUT parameter. If no OUT parameter is specified, all output fields will be output. Refer to system.functions to determine availaible mutations. To determine if a field is supported as an input/output field, refer to system.functions.columns for more information.
For instance, the CallMutation statement for INSERT INTO customer (input-email) VALUES ('email') would be: CallMutation customerCreate (input-email, OUT customer-id) VALUES ('email')
After executing the statement, retrieve the results with getResultSet to see the mutation’s record ID, any errors, and related details. Any fields specified as output fields will also be displayed in the result set.
String sql = "CallMutation commentSpam (id, OUT comment-id) VALUES (?)";
try {
    Connection connection = buildRestConnectionFromDriverManager();
    PreparedStatement ps = connection.prepareStatement(customSql);
    ps.setString(1, "gid://shopify/Comment/20430717041");
    ps.executeUpdate();
    LOGGER.info(ps.getResultSet().toString());
} catch (SQLException e) {
    e.printStackTrace();
}
comment-id,errorcode,errormessage,processdata,haserror
gid://shopify/Comment/20430717041,null,null,{"var1":"gid://shopify/Comment/20430717041"},false
Metadata Discovery
This section provides examples on how to retrieve table and column metadata using the getTables, getColumns, and getPrimaryKeys methods from the DatabaseMetaData interface. These are essential for discovering database structures.
Tables
The getTables method from the DatabaseMetaData interface can be used to retrieve a list of tables.
This method only retrieves tables that are not write-only.
To get a list of tables which include write-only tables, query the table system.tables.
try {
    Connection connection = buildRestConnectionFromDriverManager();
    ResultSet rs = connection.getMetaData().getTables(null, null, null, null);
    LOGGER.info("\r\n" + rs.toString());
} catch (SQLException e) {
    LOGGER.severe(e.getMessage());
}
TABLE_CAT,TABLE_SCHEM,TABLE_NAME,TABLE_TYPE,REMARKS
null,null,adaptive_auth_event,Table,
null,null,agent_assist_recommendation,Table,
null,null,agent_file,Table,
......
The getTables method returns the following metadata columns:
| Column Name | Data Type | Description |
|---|---|---|
| TABLE_CAT | String | The catalog that contains the table. |
| TABLE_SCHEM | String | The schema of the table. |
| TABLE_NAME | String | The name of the table. |
| TABLE_TYPE | String | The type of the table (e.g., TABLE or VIEW). |
| REMARKS | String | An optional description of the table. |
Columns
Use the getColumns method of the DatabaseMetaData interface to retrieve detailed information about database columns. To narrow the results to a specific table, specify the table name using the parameter table_name.
This method returns columns only for tables that are not write-only.
To get columns for tables which are write-only, query the table system.columns.
try {
    Connection connection = buildRestConnectionFromDriverManager();
    ResultSet rs = connection.getMetaData().getColumns(null, null, "agent_file", null);
    LOGGER.info(rs.toString());
} catch (SQLException e) {
    e.printStackTrace();
}
TABLE_CAT,TABLE_SCHEM,TABLE_NAME,COLUMN_NAME,DATA_TYPE,TYPE_NAME,COLUMN_SIZE,BUFFER_LENGTH,DECIMAL_DIGITS,NUM_PREC_RADIX,NULLABLE,REMARKS,COLUMN_DEF,SQL_DATA_TYPE,SQL_DATETIME_SUB,CHAR_OCTET_LENGTH,ORDINAL_POSITION,IS_NULLABLE,SCOPE_CATALOG,SCOPE_SCHEMA,SCOPE_TABLE,SOURCE_DATA_TYPE,IS_AUTOINCREMENT,IS_GENERATEDCOLUMN,DTS_TYPE
null,null,agent_file,sys_updated_on,91,java.util.Date,40,null,0,0,null,null,null,91,null,null,null,null,null,null,null,null,null,null,DT_DBDATE
null,null,agent_file,start_date,91,java.util.Date,40,null,0,0,null,null,null,91,null,null,null,null,null,null,null,null,null,null,DT_DBDATE
null,null,agent_file,sys_updated_by,12,java.lang.String,40,null,0,0,null,null,null,12,null,null,null,null,null,null,null,null,null,null,DT_WSTR
The getColumns method returns the following columns:
| Column Name | Data Type | Description |
|---|---|---|
| TABLE_CAT | String | The database name. |
| TABLE_SCHEM | String | The table schema. |
| TABLE_NAME | String | The table name. |
| COLUMN_NAME | String | The column name. |
| DATA_TYPE | Integer | The data type represented by a constant value from java.sql.Types. |
| TYPE_NAME | String | The data type name used by the driver. |
| COLUMN_SIZE | Integer | The length in characters of the column or the numeric precision. |
| BUFFER_LENGTH | Integer | The buffer length. |
| DECIMAL_DIGITS | Integer | The column scale or number of digits to the right of the decimal point. |
| NUM_PREC_RADIX | Integer | The radix, or base. |
| NULLABLE | Integer | Whether the column can contain null as defined by the following JDBC DatabaseMetaData constants: columnNoNulls (0) or columnNullable (1). |
| REMARKS | String | The comment or note associated with the object. |
| COLUMN_DEF | String | The default value for the column. |
| SQL_DATA_TYPE | Integer | Reserved by the specification. |
| SQL_DATETIME_SUB | Integer | Reserved by the specification. |
| CHAR_OCTET_LENGTH | Integer | The maximum length of binary and character-based columns. |
| ORDINAL_POSITION | Integer | The position of the column in the table, starting at 1. |
| IS_NULLABLE | String | Whether a null value is allowed: YES or NO. |
| SCOPE_CATALOG | String | The catalog of the table referenced by a reference attribute (null if DATA_TYPE is not REF). |
| SCOPE_SCHEMA | String | The schema of the table referenced by a reference attribute (null if DATA_TYPE is not REF). |
| SCOPE_TABLE | String | The name of the table referenced by a reference attribute (null if DATA_TYPE is not REF). |
| SOURCE_DATA_TYPE | Short | The source type of a distinct type or user-defined REF type (null if DATA_TYPE is neither DISTINCT nor a user-defined REF). |
| IS_AUTOINCREMENT | String | Whether the column value is assigned by GraphQL in fixed increments. |
| IS_GENERATEDCOLUMN | String | Whether the column is generated: YES or NO. |
| DTS_TYPE | String | Object DTS attribute type. |
Primary Keys
The getPrimaryKeys method in the DatabaseMetaData interface is used to retrieve metadata about primary keys for a given table in GraphQL.
try {
    Connection connection = buildRestConnectionFromDriverManager();
    ResultSet resultSet = connection.getMetaData().getPrimaryKeys(null, null, "agent_file");
    LOGGER.info("\r\n" + resultSet.toString());
    Assertions.assertNotNull(resultSet);
} catch (SQLException e) {
    LOGGER.severe(e.getMessage());
}
TABLE_CAT,TABLE_SCHEM,TABLE_NAME,COLUMN_NAME,KEY_SEQ,PK_NAME
null,null,agent_file,sys_id,1,null
The getPrimaryKeys method returns the following columns:
| Column Name | Data Type | Description |
|---|---|---|
| TABLE_CAT | String | The catalog name. |
| TABLE_SCHEM | String | The schema name. |
| TABLE_NAME | String | The name of the table that contains the primary key. |
| COLUMN_NAME | String | The name of the column that serves as the primary key for the table. |
| KEY_SEQ | Short | The sequence number within the primary key. |
| PK_NAME | String | The primary key name. |
Connection Settings
| Connection Setting | Type | Default Value | Description |
|---|---|---|---|
| AccessKey | String | "" | A unique identifier used to authenticate API requests in cloud services like AWS. |
| AccessSecret | String | "" | A secret key associated with the AccessKey for secure sign-in requests to cloud services. |
| AccessToken | String | "" | The AccessToken is used to authenticate access to GraphQL. |
| AccessTokenSecret | String | "" | A secret key paired with the AccessToken to sign API requests and confirm integrity. |
| AllowAutoRedirect | Boolean | true | Whether the HTTP client should automatically follow redirect when the server responds with a redirect status. |
| ApiKey | String | "" | The ApiKey is the unique identifier used for authenticating API requests to access GraphQL resources. |
| ApiThrottleRate | Integer | 10 | The maximum number of API requests a client can make to the server within a specific time period, defined in the ThrottleRateUnit setting. |
| AuthenticationMode | String | "AuthorizationCode" | AuthenticationMode specifies the method used to authenticate when connecting to GraphQL GraphQL API. |
| AWSRegion | String | "" | The geographical region where the AWS resources are hosted. |
| AzureCertificatePassword | String | "" | The password associated with the certificate file for decryption. |
| AzureOAuthType | String | "Certificate" | The method used for authenticating a client to an authorization server. |
| AzurePathToCertificate | String | "" | The file path to a certificate used for encrypted communication during connection. |
| BaseUrl | String | "" | The root URL or endpoint of the API or service being connected. |
| BasicAuth | Boolean | false | Whether the credentials are encoded in the HTTP header for connection verification. |
| BatchSizeArgumentName | String | "" | The argument used to indicate the batch size. |
| BearerToken | String | "" | A token provided to grant API requests access to resources. |
| BulkPollingInterval | Integer | 5 | How often the component checks the job status until the job status is COMPLETE. |
| CacheExpirationTime | Integer | 30 | Defines the expiration time for cache. A value of 0 disables caching. |
| CertificatePassword | String | "" | The password associated with the certificate file for decryption. |
| ChunkSize | Integer | 0 | The size of data chunks that are sent or received in an API request or response. |
| ClientId | String | "" | A unique identifier for the application or client making requests to an API. |
| ClientSecret | String | "" | A secret key used with the ClientId to authenticate a client in OAuth |
| ConcurrentWritingThreads | Integer | 1 | The number of threads for executing operations in parallel. A value of 0 will disable multi-threading. |
| ConnectionTimeout | Integer | 30 | ConnectionTimeout is the maximum amount of time the program will wait to set up a connection to the GraphQL API. |
| ConsumerKey | String | "" | A public identifier for the client making the API request. |
| ConsumerSecret | String | "" | A private key associated with the ConsumerKey used to securely authenticate the client. |
| CurlCommandText | String | "" | The CURL command in text form used to test the connection to an API. It includes details such as HTTP method, headers, and any payload. |
| CurlFilePath | String | "" | The file path to a CURL file containing predefined settings for sending requests. |
| CurlSource | String | "" | The source of the CURL command and whether the CurlFilePath or CurlCommandText is being used. |
| CursorArgumentName | String | "" | The argument name used to indicate the cursor. |
| CustomHeaders | String | "" | A JsonNode String of header key value pairs used in requests. |
| Domain | String | "" | The domain name or host being connected to. |
| DropAuthHeader | Boolean | false | Whether or remove or ignore the authentication header in the request. |
| GoogleCertificatePassword | String | "" | The password associated with the certificate file for decryption. |
| GoogleJsonKeyFile | String | "" | The GoogleJsonKeyFile option specifies the file path for the JSON key file that is used when connecting using a Google Service Account. |
| GooglePathToCertificate | String | "" | The file path to a certificate used for encrypted communication during connection. |
| GraphQlMaxQueryDepth | Integer | 2 | GraphQlMaxQueryDepth refers to the maximum depth allowed for a GraphQL query to avoid performance issues. It has a maximum valid value of 8 and will be used when a higher depth is used. |
| HasMorePagesFieldName | String | "" | The field used to indicate whether there are more pages for pagination. |
| IgnoreCertificateErrors | Boolean | false | Specifies whether to verify the certificate when connecting to GraphQL. If certificate verification is not required, you can set this value to 'true'. |
| IgnoreError | Boolean | false | Determines if the program continues executing SQL statements after encountering an error. |
| JwtClaims | String | "" | The claims encoded within a JSON Web Token (JWT). |
| JwtKeyFile | String | "" | A file containing a key used to sign or verify the JWT. |
| JwtSecret | String | "" | A secret key used in signing and verification of JWTs. |
| JwtSource | String | "" | The source from which the JWT is obtained. |
| LogFileSize | String | "10485760" | A string specifying the maximum size in bytes for a log file. |
| LogLevel | String | "INFO" | The logging level for the JDBC driver. |
| LogPath | String | "./jdbcLogs" | The directory where log files are stored. |
| NextPageCursorFieldName | String | "" | The field used to indicate the cursor pointing at the next page. |
| OemKey | String | "" | The OEM license key. |
| PageArgumentName | String | "" | The argument name used to indicate a page. |
| PageCountFieldName | String | "" | The field used to indicate the total pages count. |
| PaginationStrategy | String | "" | The approach used to handle the retrieval of large sets of data divided into pages. |
| Password | String | "" | The password used to authenticate the user. |
| PathToCertificate | String | "" | The file path to a certificate used for encrypted communication during connection. |
| PathToPrivateKey | String | "" | The private key file path for authentication when using an RSA based Signature Method. |
| PathToTokenFile | String | "" | The file path where a token is stored. |
| ProxyMode | String | NoProxy | This setting configures the proxy. Allowed values are "NoProxy", "AutoDetect" and "Manual". |
| ProxyPassword | String | "" | The password to be used to authenticate to the proxy. |
| ProxyServer | String | "" | The host of the proxy server. |
| ProxyServerPort | Integer | 0 | The port of the proxy server. |
| ProxyUsername | String | "" | The username to be used to authenticate to the proxy. |
| ReadBatchSize | Integer | 1000 | ReadBatchSize is used to set how many records can be read from GraphQL in a single call. |
| Realm | String | "" | A domain within which authentication and authorization processes occur. |
| RecordOffsetEndName | String | "" | The field used to indicate the end of the record offset. |
| RecordOffsetStartName | String | "" | The field used to indicate the start of the record offset. |
| ResultPath | String | "" | The path where the execution result files are saved. |
| RetryOnIntermittentErrors | Boolean | true | The RetryOnIntermittentErrors parameter indicates whether to retry the connection when it might occasionally fail due to temporary issues. |
| SaveResult | Boolean | false | The SaveResult parameter indicates whether to save the execution results to a file. |
| Scope | String | "" | The access level or permissions granted for a token. |
| ServiceAccount | String | "" | A account used to authenticate and authorize a service to interact with APIs. |
| ServiceName | String | "" | The ServiceName refers to the name of the service API selected by the user. |
| ServiceNameAWS | String | "" | The name of the name of the AWS service selected by the user. |
| ServiceTimeout | Integer | 120 | The ServiceTimeout is the timeout to receive the full response from GraphQL API. |
| SessionToken | String | "" | A temporary security token used with the AccessKey and AccessSecret for temporary credentials. |
| SignatureMethod | String | "" | The method used to sign API requests for authentication. |
| SignatureVersion | Integer | 4 | The version of the signature algorithm used to authenticate requests. |
| StaticTokenName | String | "" | The name of the static token. |
| StaticTokenValue | String | "" | The value of the static token. |
| Suppress404NotFoundError | Boolean | true | When set to true, if a query results in an HTTP 404 error, a result set will still be created. When set to false, an error is logged instead and no result set is created. |
| TenantId | String | "" | An identifier for a specific tenant, used to distinguish users or organizations. |
| ThrottleRateUnit | String | "PerSecond" | The unit of time for limiting API requests to avoid being throttled. Valid values include, "PerSecond", "PerMinute" and "PerHour". |
| TokenExpiry | Integer | 0 | The expiration time or validity period of a token, after which the token becomes invalid and needs to be refreshed or reissued. |
| TokenExpression | String | "" | A specified expression or rule used to extract or manipulate the token from the CURL response. |
| TokenLocation | String | "" | The TokenLocation option allows you to specify where the token should be placed in a request. Valid values are "Http Header", "Query String" and "Custom". Custom allows you to place the token in a user specified location in the Base URL or Header by using @Connection[AccessToken] to represent the token. Example of use in Base URL: to set the token to a user defined parameter on the base URL: https://example.com?customTokenLocation=@Connection[AccessToken] |
| TokenPassword | String | "" | A password associated with the token used for encryption and decryption. |
| TokenStrategy | String | "" | The approach used for handling the CURL request response. |
| TokenUrl | String | "" | The URL endpoint used to request or obtain a token. |
| TotalCountFieldName | String | "" | The field used to indicate the total fields count. |
| UserEmail | String | "" | The email specifies the user account used for OAuth JWT connection to GraphQL. |
| UserName | String | "" | The user account used to connect to the server. |
| WriteBatchSize | Integer | 200 | WriteBatchSize is used to set how many records can be written to GraphQL in a single call. |