Using the F&O/AX Connection Manager
The F&O/AX Connection Manager is an SSIS connection manager that can be used to establish connections with Microsoft Dynamics 365 Finance & Operations or the Microsoft Dynamics AX Server.
The F&O/AX Connection Manager allows you to specify how you want to connect to your 365/AX server.
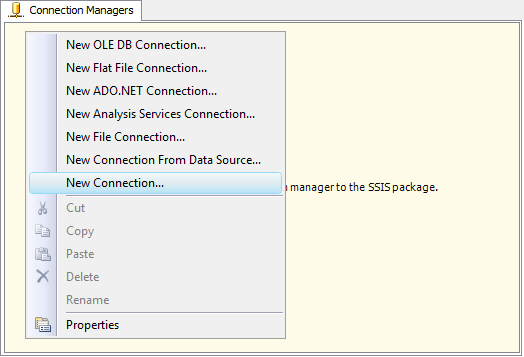
To add an F&O/AX connection to your SSIS package, right-click in the Connection Manager area, and choose "New Connection..." from the context menu.
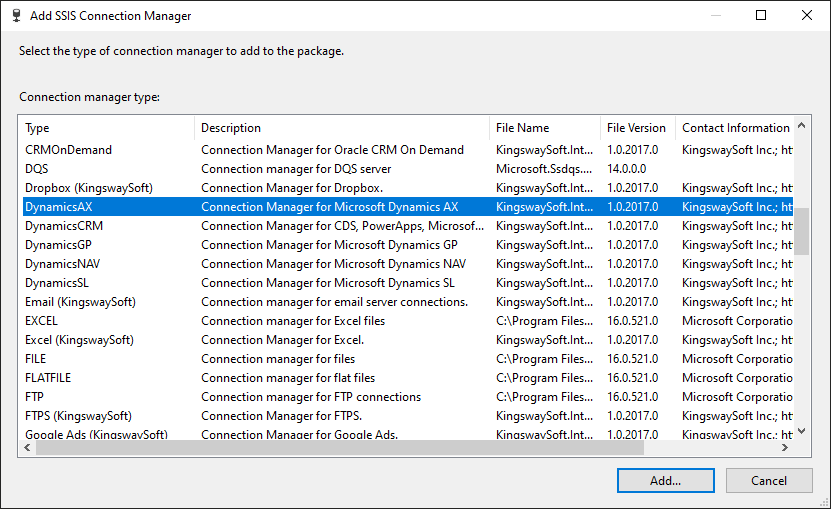
You will be prompted the following window, where you can choose the "DynamicsAX" item to add the connection.
The F&O/AX Connection Manager contains the following three pages for configuring how to connect to the Microsoft Dynamics F&O/AX server:
- General
- Advanced Settings
- More Info
General Page
The General page of F&O/AX Connection Manager allows you to specify the general settings of the connection. Specifically, this is where you enter authentication information for your Dynamics F&O/AX connection.
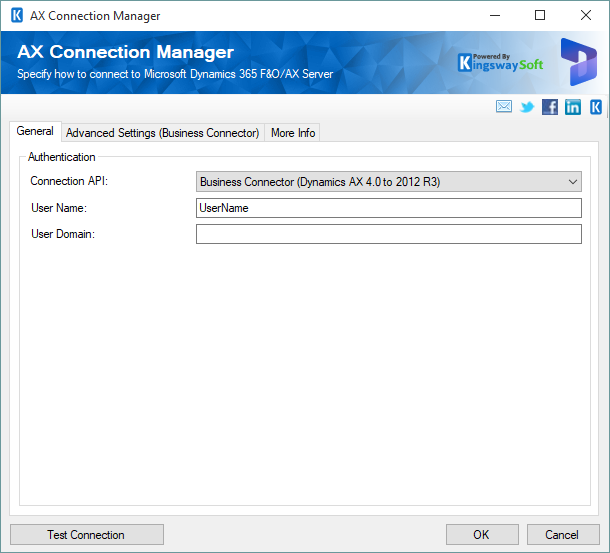
- Connection API (since v9.0)
- The Connection API drop-down allows you to specify which connection API you want to use to build the connection. It includes two types of APIs:
-
- Business Connector: Microsoft Dynamics AX (4.0 – 2012 R3)
- OData: Microsoft Dynamics 365 Finance & Operations
- Connection API - Business Connector
-
Microsoft Dynamics AX .NET Business Connector is usually shipped with the AX installation package. It needs to be installed on the developer machine or your integration servers.
- User Name
- The User Name option allows you to specify the Windows user account that you want to use when connecting to the Dynamics AX server. Note that the user name should be a Windows domain account instead of the actual Dynamics AX user account.
- User Domain
- The User Domain option is used to specify the active directory domain of the Windows user.
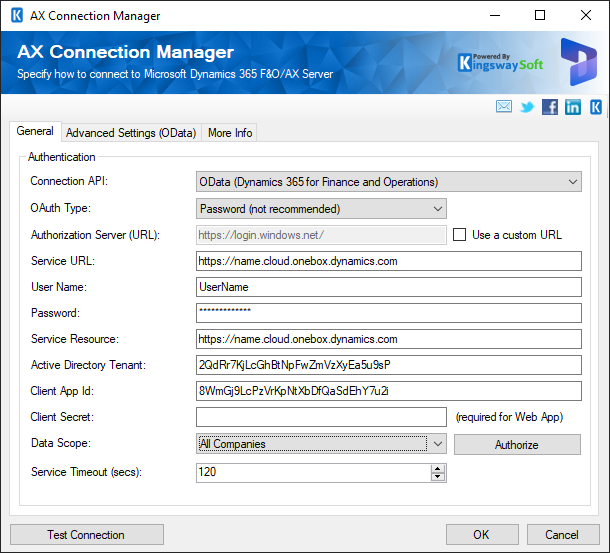
- Connection API - OData
-
-
- OAuth Type
-
The OAuth Type option allows you to specify the OAuth type you want to use. There are three options available.
- Authorization Code (since v25.1)
- Password
- Certificate
- Client Credentials (server-to-server authentication)
-
- Authorization Server (URL)
-
The Authorization Server (URL) option allows you to specify your authorization server endpoint which you can use to authorize the application to access your Dynamics 365 for Finance and Operations data.
Note: This option is by default to https://login.windows.net/ when connecting to Dynamics 365 for Finance and Operations. Depending on your environment, you can provide your custom URL by checking the Use a custom URL option.
- Service URL
-
The Service URL option allows you to specify your organization's root service endpoint which you can use to connect to your Dynamics 365 for Finance and Operations.
-
- Token Path (Available for Authorization Code OAuth type - since v25.1)
-
The path where the token file is saved. Please note that we support both file system paths and Azure blob storage Shared Access Signature (SAS) URLs.
- Get New Token (Available for Authorization Code OAuth type - since v25.1)
-
This button completes the OAuth authentication process in order to generate a new token.
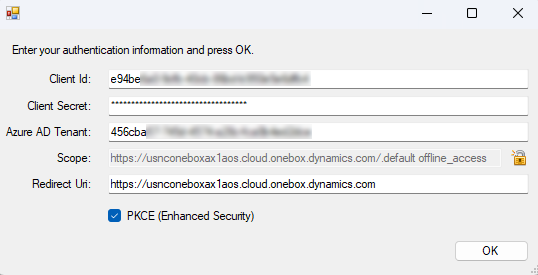
- Client Id: The Client Id option allows you to specify the unique ID which identifies the application making the request.
- Client Secret: The Client Secret option allows you to specify the client secret belonging to your app.
- Azure AD Tenant: Specify the Azure AD tenant in this option.
- Redirect Url: The Redirect Url option allows you to specify the Redirect Url to complete the authentication process.
- PKCE (Enhanced Security): The PKCE(Proof Key for Code Exchange) option may be enabled for PKCE App Type. Ensures that the client that initiates the OAuth flow is the same client that completes flow.
- Token Password (Available for Authorization Code OAuth type - since v25.1)
-
The password to the token file.
- User Name
-
The User Name option allows you to specify the user account that you want to use when connecting to your Dynamics 365 for Finance and Operations.
Note: This option is only available when the Password OAuth type is selected.
- Password
-
The Password option allows you to specify the password for the above user account in order to log in to your Dynamics 365 for Finance and Operations.
Note: This option is only available when the Password OAuth type is selected.
- Active Directory Resources
-
The Active Directory Resources option allows you to specify the Microsoft Active Directory (AAD) Resource URL to complete the OAuth authorization process. The URL is usually your organization's root service endpoint (i.e. same as the Service URL).
- Active Directory Tenant
-
The Active Directory Tenant option allows you to specify the Tenant name where the Client App Id is verified to complete the authorization process. This should typically be the email domain that you use to log in to your Dynamics 365 for Finance and Operations instance - there might be exceptions, however.
- Client App Id
-
The Client App Id option allows you to specify the GUID value that identifies a client application in Microsoft Azure Active Directory (AAD). Note that you may need to register your application with AAD via the Azure portal in order to generate your Client App Id.
To create an application in Azure Active Directory (AAD):
- Log in Azure Portal
- Navigate to Azure Active Directory | App registrations | New registration
- Give a name to the application and choose an appropriate application type using the
Redirect URI option on the page.
- Password: Public client (mobile & desktop), or Web
- Certificate: Web
- Client Credentials (server-to-server authentication): Web
In order to work with Certificate and Client Credentials (server-to-server authentication) OAuth Type, it is also required to have an Azure Active Directory application created in your Dynamics 365 for Finance and Operations:
- Log in to Dynamics 365 for Finance and Operations
- Navigate to Modules | System administration | Setup and click Azure Active Directory applications
- Click New and fill out the required fields to specify the Azure Active Directory applications. Note that the Client Id is the Client App Id that we've created in the previous step, and then specify the User ID for this application.
- Certificate Thumbprint
-
The Certificate Thumbprint option allows you to specify the thumbprint once you have selected or created an application in Microsoft Azure Active Directory (AAD).
Before generating a thumbprint in Microsoft Azure Active Directory (AAD), you would need to create a Public/Private Key Pair:
- Download and install OpenSSL for Windows. Note that you may need to restart your machine after installation
- Launch Windows Command Prompt as an administrator using the "Run as administrator" option
- In the command prompt window, navigate to the bin folder of the installation location of OpenSSL, e.g. "cd C:\OpenSSL-Win32\bin"
- Execute the following commands. Note that the third command will prompt you to enter a password. Two files will be generated in this step:
- publickey.cer: this is the Public Key file that is going to be uploaded to Microsoft Azure Active Directory (AAD).
- public_privatekey.pfx: this is the Private Key file that is going to be installed on the machine where AX Connection Manager is used.
openssl genrsa -out privatekey.pem 1024
openssl req -new -x509 -key privatekey.pem -out publickey.cer -days 1825
openssl pkcs12 -export -out public_privatekey.pfx -inkey privatekey.pem -in publickey.cer
To generate a thumbprint for a specific Web App / API application in Azure Active Directory:
- Log in Azure Portal
- Navigate to Azure Active Directory | App registrations and select the Web App / API application
- Click Settings | Keys | Upload Public Key
- Specify the location of the Public Key file (publickey.cer) and click Save to display the Thumbprint.
Once you get a thumbprint from Azure Active Directory, please be sure to install the Private Key file (public_privatekey.pfx) on the machine where the AX Connection Manager is used.
Note: This option will only be available to Certificate OAuth Type.
- Client Secret
-
The Client Secret option allows you to specify the client secret that you have requested from Microsoft Azure Active Directory (AAD), which will be used to authenticate using the Azure Web application.
To create a client secret for a specific Web App / API application:
- Log in Azure Portal
- Navigate to Azure Active Directory | App registrations and select the Web App / API application
- Click Settings | Keys and fill out the required fields
- Click Save to display the Client Secret
Note: This option is only required when working with a Web App / API application.
- Data Scope
-
The Data Scope drop-down provides two options to select. You can specify the scope of this connection as Default Company Only or All Companies.
- Service Timeout (secs)
-
The Service Timeout (secs) option allows you to specify a timeout value in seconds for the connection. The default value is 120 seconds.
- Authorize Button
-
By clicking the Authorize button, it will pop up an Application Access Authorization window to help you authorize the application to access your Dynamics 365 for Finance and Operations data. All you need to do is to provide the Redirect URL depending on your Azure Application's application type:
- Native application: put the Redirect URI of the application into the Redirect URL field.
- Web app / API application: put the Sign-on URL of the application into the Redirect URL field.
Two types of authorizations are supported:
- Authorize in App
- Authorize in Browser
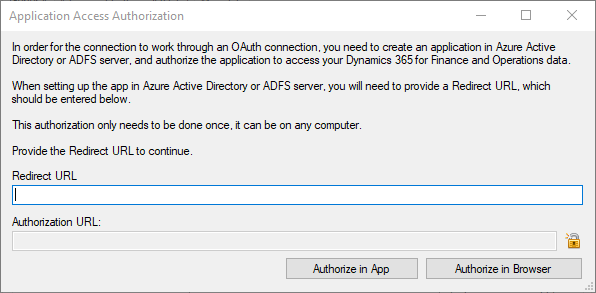
Note: This button is only available when the Password OAuth type is selected.
-
- Test Connection
-
After all the connection information has been provided, you may click the "Test Connection" button to test if the user can successfully log in to the AX server.
Advanced Settings Page
The Advanced Settings page of the F&O/AX Connection Manager allows you to specify some advanced settings of the connection.
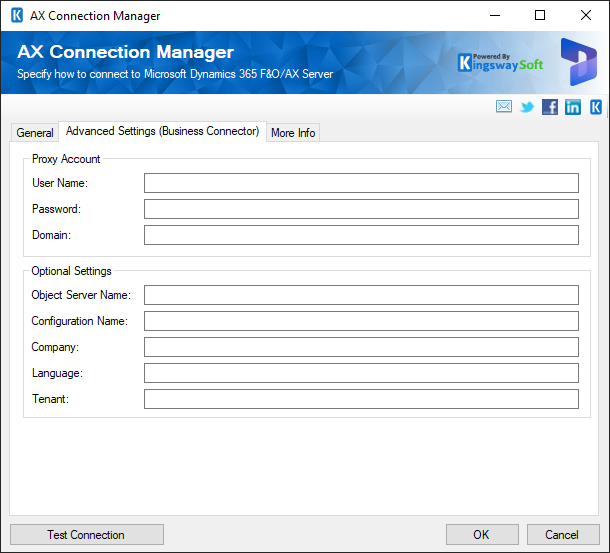
- Advanced Settings (Business Connector)
-
- Proxy Account
-
- Proxy Account - User Name
-
Specify the .NET Business Connector proxy account's user name that is used for the AX connection. This may or may not be required depending on your system's Dynamics AX configuration.
- Proxy Account - Password
-
Specify the .NET Business Connector proxy account's password. This is only required when you have specified a proxy account.
- Proxy Account - Domain
-
Specify the .NET Business Connector proxy account's Windows domain name. This may or may not be required in the case that a proxy account is specified.
- Optional Settings
-
- Object Server Name
-
Specify the Microsoft Dynamics AX Application Object Server (AOS) used for the connection. This may or may not be required depending on your system's Dynamics AX configuration.
- Configuration Name
-
Specify the name of the Microsoft Dynamics AX configuration to be used for the connection. This can be a file path to your AX configuration file (.axc).
- Company
-
Specify the company to be used for the connection. This is an optional parameter.
- Language
-
Specify the language to be used for Dynamics AX labels for the connection session. An example of such language is "en-us". This is usually an optional parameter.
- Tenant
-
Specify the tenant when establishing the connection to your Dynamics AX server. This is usually an optional parameter.
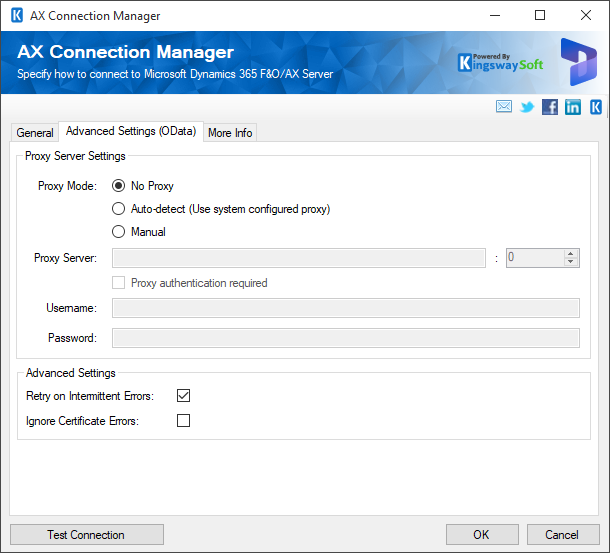
- Advanced Settings (OData)
-
- Proxy Server Settings
-
- Proxy Mode
-
The Proxy Mode option allows you to specify how you want to configure the proxy server setting. There are three options available.
- No Proxy
- Auto-detect (Using system-configured proxy)
- Manual
- Proxy Server
-
Using the Proxy Server option, you can provide a proxy server to connect to Dynamics 365 for Operations.
- Port
-
The Port option allows you to specify the port number of the proxy server for the connection.
- Username
-
The Username option allows you to specify the proxy user account.
- Password
-
The Password option allows you to specify the proxy user’s password.
Note: Proxy Password is not included in the AX connection manager's ConnectionString property by default. This is done by design for security reasons. However, you can include it in your ConnectionString if you want to parameterize your connection manager. The format would be ProxyPassword=myProxyPassword; (make sure you have a semicolon as the last character). It can be anywhere in the ConnectionString.
- Advanced Settings
-
- Retry on Intermittent Errors
-
This is an option designed to help recover from possible intermittent outages or disruption of service. It prevents the integration process from stopping due to temporary issues. Enabling this option will allow service calls to be retried upon certain types of failure. A service call may be retried up to 3 times before an exception is fired. Retries occur after 0 seconds, 15 seconds, and 60 seconds.
Warning: We have designed our retry feature carefully such that the retry should only occur when it is deemed safe to do so; however, in some occasions, such retry service calls could result in the creation of duplicate data.
- Ignore Certificate Errors (since v10.0)
-
This option can be used to ignore those SSL certificate errors when connecting to Dynamics 365 Finance & Operations.
Warning: Enabling the "Ignore Certificate Errors" option is generally NOT recommended, particularly for production instances. Unless there is a strong reason to believe the connection is secure - such as the network communication is only happening in an internal infrastructure, this option should be unchecked for best security.
Note: When this option is enabled, it applies to all HTTP-based SSL connections in the same job process, it is not just limited to Dynamics 365 for Finance and Operations connections.
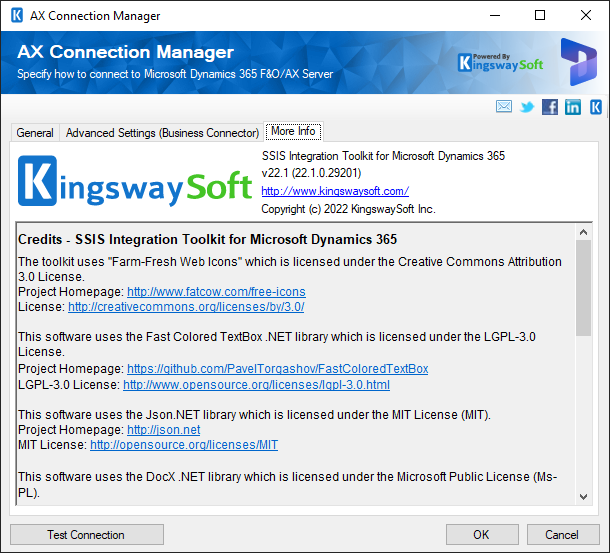
More Info Page
The More Info page shows some basic information about the toolkit. On this page, you can find the version information of the toolkit.