In high-volume ETL workflows, file compression is far more than a housekeeping task; it is a critical strategy for performance and cost optimization. Efficient compression significantly reduces cloud storage footprints, slashes data transfer times between platforms or different regions when the same cloud provider is used, and ensures that sensitive archives are bundled securely for downstream processing. While the Compression Task in KingswaySoft's SSIS Integration Toolkit (previously SSIS Productivity Pack) has long supported these operations, it was previously limited to local file systems. For cloud-first teams, this meant a clunky three-step workaround: download the file(s) to a local directory, compress (or decompress), and then re-upload. This "local staging" not only introduced latency and storage overhead but also created security risks by storing sensitive data on local disks (even if the storage might be temporary).
With the release of SSIS Integration Toolkit v26.1, we have streamlined this process by introducing native support for cloud connection managers within the Compression Task for either the source or the destination paths. This means files can be read directly from a cloud storage location, compressed or decompressed in memory, and written to another cloud storage location, all within a single task and without any local staging. Teams working with cloud-native architectures, whether on Azure, AWS, or other supported providers, can now handle compression and decompression as a first-class task in their Control Flow without the need for inefficient workarounds. This is particularly valuable in scenarios such as archiving processed output files into a ZIP for long-term storage, packaging files for delivery to an external party, or extracting inbound compressed payloads before passing them to downstream data flow components.
In this blog post, we will walk through two practical examples that demonstrate both sides of this capability.
Example 1: Compressing a Cloud Directory into a ZIP File
In the first example, we have a directory of files stored in an Azure Blob Storage container, and the goal is to package them into a single ZIP archive that is written directly to an Amazon S3 bucket. This kind of workflow is well suited for archival pipelines, file delivery, or situations where multiple output files from a prior process need to be consolidated.

To set this up, begin by creating the necessary connection managers in your SSIS project: one for your Azure Blob Storage account and one for your Amazon S3 bucket. Once those are in place, add a Compression Task to the Control Flow and open the editor to configure it.
- On the General tab, set the Action to Compress and the Compression Format to Zip.
- Under Source Directory/File Settings, select your Azure Blob Storage Connection Manager from the Connection Manager dropdown and set the Source Type to Directory. Enter the path to the source directory in the Source Path field.
- Under
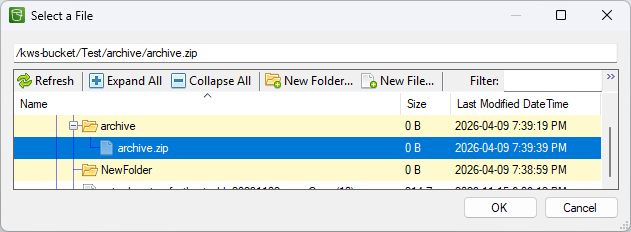
Destination Directory/File Settings, select your Amazon S3 Connection Manager. To set the destination path, click the ellipsis (
...) button next to the
Destination Path field. A file browser will open showing your S3 bucket structure. There are two approaches for specifying the destination ZIP file:
- Using the file browser: Navigate to the target folder and use the New File... button to create a new file with a .zip extension. Select it and click OK. Because this file now exists at the destination, you will need to enable Overwrite Existing Items to allow the task to write to it at runtime.
- Typing the path manually: Select any existing file in the browser to populate the Destination Path field, then close the dialog and manually edit the field to type the full intended path and file name, ending in .zip. Since no file exists at that path yet, you do not need to enable Overwrite Existing Items for the initial run.
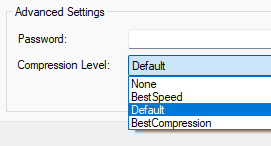
- Optionally, enable Include Subdirectories if you want the task to recurse into subdirectories when gathering files to compress. You may also configure Compression Level and supply a Password under the Advanced Settings section if the archive requires password protection.
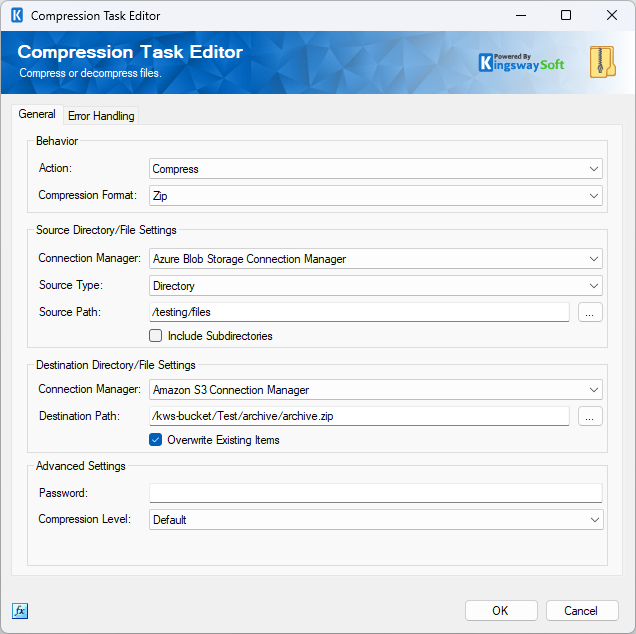
When the package runs, the Compression Task streams the files from Azure Blob Storage, compresses them in memory, and writes it to Amazon S3 in a single, fluid motion.
Example 2: Decompressing a ZIP File into a Cloud Directory
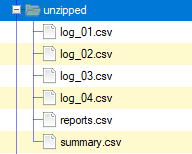
In the second example, our requirements are reversed. The source is a ZIP file stored in a cloud storage platform such as an Amazon S3 bucket, and the goal is to extract its contents into a directory in an Azure Blob Storage container. Decompression workflows like this are common when files are delivered by external vendors or partner systems as compressed archives, whether to reduce transfer size, bundle multiple files into a single payload, or meet a specific format required by the sending party. Extracting those archives directly into the target cloud location means the files are immediately available for downstream processing, without any intermediate steps.
The setup is similar to the compression example. With your connection managers already in place, add or reconfigure a Compression Task and open the editor.
- On the General tab, set the Action to Decompress and the Compression Format to Zip.
- Under Source Directory/File Settings, select your Amazon S3 Connection Manager and set the Source Type to File. Enter the path to the source ZIP file in the Source Path field.
- Under Destination Directory/File Settings, select your Azure Blob Storage Connection Manager and specify the destination directory path where the extracted files should be written.
- Optionally, enable Overwrite Existing Items if files with the same names may already exist in the destination directory. If the ZIP file is password protected, supply the password under the Advanced Settings section.
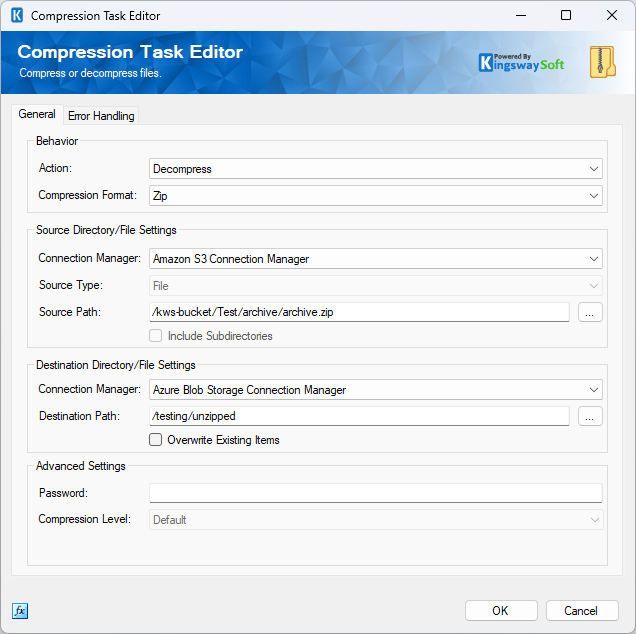
When the package runs, the Compression Task will retrieve the ZIP file from the S3 source and extract its contents into the specified Azure Blob Storage directory.
Conclusion
These two examples highlight the flexibility introduced in v26.1. While we focused on Azure and AWS, this enhancement extends across the entire KingswaySoft cloud ecosystem, including Azure Data Lake, Google Cloud Storage, OneDrive, and more. You are no longer tethered to the local file system. Whether you are zipping output for delivery or unzipping inbound payloads, you can now treat cloud compression as a first-class, "zero-staging" operation in your SSIS ETL processes. Whether you are archiving output files, preparing data for delivery, or extracting inbound payloads from a partner system, the Compression Task can handle it directly where the files already live.
Ready to upgrade your pipelines? Download the latest release of the SSIS Integration Toolkit to experience the new capabilities firsthand yourself.