Using the Dynamics SL Destination Component
The Dynamics SL Destination Component is an SSIS data flow pipeline component that can be used to write data to Microsoft Dynamics SL. You may Create, Update, and Delete records with this component.
General Page
The General page of the Dynamics SL Destination Component allows you to specify the general settings of the component.
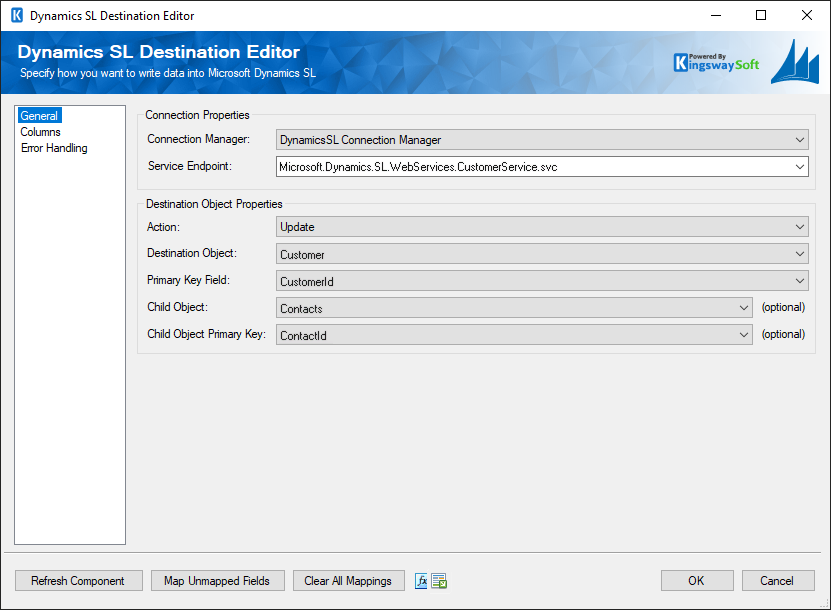
- Connection Properties
-
- Connection Manager
-
The Dynamics SL destination component requires an active connection to your Dynamics SL web services. You can specify a Connection Manager here to facilitate that connectivity.
- Service Endpoint
-
Listed here are the default service endpoints provided by Dynamics SL's web services. If you have created your own web service, you must manually enter the name of your service endpoint here.
- Destination Object Properties
-
- Action
-
The Action option allows you to specify how the data should be written into Microsoft Dynamics SL. There are three (3) action types available.
- Create: Create new record(s) in SL
- Update: Update existing record(s) in SL
- Delete: Delete record(s) from SL
- Destination Object
-
The Destination Object option allows you to specify which SL object to write data to. A drop-down with available objects is listed here.
- Primary Key Field
-
This dropdown lets you select which field corresponds to the Primary Key for the Destination Object. Currently, composite primary keys are not supported.
Note: The Primary Key field is the Destination Object's field that uniquely identifies records. Since Dynamics SL's web services do not automatically generate a unique ID for new objects, you will need to specify a source field from your upstream component that will be used to populate the primary key value in your destination.
The Primary Key field is also needed to identify which record to update or delete if those Actions are chosen.
For example, the Customer object's primary key field is the CustomerId field.
- Child Object
-
Objects may contain links to Child Objects. E.g. Customers (source) contain a list of Contacts (child). If you want to create, update, or delete data from a Child Object, choose an item from this drop-down.
Note: This is only required when you need to work with a child object. In the case that you just need to work with the parent object, you can leave this option empty.
- Child Object Primary Key
-
This drop-down lets you select which field corresponds to the Primary Key for the Child Object. Currently, composite primary keys are not supported.
Note: See the above note from Primary Key Field regarding the use of primary keys
- Refresh Component button
-
By clicking this button, the component will retrieve the latest metadata from Dynamics SL's web services. After clicking this button, you will receive a status message indicating how many fields have been updated, added, or deleted.
- Map Unmapped Fields button
-
By clicking this button, the component will map any unmapped fields by matching their names with the input columns from the upstream component. This is useful when your source component has recently added more columns, in which case you can use this button to automatically establish associations between input columns and unmapped fields.
- Clear All Mappings button
-
By clicking this button, the component will remove all field mappings. You can use this button to reset your mappings.
- Expression fx Icon
-
Click the blue fx icon to launch SSIS Expression Editor to enable dynamic updates of the property at run time.
- Generate Documentation Icon
-
Click the Generate Documentation icon to generate a Word document that describes the component's metadata including relevant mapping, and so on.
Columns Page
The Columns page of Dynamics SL Destination Component allows you to map the columns from upstream components to SL fields for the destination object.
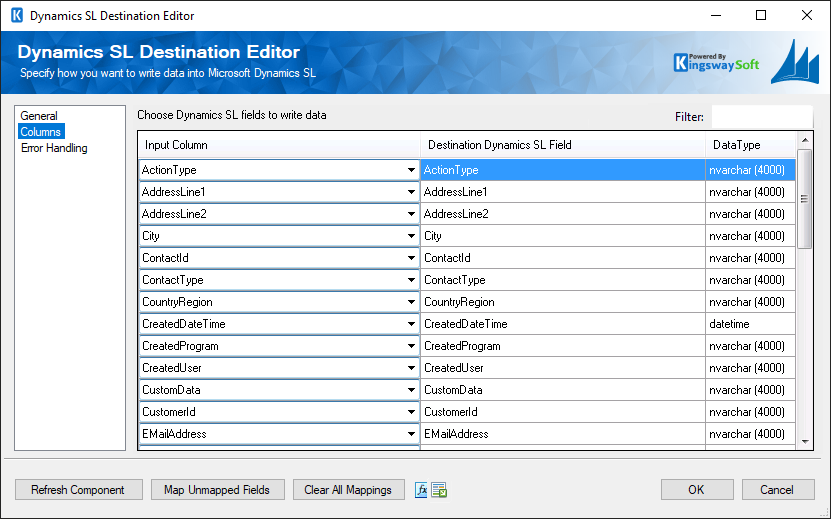
On the Columns page, you will see a grid with five columns as seen above.
- Input Column: You can select a column from your upstream component to be used as the input of the corresponding field.
- Destination Dynamics SL Field: The field that you are writing data.
- Data Type: This column indicates the type of value for the current field in Dynamics SL. Typically you would need to pass in the value using the format indicated in the Data Type column.
- Unmap: This column can be used to unmap the field from the upstream input column, or otherwise it can be used to map the field to an upstream input column by matching its name if the field is not currently mapped.
Error Handling Page
The Error Handling page allows you to specify how errors should be handled when they happen.
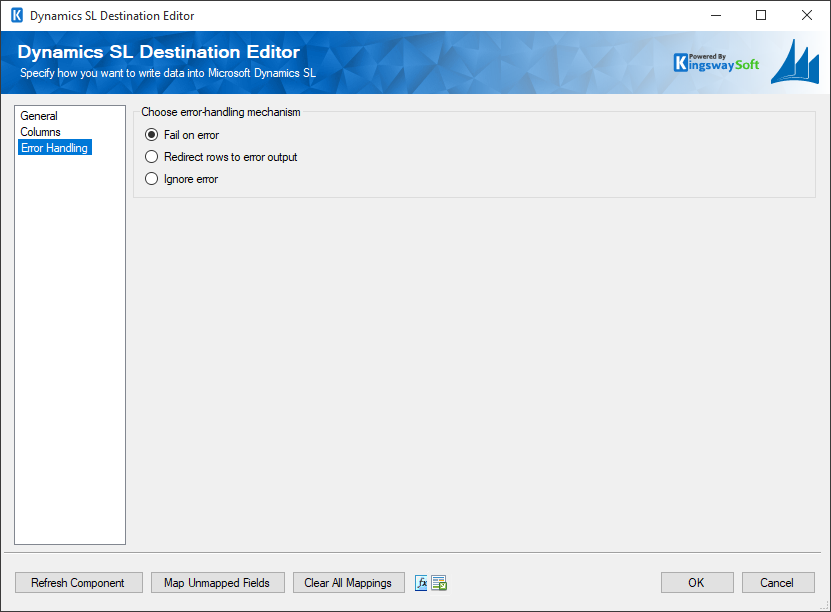
There are three options available.
- Fail on error
- Redirect rows to error output
- Ignore error
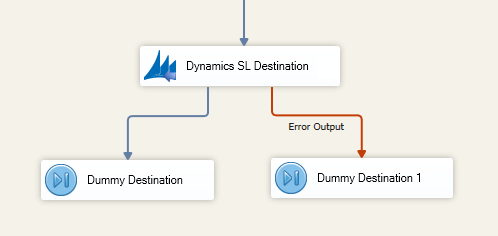
When the Redirect rows to error output option is selected, rows that failed to write to Dynamics SL will be redirected to the 'Dynamics SL Destination Error Output' output of the Destination Component. As indicated in the screenshot below, the green output connection represents rows that were successfully written, and the red 'Dynamics SL Destination Error Output' connection represents rows that were erroneous. The 'ErrorMessage' output column found in the 'Dynamics SL Destination Error Output' may contain the error message that was reported by Dynamics SL or the component itself.
Note: Use extra caution when selecting Ignore error option, since the component will remain silent for any errors that have occurred.
Contact Us
If you need any further assistance with the toolkit, please don't hesitate to contact us.