Using the Salesforce Destination Component
The Salesforce Destination Component is an SSIS data flow pipeline component that can be used to write data to your Salesforce.com instance. You may Create, Update, Delete, Upsert, Merge, HardDelete or Undelete Salesforce records using the Salesforce Destination Component.
The Salesforce Destination Component includes the following three pages to configure how SSIS writes data to Salesforce.com:
- General
- Columns
- Error Handling
General Page
The General page allows you to specify the general settings of the destination component.
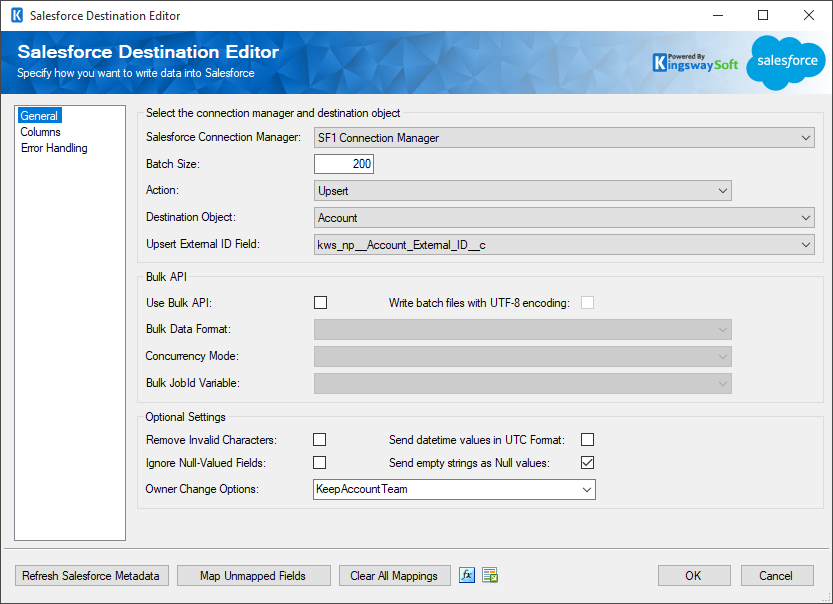
- Select the connection manager and destination object
-
- Salesforce Connection Manager
-
The Salesforce destination component requires a Salesforce connection in order to connect to your Salesforce.com instance. The Salesforce Connection Manager option will show all Salesforce connection managers that are available in the current SSIS package.
- Batch Size
-
The Batch Size option allows you to specify how many records you want to write to Salesforce with each service call.
When the Use Bulk API option is not checked, the default value of Batch Size is 200, and the maximum allowed value is also 200.
When the Use Bulk API option is checked, the default value of Batch Size is 5,000, and the maximum allowed value is 10,000.
- Action
-
The Action option specifies how the data should be written to Salesforce.com. There are 7 action types available:
- Create: Create new record(s) in Salesforce
- Update: Update existing record(s) in Salesforce
- Delete: Delete record(s) from Salesforce
- Upsert: Update an existing record in Salesforce if a matching record can be found. Otherwise, create a new record using the information from upstream pipeline components.
-
Merge
(since v7.0): Takes up to three records as its input and performs a Salesforce merge action on them by retaining the master record and deleting other records. Merge action is only possible with the following Salesforce objects:
- Account
- Contact
- Lead
- Person Account
- MasterRecordId: the ID of the record that other record(s) will be merged into.
- RecordsToMergeIds: the ID(s) of the record or other records to be merged into the master record. Minimum of one, maximum of two. ID values should be separated by a semicolon if the input contains more than one record.
- Hard Delete(since v8.0): Permanently delete records from Salesforce when Bulk API enabled
- Undelete (since v9.0): Undelete records from the Recycle Bin.
- Destination Object
-
The Destination Object option specifies which Salesforce object to write the data. When the option is clicked, SSIS Integration Toolkit will retrieve a list of all available Salesforce objects for the selected Salesforce connection.
- Upsert External ID Field
-
The Upsert External ID Field option specifies the External ID field for Upsert action. It is required when the Upsert action is used. You may use the drop-down list to select an External ID field.
- Bulk API
-
The Use Bulk API option dictates whether you want to use Salesforce Bulk API to write to your Salesforce organization. By default, this option is not selected. When using Salesforce Bulk API, your data will be processed asynchronously, which can provide some significant performance improvement, and also using Salesforce Bulk API, you are not throttled by Salesforce daily API limits. However, before v6.0, our software does not get immediate results back from Salesforce so the SalesforceRecordId field will always be empty in the Default Output when Bulk API is used. This is no longer the case after our v6.0 release.
When the option is enabled, the following bulk API-related options become available for configuration.
- Write batch files with UTF-8 encoding
-
When enabled, the batch files will be created using UTF-8 encoding, which can help improve working with non-ANSI characters in case there are any. We generally recommend turning on this option for best encoding comparability.
- Bulk Data Format
-
There are 4 options available:
- ZIP
- ZIP_CSV
- XML
- ZIP_XML
- Concurrency Mode
-
There are two options available:
- Parallel: this means that the batch file will be processed in a paralleled fashion on the Salesforce side, this will provide some better processing performance, but it also means that the sequence of the submitted batches is not respected when they are processed by Salesforce.
- Serial: this means that the batch file will be processed serially on the Salesforce side.
- Bulk JobId Variable
-
The Bulk JobId Variable option allows you to specify an SSIS variable that you can write the bulk job's ID in order to track the status of the job in Salesforce later.
- Optional Settings
-
- Remove Invalid Characters
-
When enabled, the Remove Invalid Characters option will remove any invalid characters from the input which can avoid an XML exception when the components try to construct the SOAP request to be sent to Salesforce. Those invalid characters are usually not accepted by Salesforce even posted.
- Ignore Null-Valued Fields
-
The Ignore Null-Valued Fields option allows you to ignore any fields that have a null value. By ignoring a field, the null value will not be posted to the Salesforce server. This can help avoid situations where you overwrite non-empty values with an empty value if your requirement dictates it.
- Send datetime values in UTC Format
-
Enabling this option allows you to send date time values to Salesforce in UTC format. If left unchecked, any date time value passed into Salesforce will be treated as the integration user's local time.
- Send empty string as Null values (since v8.1)
-
Enabling this option allows you to specify whether to send empty strings as NULLs when writing to Salesforce. When disabled, empty strings will not be converted to NULL value, therefore will not be posted to Salesforce. This can be helpful in the case that you want to retain original values in Salesforce when the incoming value is empty (not NULL though).
- Owner Change Options (since v21.2)
-
Specify the actions that can be performed when a record’s owner is changed. Available to Update or Upsert action.
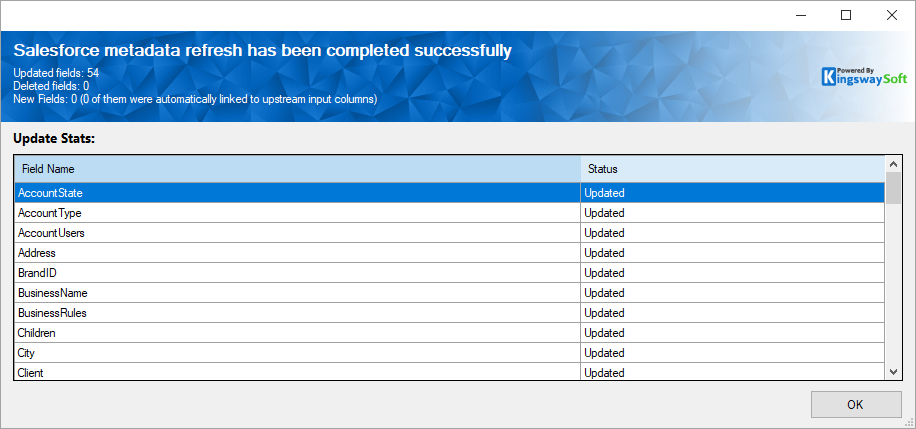
- Refresh Salesforce Metadata Button
-
By clicking the Refresh Salesforce Metadata button, the component will retrieve the latest metadata from Salesforce and update each field. This feature works by performing the following three actions:
- Update any existing object fields to the latest metadata
- Add any new object fields that have recently been created in Salesforce
- Remove any object fields that have recently been deleted from Salesforce
After clicking this button, you will receive the following screen once the refresh is done.
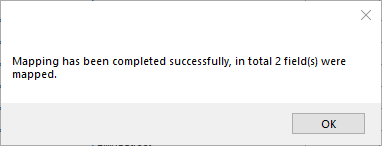
- Map Unmapped Fields Button
-
By clicking this button, the component will map any unmapped Salesforce fields by matching their names with the input columns from upstream components. This is useful when your source component has recently added more columns, in which case you can use this button to automatically establish the association between input columns and unmapped Salesforce fields.
After clicking this button, you will receive the following message.
- Clear All Mappings Button
-
By clicking this button, the component will reset all your mappings in the destination component.
- Expression fx Icon
-
Click the blue fx icon to launch SSIS Expression Editor to enable dynamic updates of the property at run time.
- Generate Documentation Icon
-
Click the Generate Documentation icon to generate a Word document that describes the component's metadata including relevant mapping, and so on.
Columns Page
The Columns page of the Salesforce Destination Component allows you to map input columns to Salesforce fields.
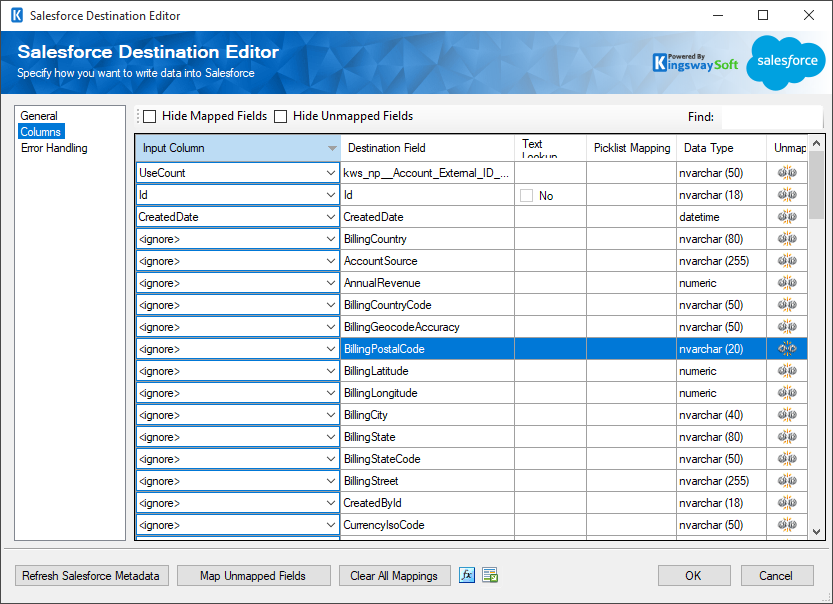
The grid on the Columns page contains six columns:
- Input Column: You can select an input column from the upstream component for the corresponding Salesforce field.
- Destination Salesforce Field: The Salesforce field that you are writing data to.
- Text Lookup: This is a feature that we introduced since v3.0. This option is only available for Salesforce lookup fields. When this option is selected, the component can perform lookup based on a text value of the target object. For further information about how to use the Text Lookup feature, please refer to the Working with the Text Lookup Feature section below.
- Picklist Mapping (since v20.2): This option is available only for Salesforce picklist fields. When this option is selected, the component can translate and set picklist values to the ones available in the target instance. For more information, please refer to the Working With Picklist feature section below.
- Data Type: The target Salesforce field's data type.
- Unmap: This column can be used to unmap the field from the upstream input column, or otherwise it can be used to map the field to an upstream input column by matching its name if the field is not currently mapped.
Working with Text Lookup Feature
The Text Lookup Feature allows you to perform lookup based on the text values of the target object. To configure the Text Lookup feature, click the ellipse button in the Text Lookup column which is available on the Salesforce Destination Component's mapping page. You will be presented with the following screen.
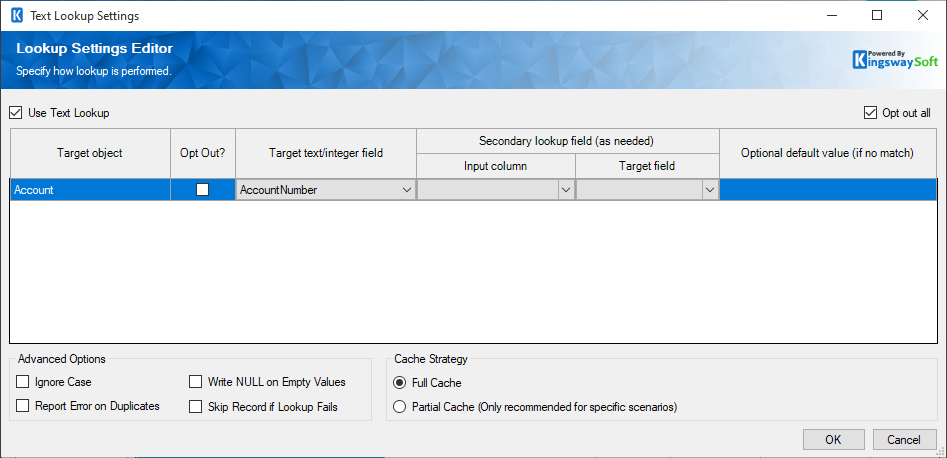
You can configure the Text Lookup setting by toggling the Use Text Lookup option. When you have checked the Use Text Lookup option, you will see a list of the target objects for the involved lookup field, and you can configure a different lookup strategy for each target object.
- Choose Target Field(s): Using this option, you can specifically choose which text field should be used for the lookup purpose. When you choose this option, you will be presented with a list of the target objects for the lookup field, and you can choose to use a different lookup strategy for each target object. In this list, you will be able to see the following options. Since the v21.1 release, we added support for a secondary lookup field when configuring the Text lookup feature, it allows you to specify an input column for the secondary lookup as needed.
- Opt Out?: When chosen, the lookup object will be excluded from being used for text lookup purposes.
- Target text/integer field: You can choose a text or integer field that will be used for the lookup purpose.
- Optional default value (if no match): When specified, the component will use this default value to perform the lookup should the input value lookup fail.
Note: In order for the Text Lookup feature to work efficiently, we populate an internal cache when a lookup is first requested. The cache is created by querying data from the target object, which would consume some Salesforce API calls.
In addition to the above settings, the Text Lookup feature also offers the following additional advanced options:
- Ignore case: When chosen, the Text Lookup will perform a case-insensitive lookup. For instance, "ABC Company" will be treated the same as "abc company".
- Report error on duplicates: When chosen, the Text Lookup feature will report an error when a duplicate is encountered at the time the lookup cache is populated.
- Write NULL on empty values: When enabled, if the input value is empty (either NULL or an empty string), lookup will be skipped, and it will write as a NULL value to the target field.
- Skip record if lookup fails: When enabled, the Text Lookup feature will skip the row when the lookup fails. Note that when this option is enabled, the skipped rows will not be sent to either the Default Output or the Error Output of the destination component.
-
Cache Strategy: You can choose from one of the two options:
- Full Cache: When chosen, the component will populate a full cache of all records from the lookup object before the lookup. This is generally the preferred option for the text lookup feature, particularly when the number of records in the lookup entity is small.
- Partial Cache: When chosen, the component will gradually build up lookup cache as the data load progresses. This is the preferred option when the number of records in lookup objects is significantly large. For instance, if you have more than a few hundred thousand records in the lookup entity, and you are only processing a few dozen records for your primary object, Partial Cache mode would provide better performance in this kind of case.
Note: Prior to v4.0, if duplicates are found when populating the lookup cache, the first one will be chosen.
Working with Picklist Mapping Feature
The Picklist Mapping feature allows you to specify how you map input values to the picklist values in your Salesforce instance. When a picklist field is mapped in your Salesforce Destination component, an ellipsis (…) will appear in the Picklist Mapping column which you can click to open the below page.
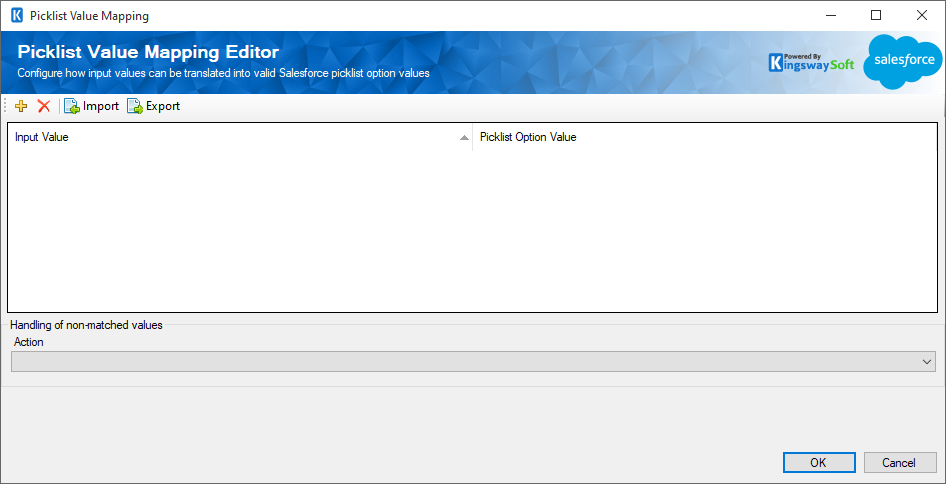
The top part of this window contains a grid that can be used to enter mapping values through four toolbar buttons. The first two buttons allow you to add or delete a mapping entry. The Import button allows you to import from a mapping that you previously saved or exported. The Export button allows you to export all mapping values in the grid to a .xml file so that edits can be made using a different tool that you feel more comfortable working with.
- Input value
-
You can specify the value that you have input that needs to be translated.
- Picklist Option Value
-
The option values available in the Salesforce instance can be chosen.
- Handling of non-matched values
-
The second part of the window is where you specify how to handle non-matched values. There are four options available:
- Create option
-
When no match is found for a particular input value, this option allows you to create a new option. Since v21.1, when choosing the Create option, you will be presented with the additional option to specify the label value.
- Replace as an existing option
-
When no match is found, an existing option value available in the Picklist can be used as the default replacement value.
- Set an empty(NULL)
-
When no match is found, it would be set as empty(NULL).
- Raise an error
-
This option allows you to throw an exception that fails the component entirely when no match is found for a particular input value.
Error Handling Page
The Error Handling page allows you to specify how errors should be handled when they happen.
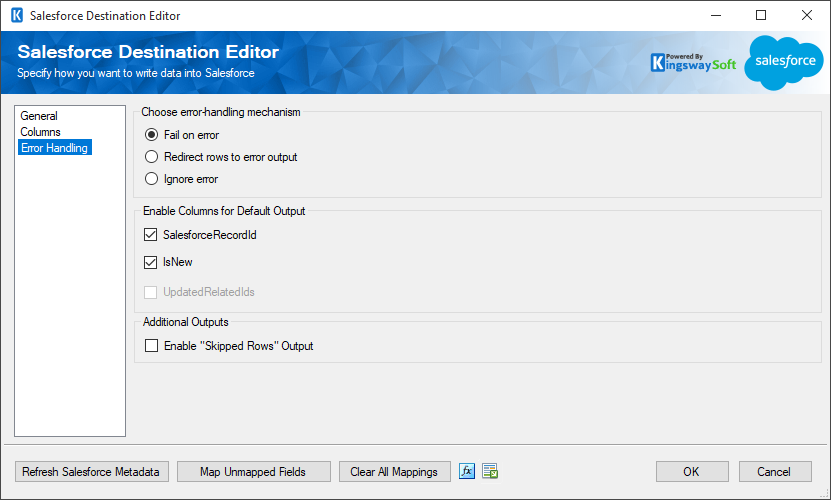
There are three options available:
- Fail on error
- Redirect rows to error output
- Ignore error
When the Redirect rows to error output option is selected, rows that failed to write to Salesforce will be redirected to the "Error Output' of the Destination component. In the error output, you can see the following columns:
-
ErrorCode: Contains the error code that is reported by the Salesforce server or the component itself.
- Note: the ErrorCode can shift for the same error between Salesforce API versions.
- ErrorColumn: Contains the name of the column that is causing the error. Note that this column is not always populated.
- ErrorMessage: Contains the error message that is reported by the Salesforce server or the component itself
Note: Use extra caution when selecting the Ignore error option, since the component will remain silent for any errors that have occurred.
On the Error Handling page, there is also an option that can be used to enable or disable the following output fields for the destination component.
- SalesforceRecordId: Contains the newly created Salesforce record's ID, which you can use to write to log or further process using additional data flow components.
- IsNew: Contains value to indicate whether it is a newly created Salesforce record or an existing one. This is useful when you use the Upsert action.
- UpdatedRelatedIds (since v11.0): This option is only available to the Merge action, which would contain the updated related IDs of those merged records.
Note: If you don't plan to use any of those fields for any further processing, it is generally recommended to turn them off, so you don't get any warning from SSIS by complaining that those fields are never used, and it should also provide slightly better performance by doing so.
In addition to the above settings, the Error Handling page also offers the following Additional Outputs option since our v6.0 release.
The "Skipped Rows" output can be useful when the Text Lookup is set up to Skip Records if Lookup Fails or the error-handling mechanism is chosen as “Ignore error” in the Error Handling page.