Using the Active Directory Destination Component
The Active Directory Destination Component is an SSIS data flow pipeline component that can be used to write data to Microsoft Azure Active Directory and Microsoft Active Directory. You can create, update, or delete objects with this component. There are three pages of configuration:
- General
- Columns
- Error Handling
General Page
The General page allows you to specify general settings for the Active Directory Destination Component.
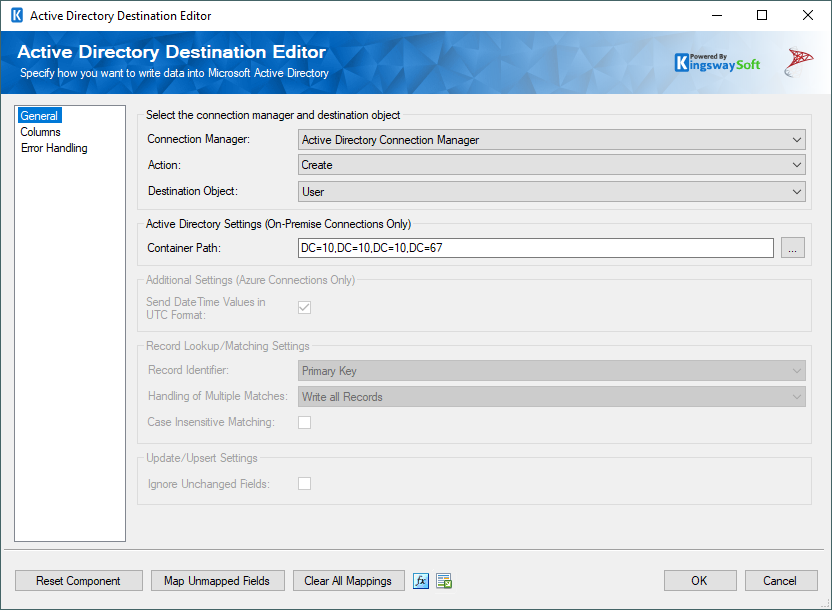
- Select the connection manager and destination object
-
- Connection Manager
-
The Active Directory Destination Component requires an Active Directory connection. The Active Directory Connection Manager option will show all ActiveDirectory connection managers that have been created in the current SSIS package or project.
- Action
-
The Action option allows you to specify how data should be written to Active Directory. There are currently five (5) supported action types available.
- Create: Create new object(s).
- Update: Update existing object(s) based on the primary key field (UserPrincipalName).
- Upsert(since v2.0, On-Premises only): Updates or creates object(s) based on primary key field (UserPrincipalName)
- Delete: Delete object(s).
- Move(since v2.3, On-Premises only): Move or rename an AD object.
- Destination Object
-
The Destination Object option allows you to specify which object to write data to. The available destination objects include:
- User: using the "User" option, you can create, update or delete Active Directory users
- Group: allows you to create, update or delete Active Directory groups
- GroupMembership: using the "GroupMembership" option, you can add users to Active Directory groups using Create action, and delete users from Active Directory groups using the Delete action
- Active Directory Settings (On-Premises Connections Only)
-
- Container Path
-
The Container Path option specifies the Directory path in which you want to manipulate Active Directory data. Note that some combinations of Container Path, Destination Object and Action may not be supported, in some cases they may produce undesired results. Make sure to select the intended container path when configuring the destination component.
Note that the Container Path option is not used by the Move action even it might be available.
Container Path has been removed as a component property since v23.2 release, it is now surfaced as a column level property that can receive different input values on each row.
- Additional Settings (Azure Connections Only)
-
- Send DateTimeValues in UTC Format
-
Enabling this option allows you to send date time values to Azure Active Directory in UTC format. If left unchecked, any date time value passed into Azure Active Directory will be treated as the integration user's local time.
- Record Lookup/Matching Settings
-
- Record Identifier
- Match the record using either Primary Key or using Manually Specified Keys.
- Handling of Multiple Matches
-
The Handling of Multiple Matches option allows you to specify what action will be taken when such multiple matches are found. There are four options available.
- Update All: This is the default behavior of the version prior to v3.0
- Update One: The component will only update the first matching record
- Ignore: The source row will be ignored when multiple matches are found
- Raise an error: An exception will be reported when multiple matches are found
- Case Insensitive Matching (Only for On Prem, since v22.1)
- Enable this option to have case-insensitive matching.
- Update/Upsert Settings
-
- Ignore Unchanged Fields
- The Ignore Unchanged Fields option allows you to ignore any fields that have not been changed in the target system.
- Map Unmapped Fields Button
-
By clicking this button, the component will try to map any unmapped Active Directory attributes by matching their names with the input columns from upstream components. This is useful when your source component has recently added more columns, in which case you can use this button to automatically establish the association between input columns and unmapped destination attributes.
- Clear All Mappings Button
-
By clicking this button, the component will reset all your mappings in the destination component.
- Expression fx Icon
-
Click the blue fx icon to launch SSIS Expression Editor to enable dynamic update of the property at run time.
- Generate Documentation Icon
-
Click the Generate Documentation icon to generate a Word document which describes the component's metadata including relevant mapping, and so on.
Columns Page
The Columns page of the Active Directory Destination Component allows you to map the columns from upstream components to to Active Directory attributes in the destination attributes.
In the Columns page, you would see a grid that contains three columns as shown below.
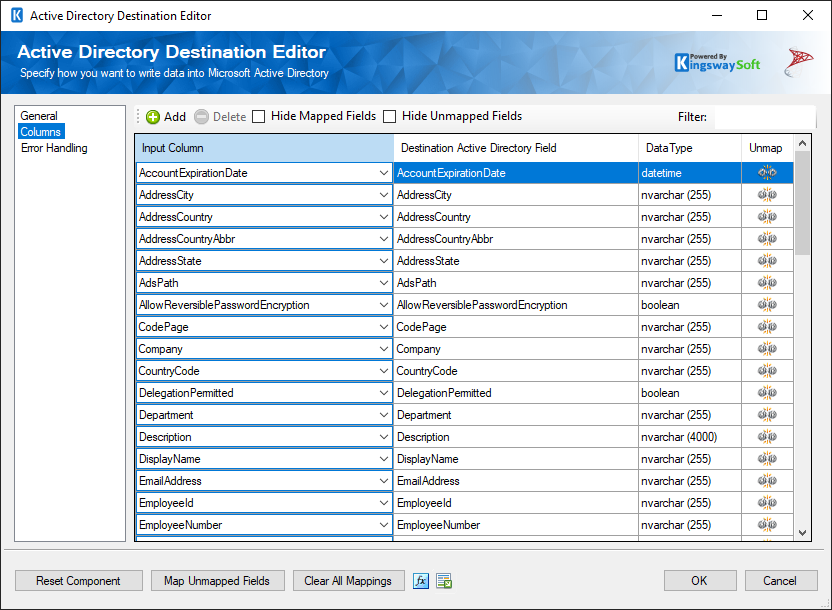
- Input Column: You can select an input column from an upstream component here.
- Destination Active Directory Field: The Active Directory attribute/field to which you are writing data.
- Data Type: This column indicates the type of value for the current attribute.
- Unmap: This button provides a convenient way to set/unset the mapping for the selected attribute/field.
Tips: In order to clear up a field value, you should set the target field's input value to NULL.
Writing to Custom Attributes (On-Premises only)
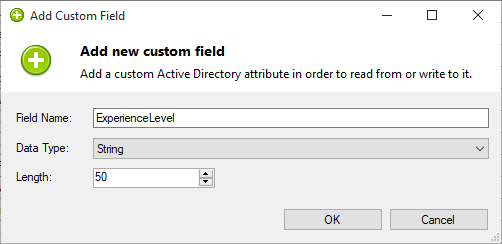
It is possible to write data to custom attributes in Active Directory. By default, custom attributes cannot be detected in the Destination Component. In version 2.x and above, in the Columns page of the Active Directory Destination Component, there is an 'Add' button, to manually add the custom field. If you select this button, you can add custom fields by entering the following information:
- Field Name
-
Specify the Field Name of the custom field that you would like to write to.
- Data Type
-
Select the Data Type drop down of the field type.
- Length
-
Choose the Length of the Data Type for your custom field.
Error Handling Page
The Error Handling page allows you to specify how errors should be handled when they occur.
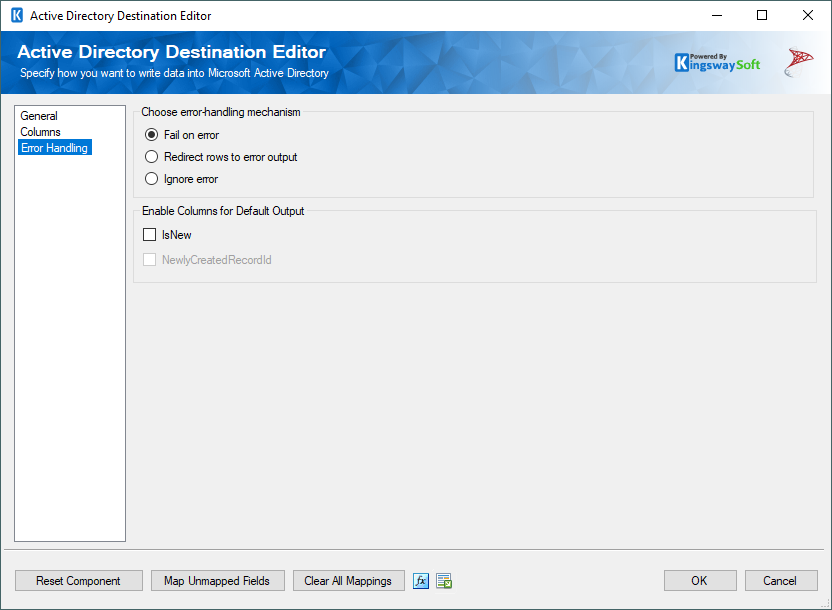
There are three options available:
- Fail on error
- Redirect rows to error output
- Ignore error
On the Error Handling page, there is also an option that can be used to enable or disable the following output field for the destination component.
- IsNew: Contains value to indicate whether it is a newly created record, or an existing one. This is useful when you use Upsert action.
- NewlyCreatedRecordId(since v4.0): Contains the newly created Azure directory object record's ID, which you can use to write to log or further process using additional data flow components.
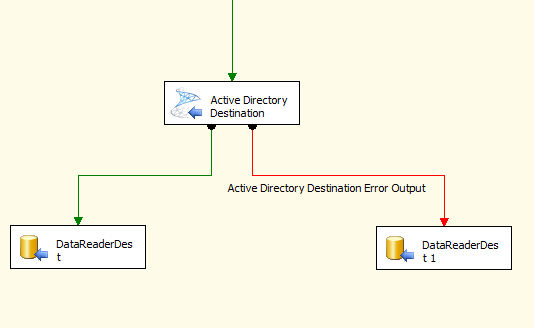
When the Redirect rows to error output option is selected, rows that failed to write to Active Directory will be redirected to the 'Active Directory Destination Error Output' output of the Destination Component. As indicated in the screenshot below, the green output connection represent rows that were successfully written, and the red 'Active Directory Destination Error Output' connection represents erroneous rows. The 'ErrorMessage' output column found in the 'Active Directory Destination Error Output' may contain the error message that was reported by Active Directory or the component itself.
Note: Use extra caution when selecting Ignore error option, since the component will remain silent for any errors that have occurred.
Adding Users as members to Groups
By selecting the GroupMembership destination object in the Destination Component, you can add members to groups. The GroupMembership object has 2 fields, GroupName and UserName. Often times, users and groups live in different container paths. In order to create membership between users and groups that live in different container paths, you will need to specify the DistingushedName property in the GroupName or UserName fields. If DistingushedNames are not used, the component will attempt to look for objects with matching Name in the specified container path.

