Using the CDS/CRM Connection Manager
The CDS/CRM Connection Manager is an SSIS connection manager that can be used to establish connections with the Microsoft Dynamics CRM Server. The following documentation can also be used for establishing a connection to Microsoft Common Data Service (CDS) using CDS Connection Manager.
The CDS/CRM Connection Manager allows you to specify how you want to connect to your CRM server. To add a CRM connection to your SSIS package, right-click in the Connection Manager area, and choose "New Connection..." from the context menu.
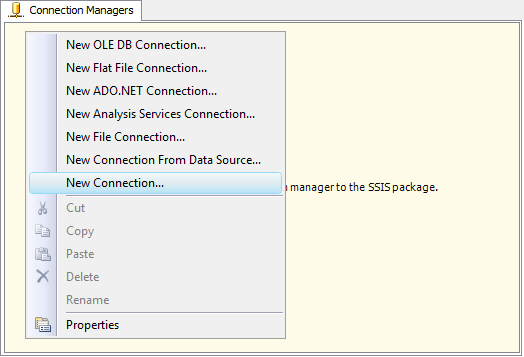
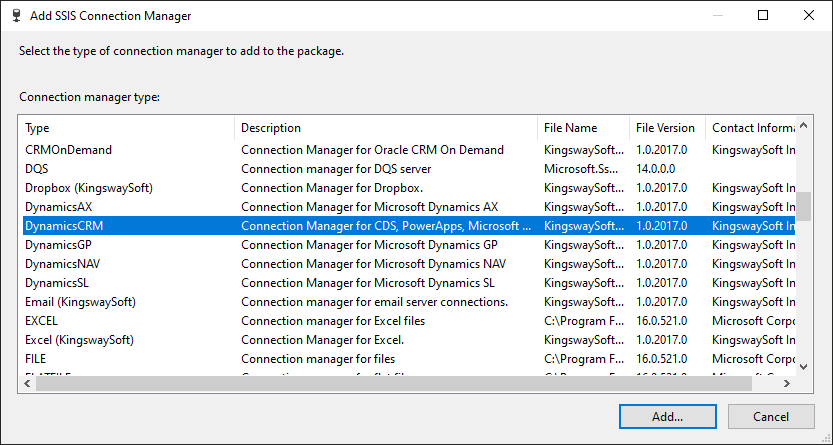
You will be prompted with the "Add SSIS Connection Manager" window where you can add the "DynamicsCRM" item.

The CDS/CRM Connection Manager contains the following four pages which configure how you want to connect to a Dataverse instance or a Microsoft Dynamics 365 CE/CRM server:
- Generic Service Configurations
- Proxy Server
- Advanced Settings
- More Info
Generic Service Configuration Page
The Generic Service Configuration page of the CRM/CDS Connection Manager allows you to specify general settings for the connection.
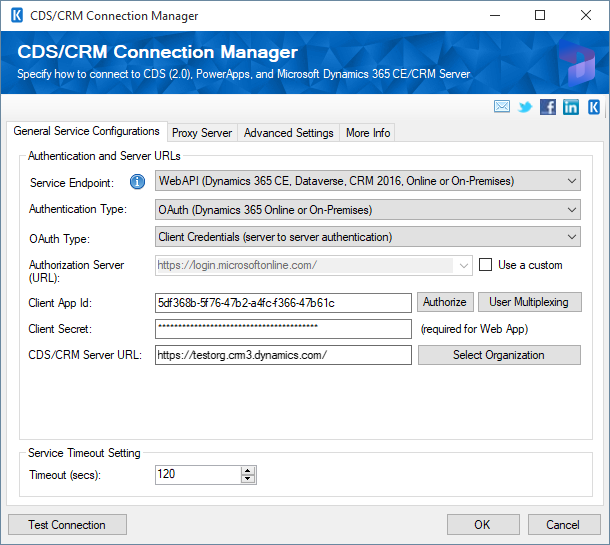
- Authentication and Server URLs
-
- Service Endpoint
-
The Service Endpoint option allows you to specify the service endpoint that you want to use in order to connect to the Microsoft Dynamics 365CE/CRM server. We currently support the following options:
- WebAPI (Dynamics 365 CE, CRM 2016, Online or On-Premises)
- SOAP 2011 (Dynamics 365 CE, CDS, CRM 2016, 2015, 2013, 2011)
- SOAP 2007 (CRM 4.0 and CRM 2011 On-premises)
- SOAP 2006 (CRM 3.0)
Note: The WebAPI service endpoint is made available since our v11.0 release. The WebAPI option has quite some limitations and restrictions as of Microsoft Dynamics 365 Customer Engagement v9.2 release (including Microsoft Dynamics CRM 2016). Those limitations and restrictions have been mentioned in the software UI which can be found by the "i" icon next to the Service Endpoint option. Please make sure you read and understand those limitations when you decide to use the option.
Note: You may change the Service Endpoint option after a connection manager has been saved. However, when doing so, it might happen that you have just switched to a service endpoint that uses an entirely different metadata system, which would consequently break all components that reference the connection manager. If this ever happens, you need to make sure that you will update all referenced SSIS data flow components by using its Refresh CRM Metadata button. The following are two important situations that you should take into consideration when making changes to this option.
- WebAPI and SOAP2011 use the same metadata system with subtle differences when working with custom lookup fields. In most cases, the two options should work without doing anything extra after switching from one to another. However, due to the subtle metadata differences, we generally recommend you perform a component refresh after you have changed the SOAP service endpoint to WebAPI. The other around should work completely fine without the need for a refresh because the extra metadata saved by WebAPI will not be used by the SOAP service endpoint, it will simply be ignored with no harm.
- For Microsoft Dynamics CRM 2011 on-premises server, you could potentially use either the SOAP2011 or SOAP2007 service endpoint, however, these two service endpoints use two different metadata systems - so a component refresh is required if a change of the Service Endpoint has ever occurred.
Note: The SOAP2011 service endpoint has technically been deprecated by Microsoft. In case you are working with Dynamics 365 online or Dynamics 365 v9 on-premises server, the recommended connection option is the WebAPI service endpoint. However, due to the limitations related to WebAPI, you might run into a situation where you have to use the SOAP service endpoint to achieve your integration requirements. For instance, if you plan to use the Audit Logs source type in the CRM/CDS source component to extract Dynamics audit log details, you would have to use the SOAP service endpoint. The reason is, the WebAPI does not return the auditid field in the audit details returned. Because of this, there isn't a way to properly associate the audit detail records with the audit entry. In addition, it is believed that there should be no engineered performance differences between the two service endpoints. However, the payload via WebAPI could be substantially smaller than SOAP service calls, therefore it could render some slightly better performance.
- Authentication Type
-
The Authentication Type option allows you to specify the deployment type of your CRM server and what authentication will be used. There are four options available:
- Active Directory (On-Premises)
- Federation (IFD, On-Premises or Partner-hosted)
- Online Federation (Office 365 CRM Online - Office 365)
- OAuth (Dynamics 365 Online or On-Premises)
Note: For CDS connection, only the Active Directory and OAuth options are available, as the other options are not applicable.
Note: It is important to note that Online Federation authentication has been deprecated by Microsoft, it should no longer be used. The recommended replacement is the OAuth option.
- OAuth Type (since v10.0)
-
The OAuth Type option allows you to specify the OAuth type when you use OAuth (Dynamics 365 Online or On-Premises) authentication. There are five options available:
- Authorization Code (since v22.1)
- Client Credentials (Server to Server authentication)
- Certificate
- Password (Not recommended for security reasons)
- Interactive Login (Use for design-time only)
- Authorization Code (since v22.1)
- Use Integrated Authentication
-
This option is only available if you have chosen "Active Directory (On-Premises)" as the Authentication Type. When chosen, you will be connecting to the Dynamics 365 CE/CRM server using the currently logged-in user account (essentially yourself if you are running the software interactively, or the service account / proxy account for scheduled job execution). Using this option, you have the flexibility of not saving your login credential in the SSIS package, which might help simplify the deployment process of your SSIS packages.
- Authorization Server (URL)
-
This option is introduced in our v11.0 release, and it is only available when OAuth is used. When connecting to Dynamics 365 CE/CRM online, we use https://login.microsoftonline.com/ as the default authorization server, which you don't generally need to make a change unless there is a specific reason in the case that your CDS/CRM online instance is using some special authentication flow. This is more often used for Dynamics 365 on-premises installation with a particular authorization server. To enable the option for editing, you must first click on the "Use a Custom URL" checkbox next to the option.
The custom Authorization Server URL can be provided in the following format.
- https://servername - when the value is provided this way, our software will automatically append common/oauth2/token after the server URL.
- https://servername/<TenantId>/oauth2/token - when the value is provided this way with /oauth2/token at the end, our software will authenticate against the URL as it is. This is useful for the case when working with GCC or GCC high environment, your authorization URL is likely to be https://login.microsoftonline.us/<TenantId>/oauth2/token. You can find out your talent ID by logging into your Azure Portal.
- Token Path (Available for Authorization Code OAuth type - since v22.1)
-
The path where the token file is saved. Please note that we support both file system paths and Azure blob storage Shared Access Signature (SAS) URLs.
- Get New Token (Available for Authorization Code OAuth type - since v22.1)
-
This button completes the OAuth authentication process in order to generate a new token.
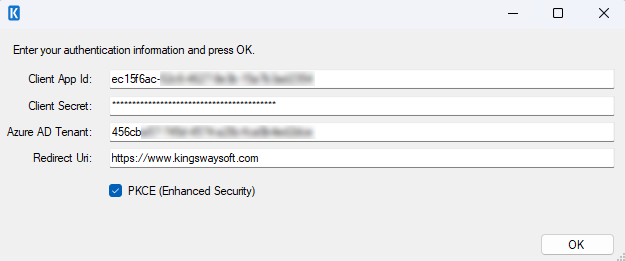
- Client Id: The Client Id option allows you to specify the unique ID which identifies the application making the request.
- Client Secret: The Client Secret option allows you to specify the client secret belonging to your app.
- Azure AD Tenant: Specify the Azure AD tenant in this option.
- Redirect Url: The Redirect Url option allows you to specify the Redirect Url to complete the authentication process.
- Token Password (Available for Authorization Code OAuth type - since v22.1)
-
The password to the token file.
- Service Resource (since v11.0)
-
The Service Resource option is only available when the "Use a custom URL" (discussed above) is chosen, it allows you to specify the service resource that our software is accessing during design time or runtime. When the option is not made available or when it is not specified, our software will try to automatically discover the service resource during both design time and run time, which should work reliably for Dynamics 365 CE or CDS online instances. The option is generally used for Dynamics 365 on-premises installations, in which case you would first specify your ADFS server as the authorization server and enter the service resource here.
The Service Resource should typically be your tenant URL such as https://mytenant.crmx.dynamics.com/ when x represents your CDS or Dynamics region. For instance, if you are US-based, it would be https://mytenant.crm.dynamics.com/ or https://mytenant.crm4.dynamics.com/ for EMEA, and so on. Note that it typically requires the trailing slash character, but you can always try your tenant URL without the trailing slash. For on-premises installations, it would be your organization's instance URL in a similar fashion.
- User Name
-
The User Name option allows you to specify the user account that you want to use when connecting to your Dynamics 365 CE/CRM server. Depending on how the connection is used, the user account needs to have proper privileges in your CDS/CRM system.
- Password
-
The Password option allows you to specify the password for the above user account to log in to your CDS/CRM server.
Note: The Password is not included in the CRM connection manager's ConnectionString property by default. This is done by design for security reasons. When you need to parameterize the connection manager for runtime execution, there are two options available in providing customized login credentials (including the Password). The first option is to parameterize the ConnectionString property and Password separately. The second option is to include the Password in the ConnectionString property, so you would just parameterize the entire ConnectionString with the password included. The format would be adding ;Password=myPassword at the end of the ConnectionString (or anywhere in the middle as long as the semicolon is inserted in the correct place).
- Domain
-
The Domain option is used to specify the active directory domain of the CRM user account. This option is only available when the Authentication Type is "Active Directory (On-Premises)".
- Client App Id
-
The Client App Id option is available when the OAuth (Dynamics 365 Online or On-Premises) Authentication Type is selected, and it allows you to specify the ID (in GUID format) of the Azure Active Directory (Azure AD or AAD) application you have created for application authentication.
To create an application in Azure Active Directory (AAD):
- Log in Azure Portal
- Navigate to Azure Active Directory | App registrations | New registration
- Give a name to the application and choose an appropriate application type using the
Redirect URI option on the page.
- Password: Public client (mobile & desktop), or Web
- Certificate: Web
- Client Credentials (server-to-server authentication): Web
In order to work with Certificate and Client Credentials (server-to-server authentication) OAuth Type, it is also required to have an Application User created in your Dynamics 365 CE/CRM instance. To create an Application User:
- Log in to Dynamics 365/CRM
- Navigate to Settings | Security | Users and switch to the Application Users view. Please make sure you are in this view otherwise the user you create would not be an App User.
- Click "New" and fill out the form to create an Application User. Please ensure that the user type is set to "USER: APPLICATION USER" and that the Application ID is the Client App Id we created in the previous step.
- Certificate Thumbprint
-
The Certificate Thumbprint option is only available when the Certificate OAuth Type has been chosen, it allows you to specify the thumbprint of the certificate created for the application registered in Microsoft Azure Active Directory (AAD).
Before generating a thumbprint in Microsoft Azure Active Directory (AAD), you would need to create a Public/Private Key Pair:
- Download and install OpenSSL for Windows. Note that you may need to restart your machine after installation
- Launch Windows Command Prompt as an administrator using the "Run as administrator" option
- In the command prompt window, navigate to the bin folder of the installation location of OpenSSL, e.g. "cd C:\OpenSSL-Win32\bin"
- Execute the following commands. Note that the third command will prompt you to enter a password. Two files will be generated in this step:
- publickey.cer: This is the Public Key file that is going to be uploaded to Microsoft Azure Active Directory (AAD).
- public_privatekey.pfx: this is the Private Key file that is going to be installed on the machine where CRM Connection Manager is used.
openssl genrsa -out privatekey.pem 2048
openssl req -new -x509 -key privatekey.pem -out publickey.cer -days 1825
openssl pkcs12 -export -out public_privatekey.pfx -inkey privatekey.pem -in publickey.cer
To generate a thumbprint for a specific Web App / API application in Azure Active Directory:
- Log in Azure Portal
- Navigate to Azure Active Directory | App registrations and select the application
- Click Certificates & Secrets | Upload certificate
- Specify the location of the Public Key file (publickey.cer) and click Save to display the Thumbprint.
Once you get a thumbprint from Azure Active Directory, please be sure to install the Private Key file (public_privatekey.pfx) on the machine where CDS/CRM Connection Manager is used. Note that the certificate has to be installed in the Personal store in order for it to be discoverable during runtime.
Note: This option will only be available to Certificate OAuth Type.
- Client Secret
-
The Client Secret option allows you to specify the client secret once you have selected or created an application in Microsoft Azure Active Directory (AAD).
To create a client secret for a specific Web App / API application:
- Log in Azure Portal
- Navigate to Azure Active Directory | App registrations and select the application
- Click Certificates & secrets
- Click the New client secret button and follow the instructions on the screen to enter a description of the key and specify whether the key should expire
- Click Add to save the Client Secret and make sure to take note of the client secret right away
Note: This option will only be available to Client Credentials (server-to-server authentication) OAuth Type.
- Authorize Button
-
By clicking the Authorize button, it will pop up an Application Access Authorization window to help you authorize the application to access your Dynamics 365/CRM data. All you need to do is to provide the Redirect URL depending on your Azure Application's application type:
- Native application: put the Redirect URI of the application into the Redirect URL field.
- Web app / API application: put the Sign-on URL of the application into the Redirect URL field.
Two types of authorizations are supported:
- Authorize in App
- Authorize in Browser
Note: This option will only be available to OAuth (Dynamics 365 Online or On-Premises) Authentication Type.
- User Multiplexing (since v22.1)
-
This option will enable you to specify more than one App User as needed to enable higher throughput writing. Clicking the button opens up the below window.
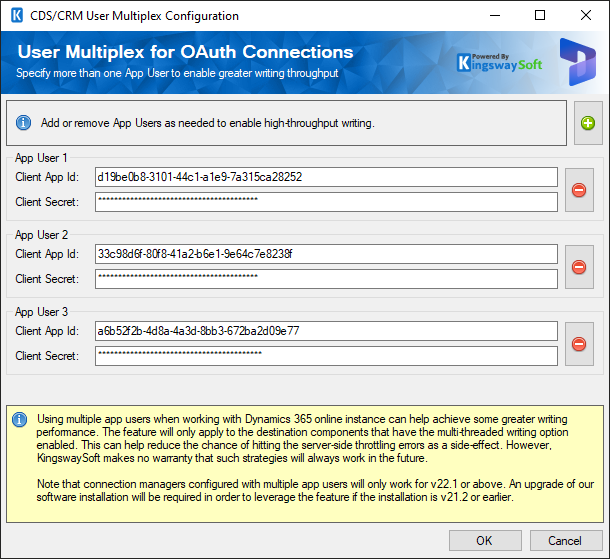
Using multiple App users when working with Dynamics 365 Online instance can help achieve higher performance while writing. The feature will only apply to the Destination components that have a multi-threaded writing option enabled in it. This can help reduce the chance of hitting server-side throttling errors. However, KingswaySoft makes no warranty that such strategies will always work in the future.
- CDS/CRM Server URL (since v5.1)
-
The CDS/CRM Server URL is the actual URL that is utilized by the connection manager to make service calls to Microsoft Dynamics 365 CRM, CDS, or Dataverse. This field should be prepopulated for you after using the Select Organization feature. This URL is generally your CRM, CDS tenant URL. For Dynamics CRM 4.0, this should be the URL with your organization name. This property is backed by a connection string property called ServerUrl starting from v20.2, which used to be called CrmServerUrl. In v20.1 or earlier, this field is automatically populated after you have chosen an organization using the dropdown combo box available in the connection manager. When using v20.1 or earlier, this option is generally disabled for editing by default, but you can always unlock the field for editing if you need to - again, this behavior only applies to our v20.1 release or lower. Our v20.2 (including any newer versions) still supports the CrmServerUrl property in the connection manager's ConnectionString property, but it is just not available as an individual property anymore.
- Select Organization (since v20.1)
-
Clicking this button will open a dialog box that allows you to discover and select from the available organizations in your CDS or Dynamics CRM instance.
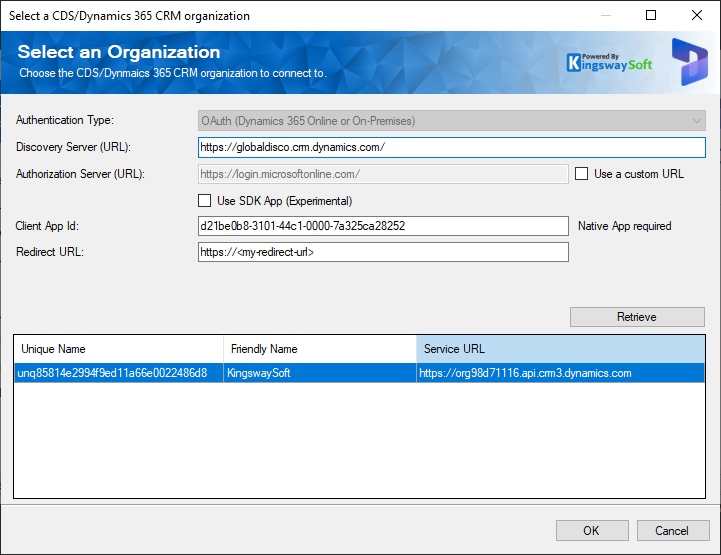
This window is generally pre-populated with as much information as available in the main connection manager UI. The following is the list of options available on this screen.
- Authentication Type
-
This is a disabled option that should be automatically populated with the same value as the main connection manager form.
- CRM Discovery Server
-
The CRM Discovery Server option allows you to specify the CRM discovery server URL which you can use to discover your CDS/CRM organizations and their web service URLs. The CRM discovery server can be found in the CRM system from Settings | Customizations | Developer Resources after you have logged in to your CRM application.
Please ensure to enter the full URL of your CRM discovery server, the path after the server name is not needed.
When working with a Dynamics 365/CRM on-premises or IFD (Internet Facing deployment) environment, the URL should typically be in one of the following formats, depending on your CRM server's setup.
- http://CrmServerName/
- https://CrmServerName/
- http://CrmServerName:PortNumber/
- https://CrmServerName:PortNumber/
When working with CDS or Dynamics 365 Online instances, we generally recommend using the OAuth option, in which case the discovery server should always be https://globaldisco.crm.dynamics.com/ if you are using v20.1 or later.
When working with CDS/Dynamics 365 CE/CRM Online Federation, you should select the discovery server URL based on your region using the dropdown list. We generally recommend you select the regional discovery server from the dropdown list. It is important to note that the Online Federation connection has been deprecated by Microsoft as of March 2020. The general format of the regional discovery server is https://disco.crm<region-id>.dynamics.com/. Make sure that you don't use your tenant URL such as https://myorganame.crm<region-id>.dynamics.com/ here.
- Authorization Server (URL)
-
This is a disabled option that should be automatically populated with the same value as the main connection manager form.
- Use a custom URL
-
This option functions the same as the Use a custom URL option in the connection manager form. You can use the option to enable the Authorization Server (URL) option so that you can use a custom authorization server URL. When the option is unchecked, it will default to Microsoft online authorization server URL which is https://login.microsoftonline.com/. When the option is enabled, a Service Resource option (discussed next) will become available.
- Service Resource
-
This option functions the same as the Service Resource option in the connection manager form. Using this option, you can specify a service resource that the application is trying to access. When the option is not visible or empty, our software will automatically discover the resource to be accessed during execution.
- Client App Id
-
This option should have a copy of the value that is entered in the connection manager form. In order for the discovery to work properly, this needs to be a native app within Azure Active Directory, even the connection manager might be using a web app. The limitation is related to the Microsoft Authentication Library that we use.
When using a web app here, you will receive the following error message when trying to get a list of Dynamics 365 or CDS organizations.
AADSTS7000218: The request body must contain the following parameter: 'client_assertion' or 'client_secret'
- Redirect URL
-
You need to provide the Azure app's Redirect URL.
Once you have all the options specified in the form, you may click the Retrieve button to get the list of available organizations of the current connection. This covers the use of the Selection Organization window, we will be back to the main screen at the next option.
- Service Timeout Setting
- Timeout (secs)
-
The Timeout (secs) option allows you to specify a timeout value in seconds for the connection. The default value is 60 seconds.
- Test Connection
After all the connection information has been provided, you may click the "Test Connection" button to test if the user can successfully log in to the CRM server.
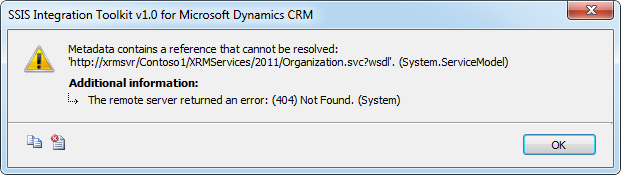
If you happen to run into the following error message when testing the connection, it is most likely that the provided CDS/CRM organization does not exist in the target CRM server.
Metadata contains a reference that cannot be resolved: 'http://xrmsvr/CrmOrganizationName/XRMServices/2011/Organization.svc?wsdl'. (System.ServiceModel)
ADDITIONAL INFORMATION:
The remote server returned an error: (404) Not Found. (System)
Proxy Server Page
The Proxy Server page of CRM Connection Manager allows you to specify how you want to configure the proxy server.
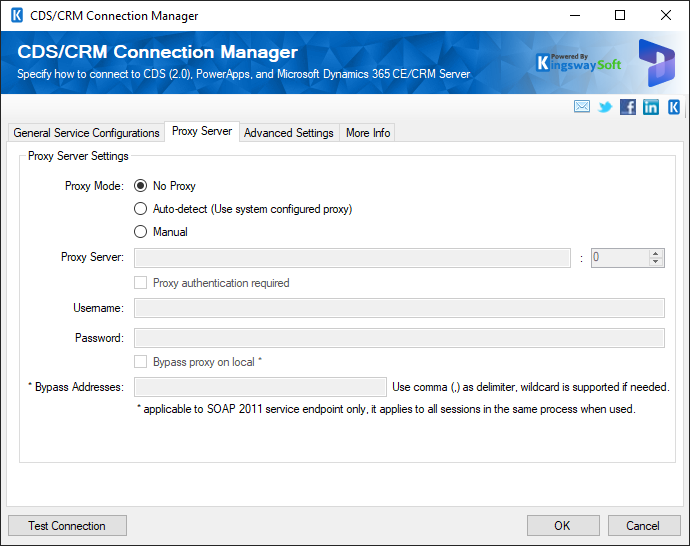
- Proxy Mode (since v8.0)
-
The Proxy Mode option allows you to specify how you want to configure the proxy server setting. There are three options available.
- No Proxy
- Auto-detect (Using system-configured proxy)
- Manual
- Proxy Server
-
Using the Proxy Server option, you can provide a proxy server to connect to the CRM server.
- Port
-
The Port option allows you to specify the port number of the proxy server for the connection.
- Username (Proxy Server Authentication)
-
The Username option (under Proxy Server Authentication) allows you to specify the proxy user account.
- Password (Proxy Server Authentication)
-
The Password option (under Proxy Server Authentication) allows you to specify the proxy user's password.
Note: Proxy Password is not included in the CRM connection manager's ConnectionString property by default. This is done by design for security reasons. However, you can include it in your ConnectionString if you want to parameterize your connection manager. The format would be ProxyPassword=myProxyPassword; (make sure you have a semicolon as the last character). It can be anywhere in the ConnectionString.
- *Bypass Addresses
-
The *Bypass Addresses option allows you to exclude specific data addresses or filter out data based on predefined criteria during the integration process. Use (,) as a delimiter; wild card is supported if needed. Applicable to SOAP 2011 service endpoint only. It applies to all sessions in the same process when used.
Advanced Settings Page
The Advanced Settings page of CRM Connection Manager allows you to specify some advanced settings of the connection.
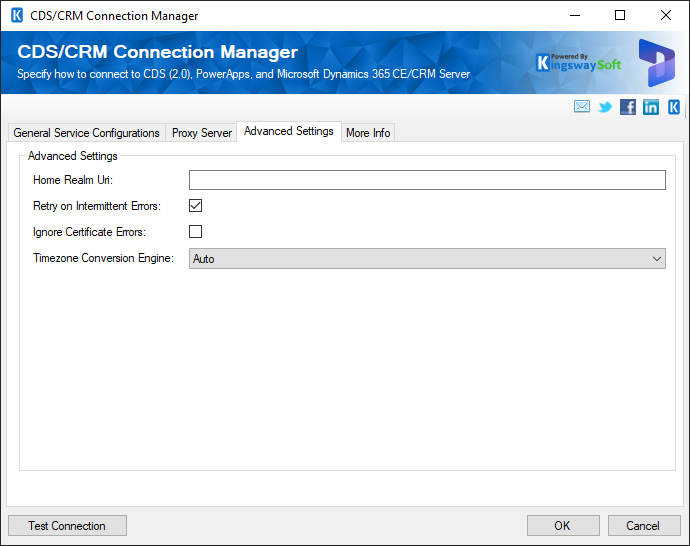
- Home Realm Uri (since v4.1)
-
Specify the URI of the cross-realm STS metadata endpoint. It should typically be a URL starting with https. This option is usually optional, and it may be required for certain deployments. In the case that this option is required, it should typically be in the following format.
https://adfs-server-name.mycompany.com/adfs/services/trust/mex
- Retry on Intermittent Errors (since v5.1)
-
This is an option designed to help recover from possible intermittent outages or disruption of service so the integration does not have to be stopped because of such temporary issues. Enabling this option will allow service calls to be retried upon certain types of failure. A service call may be retried up to 3 times before an exception is fired. Retries occur after 0 seconds, 15 seconds, and 60 seconds.
Warning: Although we have carefully designed this feature so that such retries should only happen when it is deemed to be safe to do so. However, in some extreme occasions, such retried service calls could result in the creation of duplicate data.
Note: between v3.0 and v5.0 SR-1 (inclusive), the retry implementation was enabled by default, and there is no option to turn it off until the v5.1 release.
- Ignore Certificate Errors (since v7.2)
-
This option can be used to ignore those SSL certificate errors when connecting to the CRM server.
Warning: Enabling the "Ignore Certificate Errors" option is generally NOT recommended, particularly for production instances. Unless there is a strong reason to believe the connection is secure - such as the network communication is only happening in an internal infrastructure, this option should be unchecked for best security.
Note: When this option is enabled, it applies to all HTTP-based SSL connections in the same job process, it is not just limited to Dynamics CRM connections.
- Timezone Conversion Engine (Since v21.2)
-
The Timezone Conversion Engine option was added to manage Microsoft's deprecation of the TimeZoneRule entity and some attributes of the TimeZoneDefinition entity. You could choose from the below three options.
-
Auto
-
Modern
-
Legacy
-
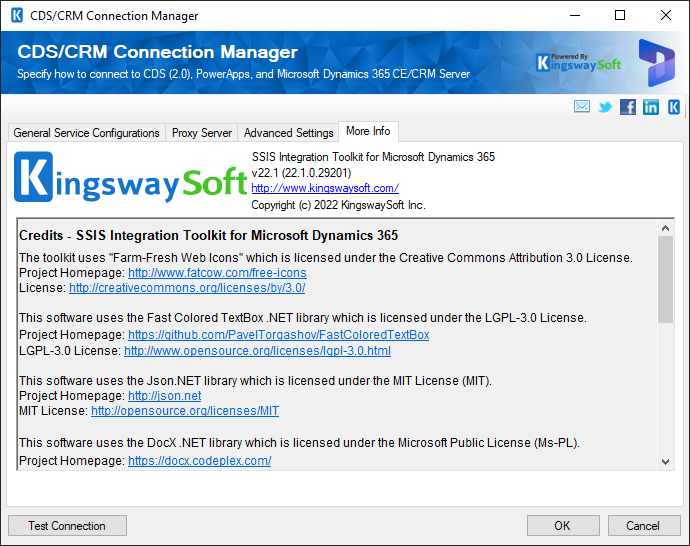
More Info Page
The More Info page contains basic information about the toolkit. On this page, you can find the version information of the toolkit.