When connecting to a SharePoint server to process data in an ETL process for either reading or writing purposes, you could use either the SOAP or REST service endpoint. Both of them are supported in our SSIS Integration Toolkit for Microsoft SharePoint product. When working with SharePoint online, we generally recommend the REST service endpoint by utilizing the OAuth authentication, which works with the modern SharePoint infrastructure by enabling a more secure connection.
When using the OAuth option, you would generally create an Azure AD app and authenticate through the app. Such Azure AD app support has been made available since our v22.1 release. This works well but it requires certain Azure privileges which are not always available to ETL developers. For this reason, we have recently added the new Client Credentials using Custom App option to the SharePoint connection manager in our v23.1 release. What makes this unique is, this option provide some benefits that are not available in the general Azure AD app connection.
- It requires zero Azure admin privileges in order to create the authentication option.
- The app requires limited access to the SharePoint application, which reduces the risks of potential security issues.
- The application access is restricted to the current site collection only, which can eliminate some potential security risks.
For the above reasons, it is highly desirable that you might want to leverage the option for better security in your SharePoint ETL development. In this blog post, we will go through its prerequisites, and how to configure it within our connection manager. As we have briefly mentioned, this method is different from the general OAuth authorization code method, in which case you generate an Azure AD app from within the Azure portal, and configure the connection manager to authenticate with the app by generating necessary security tokens for connection purposes. In comparison, when using the Custom App option, you register an App inside the SharePoint application itself which is not related to your Azure AD tenant, the app works very much the same as an Azure AD app, but with better security protection.
It is to be noted that, in our illustrations below, we will be using the admin site, and you would be adding a "-admin" to the instance name. You could also generate the App without the -admin part in the URL, and in such cases, the App registration page would look slightly different - But the process and steps remain the same.
Pre-requisites
In order for the approach illustrated in this blog post to work if you are working with a SharePoint online instance, you need to make sure that you have disabled the DisableCustomAppAuthentication option for your SharePoint tenant. In order to achieve so, please run the following PowerShell script.
Install-Module -Name Microsoft.Online.SharePoint.PowerShell
$spoUrl="<SharePoint Online base url, example:https://companyA.sharepoint.com>".TrimEnd('>')
$tenantName = ([System.Uri]$spoUrl).Host.Split('.')[0]
Connect-SPOService -Url https://$tenantName-admin.sharepoint.com
set-spotenant -DisableCustomAppAuthentication $false
It should be noted that the Connect-SPOService line might require some additional parameters pertaining to your SharePoint configuration. Please refer to its documentation page for more details.
Without the setting disabled, you could receive the following error when connecting after all below is done.
KingswaySoft.IntegrationToolkit.SharePoint.REST.OdataServiceException: The remote server returned an error: (401) Unauthorized. (Error type/cause: unauthorized, detailed message: {
  "error": "invalid_request",
  "error_description": "The token type is not allowed."
})
App Registration
The first step would be to register the App. For this, navigate to the link shown below after inserting your own instance name into it. As previously mentioned, we have added the "-admin" part in order to access the admin portal.
https://<tenant-name>-admin.sharepoint.com/_layouts/15/appregnew.aspx
You should be prompted to log in to the page. After you have logged in, you should see a page similar to the screenshot below, in which you can click on "Generate" buttons under Client Id and Client Secret.
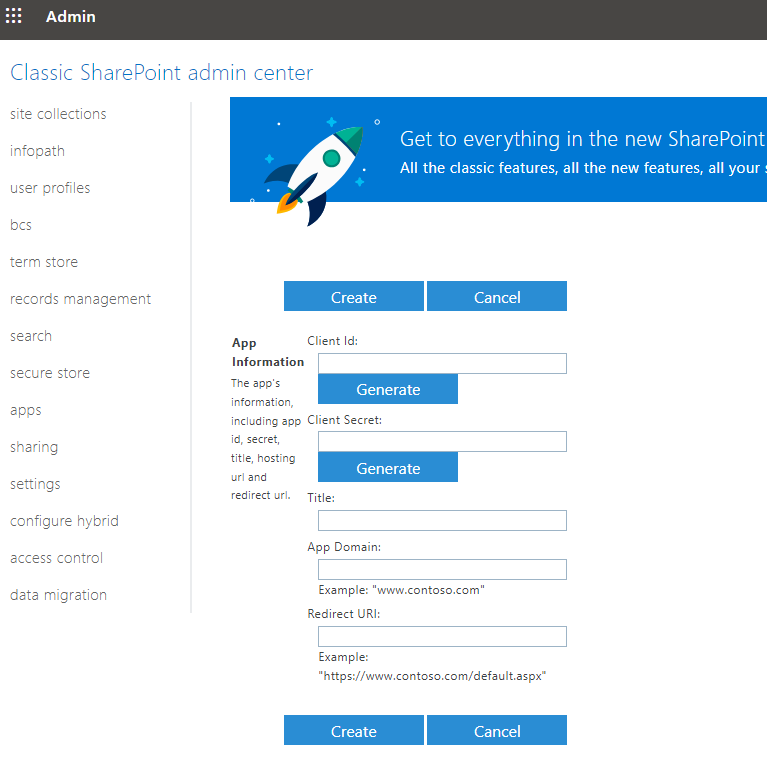
Once generated, you may give the app a name by using the Title field. In addition, you will be asked to provide an App Domain, and a Redirect URI. App Domain can be an app name or anything that would identify the app's use. For the Redirect URI option, to keep it generic, we have entered it as https://localhost, as shown in the screenshot below. It is worth noting, the redirect URI can be any valid HTTPS URL, its whole purpose is to get back an authorization code that can be later used to obtain your authentication tokens (if needed). You should choose a URL that you can trust, due to the fact that it will receive an authorization code. You would also want to make sure that the URL does not make redirects, otherwise, the authorization code might get lost during the redirects. Keep in mind that the provided Redirect URI doesn't even have to work. In the configuration that we have illustrated in this blog post, this URL is actually not being used.

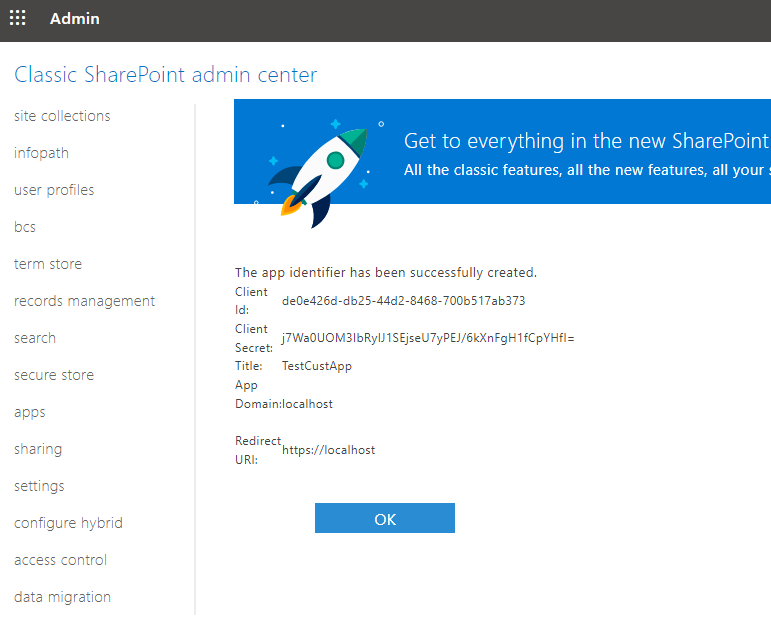
After the above steps, click on the "Create" button you see on the screen (top or bottom) and the App creation would show as successful. You could write down the client Id and details.
Grant Permissions
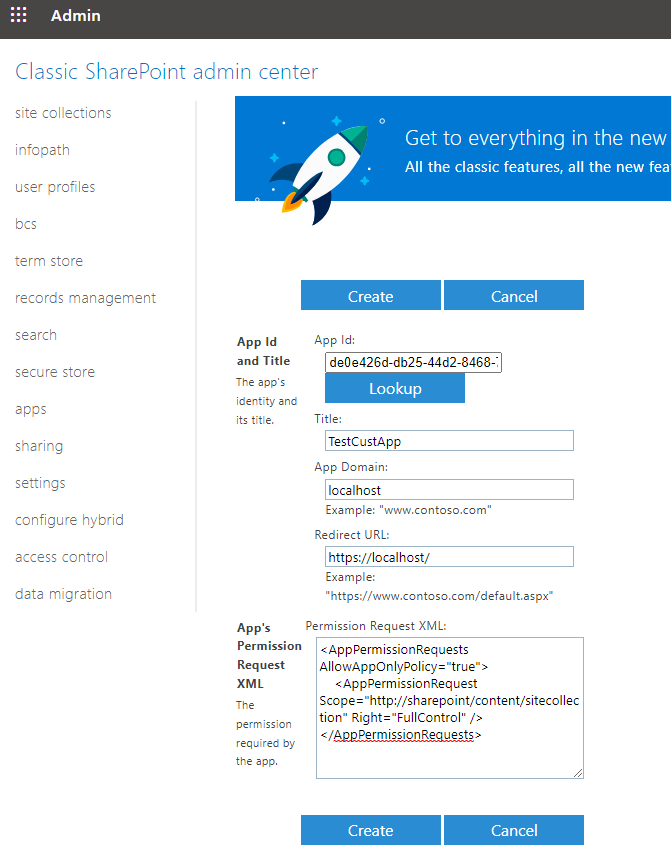
Next step would be to grant permissions to the App. In order to do this, navigate to the permissions page using the URL below.
https://<tenant-name>-admin.sharepoint.com/_layouts/15/appinv.aspx
In the field that shows up for "App ID", enter the client ID for the App created before, and the details will be pulled up. Here, under "App's permission request XML", enter the XML code for the required permissions. See the XML code below:
<AppPermissionRequests AllowAppOnlyPolicy="true">
    <AppPermissionRequest Scope="http://sharepoint/content/sitecollection" Right="FullControl" />
</AppPermissionRequests>
Please note that we have requested full control in the XML code snippet, but you could modify it as required to restrict the permissions.
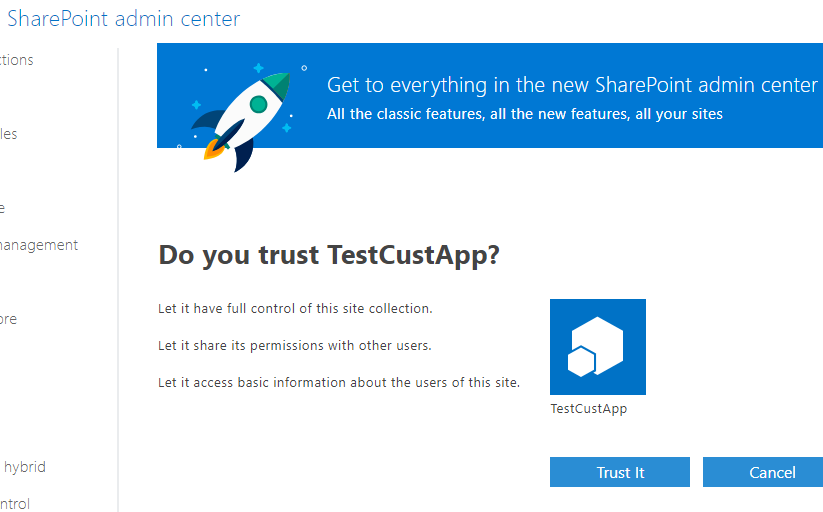
Click on the Create button, which will redirect you to the following page, where you would then click the "Trust It" button to trust the Add-in (Custom) App that we have just created above.
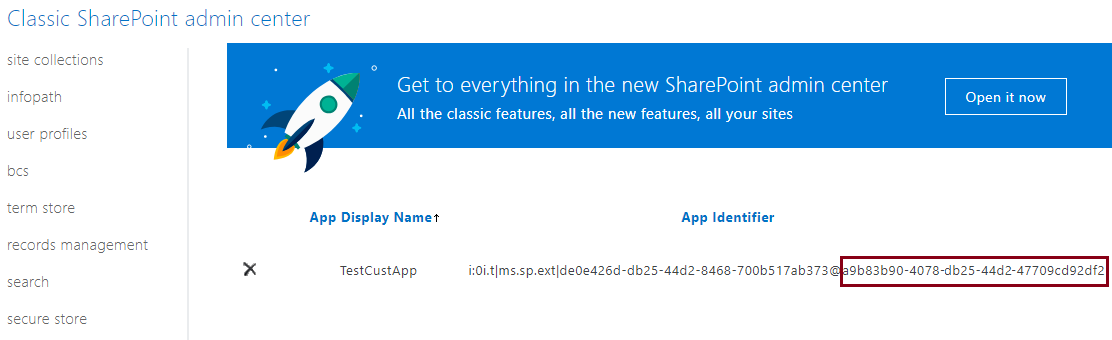
Now, the last piece that you would need is the Tenant ID, which you can get by navigating to the path .../_layouts/15/appprincipals.aspx in your instance. And as shown below, the part that comes after the "@" is the Tenant ID (The part before the "@" is the Resource ID).
Configure the Connection Manager
Once the custom app has been created, we can now head to the SharePoint Connection Manager to complete the setup. With the above details ready, we can configure the connection manager, which might look as shown below:
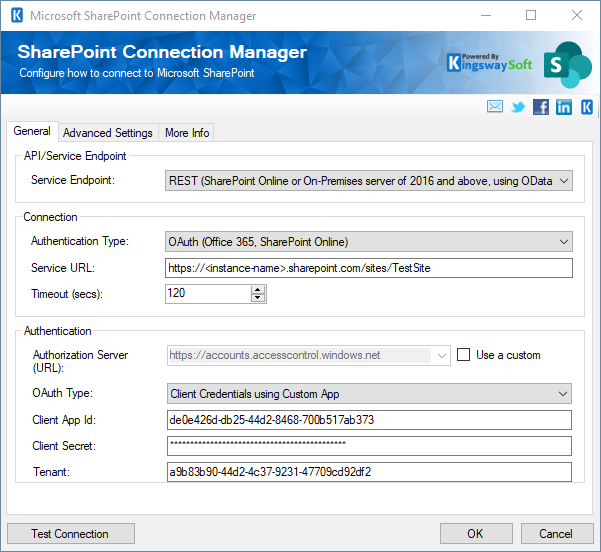
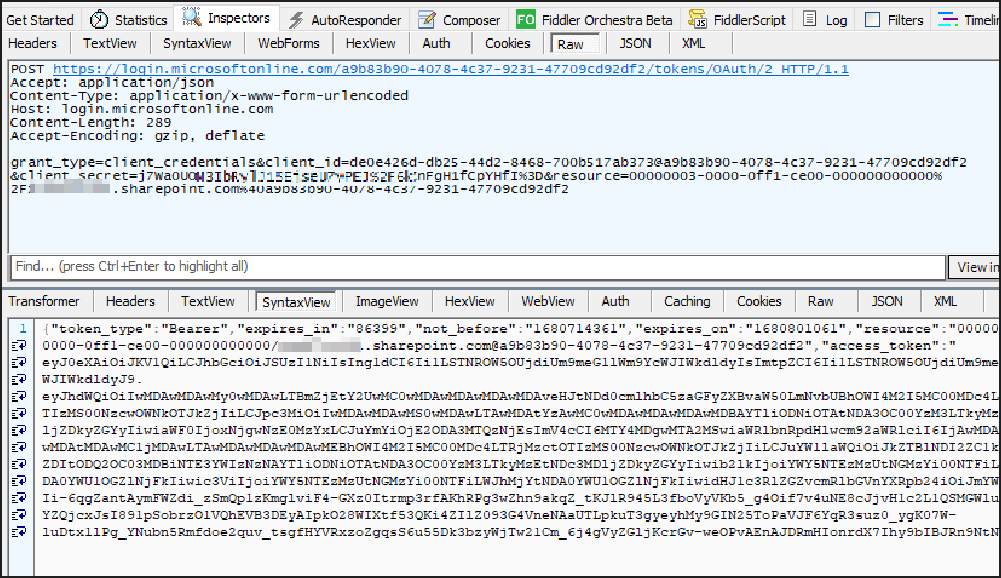
Click on the Test Connection button to make sure that everything has been configured properly and that the connection is working in the connection manager. As you can see, we get the Authentication token successfully from the API.
Conclusion
By using KingswaySoft, you could create Custom App/Add-in Apps authentications, and this usually comes useful in cases where the permissions required need to be restricted to the OAuth App. By easily configuring the Client ID, Client Secret, and Tenant ID, the OAuth request is handled by our component to get the access tokens successfully.
We hope that you find this blog post useful!