The KingswaySoft HTTP Connection manager is a widely popular component used in tandem with few other components in general and is used in numerous business cases. For instance, if you wish to connect to any REST or SOAP based APIs, you would use those JSON or XML/WebService components respectively, and the HTTP connection manager is the underlying connection infrastructure which makes this possible. In other words, in order to authenticate to the corresponding endpoint in those JSON or XML/WebService components, you should be looking at using the HTTP Connection manager offered in our SSIS Productivity Pack product. It is worth mentioning, as of our most recent v21.1 release, the HTTP connection manager supports a total of 11 dedicated authentication methods, including OAuth2, JWT, Bearer Token, AWS Signature etc (to name a few in demand). With those 11 authentication methods, we are confident to say that we have covered at least 95% of authentication scenarios that you might run into. However, there are cases in which such conventional authentication processes will not work, one of such scenarios is when the process involves the use of an arbitrarily formatted authentication token. And in such cases, you would need to rely on parsing the response using either a specific path (depending on the nature of the API), or an expression in a different process and then feed it to a parameterized connection manager using parameters or variables. Such process will not be very straightforward to achieve without a proper supporting infrastructure in handling such arbitrary token format. With that in mind, our HTTP connection manager has recently introduced a Custom Token authentication option which is designed to work with such situation with ease. In the example below, we would see different ways in which an authentication token can be parsed out of a custom response from inside the HTTP connection manager, and then used for the actual subsequent service calls. The components that we discuss below is available to download as a part of our SSIS Productivity Pack.
Initial Setup
Before we dive deep into how to configure the component, let’s have have a quick look of the sample token response that we might receive. For instance, we would be looking at a response that would have an authentication token inside an array. The response structure is as shown below.
{
       "ownerOrganization": {
              "providerId": 0,
              "providerDomainName": "YourDomain"
       },
       "CompanyDetails": {
              "aliasName": "1",
              "userGUID": "99965E43-C535-49F6-900C-2FF243532549"
       },
       "userName": "admin",
       "providerType": 1,
       "ccn": 0,
       "authentication": [{
              "Status": "Success",
              "token": "3feedcdeccfa56f536a1e9ddc92275e7e78025640882eb10696",
              "capability": 4328650366975
       }]
}
We have created a mock link that would bring us back such token response, so that we could test it out in our HTTP connection manager. Now, the authentication request for our sample service endpoint needs to be a POST request, and it requires three parameters to be sent in the body of the request in a form URL encoded format (which is a very commonly used body format used in HTTP connections for authentication purpose).
- Username
- Password
- Id
In order to work with such scenario, we would need to prepare a Curl command file that will be used by the connection manager to send this request in order to receive the authentication token before making the actual service calls. And the below would be the one in this case.
curl -d "username=TestUsername&password=MyPassword&id=MyId" -H "Content-Type: application/x-www-form-urlencoded" -X POST https://run.mocky.io/v3/aa33a769-73fb-4e32-b766-c433318b5551
Please note that we are performing a POST request, with the required parameters in the header and body. Now, save this to a notepad and save it as a .TXT or as a cURL file.
HTTP Connection Manager Configuration
Now with everything ready, we can head to the Visual Studio and create a connection manager that has a name of HTTP (KingswaySoft). Once we are in HTTP Connection manager UI, we would head to the “Authentication” Tab, choose the “Authentication Mode” as “Custom Token” as shown below. And then, click on the ellipsis next to the field that says “CURL File” and choose the previously created file. Once we have chosen that, click on the “Test Custom Token…” button.
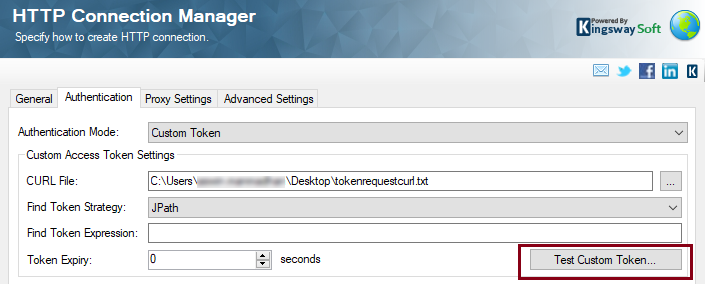
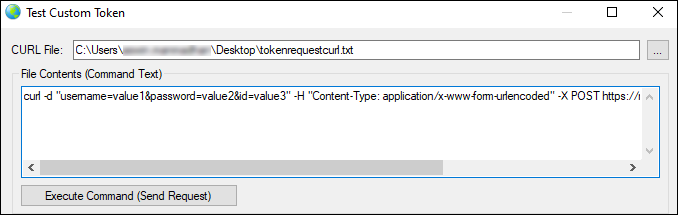
Test Custom Token Page
In this page, we would see that the CURL file you have selected has been parsed for its content, and the CURL command is present in the “File Contents” field.
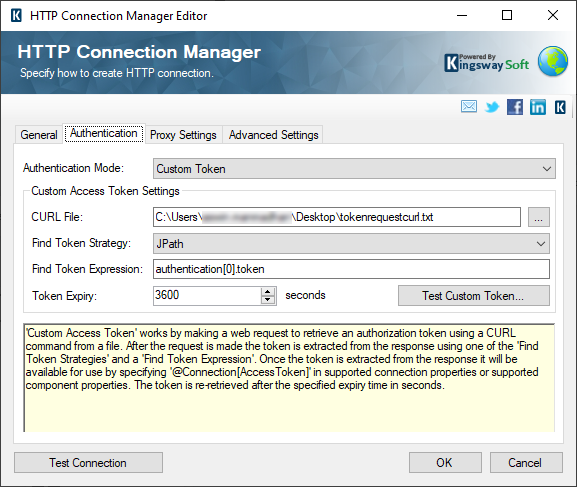
Once we verify that, we would need to define a way to retrieve the token from the response after the authentication request has been posted to the server. To do this, first we need to choose a “Find Token Strategy” which has four options to select from:
- JPath – Provide a JPath to retrieve a value from JSON response.
- XPath – provide an XPath to retrieve a value from XML/SOAP response.
- Regex – provide a regex (regular expression).
- Header – Retrieve the token from the response header.
In our case, as seen the first section of this blog post, the response is a JSON and the token is in the response body. So we go with the “JPath” option. And then we would need to specify a “Find Token Expression” which would be the appropriate JPath. Based on our sample response structure, the token node is inside the “authentication” array, and hence the JPath would be as below.
authentication[0].token
And then, we can go ahead and click on the “Execute Command (Send Request)” button which would execute the CURL command and send the request to the endpoint.

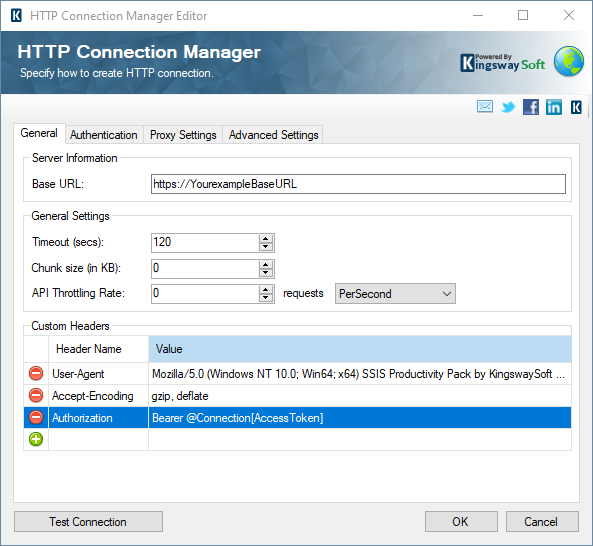
And based on what we have configured, as you can see above, the token has been parsed out of the response. Now, Once the token is extracted from the response it will be available for use by specifying '@Connection[AccessToken]' in supported connection properties or supported component properties. The token is re-retrieved after the specified expiry time in seconds. And in our example we have set it as one hour (3600 seconds).
An example to use the custom token variable would be as shown below.
Conclusion
In a nutshell, using the KingswaySoft HTTP Connection Manager, you could simplify the process of getting a custom authentication token from a response, and by parsing it out and using it within the same connection manager – all in a single step in SSIS – thereby making your design much simple.