There might be cases where you would be receiving emails with some tables contained in the email body and you are tasked to extract data from those tables and transform them into a flat file or otherwise a database table. This can be a challenging situation without proper tools. Thanks to the KingswaySoft Email Source and HTML Table Source components offered in the SSIS Productivity Pack product, this particular requirement can be achieved with some very minimal effort.
- Email Source - Using our Email Source component, we can easily read the email and get its HTML body
- HTML Table Source - Using the HTML Table Source component, we can easily to extract the tables from HTML code
In addition to the above, the Premium Derived Column as well as the Premium Flat File Destination components are also used. All the above components are available as a part of our SSIS Productivity Pack, which you can download here and give it a try for free.
We will go over both the cases of extracting a table from a single email and extracting table data from multiple emails.
Example #1. Single Email
The basic control flow requires two Data Flow Tasks. The first Data Flow connects to an Email Source Component to retrieve the email body and assign it to a variable. The second Data Flow then extracts the table content from the variable and writes it to a destination (a CSV/Flat file in our example, but you could also write it a database table, an Excel file, etc.).

Givent the below is the email content that we are receiving:

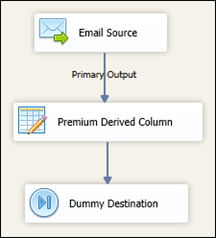
In order to get the Email body as a variable, we will connect an Email Source component (used to retrieve the Email body) to a Premium Derived Column component, which contains functions that can be used to write to SSIS variables. Finally, we connect it to a Dummy Destination which is to close off the flow and make sure the entire data flow is always executed irregardless the optimization setting of the data flow task. The entire flow looks like something below.
In the Email Source component, you will use the Email Connection Manager that you have set up. On the “General” page, you may want to make sure you have checked the “Only Process Unread Messages” checkbox, as in this case, we are trying to get unread messages. Depending on your use case, you can choose to have this checked or unchecked.

If you need to parameterize the source (e.g. get emails from only a specific address, or with a specific subject), then you would do this here. Please refer to our blog post “Setting KingswaySoft Component Properties Dynamically” for a guide on how to parameterize our components.
In the “Columns” page, you can include whatever fields you want if you need them for other purposes, but for our use case we just need the BodyHTML field:

When you connect the Email Source component to the Premium Derived Column (PDC) component, it will ask you which output you want to connect. Select “Primary Output”. Within the Premium Derived Column (PDC) Editor, you can search for the “WriteValueToVariable()” function, and drag it to the Expression section. Then you can drag the desired string variable (we called ours varContent) on to the <<variable>> part of the expression, and drag the “BodyHTML” column onto <<value_expression>> part of the expression. We have renamed our column “ContentVariableColumn”, but you will not be using the column itself at all. You just need this function to assign the BodyHTML to the varContent variable.

Next we need to create a brand new Data Flow task, which would be the 2nd Data Flow in the same package. We will design this new data flow task to extract the table content and write it to our destination. Here, we use the HTML Table Source, and connect it (in our case) to a Premium Flat File Destination. As mentioned above, the destination could instead be a database (ADO.NET Destination), a Premium Excel Destination, etc., the data can be written to any supported data storage.

In the HTML Table Source, set your Connection Manager to <<Variable>> and then for “Input Variable” select the variable to which you wrote the email’s BodyHTML. Likely you will want to get the table by “Position”. If there is only one table, then the Position = 1. If there are multiple tables in the email body, enter in the position of the table you want to extract. Also, signatures may sometimes count as a table, so if the emails are replies or forwards, you may have to adjust the Position to account for that.

In the Columns page, add in the appropriate number of columns using the green “+” button. Make sure to set the Column Properties in the right-side pane (e.g. Data Type, Length, etc.) for each column. Column names don’t matter at this point, but if you want to set the Name now you can, just for clarity’s sake.

Now you would connect the HTML Table Source to your chosen SSIS destination component. For the Flat File, I have made sure I am not appending, and that the first row has headers. However, your choice will depend on your use case and you may have a different configuration from what we have shown below.

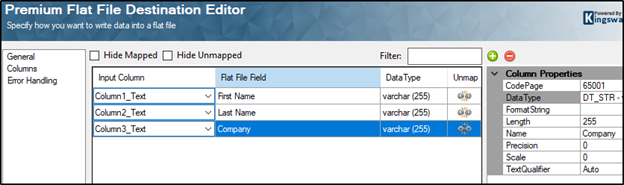
In the Columns page, the fields are determined by your selected file and Input Columns are unmapped. If you’ve entered a file name that does not exist, there will be no columns. You can click on the “Reset Columns” button at the bottom to detect and use the columns and column properties from the input (Source component). Because in our case the column names were not set in the Source, we will set them here, using the Column Properties pane on the right.
The package is now set up, and when run, it will extract the data from your email’s table and write it to the flat file specified in your Destination component. Note: if you have multiple tables in the email, you can cascade more of the “Extract HTML Table Content” data flows, each using the same string variable (varContent in our example), but a different Position value for the table, and presumably different file names/paths for writing.
Example #2. Multiple Emails
The basic process is similar for when you have multiple emails with tables that you need to extract. The following steps assume that you have set your Email Source to retrieve only those emails containing the tables, and that the table positions and columns are all the same. In this case, we will get the BodyHTML from all the emails and write them to an Object variable, which we use in a Foreach Loop Container to extract one by one.

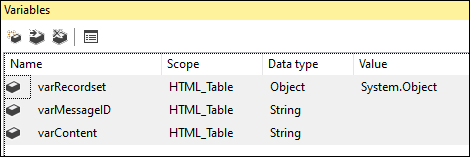
We will need at least two variables here. A string variable like before (we’ll use varContent again), and an Object variable (varRecordset) in which to store all the email records that contain the BodyHTML contents. Here we’ve also decided to use a third variable called varMessageID, so that when we write the HTML table to files, we can use the email’s MessageID as part of the file name.
To write the list of BodyHTML values to an Object variable, we connect the Email Source to an out-of-box Recordset Destination (generally found in the “Other Desinations” section of the SSIS Toolbox). As before in our Email Source, we will select BodyHTML in the Columns page. This time we are also including MessageID for file naming purposes.

To configure the Recordset Destination, set the variable in the “Component Properties” tab using the dropdown arrow and selecting the Object variable you have created.

Then in the “Input Columns” tab, select BodyHTML. We are also selecting MessageID, though if you did not add it to your selected Columns in the Email Source you will not see it here. You do not need to configure anything in the “Input and Output Properties” tab.

The above Data Flow Task gets connected to a Foreach Loop Editor. Double click on the container to configure it. On the “Collection” page, select “Foreach ADO Enumerator” from the Enumerator dropdown list. In “Enumerator configuration”, select your Object variable as the ADO object source variable.

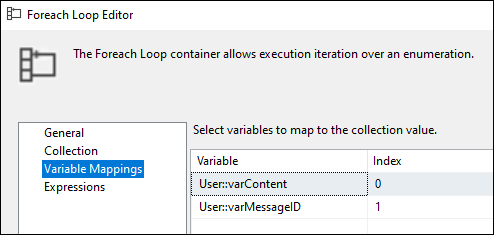
For Variable Mappings, make sure you have the index order (starting from zero) matching the order of the fields in the Recordset Destination’s “Input Columns” page. For Input Columns we had BodyHTML then MessageID, so here we give varContent (which contains BodyHTML) the first index, 0, and then varMessageID maps to the next Input Column (MessageID), which is index 1. If you are not using MessageID, then you will only use varContent and Index 0.
When the package is executed, the Foreach Loop will cycle through the list of values in the Recordset, each time assigning a BodyHTML value to varContent and MessageID to varMessageID.
The Data Flow task inside the container is the same as the task in Example #1 above for a single email. The only difference here is that we’ve parameterized the Destination File Path to include the MessageID as part of the filename. To do this, first provide a placeholder path in the Destination File Path textbox. Then click on the blue “fx” button on the Destination Editor. In the Property Expressions Editor, select the “[Premium Flat File Destination].[DestinationFilePath]” property and click the ellipsis to bring up the Expression Builder window. Enter your path in quotes and with double backslashes (a single backslash is taken as an escape character). You can drag the variable from the top left section down to the expression and concatenate it there using “+” symbols. Click the “Evaluate Expression” button to make sure it is valid and evaluates correctly. Click OK on all the windows.

When the package is run, you will now receive all the tables from your emails, written to individual csv files with the MessageID as part of their file name.
Closing Notes
This wraps up this blog post, we hope that we have shown you an efficient way to handle reading tables in email content and storing it to a required destination. As we had mentioned above, if you wish to write the Email table contents to a Database table, then you could substitute the Premium Flat File Destination with a Premium ADO.NET Destination which is part of our SSIS Productivity Pack product. Similarly, for writing to Excel, the Premium Excel Destination component can be used.