

Using the Email Connection Manager
The Email Connection Manager is an SSIS connection manager component that can be used to establish connections to an Email server for the purpose of sending emails. Supported protocols are POP3, IMAP and Exchange Web Services. The following pages are available for configuration:
- General
- Advanced Settings
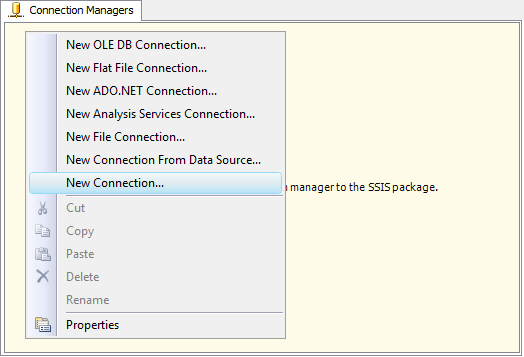
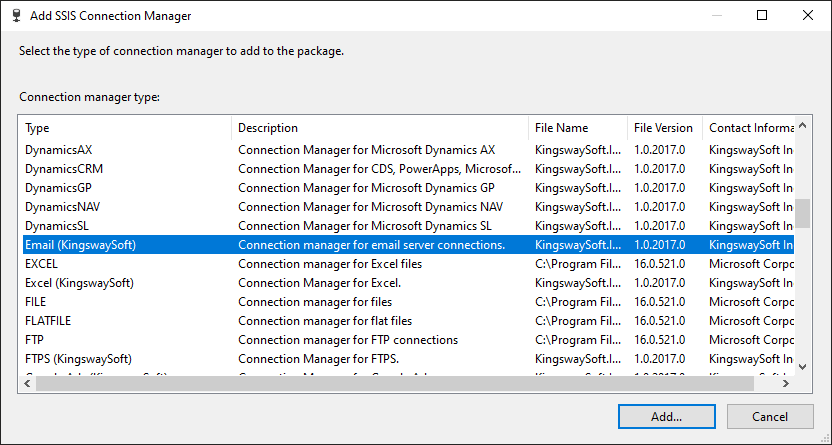
To add an Email connection to your SSIS package, right-click the Connection Manager area in your Visual Studio project, and choose "New Connection..." from the context menu. You will be prompted the "Add SSIS Connection Manager" window. Select the "Email (KingswaySoft)" item to add the new Email connection manager.
General Page
The General page on the Email Connection Manager allows you to specify general settings for the connection.

- Server Information
- Protocol
-
The Protocol of the email server. The available options are:
- Exchange Web Services (Microsoft Graph) (Since v26.2)
- Exchange Web Services (Office 365 Online, Exchange hosted or on-premises installations) (Deprecated)
- IMAP
- POP3
Note: Microsoft is officially retiring Exchange Web Services (EWS) for Exchange Online, with global disablement beginning in October 2026 and full decommissioning completed by April 2027. To move to a more secure architecture, all internal and third-party applications must transition to the modern Microsoft Graph API framework. We have added support for Exchange Web Services using Microsoft Graph in our version 26.2. The transition would be easy to adapt even for existing connection managers with older EWS connections. The below are the current API limitations you may encounter while using Microsoft Graph:- Microsoft Graph is a cloud-only service and does not support on-premises Exchange servers.
- The API requires OAuth 2.0 authentication and no longer supports Basic or NTLM methods.
- Microsoft Graph does not natively support access to shared mailboxes in the same way as EWS.
- The following actions, that were previously available with EWS, is not available with Microsoft Graph: Add Attachment, Delete Attachment, Update Email.
- All attachments and message content must be included at the time the draft is initially generated.
- The API does not include the following fields in the metadata: Priority, ChangeKey, Importance
- Host Name
-
The address of the email server.
- SSL Mode
-
Specifies the SSL mode to use when connecting to the server. The options are None, Implicit and Explicit.
- Port
-
The Port of the email server.
- Authentication Type (since v21.1)
-
This property is only available for Exchange Web Services Protocol, the available options are:
- Basic
- OAuth 2 (Available for all the protocols - EWS, IMAP and POP3 since v23.1)
- NTLM
-
- User/Email (Available for Basic and NTLM Authentication mode)
-
User's login name. Provide email address value or domain user name in the format of "domain\username".
- Password (Available for Basic and NTLM Authentication mode)
-
The password for authentication of the email server.
- Grant Type
-
The available authentication modes when OAuth2 is selected:
- Authorization Code
- Client Credentials (since v25.2)
- Certificate (since v25.2)
-
- OAuth Authorization Code
-

-
- Generate Token File (Available for all the protocols - EWS, IMAP and POP3 since v23.1)
-
The Generate Token File button completes the OAuth authentication. After you click this button simply follow the steps in the dialog to generate your token.
-
-

- App Type:
-
- KingswaySoft
-
The Connection Manager will use the Client Id and Secret that is provided by KingswaySoft for your convenience when setting up the connection, it should NEVER be used for production purposes.
- My Own App
-
Selecting this option will allow you to use your own Client ID and Secret to connect to HubSpot.
Here you can enter the tenant ID, App ID,Client Secret which you would be getting from the OAuth setup on the API side. The Redirect URL would be the one that you had specified in the App settings.
-
- Scope: Set the Scope to identify the set of resources that can access token permits.
- Use Default Browser to Sign In: When this option is checked the Sign In and Authorize button will open your default web browser to complete the OAuth authentication. When this option is unchecked, the Sign In and Authorize button will complete the entire OAuth authentication process inside of the toolkit.
- Sign In and Authorize: This button allows you to log in to the service endpoint and authorize your app to generate a token.
-
- Path To Token File
-
The path to the token file on the file system. Please note that this field supports both file system paths as well as Azure Blob Storage Shared Access Signature (SAS) URL path.
Note: The component supports Azure Blob Shared Access Signature (SAS) URL in the token file path.
- Token File Password
-
The password to the token file.
- Client Credentials
-

-
- Tenant Id
-
The Tenant information for your instance can be specified here.
- Client Id
-
The Client Id option allows you to specify the ID (in GUID format) of application.
- Client Secret
-
The Client Secret option allows you to specify the client secret.
- Certificate
-

-
- Certificate Location
-
The Certificate location can be either a Store or File system.
- Certificate Thumbprint
-
The Certificate Thumbprint option allows you to specify the thumbprint of the certificate created for the application you have created.
- Path to Certificate
-
Provide the path to the certificate file to use for authentication. Click the ellipses button to browse their file system for the certificate. This option is available when you choose File System as Certificate Location.
-
Note: The component supports Azure Blob Shared Access Signature (SAS) URL in the certificate path.
- Certificate Password
-
Provide the password to the certificate file. This option is available when you choose File System as the Certificate Location.
- Shared Mailbox (since v4.0)
-
The shared mailbox you want access to. Provide email address value in this field.
Note: this option is only available for Exchange Web Services Protocol.
- Impersonate Mailbox (since v4.0)
-
The Impersonate Mailbox allows you to act as a different user when logged into Exchange Server. Provide email address value in this field.
Note: this option only available for Exchange Web Services Protocol.
- Test Connection Button
Use this button to test the connection using the settings you have entered.
Advanced Settings Page
The Advanced Settings page on the Email Connection Manager allows you to specify advanced settings for the connection.
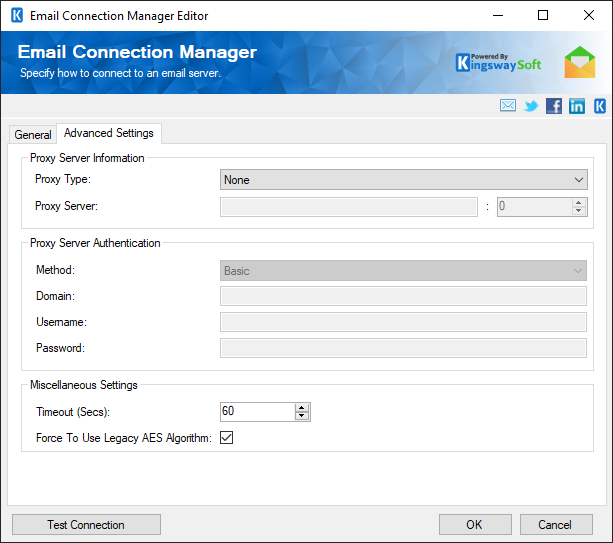
- Proxy Server Information
-
- Proxy Type
-
The type of proxy server. The options are None, Socks4, Socks4a, Socks5, and HttpConnect.
- Proxy Server
-
The address of the proxy server.
- Port
-
The port of the proxy server.
- Proxy Server Authentication
-
- Method
-
The authentication method to use for the proxy server.
- Domain
-
The domain to use for proxy server authentication.
- Username
-
The username for authentication of the proxy server.
- Password
-
The password for authentication of the proxy server.
- Miscellaneous Settings
-
- Timeout
-
The timeout in seconds to use when attempting to connect to the server.
- Logging
-
- Path To Log File
-
The Path To Log File option allows you to specify the file path to which to write the Email connection log.
-
- Output Log
-
The checkbox can be used to enable output logging.
- Log Level
-
There are several options available:
- Off: default
- Error: logs error messages only
- Info: logs important informative messages as well
- Debug: logs all messages useful for debugging purposes
- Verbose: very detailed log for advanced analysis; logs content of communication packets