An integration usually involves retrieving actual data and moving it from a source system to a target system or database. However, in some cases, you might run into the requirements in which you are tasked to retrieve your Dynamics 365 system's metadata, and have it saved to a database table or a flat file for a particular use case, such as, using the metadata for programmatic metadata processing, SSIS package parameterization (likely based on certain entities and its availability), or simply for documentation purposes. In this blog post, we will demonstrate on how to retrieve metadata information from Dynamics 365 CRM/CDS API and save the list of entities and attributes to different tables.
In order to achieve this, we will be using the following components:
- JSON Source component
- Premium ADO.NET Destination component
- HTTP connection manager
- Premium Derived column component
The above components are all available in our SSIS Productivity Pack product. Additionally, we would be using an out of the box component called Execute SQL Task.
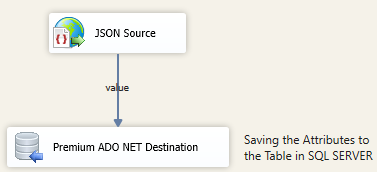
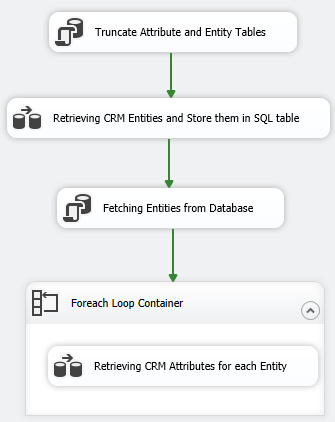
The basic flow would involve retrieving the list of entities and attributes from the CRM/CDS OData service endpoint, and save it to two different tables. And in order to maintain the latest information, as a first step, we truncate the tables by using the Execute SQL Task component. Next, we connect the Execute SQL Task to the data flow in which we have used two components which are JSON Source component and Premium ADO.NET destination component.
Creating a connection to Dynamics CE/CRM/Dataverse API endpoint
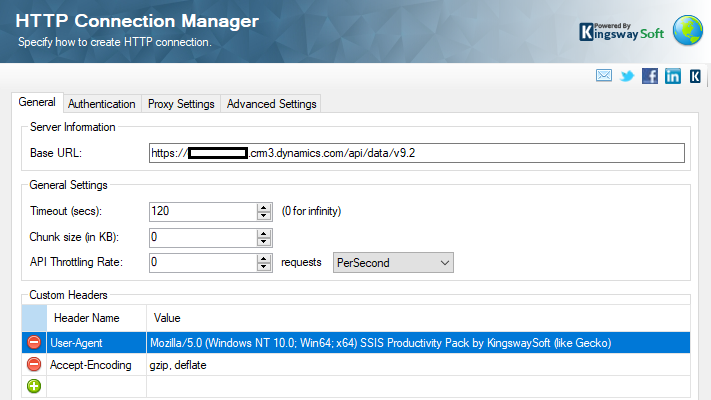
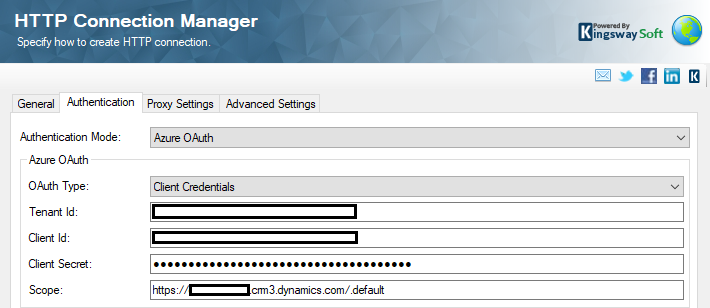
In order to facilitate metadata reading using the JSON Source component, we need to first establish a connection to the Dynamics 365 CE/CRM/Dataverse OData service endpoint. To achieve this, we launch the SSIS connection manager, in which we would select the HTTP Connection manager from the list of available connections. From within the HTTP Connection Manager UI, we first set the Base URL of the Dynamics CRM which format is like https://<instance-name>.crmX.dynamics.com on the General page, where X represents the region of your D365 CE or Dataverse instance reside. For US, X should be empty, while, 2 represents Canada, 4 represents EMEA, and so on. After that, you should provide authentication information in the Authentication tab. Our HTTP connection manager supports many different authentication options that are designed to work with different service endpoints. In our case, we would be using the Azure OAuth option to connect to our CDS/CRM OData service endpoint.
To confirm the connection is working properly, you can click on the Test Connection button in the connection manager, and you should be able to see the response in the window. Now that you have connected to your Dynamics 365 CRM/CDS/Dataverse instance successfully, the connection manager is ready to be used in JSON Source components. We will see how that is configured in the next section.
Configuring JSON Source Component for Retrieving CRM/CDS Entities
In the JSON Source Component, you would first set the connection manager which was created in the previous step and select GET as the HTTP Method. For retrieving the entity information from the CDS/CRM/Dataverse instance, we are mainly interested in getting the list of names for all entities, in which case, we only need to have the LogicalName returned. Therefore we have constructed a URL like to the following. However, if you want to get more information, you can add additional attributes as required. The URL below is the rest of the fully formed URL, to be appended to the Base URL that has been specified in the connection manager. Should you need to have all attributes returned, you can simply omit the querystring part.
/EntityDefinitions?$select=LogicalName

Note: Also, for finding the name of other attributes, you can refer to the link below: - https://docs.microsoft.com/en-us/powerapps/developer/data-platform/webapi/query-metadata-web-api
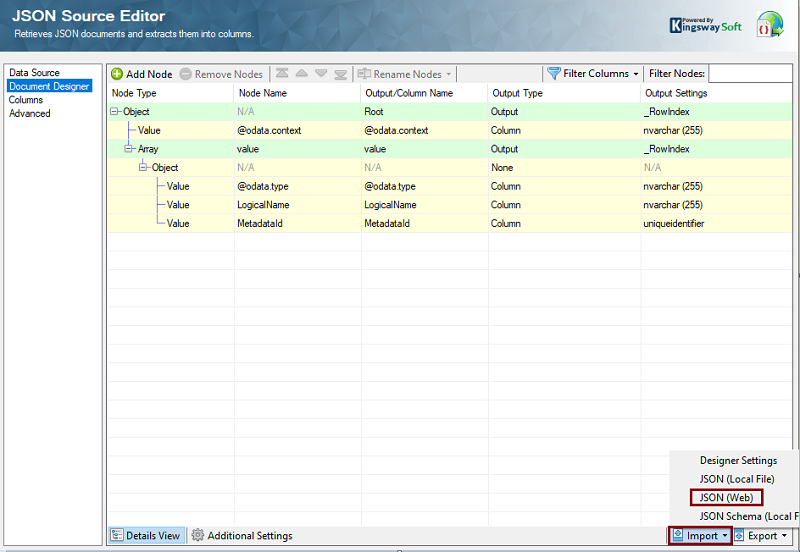
After setting these configurations, in the Document Designer page, you can click on the import button at bottom of the page and select JSON(WEB) to retrieve the JSON design from the CRM API. The document designer page defines the JSON structure that is expected, to be parsed out by the JSON Source component.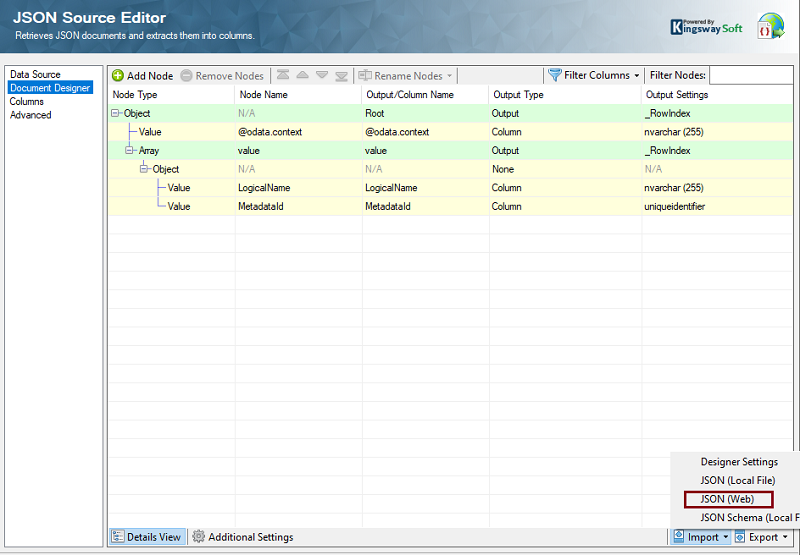
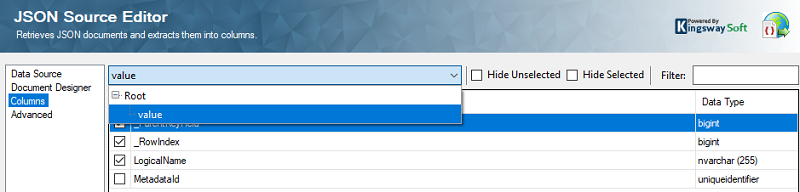
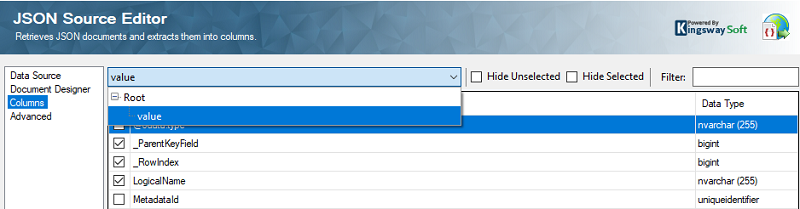
And in the Columns page, you can see a drop-down list at the top of the page that shows two outputs - Root and Value. If you select the Value, you can find the LogicalName column that could be selected as an output.
Now that you have configured the JSON Source component, you could connect its value output to the Premium ADO.NET Destination component to write the Entities to a database table.
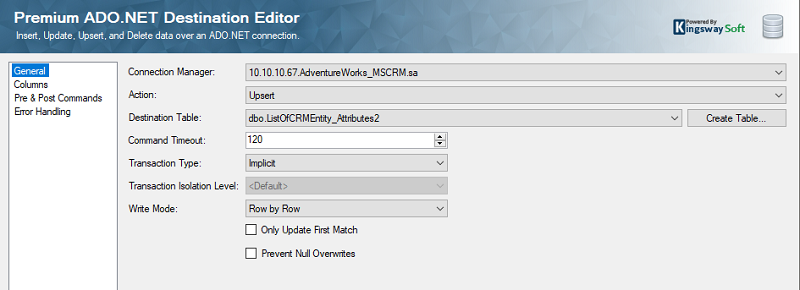
Once you have connected the outputs to Premium ADO.NET Destination component, double-click on it to configure its settings. Select the ADO.NET Connection Manager (which connects to your database instance) and choose the Insert action.
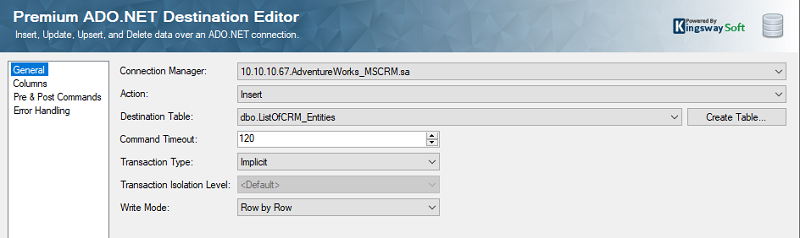
Next, select the appropriate table that the input values should be written to. The Premium ADO.NET Destination component provides a useful feature called Create Table function. The Create Table button, when clicked,automatically generates the command based on the input data - which you can of course modify as needed - before executing it. On the Columns page, select the Input column that needs to be mapped to the Destination Table columns.

Once the required fields have been mapped and configured, click on the OK button to save, and close the Destination Editor. Now when executing this part of the package, you can read and save all of CRM entities in to a database table that you have specified. In our next section, we will move onto retrieving the attributes for each entity.
Retrieving CRM/CDS Attributes/Columns
As we want to retrieve each entity’s attributes, we would need to request for each entity using the entity's names that we have previously downloaded. To achieve so, you would first use an Execute SQL Task and fetch the list of entities from the table that you have used in the previous Data Flow.
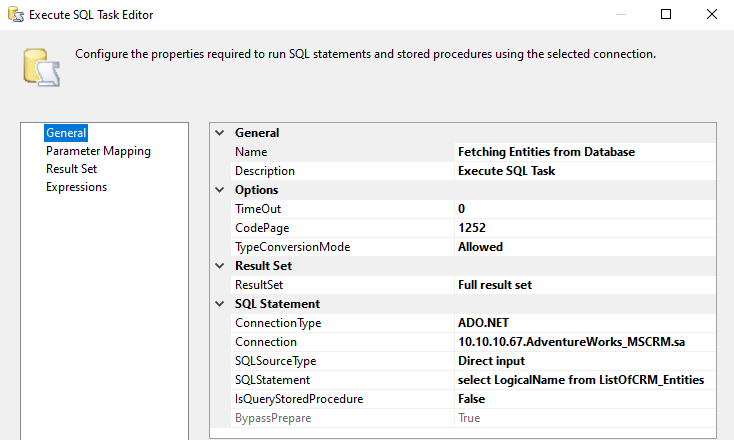
Now, we are going to assign the result set to an object variable, from which we would be looping through to get each of the values in our further below data flow design. In order to do that, in the Execute SQL Task configuration, you would set the ResultSet to Full Result Set. And in the ResultSet page, define 0 for the Result Name and set the variable with the type of object for Variable name. Here our object variable is @[User::Entities].

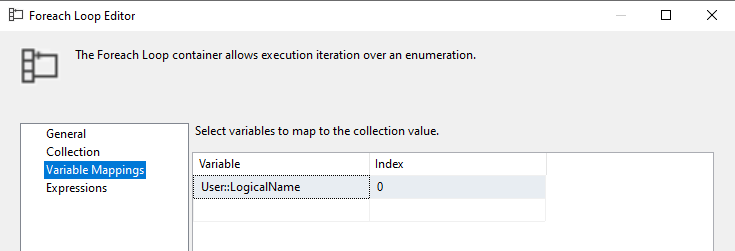
Now, to add the looping mechanism, and for this you would use a foreach loop container in the control flow. Inside the foreach loop container, you can add another data flow in which you should pass the entity name which is saved in the variable to a parameterized JSON Source component. In the foreach loop container component -> collection page, you should set Enumerator as Foreach ADO Enumerator and set the ADO object source variable to the defined variable in the Execute SQL Task component.
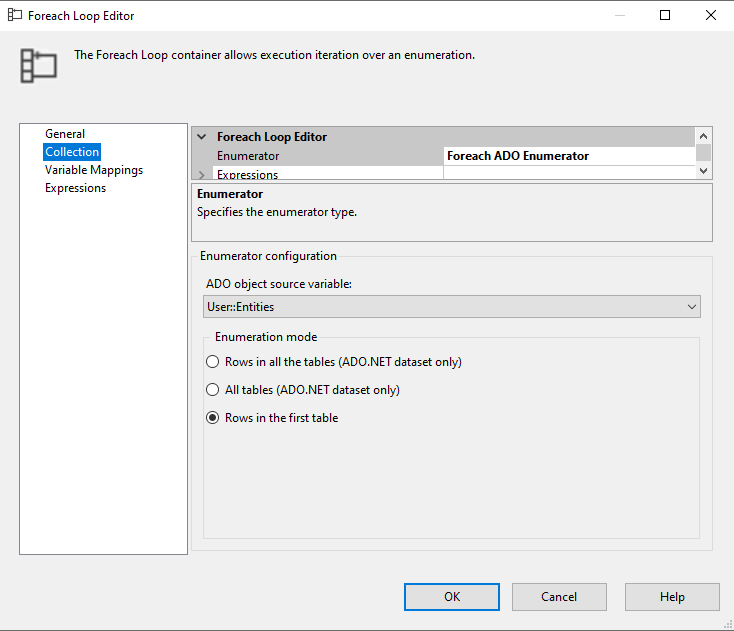
And in Variable Mappings page, set a variable for saving the entity name for use in the JSON Source component. In our example, the string variable is @[User::LogicalName]. In each iteration, the entity name comes into this variable, one by one, for it to be used in the data flow task inside the foreach loop container.
Parameterizing the JSON Source Component for Retrieving CDS/CRM Entity Attributes
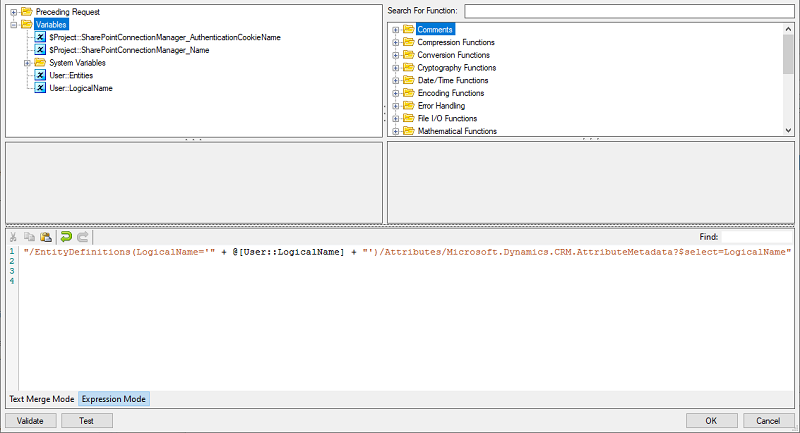
Now that you have arranged to save the entity’s name in the variable, you can send it along with the request for getting the entity’s attributes. In the JSON Source component, you can use the same old HTTP connection manager from the previous data flow. And use either POST or GET HTTP Method. Now, to parameterize the relative path, you should click on
fx button, and in the “Expression Mode” concatenate your variable from the list of variables at the top of the page. Your Relative path would be like the statement below:
"/EntityDefinitions(LogicalName='" + @[User::LogicalName] + "')/Attributes/Microsoft.Dynamics.CRM.AttributeMetadata?$select=LogicalName"

Now you can import the JSON (web) in document designer to import the JSON file from the CRM endpoint. Please note that the variable @[User::LogicalName] would need to have a dummy value for initial design time initialization and validation. This would be replaced at runtime by an actual value at runtime.
And in the Columns page, you can define the values that you want to save in your database. The LogicalName here is the name of the attributes.
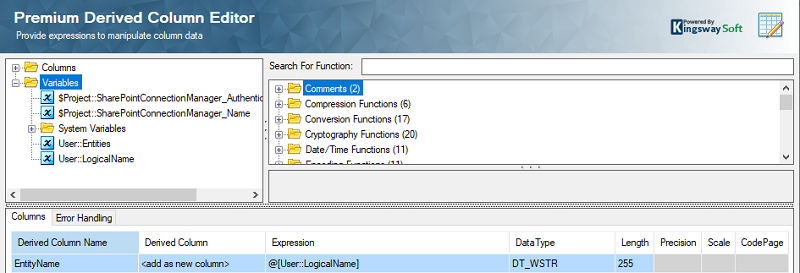
As we want to save the entity name along with the name of the attributes, we have used the Premium Derived Column component after the JSON Source component and set the @[User::LogicalName] variable which has the value of the entity’s name as a column.
Now connect the outputs to a Premium ADO.NET Destination, double-click on it to configure its settings. Select the ADO.NET Connection Manager and choose the Insert action.
Next, select the appropriate table that the input values should be written to. On the Columns page, select the Input column that needs to be mapped to the Destination Table column. Once the required field has been mapped and the Error Handling page has been configured, click on the OK button to save, and close the Destination Editor. When you run the package, you can get all the CRM entities and their attributes.
By following the above design, you can easily get the latest set of entities and its related metadata from your CDS/CRM/Dataverse instance. This can prove really useful for specific use cases, and would also server as a design to have a documentation of all your instance's metadata. And as we have seen above, KingswaySoft products can be used to simplify many of the complex processes that is involved in this design. We have a sample package that you can download from the link here, and add it to your project, and open it to see more details on the configurations.