Using the HTTP Connection Manager
Web Service comes with an SSIS connection manager component that can be used to establish HTTP connections.
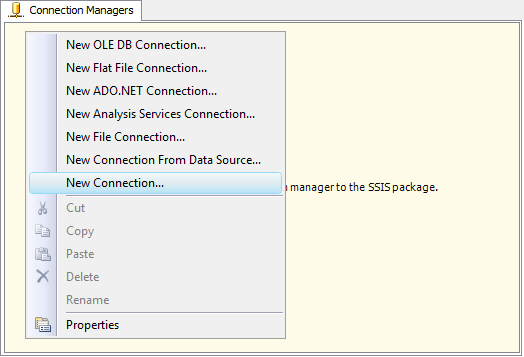
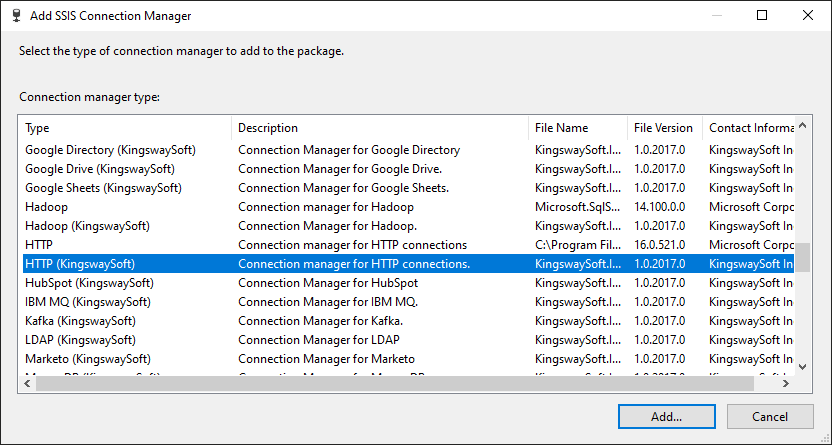
To add a connection to your SSIS package, right-click the Connection Manager area in your Visual Studio project, and choose "New Connection..." from the context menu. You will be prompted the "Add SSIS Connection Manager" window. Select the "HTTP Connection Manager (KingswaySoft)" item to add the new connection manager.
The HTTP Connection Manager contains the following four pages to connect to the HTTP server.
- General
- Authentication
- Proxy Settings
- Advanced Settings
General Page
The General page on the HTTP Connection Manager allows you to specify general settings for the connection.
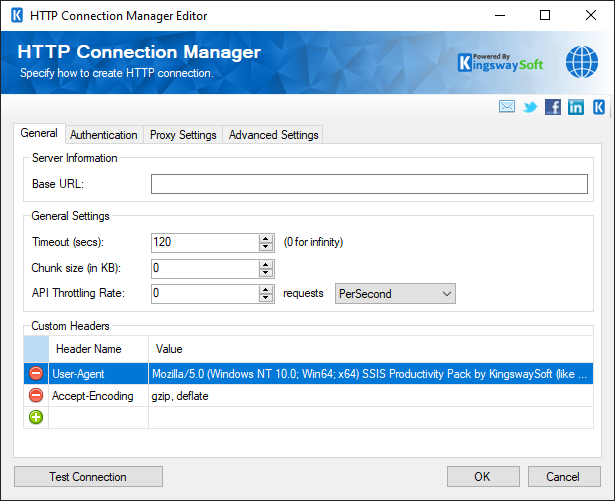
- Server Information
-
- Base URL
-
The URL field represents the address of the web service to connect to.
- General Settings
-
- Timeout (secs)
-
The Timeout (secs) option allows you to specify a timeout value in seconds for the connection. The default value is 120 seconds. Specify 0 for infinite timeout.
- Chunk Size (in KB)
-
The chunk size to use when sending web requests. If a size of 0 is used chunking will not be used.
- API Throttling Rate
-
The API Throttling Rate will limit the number of requests that can be sent per unit of time. This is useful when accessing APIs with request limits. The Requests drop-down will allow you to specify whether the API Throttling Rate should be per second, minute or hour.
- Custom Headers
-
The Custom Headers grid will allow HTTP headers to be entered that will be used for each request.
- Test Connection button
-
The Test Connection button will open up a dialog that allows you to test the connection manager.
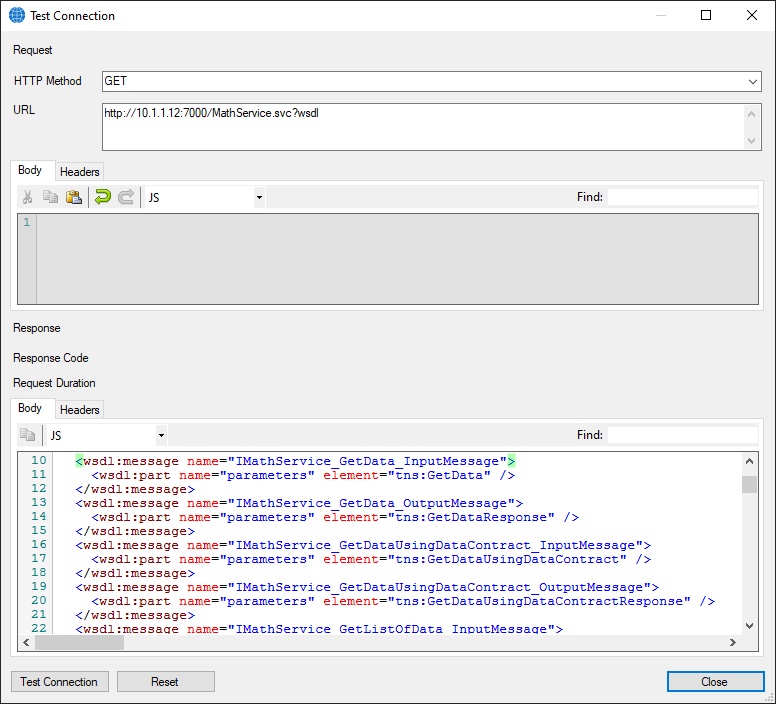
The Test Connection dialog request properties will be prepopulated with the base URL and headers from your connection manager. You can add or change headers, HTTP method, URL, and body if required.
- HTTP Method
-
The HTTP method of the test HTTP request will default to GET but can be any HTTP method that your server supports.
- URL
-
The URL or the test HTTP request will default to the base URL from the connection manager and any query string parameters associated with authentication.
- Body
-
The Body of the test HTTP request will default to empty or may contain a soap envelope for soap requests.
- Headers
-
The Headers of the test HTTP request will by default contain any custom headers from the connection manager and headers related to authentication.
- Test Connection button
-
The Test Connection button will send a request that uses proxy and authentication information from the connection manager, and the method, URL, body, and headers that are currently in the test connection dialog.
- Reset button
-
The Reset button will reset the request HTTP Method, URL, body, and header to the default values.
Authentication Page
The Authentication page allows you to specify the authentication mode that will be used with the connection.
There are 14 authentication modes available:
- AWS Signature (Since v20.1)
- Azure OAuth (since v21.1)
- Basic
- Bearer Token (since v21.1)
- Credentials (Basic, Digest, NTLM)
- Custom Token (Since v20.1)
- Google Service Account (since v21.1)
- JWT (since v20.1)
- Kerberos (since v20.1)
- None
- OAuth1
- OAuth2
- WSSE (Since v22.1)
- Windows Integrated Authentication (since 23.1)
- Authentication Mode: AWS Signature
-
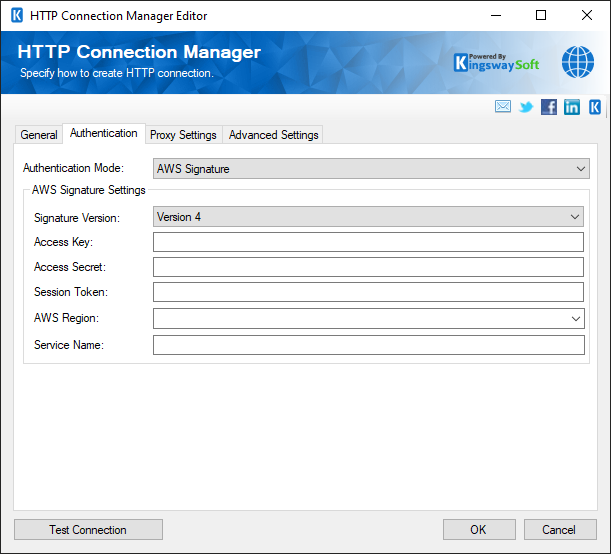
- AWS Signature Settings
-
- Signature Version
-
Specify between Version 4 and Version 2.
- Access Key
-
The Access key to be used for authentication.
- Access Secret
-
Provide the Access secret to be used for authentication.
- Session Token
-
The Session Token option allows you to specify a temporary security token, known as temporary security credentials. Note this property is optional.
- AWS Region (Only for Version 4 Signature version)
-
The AWS Region for the web service endpoint.
- Service Name (Only for Version 4 Signature version)
-
The AWS service name to be provided.
- Signature Method (Only for Version 2 Signature version)
- Choose between available Signature Methods
- HMAC-SHA1
- HMAC-SHA256
- Authentication Mode: Azure OAuth
-
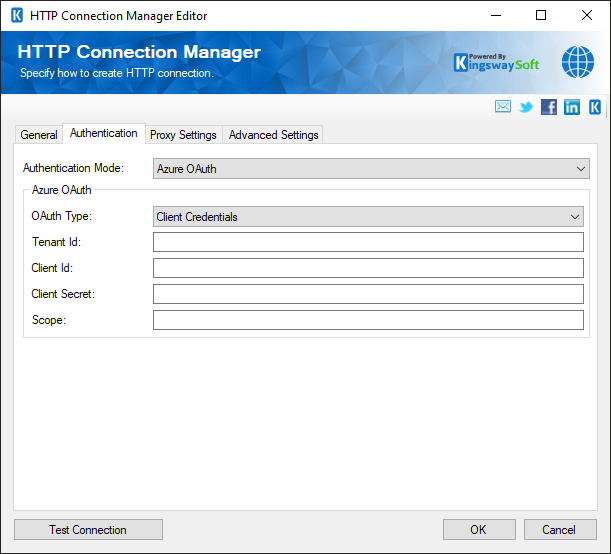
- Azure OAuth
-
- OAuth Type
-
The OAuth Type can be chosen between the below.
- Certificate
- Client Credentials
- Tenant Id
-
Provide tenant identifiers such as the tenant ID or domain name for your Microsoft organization. A default value “common” is used when no value is provided.
- Client Id
-
The Application ID of the Azure Active Directory App.
- Client Secret (Only for Client Credentials OAuth Type)
-
The Application Secret that you generated for your app in the app registration portal.
- Scope
-
Set Scope to identify the set of resources and operations that an access token permits. The value passed for the scope parameter in this request should be the resource identifier (Application ID URI) of the resource you want, affixed with the .default suffix.
- Certificate Location (Only for Certificate type OAuth type)
-
The certificate location can be either of the below.
- Store
- File System
- Path to File System
-
Provide the path to the certificate file to use for authentication. Click the ellipses button to browse their file system for the certificate. This option is available when you choose File System as Certificate Location.
Note: The component supports Azure Blob Shared Access Signature (SAS) URL in the certificate path.
- Certificate Password
-
Provide the password to the certificate file. This option is available when you choose File System as the Certificate Location.
- Certificate Thumbprint
-
The Certificate Thumbprint option is only available when the Certificate OAuth Type has been chosen, it allows you to specify the thumbprint of the certificate created for the application registered in Microsoft Azure Active Directory (AAD).
- Authentication Mode: Basic
-

Basic authentication adds a basic authentication header to web requests. The HTTP Connection Manager will append the Base64 encoded string value representing your username and password to the text “Basic” in the request Authorization header.
- Credentials
-
- Username
-
The Username to use when accessing the web service.
- Password
-
The Password to use when accessing the web service.
- Authentication Mode: Bearer Token
-
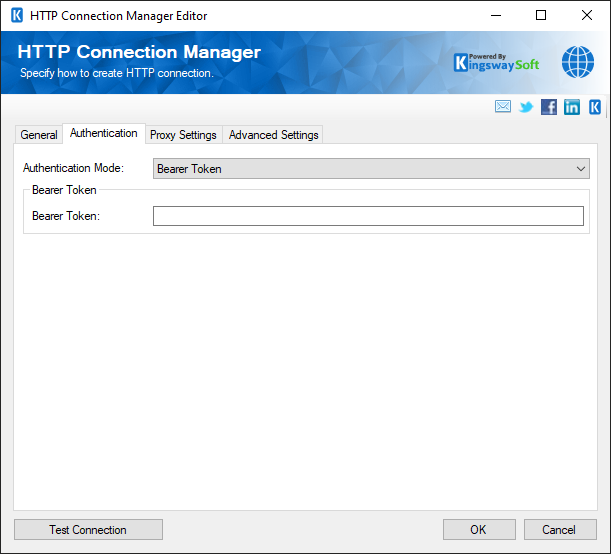
- Bearer Token
-
The Bearer Token allows requests to authenticate using a static access key. HTTP Connection Manager will append the token value to the text "Bearer " in the required format to the request Authorization header.
- Authentication Mode: Credentials
-
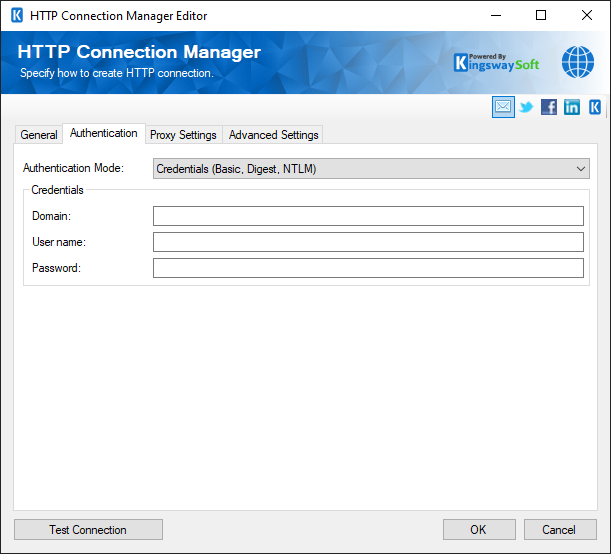
- Credentials
-
- Domain
-
The domain or host to authenticate against.
- Username
-
The Username option allows you to specify the user account that you want to use when connecting to the specified server.
- Password
-
The Password option allows you to specify the password for the above user account in order to log in to the specified server.
- Authentication Mode: Custom Token
-

- Custom Access Token Settings
-
- CURL Source(since v22.1)
-
The CURL Source contains two allows options:
- File: Provide a local file for the curl command.
- Manually Enter: Fill in the command text.
- CURL File
-
Provide the location to a file that contains a token request CURL command.
- CURL Command Text(since v22.1)
-
Provide the CURL command to get the authorization token.
- Find Token Strategy
-
Provide the find token strategy by specifying one from the below.
- JPath
- XPath
- Regex
- Header
- Find Token Strategy
-
Provide the JPath, XPath, expression, etc. that can be used to extract the token value from the response.
- Token Expiry
-
Manually specify the token expiry in seconds.
- Test Custom Token
-
Click on this button to open up the below screen in which you can parse through the CURL File and test the token request.
-
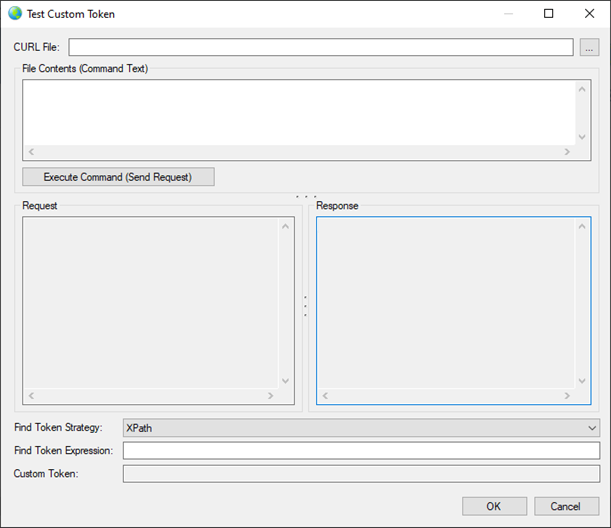
Note: The Custom Access Token works by making a web request to retrieve an authorization token using a CURL command from a file. After the request is made the token is extracted from the response using one of the 'Find Token Strategies' and a 'Find Token Expression'. Once the token is extracted from the response it will be available for use by specifying '@Connection[AccessToken]' in supported connection properties or supported component properties. The token is re-retrieved after the specified expiry time in seconds.
- Authentication Mode: Google Service Account
-
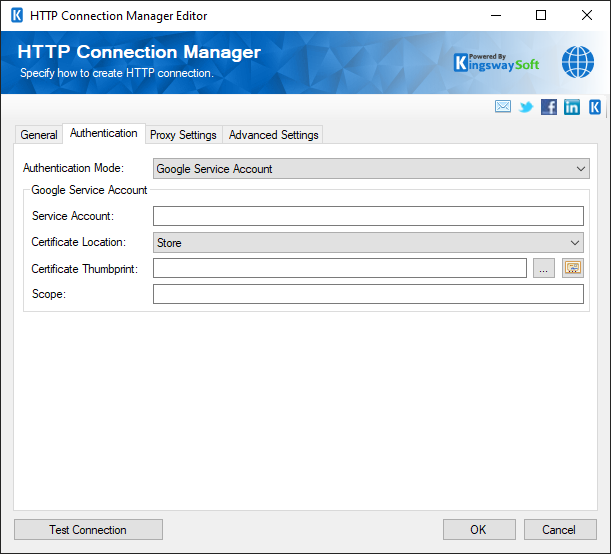
- Google Service Account
-
The Service Account option allows you to specify the account which will be used to connect to your Google service.
-
- Certificate Location (Only for Certificate type OAuth type)
-
The certificate location can be either of the below.
- Store
- File System
- Path to File System
-
Provide the path to the certificate file to use for authentication. Click the ellipses button to browse their file system for the certificate. This option is available when you choose File System as Certificate Location.
Note: The component supports Azure Blob Shared Access Signature (SAS) URL in the certificate path.
- Certificate Password
-
Provide the password to the certificate file. This option is available when you choose File System as the Certificate Location.
- Certificate Thumbprint
-
This option allows you to specify the thumbprint of the selected certificate in order to authenticate using your Google Service Account.
- Scope
-
Set Scope to identify the set of resources and operations that an access token permits.
- Authentication Mode: JWT
-
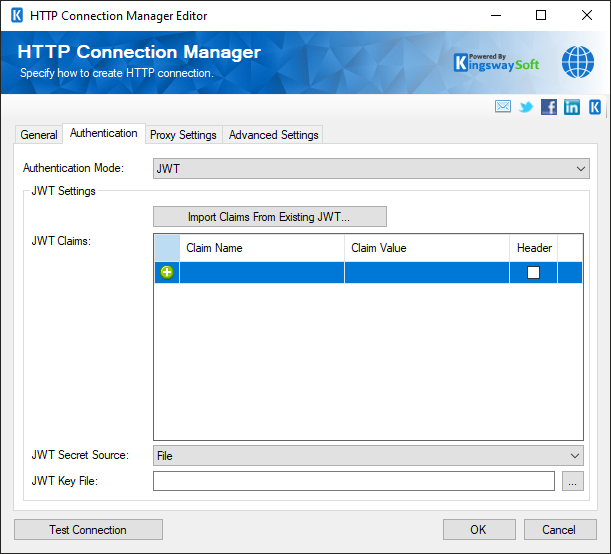
- JWT Settings
-
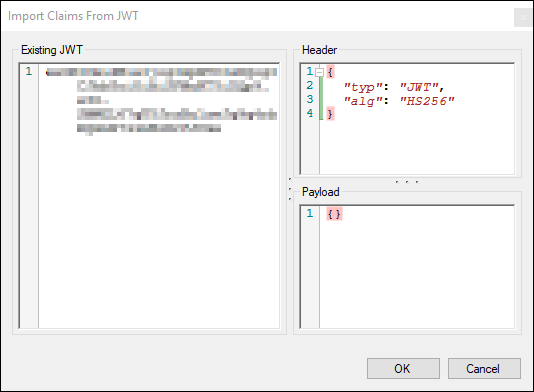
- Import Claims from Existing JWT…
-
-
Clicking on this button will open up the below page to import claims from existing JWT.
-
- JWT Claims
-
The grid contains the following columns
- Claim Name
- Claim Value
- Header (checkbox)
- JWT Secret
-
Provide the JWT Secret.
- Authentication Mode: Kerberos
-
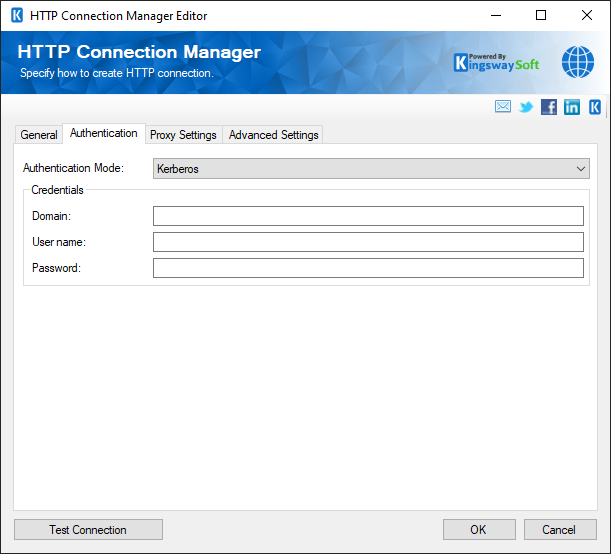
- Credentials
-
- Domain
-
The domain or host to authenticate against.
- Username
-
The Username option allows you to specify the user account that you want to use when connecting to the specified server.
- Password
-
The Password option allows you to specify the password for the above user account in order to log in to the specified server.
- Authentication Mode: None
-
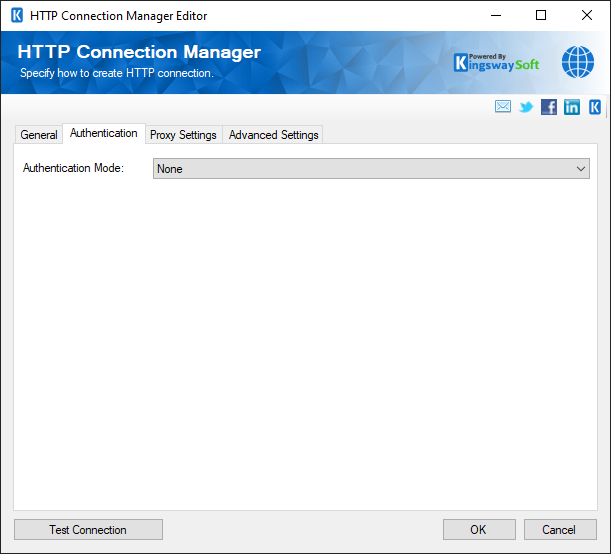
Use None mode when your request does not require authorization.
- Authentication Mode: OAuth 1
-
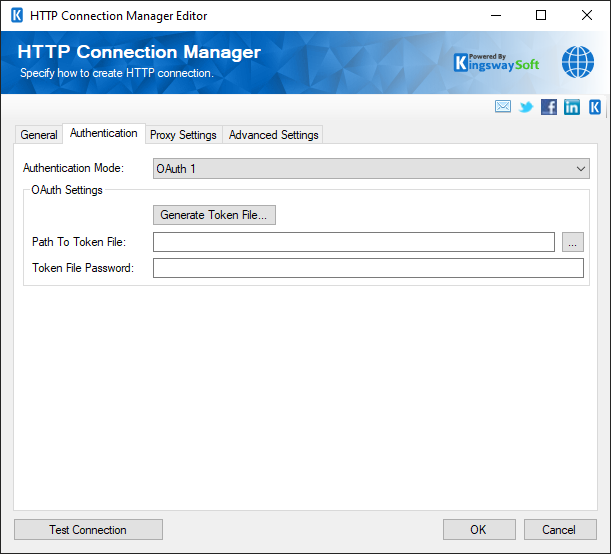
- OAuth Settings
-
- Generate Token file…
-
button would take you to the OAuth token generator.
- Path to Token File
-
The path to the token file on the file system.
- Token File Password
-
The password to the token file.
- Authentication Mode: OAuth 2
-
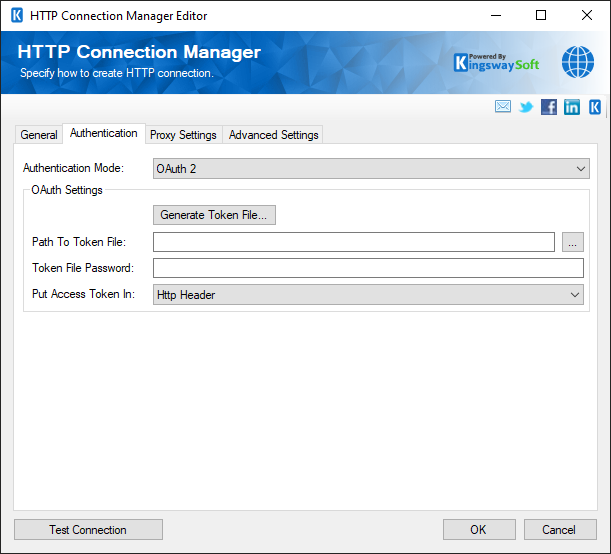
- OAuth Settings
-
- Generate Token file…
-
button would take you to the OAuth token generator.
- Path to Token File
-
The path to the token file on the file system.
- Token File Password
-
The password to the token file.
- Put Access Token In
-
In the part of the web request where the token should go, there are three options available:
- HTTP Header
- Query String
- Custom
Note: The “Custom” access token location option is designed to work for advanced scenarios where the injection of the access token received from the OAuth authentication flow needs to be managed in a very particular way, such as inserting it in your HTTP request body, or using it in a different HTTP header or query string parameter (other than the standard OAuth Authorization HTTP header or query string parameter). Note that when using this option, where the access token is actually placed will depend on your implementation at the component level by using the @Connection[AccessToken] variable; otherwise, the token will be simply ignored. Supported components includes Web Service/XML/JSON components.
- Authentication Mode: Windows Integrated Authentication (since v23.1)
-
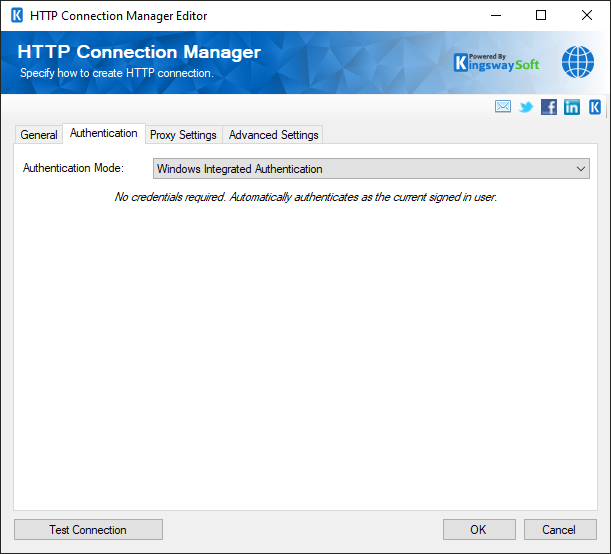
No credentials required. Automatically authenticates as the current signed in user.
- Authentication Mode: WSSE (since v22.1)
-

- WSSE
-
- Username
-
The Username to use when accessing the web service.
- Password
-
The Password to use when accessing the web service.
Proxy Settings Page
The Proxy Settings page on the HTTP Connection Manager allows you to specify some advanced and optional settings for the connection.
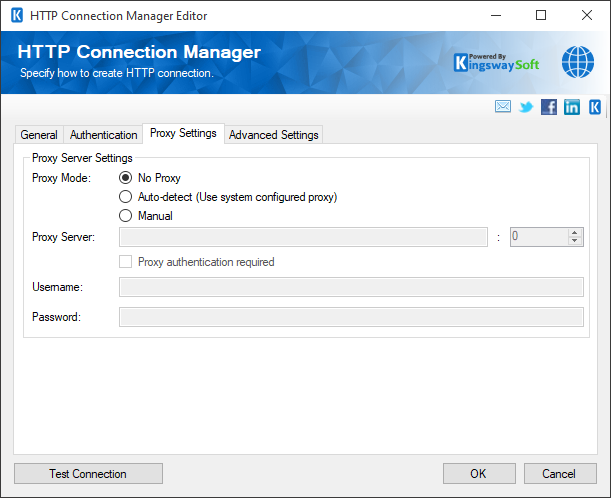
- Proxy Server Settings
-
- Proxy Mode(since v3.0)
-
The Proxy Mode option allows you to specify how you want to configure the proxy server setting. There are three options available.
- No Proxy
- Auto-detect (Using system-configured proxy)
- Manual
- Proxy Server
-
Using the Proxy Server option allows you to specify the name of the proxy server for the connection.
- Port
-
The Port option allows you to specify the port number of the proxy server for the connection.
- Username (Proxy Server Authentication)
-
The Username option (under Proxy Server Authentication) allows you to specify the proxy user account.
- Password (Proxy Server Authentication)
-
The Password option (under Proxy Server Authentication) allows you to specify the proxy user's password.
Note: The Proxy Password is not included in the connection manager's ConnectionString property by default. This is by design for security reasons. However, you can include it in your ConnectionString if you want to parameterize your connection manager. The format would be ProxyPassword=myProxyPassword; (make sure you have a semicolon as the last character). It can be anywhere in the ConnectionString.
Advanced Settings Page
The Advanced Settings page allows you to specify advanced settings for the connection.
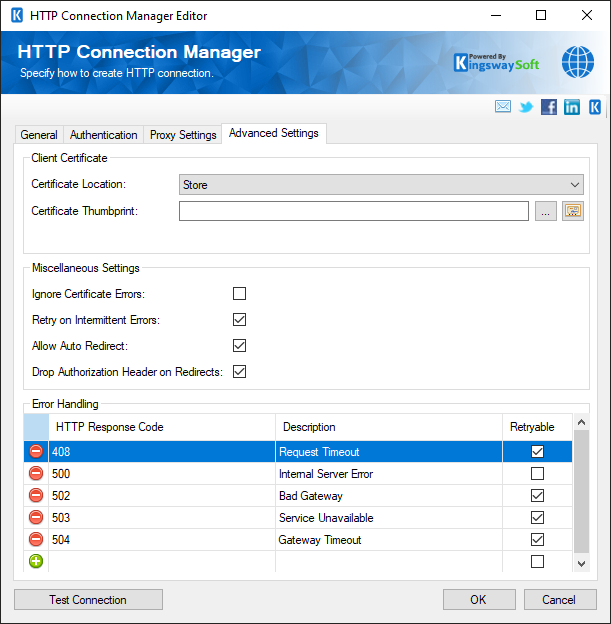
- Client Certificate
-
- Certificate Location
-
Allows you to specify the location of the certificate that will be used. There are two options available:
- Store
- File System
- Certificate Thumbprint
-
Allows you to specify the thumbprint of the client certificate from the Certificate Store. Click the ellipses button to browse and select a certificate for the user's store. This option is available when you choose Store as Certificate Location.
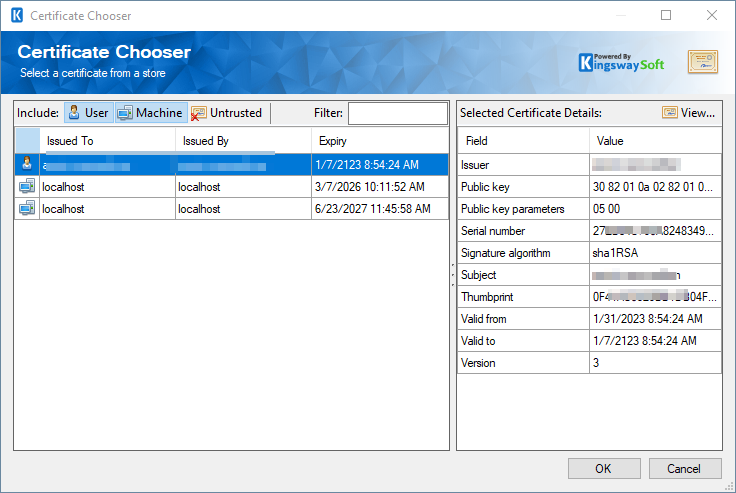
- Certificate Chooser (...)
-
Click on the ellipsis button to open the certificate choose window.
- Path to Certificate
-
Provide the path to the certificate file to use for authentication. Click the ellipses button to browse their file system for the certificate. This option is available when you choose File System as Certificate Location.
Note: The component supports Azure Blob Shared Access Signature (SAS) URL in the certificate path.
- Certificate Password
-
Provide the password to the certificate file. This option is available when you choose File System as the Certificate Location.
-
Miscellaneous Settings
-
- Ignore Certificate Errors
-
This option can be used to ignore those SSL certificate errors when connecting to the target server.
Warning: Enabling the "Ignore Certificate Errors" option is generally NOT recommended, particularly for production instances. Unless there is a strong reason to believe the connection is secure - such as the network communication is only happening in an internal infrastructure, this option should be unchecked for best security.
Note: When this option is enabled, it applies to all HTTP-based SSL connections in the same job process.
- Retry on Intermittent Errors
-
The retry on intermittent errors determines if requests will be retried when there is an error. If this option is checked requests will be retried up to 3 times.
- Allow Auto Redirect(since v22.1)
-
The allow auto redirect option determines if requests will be automatically redirected when receiving a server-side redirect.
- Drop Authorization Header on Redirects(since v23.1)
-
Allows you to specify whether to drop the authorization header on any redirects.
- HTTP Response Error Code
-
The HTTP response error codes are a list of HTTP response codes that will be treated as errors when they are encountered by the component. This determines if the response will cause the component to fail (in a source component) or some other error-handling behaviour (destination component). For each error code specified, it can be marked as retryable. When a retryable error is encountered the component will retry the request 3 times before failing.
Using the OAuth 2 Token Generator
The OAuth 2 Token Generator is used to generate token files for the HTTP Connection Manager. The HTTP Connection Manager will then use the file to refresh tokens as needed. Before getting started you will need to have a developer account for the service you wish to connect to. After that, you will need to create an 'App' in the developer console. Search the API/Documentation of the service to find out how to do this.
General Settings Page
This page contains basic sign-in information for the service you wish to connect to. The information can be found in the developer console in your apps settings.
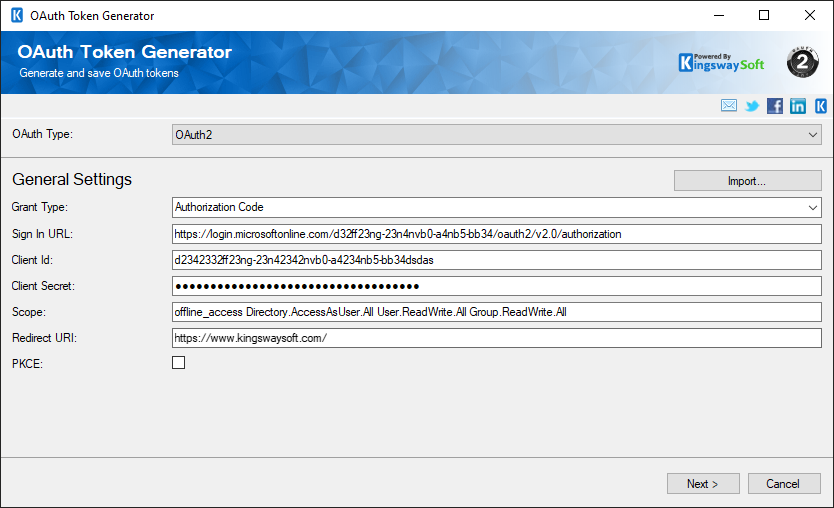
- OAuth Type
-
The OAuth type can be chosen from the below options:
- OAuth 1
- OAuth 2
Note: While working with OAuth 1, you have the option to work with a Certificate. The location of the Certificate can either be in the Store or a File System path. When File System is selected, the component can support Azure Blob Shared Access Signature (SAS) URL in the certificate path.
- Import...
-
The Import button allows you to import OAuth 2 Token Generator settings from a settings JSON file (created before v10.0) or a token file (created after v10.0).
- Grant Type
-
Specify the grant type for the OAuth2 authentication. Default options are Authorization Code, Client Credentials, and Password.
- Sign In URL
-
This is the base url that you will be directed to when authentication is required.
- Client Id
-
The client_id OAuth parameter.
- Client Secret
-
The client_secret OAuth parameter.
- Scope
-
The scope OAuth parameter.
Redirect URI
The redirect_uri OAuth parameter.
- PKCE
-
Check this option to enable PKCE.
Authorize App Page
This page allows you to sign in to an account and authorize your app.

- Edit URL
-
Launches an editor that allows you to edit the sign-in URL. This is for if the OAuth workflow requires additional parameters.
- Authorize In App
-
Launches a web browser within the OAuth 2 Token Generator that allows you to sign in and authorize your app. The generator will automatically get the code parameter from the redirect URI.
- Authorize In Browser
-
Launches the default web browser and opens a dialog containing a textbox. Complete the sign in and authorization process in the browser and when redirected to the redirec_uri, copy the entire URL and paste it into the textbox.
Request Tokens Page
This page will use the code retrieved from the Authorize App page and request tokens from the service.
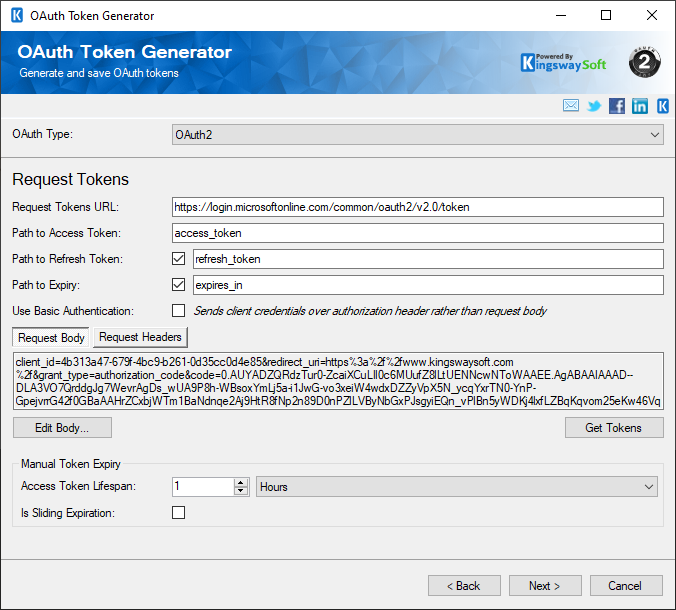
- Request Tokens URL
-
The base URL to request tokens from.
- Path to Access Token (since v6.0):
-
Specify the JPath to get the access token. Default path is "access_token".
- Path to Refresh Token (since v6.0):
-
Specify the JPath to get the refresh token. Default path is "refresh_token".
- Path to Expiry (since v6.0):
-
Specify the JPath to get the expiry. Default path is "expires_in".
- Use Basic Authentication (since v21.1)
-
Enable this option to send client credentials over the authorization header than the request body.
- Edit Body
-
Launches an editor that allows you to edit the request body. This is for if the OAuth workflow requires additional parameters.
- Edit Header (since v6.2)
-
Launches an editor that allows you to edit the request header. This is for if the OAuth workflow requires additional parameters.
- Get Tokens:
-
Makes a request using the Request Token Url and Request Body to request tokens from the service.
- Access Token Lifespan:
-
The option would be available when the Expiry value is not received which can be used to specify the token expiration time manually.
- Is Sliding Expiration:
-
Use the option to specify if the access token is sliding expiration.
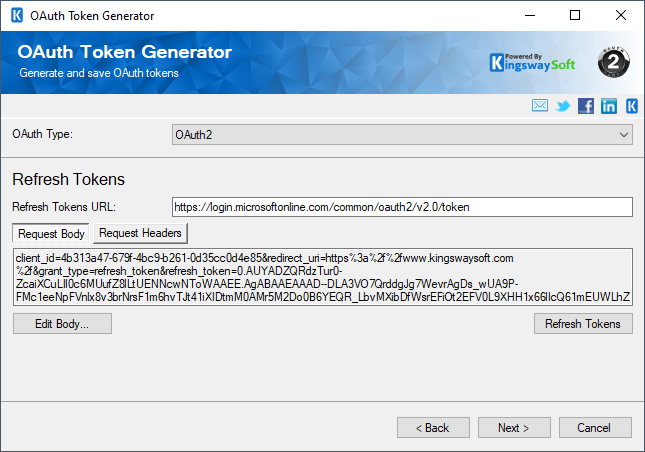
Refresh Tokens Page
This page is the same as the Request Tokens Page. Make any necessary changes to the URL and Body then click the Refresh Tokens button to continue.
Save Tokens Page
This page is used to save tokens and the settings to an encrypted file.
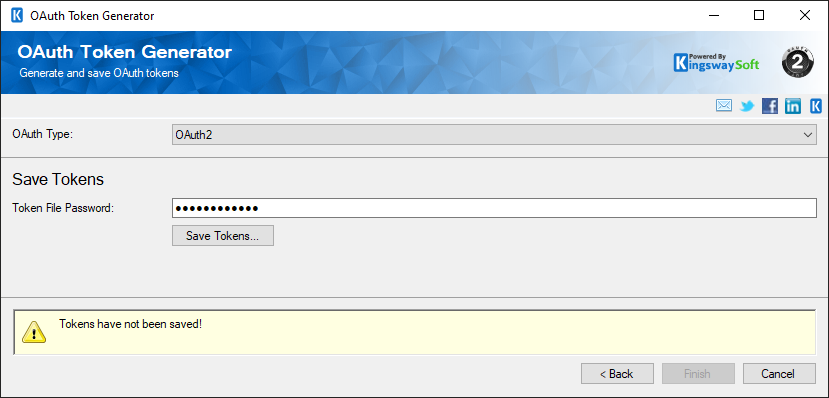
- Token File Password
-
The password used to encrypt the file. You will need to provide this to the HTTP Connection Manager.
- Save Tokens...
-
Launches a save file dialog. You will need to provide the path to this file to the HTTP Connection Manager.