Premium Excel Destination Component
The Premium Excel Destination Component is an SSIS data flow pipeline component that can be used to write data to an Excel File. There are three pages of configuration:
- General
- Columns
- Error Handling
The General page is used to specify general settings for the Premium Excel Destination component. The Columns page is used to manage columns from the upstream component. The Error Handling page allows you to specify how errors should be handled when they occur.
General Page
The General page allows you to specify general settings for the component.

- Destination File Settings
-
- Connection Manager
-
The Premium Excel Destination Component requires a connection. The Connection Manager drop-down will show a list of connection managers that are available. The supported connection managers are listed below:
- Excel Connection Manager
- Local File
- SFTP Connection Manager
- FTPS Connection Manager
- Amazon S3 Connection Manager
- Azure Blob Connection Manager
- Azure Data Lake Storage Connection Manager
- Azure Files Connection Manager (since v20.1)
- Box Connection Manager
- Dropbox Connection Manager
- Google Cloud Storage Connection Manager
- Google Drive Connection Manager (since v21.2)
- Hadoop Connection Manager
- OneDrive Connection Manager
- SharePoint Connection Manager
- WebDAV Connection Manager (since v20.1)
- Destination File Path
-
The Destination File Path specifies the location of the Excel file that you are trying to write to. Click the eclipse button ('...') to open up a browser dialog to select an item. This field is greyed out if an Excel Connection Manager is used, as the Path would be specified in that connection manager.
- Password to open
-
This option is used to specify the password to open the Excel file. If the Excel file is not encrypted, you can leave this field blank.
Note: Password will be stored as plain text; if this information is critical, please save the file on the local disk and use Excel Connection Manager.
- Column Names Settings
-
- Worksheet
-
Specify the Excel Worksheet you want to work with.
- Column Names
-
This option allows you to choose how to write column names as headers in your destination file. Available options are:
- Write No Column Header: No headers will be written to the destination Excel sheet.
- Write Column Header on First Row: The column header will be written to the first row on the Excel sheet.
- Write Column Header to Row: This enables the Column Name Row option which will allow you to specify the row number to write the column header to.
- Column Name Row
-
This option is enabled when the “Write Column Header to Row” option is selected. It allows you to specify the exact row number to write your column headers to.
- Writing Settings
-
- Set Password for Write Access
-
Select this option to set the “Password to modify” in Excel Files. When this option is used, it will automatically enable the "Read-only recommended" option for the Excel file after it is written.
Note: This option differs from the Excel Connection Manager's Password to Open option, it basically protects the file from writing while the Password to Open option in Excel Connection Manager protects it from opening and reading.
- Write Mode Setting
-
There are four options available:
- Clear and write new data: choose this option to clear the whole sheet and write rows.
- Append at end: choose this option to append new rows at the end of existing rows.
- Overwrite existing cells: choose this option to overwrite the existing rows.
-
Write to specified rows: choose this option to specify the rows to write
- Start from row: enter the row number of the start row.
- Start from row: enter the row number of the start row.
- Refresh Component Button
-
Clicking the Refresh Component Button will bring up a prompt for you to confirm the refresh. After clicking “Yes”, it will remove any existing columns and add all columns from the selected Excel worksheet.
- Reset Columns Button
-
Clicking the Reset Columns button will bring up a prompt for you to confirm the reset. After clicking “Yes”, it will remove any existing columns and replace them with that of the Input Columns.
- Map Unmapped Fields Button
-
By clicking this button, the component will try to map any unmapped attributes by matching their names with the input columns from upstream components.
- Clear All Mappings Button
-
By clicking this button, the component will reset (clear) all your mappings in the destination component.
- Expression fx Button
-
Clicking the fx button to launch SSIS Expression Editor to enable dynamic update of the property at run time.
- Generate Documentation Button
-
Clicking the Generate Documentation button generates a Word document that describes the component's metadata including relevant mapping, and so on.
Columns Page
The Columns page of the Premium Excel Destination Component allows you to map the columns from upstream components to the Excel Fields. The Columns page displays a grid that contains four columns as shown below.
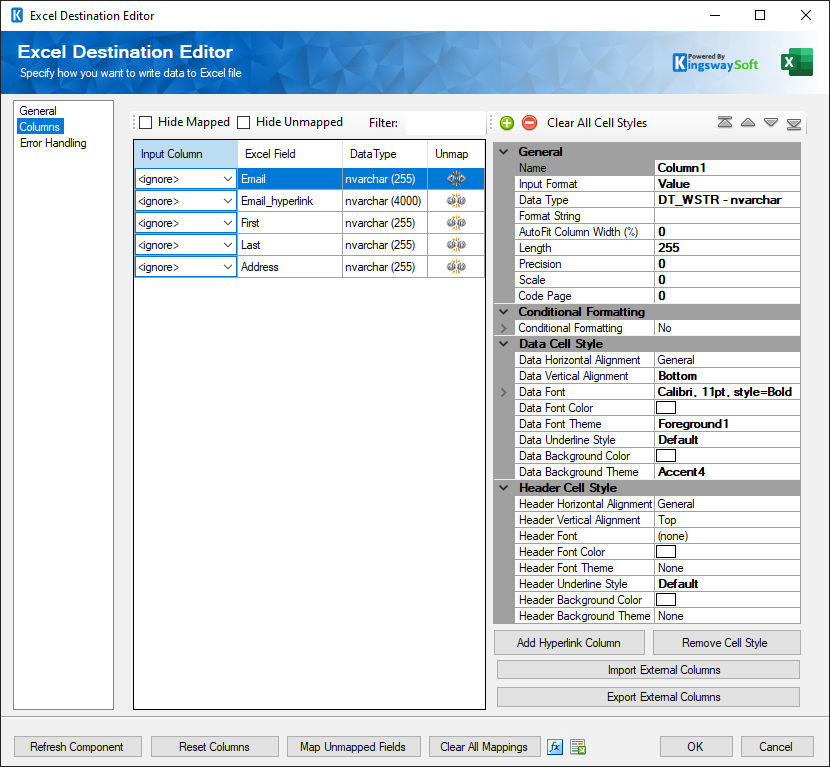
- Input Column: You can select an input column from an upstream component for the corresponding Excel Field.
- Excel Field: The field that you are writing data to.
- Data Type: This column indicates the type of value for the current field.
- Unmap: This column can be used to unmap the field from the upstream input column, or otherwise it can be used to map the field to an upstream input column by matching its name if the field is not currently mapped.
- + sign: Add field to Excel File
- - sign: Remove field from Excel File
- Arrows: Move the field to a desired location in the file.
- Properties window for the field listed. The following values are configurable:
General:
- Name: Specify the Column name.
- Input Format: Specify if the input is a Value or a Formula.
- Data Type: The data type can be changed accordingly.
- Format String: Specify the format codes to utilize the TEXT function that allows you to change the way a number appears. For more information on format codes, visit the TEXT function.
- AutoFit Column Width: Specify if you want the Excel sheet to adjust the column width to fit the input data. Options are False (default) or True.
- Length: If the data type specified is a string, the length specified here would be the maximum size. If the data type is not a string, the length will be ignored.
- Precision: Specify the number of digits in a number.
- Scale: Specify the number of digits to the right of the decimal point in a number.
- CodePage: Specify the Code Page of the field.
-
Conditional Formatting (since v21.1):
Conditional Formatting: Used to set any conditional formatting for the current Excel column. The default is No. If you click into this field and then click on the ellipsis, you will get the Conditional Formatting window. Here you can set Font Styles and Fill Patterns for cells in a column with values that match the Condition set in the Rules section. Different conditions are available for string fields and for number/date fields.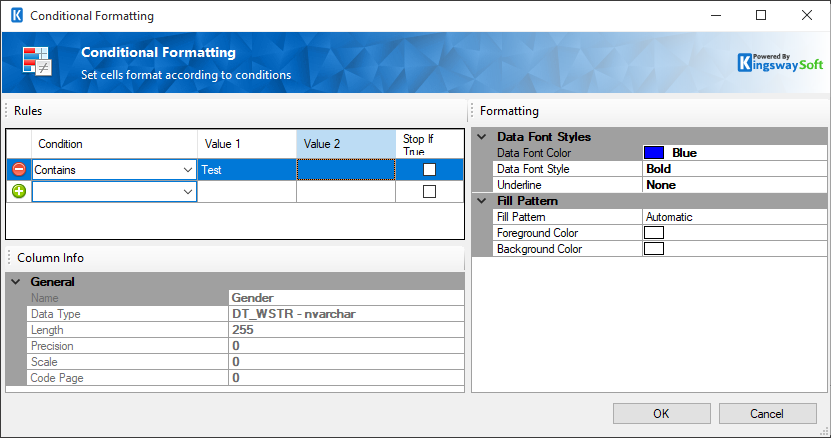
-
Rules: This section is where you set the condition that must be met. The type of condition is set in the first column.
- Condition (options for String data type):
-
- BeginsWith
- Blank
- Contains
- EndsWith
- Equal
- NotBlank
- NotContains
- NotEqual
- Condition (options for Number/Date data type):
-
- Between
- Blank
- Equal
- Greater
- GreaterEqual
- Less
- LessEqual
- NotBetween
- NotBlank
- NotEqual
-
Value 1: The first value to check in the Condition.
Value 2: The second value to use in the Condition. This is only available/used for Number/Date data types, and only for the “Between” and “NotBetween” conditions.
Stop If True: The condition will stop being checked after it has encountered the first value that meets the condition. Only that cell in the Excel sheet will be formatted.
- Formatting: This is where you set the font and fill for cells that meet the condition
Data Font Styles:
Data Font Color: Contains options from different Color sets (Custom, Web, and System). There is no color wheel or spectrum, but if you select “Custom”, then depending on the color selected you can modify the three RBG values to tweak the color.
-
- Data Font Style: Options include Bold, Italic, StrikeOut, etc.
- Underline: None, Single, Double, SingleAccounting, or DoubleAccounting
Fill Pattern:
- Fill Pattern: Contains a variety of options (Solid, Checker, Gradient, etc.)
- Foreground Color: Same options as for Data Font Color
- Background Color: Same options as for Data Font Color
-
- General: This shows information about the Excel column. The data in this section is read-only.
-
Data Cell Style:
-
Data Horizontal Alignment: This option allows you to specify the horizontal alignment for the
Header cells. Available options are:
- General
- Left
- Center
- Right
- Fill
- Justify
- CenterAcrossSelection
- Distributed
-
Data Vertical Alignment: This option allows you to specify the vertical alignment for the
Header cells. Available options are:
- Top
- Center
- Bottom
- Justify
- Distributed
- Data Font: This option allows you to choose the font of the selected Excel Field.
- Data Font Color: This option allows you to choose the color of the font of the selected Excel Field.
- Data Font Theme: This option allows you to choose a font theme for the selected Excel Field.
- Data Underline Style: This option allows you to choose if the selected Excel Field would be underlined.
- Data Background Color: This option allows you to choose the background color of the selected Excel Field.
- Data Background Theme: This option allows you to choose a Background theme for the selected Excel Field.
Header Cell Style:
-
Header Horizontal Alignment: This option allows you to specify the horizontal alignment for the
Header cells. Available options are:
- General
- Left
- Center
- Right
- Fill
- Justify
- CenterAcrossSelection
- Distributed
-
Header Vertical Alignment: This option allows you to specify the vertical alignment for the
Header cells. Available options are:
- Top
- Center
- Bottom
- Justify
- Distributed
- Header Font: This option allows you to choose the font of the selected Excel Field.
- Header Font Color: This option allows you to choose the color of the font of the selected Excel Field.
- Header Font Theme: This option allows you to choose a font theme for the selected Excel Field.
- Header Underline Style: This option allows you to choose if the selected Excel Field would be underlined.
- Header Background Color: This option allows you to choose the background color of the selected Excel Field.
- Header Background Theme: This option allows you to choose a Background theme for the selected Excel Field.
-
Data Horizontal Alignment: This option allows you to specify the horizontal alignment for the
Header cells. Available options are:
- + sign: Add field to Excel File
- - sign: Remove field from Excel File
- Arrows: Move the field to a desired location in the file.
- Add Hyperlink Column: This button can be used when the field you are trying to write to has hyperlink information which in this case, the component will create an additional field called fieldname_hyperlink which you can pass the link from an upstream component for a given Excel Field.
- Remove Cell Style: This button can be used to remove all the configured style settings for the selected Excel Field.
- Import External Columns: Click this to import external columns from a JSON file.
- Export External Columns: Click this button to export the columns to a JSON file.
Error Handling
The Error Handling page allows you to specify how errors should be handled when they happen.
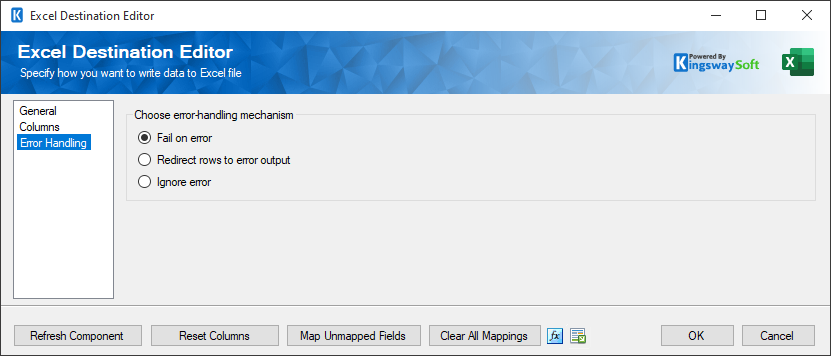
There are three options available.
- Fail on error
- Redirect rows to error output
- Ignore error
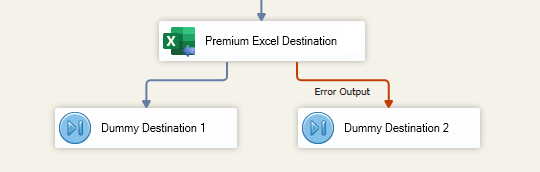
When the Redirect rows to error output option is selected, rows that failed to write to the Excel File will be redirected to the ‘Error Output’ output of the Destination Component. As indicated in the screenshot below, the blue output connection represents rows that were successfully written, and the red ‘Error Output’ connection represents rows that were erroneous. The ‘ErrorMessage’ output column found in the ‘Error Output’ may contain the error message that was reported by the server or the component itself.