Using the Snowflake Destination Component
The Snowflake Destination component is an SSIS data flow pipeline component that can be used to write data to a Snowflake instance. There are four pages of configuration:
- General
- Columns
- Pre and Post Commands
- Error Handling
General Page
The General page of the Snowflake Destination Component allows you to specify the general settings of the component.
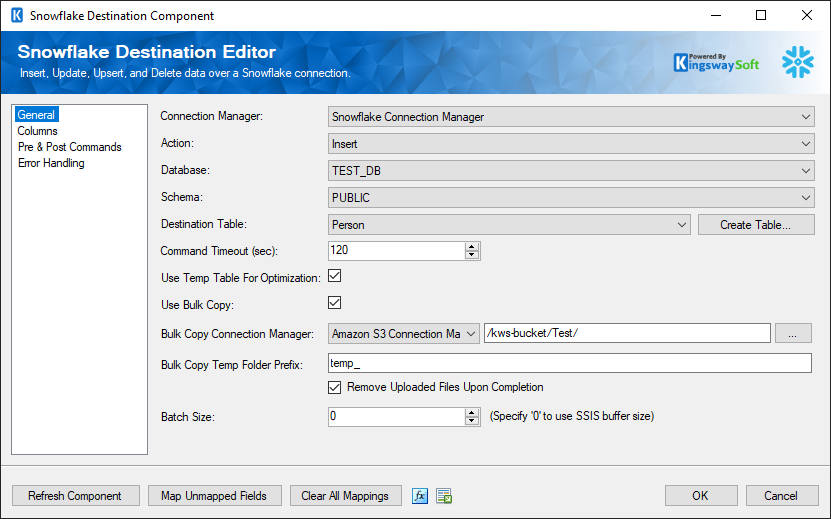
- Connection Manager
-
The Snowflake Source Component requires a Snowflake connection manager.
- Action
-
The command you want to execute on the Destination Table. Available actions include:
- Insert: Add records to the Destination Table.
- Update: Update existing records in the Destination Table
- Upsert: If the specified record exists in the Destination Table it is updated otherwise it is inserted.
- Delete: Delete existing records from the Destination Table
- Full Sync: Synchronize input data to the Destination Table. Full Sync action differs from Upsert action in the way that it can delete those records in the target system but not in the source system.
- Custom Command: Allows you to write your own database command. When the Custom Command action is selected you will notice a command text box and a tree view will appear. The tree view contains a list of Input Columns, SSIS Variables, and Database Tables from the selected Snowflake Connection Manager. Selecting a table will expand it with its columns. You can drag and drop the items in the tree view to the command text box to help construct the command. During runtime, the command is executed for each record in the Input. Column and Variable values are properly parameterized and prepared for the database.
- Database
-
The Database drop-down menu displays a list of available databases in the Snowflake instance defined in the Connection Manager. Selecting a database here will automatically populate the Schema drop-down list.
- Schema
-
The Schema drop-down menu displays a list of available Schemas in the previously selected Snowflake database. Selecting a schema here will automatically populate the Table drop-down list.
- Destination Table
-
The Destination Table drop-down menu displays a list of available tables from the schema specified in the previously selected database schema.
- Create Table...
-
Opens The Snowflake Table Creator.
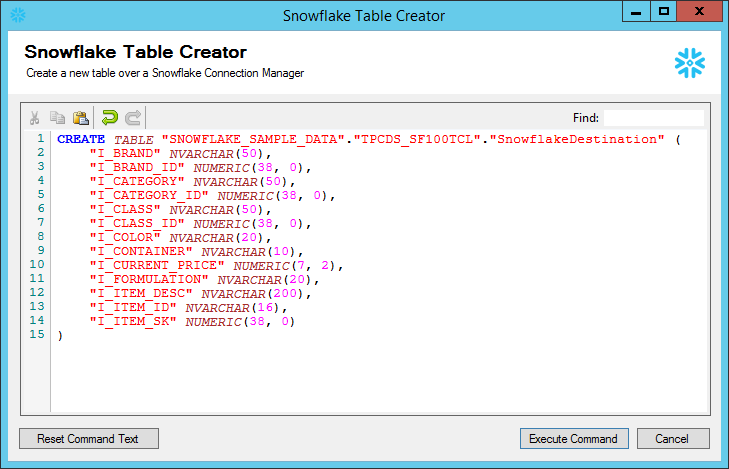
It auto-generates a command based on the selected Connection Manager and Input Columns to create a new table. You can further customize the command to suit your needs and then click the 'Execute Command' button. You will be informed if the command was executed successfully or not and the table you created will be selected in the Destination Table property.
- Command Timeout
-
The Command Timeout option allows you to specify the number of seconds for the command timeout values. The default value is 120 seconds.
- Use Temp Table for Optimization
-
Enabling this option should result in an increase in performance as when it is checked, the component populates a temp table with all the rows first, then it merges them into the target table.
- Prevent Null Overwrites
-
The Prevent Null Overwrites option allows you to ignore any fields that have a null value. By ignoring a field, the null value will not be sent to the target table. This option is only available for Update and Upsert actions.
- Use Bulk Copy(since v20.2)
-
This option can be checked to enable the Bulk Copy feature in Snowflake. The Bulk Copy option is available for all actions in the Snowflake Destination component except when the Custom command is chosen. This is used to load data from staged files to an existing table.
- Bulk Copy Connection Manager
-
The Bulk Copy Connection Manager specifies which storage to use to stage the files in an external location. The below connection managers are supported.
- Amazon S3 Connection Manager
- Azure Blob Storage Connection Manager
Once the Bulk Copy Connection Manager is chosen, click on the ellipsis (…) button to select the path where the file would need to be generated.
- Bulk Copy Temp Folder Prefix(since v21.2)
-
This Bulk Copy Temp Folder Prefix option specifies the temporary folder name prefix for the staging files in the specified Bulk Copy cloud storage service.
- Remove Uploaded Files Upon Completion
-
This option can be enabled to remove the files from the stage location once the copy is done.
- Batch Size
-
The Batch Size option allows you to specify how many records you want to send to the target database server at a time. The default value is 0 meaning SSIS buffer size will be used.
- Duplicate Handling
-
The Duplicate Handling option allows you to specify how input duplicates should be handled when Use Temp Table for Optimization option enabled on Update/Upsert/Delete/Full Sync actions. There are three options available:
- Raise Error (Default)
- Remove All But Last
- Remove All But First
- Prepare Command(since v21.2)
-
Preparing commands protects against SQL injection when using the Custom command. Only disable this option when it is required, and you have absolute control over the values being merged into the command.
- Refresh Component Button
-
Clicking the Refresh Component button causes the component to retrieve the latest metadata and update each field to its most recent metadata.
- Map Unmapped Fields Button
-
By clicking this button, the component will try to map any unmapped attributes by matching their names with the input columns from upstream components.
- Clear All Mappings Button
-
By clicking this button, the component will reset (clear) all your mappings in the destination component.
- Expression fx Icon
-
Click the blue fx icon to launch SSIS Expression Editor to enable dynamic updates of the property at run time.
- Generate Documentation Icon
-
Click the Generate Documentation icon to generate a Word document that describes the component's metadata including relevant mapping, and so on.
Columns Page
The Columns page of the Snowflake Destination Component allows you to map the columns from upstream components to fields of the specified Destination Table in the General Page. The Columns Page is not available when the selected action is Custom Command.
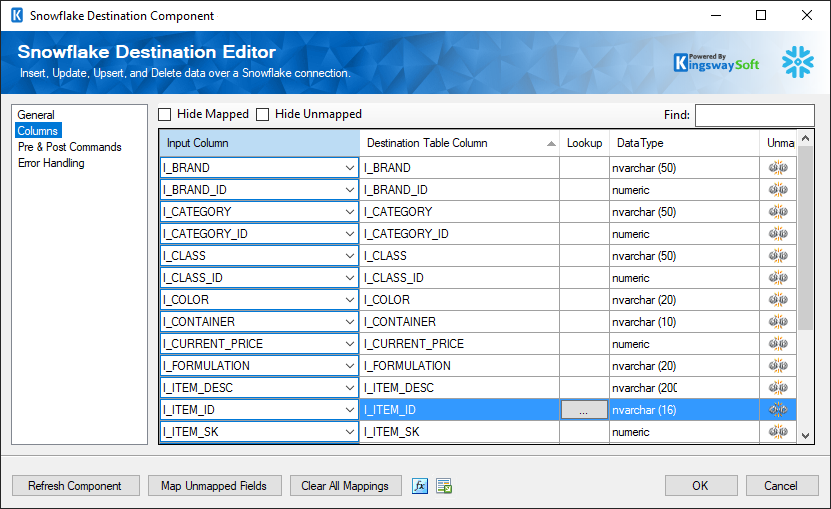
- Key Column: The key checkbox column is used when performing an update (Update or Upsert) where the selected fields represent key columns. These fields are used in the WHERE clause of the UPDATE statement. This column is not available when using INSERT because there is no condition, and not available when using DELETE because every column is a conditional/key field.
- Input Column: Select an Input Column from an upstream component here.
- Destination Table Column: This is the field you are writing data to.
- Lookup: Enable the lookup feature by mapping the virtual '<Lookup>' input column to the destination table column. When this option is selected, the component can perform a lookup based on input values. For further information about how to use the Lookup feature, please refer to the Working with the Lookup Feature section below.
- Data Type: This column indicates the type of value for the current field.
- Unmap: This column can be used to unmap the field from the upstream input column, or otherwise it can be used to map the field to an upstream input column by matching its name if the field is not currently mapped.
Working with the Lookup Feature
The Lookup feature allows you to perform a lookup based on the input values. To configure the Lookup feature, you map the destination table column with the virtual '<Lookup>' input column. You will be presented with the following screen.
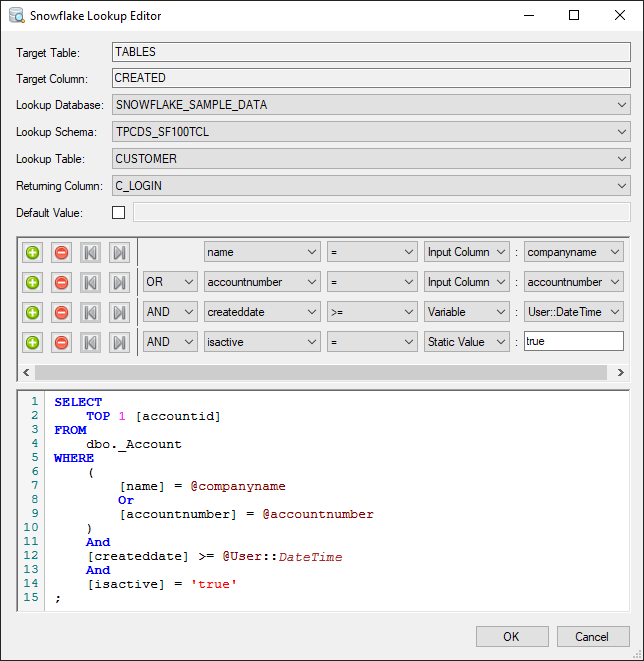
- Target Table
-
The Target Table is a read-only property that shows the destination table configured in the Snowflake Destination component.
- Target Column
-
The Target Column is a read-only property that shows the target column which is configured to use the Lookup feature.
- Lookup Database
-
The Lookup Database drop-down menu displays a list of available databases in the Snowflake instance defined in the Connection Manager. Selecting a database here will automatically populate the Lookup Schema drop-down list.
- Lookup Schema
-
The Lookup Schema drop-down menu displays a list of available Schemas in the previously selected Snowflake Lookup database. Selecting a schema here will automatically populate the Lookup Table drop-down list.
- Lookup Table
-
Select the Lookup Table from the drop-down list which displays available tables for the database specified in the Connection Manager.
- Returning Column
-
Select the Returning Column from the drop-down list which displays available columns for the specified Lookup Table.
- Default Value
-
When the Default Value is specified, the component will use this default value to write to the target column should the input value lookup fail.
- Lookup Condition
-
- + sign: Add lookup condition.
- - sign: Remove lookup condition.
- Arrows: Use arrows to group the lookup conditions.
- AND/OR: Specify AND or OR to create logical expressions of your lookup conditions.
- Lookup Column: Select the lookup column from the drop-down list which displays available columns for the specified Lookup Table.
-
Operator: Use the query operator to specify how each input value in a clause must relate to the corresponding value in a lookup table.
- =: the value of the field is equal to the selected lookup value
- <>: the value of the field is not equal to the selected lookup value
- >: the value of the field is greater than the selected lookup value
- <: the value of the field is less than the selected lookup value
- >=: the value of the field is greater than or equal to the selected lookup value
- <=: the value of the field is less than or equal to the selected lookup value
-
LIKE: the value of the field is equal to the selected lookup value based on pattern match, supports %, _, [ ], and [^] wildcards
- Note: This option may impact performance, consider using = whenever possible.
-
NOT LIKE: the value of the field is not equal to the selected lookup value based on pattern match, supports %, _, [ ], and [^] wildcards
- Note: This option may impact performance, consider using <> whenever possible.
- BETWEEN: the value of the field is between the values of two selected lookup values
- IS NULL: the value of the field is NULL
- IS NOT NULL: the value of the field is not NULL
-
Input Value: The Input Value for the lookup condition. Available options are:
- Input Column
- Enables user to perform Lookup match by selecting a field from the Lookup Table Column
- Variable
- Enables user to perform Lookup match based on a System or User SSIS variable
- Static Value
- Enables user to perform Lookup match based on a static value
- Input Column
Pre & Post Commands Page
The Pre & Post Commands page allows you to specify commands you wish to execute before and after component execution
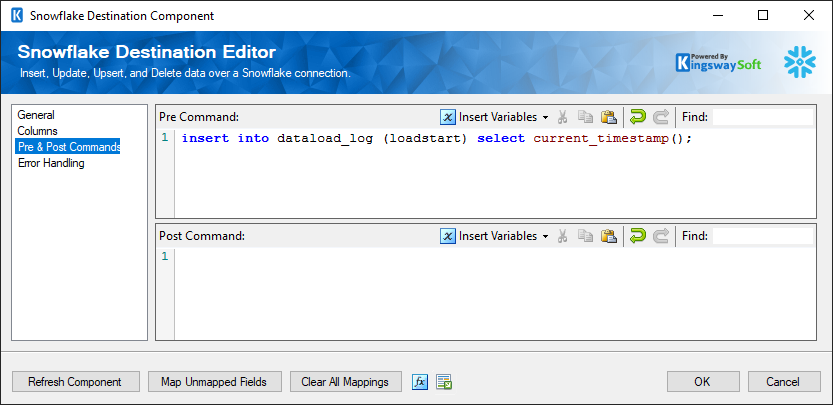
- Pre Command
-
The Pre Command will be executed in Pre-Execute. Leave blank to NOT execute any command.
- Post Command
-
The Post Command will be executed in Post-Execute. Leave blank to NOT execute any command.
Error Handling Page
The Error Handling page allows you to specify how errors should be handled when they happen.
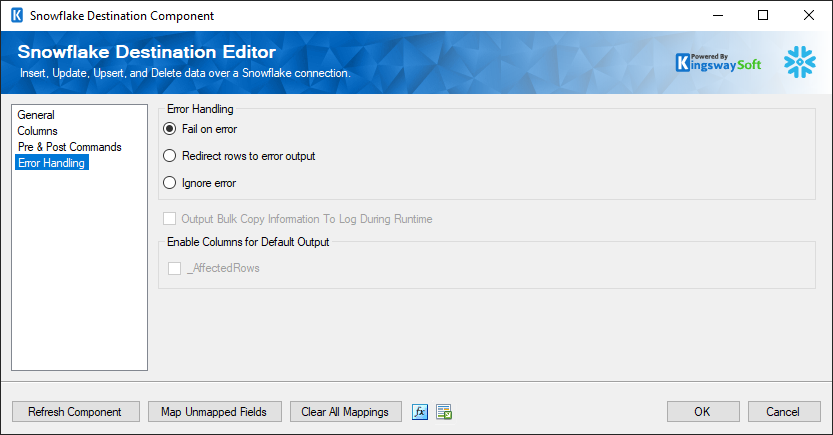
There are three options available.
- Fail on error
- Redirect rows to error output
- Ignore error
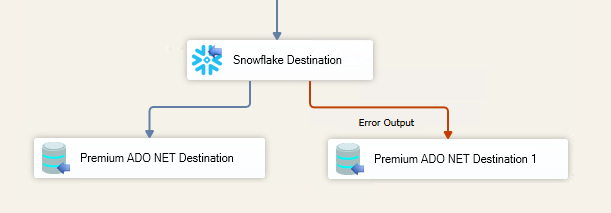
When the Redirect rows to error output option is selected, rows that failed to be sent will be redirected to the 'Error Output' output of the Transformation Component. As indicated in the screenshot below, the blue output connection represents rows that were successfully sent, and the red 'Error Output' connection represents rows that were erroneous. The 'ErrorMessage' output column found in the 'Error Output' may contain the error message that was reported by the server or the component itself.
Note: Use extra caution when selecting Ignore error option, since the component will remain silent for any errors that have occurred.
Note: When there is an error during the execution of the Post Command, the component will always fail by reporting an error even though the Error Handling option may have been chosen otherwise.
In the Error Handling page, there is also an option that can be used to enable Output Bulk Copy Information To Log During Runtime.
It also has options to enable or disable the following output fields for the destination component's Default Output.
- _AffectedRows: Reports the number of affected rows for the SQL script executed for each incoming row. This option is not available when the Bulk mode is used.