Contents
- Installation
- Working with SSIS Toolbox
- Using the Marketo Connection Manager
- Using the Marketo Source Component
- Using the Marketo Destination Component
- License Manager

Installation
To install and run SSIS Integration Toolkit for Marketo, your system must have the following components installed.
-
A supported SSIS design-time or run-time, which can be one of the following:
- Azure-SSIS Integration Run-time
- SSIS 2022
- SSIS 2019
- SSIS 2017
- SSIS 2016
- SSIS 2014
- SSIS 2012
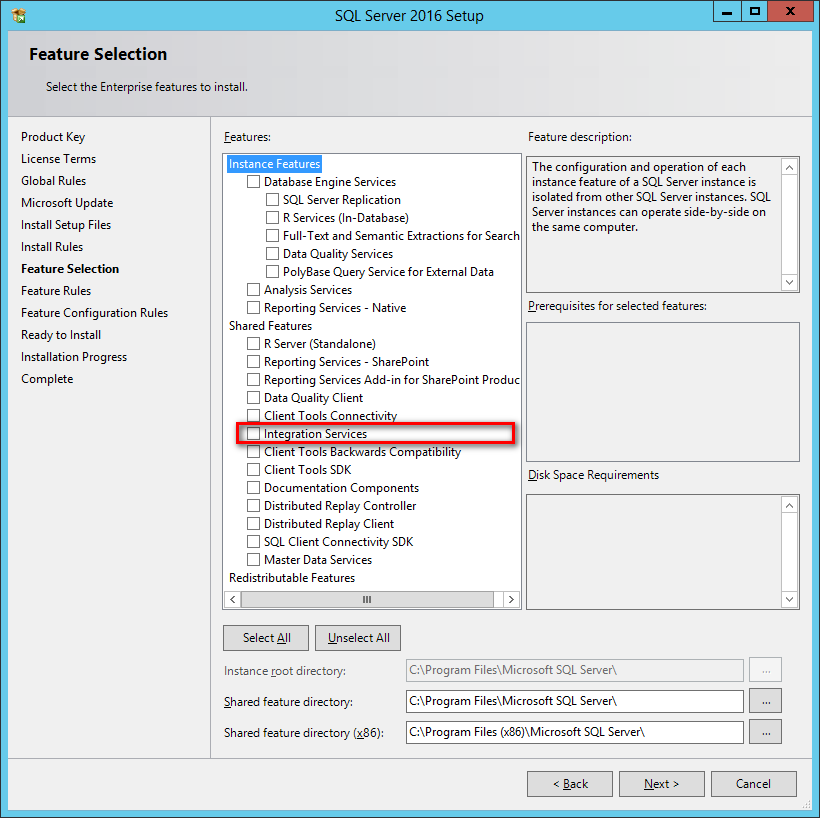
For SSIS run-time, the installation should be done by using the corresponding SQL Server installation media, and you must select the "Integration Services" component during the installation, as shown below:
Note that when using SQL Server 2014, a cumulative update is required (a recent service pack, such as one of the following, is preferred) in order to run our software during run-time.
- SQL Server 2014 Service Pack 2: https://www.microsoft.com/download/details.aspx?id=53168
- SQL Server 2014 Service Pack 1: https://www.microsoft.com/download/details.aspx?id=46694
For SSIS design-time, you should be installing the version of SSDT (SQL Server Data Tools) or BIDS (Business Intelligence Development Studio) that aligns with the SQL Server version that you plan to use for your final deployment (the run-time).
Target Server Design Time Azure-SSIS IR Any one of the following: SSIS 2022 Any one of the following: SSIS 2019 Any one of the following: SSIS 2017 Any one of the following: SSIS 2016 Any one of the following: SSIS 2014 Any one of the following: -
SSDT for Visual Studio 2019
- Packages created using SSDT 2019 need to have their project's TargetServerVersion setting set to "SQL Server 2014" in order to work with SSIS 2014.
-
SSDT for Visual Studio 2017
- Packages created using SSDT 2017 need to have their project's TargetServerVersion setting set to "SQL Server 2014" in order to work with SSIS 2014.
-
SSDT for Visual Studio 2015
- Packages created using SSDT 2015 need to have their project's TargetServerVersion setting set to "SQL Server 2014" in order to work with SSIS 2014.
- SSDT-BI for Visual Studio 2013
SSIS 2012 Any one of the following: - SSDT-BI for Visual Studio 2012 (recommended; most reliable)
-
SSDT for Visual Studio 2019 (not recommended due to potential compatibility issues with ISV solutions)
- Packages created using SSDT 2019 need to have their project's TargetServerVersion setting set to "SQL Server 2012" in order to work with SSIS 2012.
-
SSDT for Visual Studio 2017 (not recommended due to potential compatibility issues with ISV solutions)
- Packages created using SSDT 2017 need to have their project's TargetServerVersion setting set to "SQL Server 2012" in order to work with SSIS 2012.
-
SSDT for Visual Studio 2015
- Packages created using SSDT 2015 need to have their project's TargetServerVersion setting set to "SQL Server 2012" in order to work with SSIS 2012.
-
A Windows Operating System
Windows operating system requirement largely depends on the version of SSIS run-time or design-time selected. We don't have any additional requirements in terms of the Windows operating system as long as it satisfies the minimum requirements of SSIS run-time or design-time. The general guideline is the newer the operating system is, the better. In summary, our software should work for the following Windows operating systems.
-
For desktop systems (mostly for development workstations)
- We generally recommend Windows 10, version 1507 or greater.
- Windows 8.1, 8, or 7 should work fine with our software installation which supports most SSDT versions and SQL Server 2016 or below, but we highly recommend you upgrade to Windows 10 because of their support status with Microsoft.
-
For server systems (mostly for run-time deployments)
- We generally recommend Windows Server 2016 or greater (Including Windows Server 2019 and potentially future Windows Server versions).
- Windows Server 2012 or Windows Server 2012 R2 should work fine for SSIS versions up to 2016.
-
For desktop systems (mostly for development workstations)
-
A .NET Framework
-
- Our software requires the installation of .NET Framework 4.5.2 or above
- For SSIS 2016 or above, .NET Framework 4.6 (or above) is generally a prerequisite, no additional installation is required.
- For SSIS 2014 or lower, you may turn on the .NET Framework feature or install it by downloading it from the Microsoft website.
- Our software requires the installation of .NET Framework 4.5.2 or above
When you have confirmed that your system satisfies the above prerequisites, you can navigate to the KingswaySoft website at https://www.kingswaysoft.com to download the installation package.

After you have downloaded the package, you can install the software by following the installation wizard.
Working with SSIS Toolbox
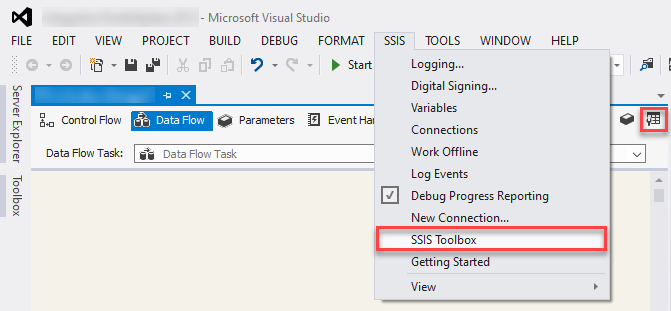
SSIS Toolbox is the first place that you will be looking for our components to be added to your ETL process during the design time.
If you are working with SSIS 2012 or later, SSIS Toolbox should be automatically available during the design time once you have an SSIS package opened provided that you have our software installed properly. If you do not see the SSIS Toolbox, you would either click the SSIS Toolbox menu option under the SSIS menu, or click the SSIS Toolbox icon in the design window's upper right corner as shown below.
Note: When working with the SSIS Toolbox, you need to make sure that you are in the right view in order to see the right components. For instance, if you are looking for a data flow component, you need to make sure that you are in the Data Flow view, not the Control Flow view. Visual Studio would show different components depending on the design view that you are currently working with.
Once the data flow components are available in the SSIS Toolbox, you can start your ETL development by dragging them from the toolbox to the Visual Studio design surface.
Using the Marketo Connection Manager
The Marketo Connection Manager is an SSIS connection manager component that can be used to establish connections with Marketo.
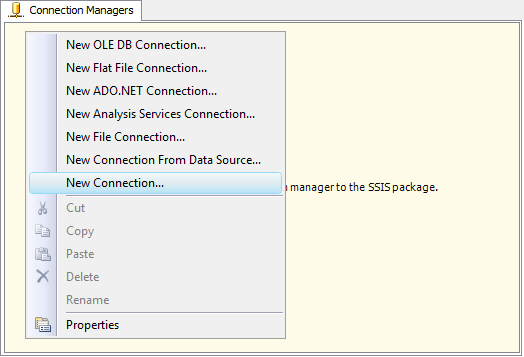
To add a Marketo connection to your SSIS package, right-click the Connection Manager area in your Visual Studio project, and choose "New Connection..." from the context menu.
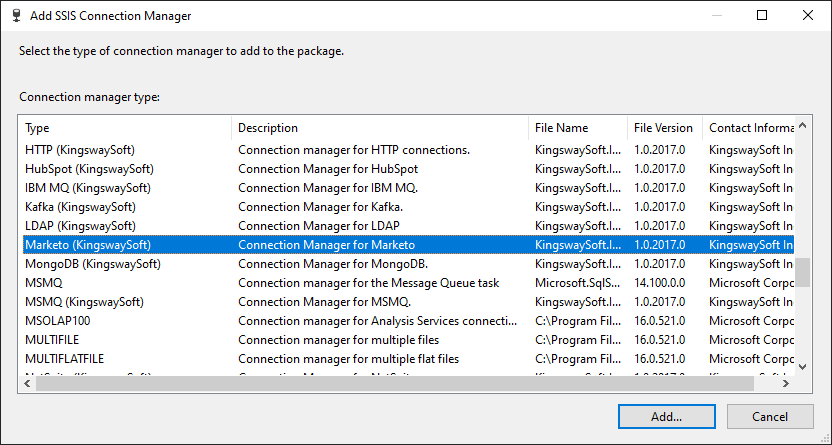
You will be prompted with the "Add SSIS Connection Manager" window. Select the "Marketo" item to add the new Marketo Connection Manager.
The Marketo Connection Manager contains the following three pages for configuring how you want to connect to Marketo:
- General
- Advanced Settings
- More Info
General Page
The General page on the Marketo Connection Manager allows you to specify general settings for the connection. Before you can connect to Marketo, you must first create a Custom Service.
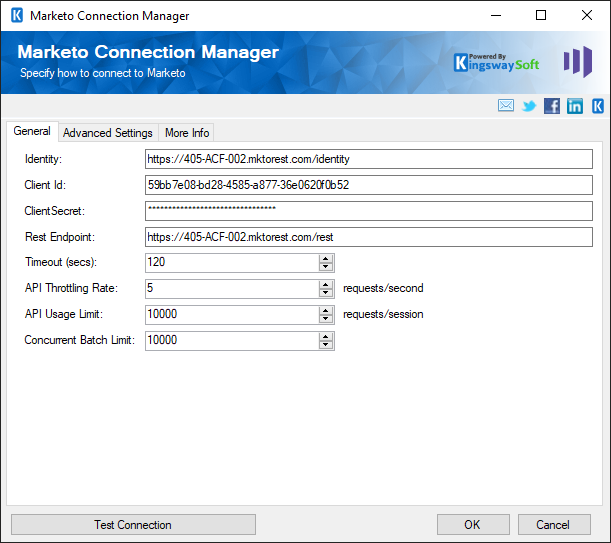
- Identity
-
The Identity field specifies the identity URL the connection will use to request an access token. The Identity can be found in Marketo under Admin > Integration > Web Services > REST API
- Client ID
-
The Client ID field specifies the Client ID of the Custom Service you created. It is used to request an Access Token. The Client ID can be found in Marketo under Admin > Integration > LaunchPoint > View Details
- Client Secret
-
The Client Secret field specifies the Client Secret of the Custom Service you created. It is used to request an Access Token. The Client Secret can be found in Marketo under Admin > Integration > LaunchPoint > View Details
- Rest Endpoint
-
The Rest Endpoint field specifies the rest endpoint the connection will use to read and write data. The Rest Endpoint can be found in Marketo under Admin > Integration > Web Services > REST API
- Timeout (secs)
-
The Timeout (secs) option allows you to specify a timeout value in seconds for the connection. The default value is 120 seconds.
- API Throttling Rate (requests/sec)
-
The API Throttling Rate is based on the Throttle Limits in Marketo. This rate is set to 5 requests per second, by default, to respect the Marketo API Throttle limit. If the API Throttling Rate exceeds 5 requests per second, the Marketo server may stop your request for a short period.
- API Usage Limit (requests/session) (since v3.0)
-
The API Usage Limit option limits the number of API calls being used per session, which can be used to avoid hitting the Marketo Daily API Quota. Marketo has a Default Daily API Quota of 10,000 API calls. If you would like to increase your Rate Limit due to high volume integrations, Marketo recommends that you contact your account representative to request to increase your daily API quota.
When the specified limit is reached,
- The Marketo Source Component would stop processing and throw a warning message.
- The Marketo Destination Component would stop processing and report an error message.
- Test Connection
-
After all the connection information has been provided, you may click the Test Connection button to test if the connection settings entered are valid.
Advanced Settings Page
The Advanced Settings page on the Marketo Connection Manager allows you to specify some advanced and optional settings for the connection.
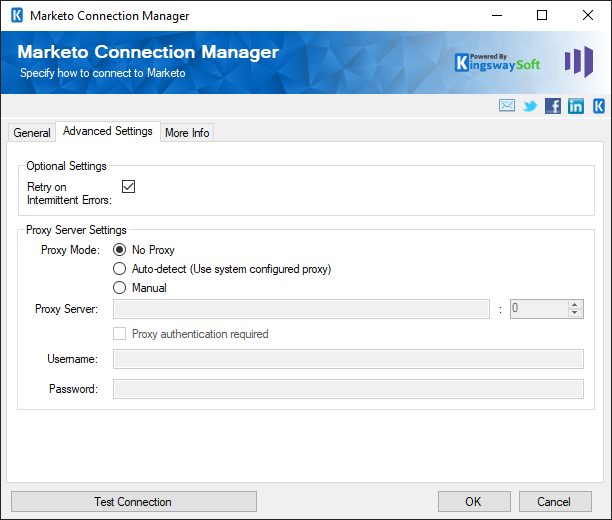
- Optional Settings
-
- Retry on Intermittent Errors
-
This is an option designed to help recover from possible intermittent outages or disruption of service so the integration does not have to be stopped because of such temporary issues. Enabling this option will allow service calls to be retried upon certain types of failure. A service call may be retried up to 3 times before an exception is fired. Retries occur after 0 seconds, 15 seconds, and 60 seconds. Warning: Although we have carefully designed this feature so that such retries should only happen when it is deemed to be safe to do so. However, in some extreme occasions, such retried service calls could result in the creation of duplicate data.
- Proxy Server Settings
-
- Proxy Mode (since v2.2)
-
The Proxy Mode option allows you to specify how you want to configure the proxy server setting. There are three options available.
- No Proxy
- Auto-detect (Using system-configured proxy)
- Manual
- Proxy Server
-
Using the Proxy Server option allows you to specify the name of the proxy server for the connection.
- Port
-
The Port option allows you to specify the port number of the proxy server for the connection.
- Proxy authentication required
-
Select this option if your proxy server requires authentication. Doing so will activate the Username and Password fields below.
- Username (Proxy Server Authentication)
-
The Username option (under Proxy Server Authentication) allows you to specify the proxy user account.
- Password (Proxy Server Authentication)
-
The Password option (under Proxy Server Authentication) allows you to specify the proxy user's password.
Note: The Proxy Password is not included in the connection manager's ConnectionString property by default. This is by design for security reasons. However, you can include it in your ConnectionString if you want to parameterize your connection manager. The format would be ProxyPassword=myProxyPassword; (make sure you have a semicolon as the last character). It can be anywhere in the ConnectionString.
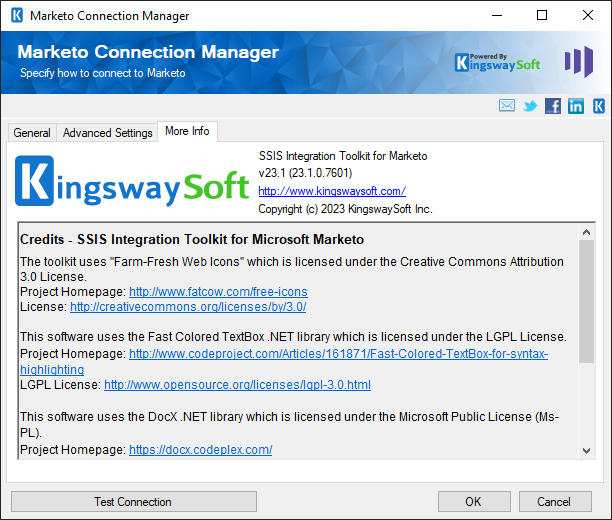
More Info Page
The More Info page shows some basic information about the toolkit, such as the version number.
Using the Marketo Source Component
The Marketo Source Component is an SSIS data flow pipeline component that can be used to read/retrieve data from Marketo.
The component includes the following two pages to configure how you want to read data from Marketo.
- General
- Columns
General Page
The General page of the Marketo Source Component allows you to specify the general settings of the component.
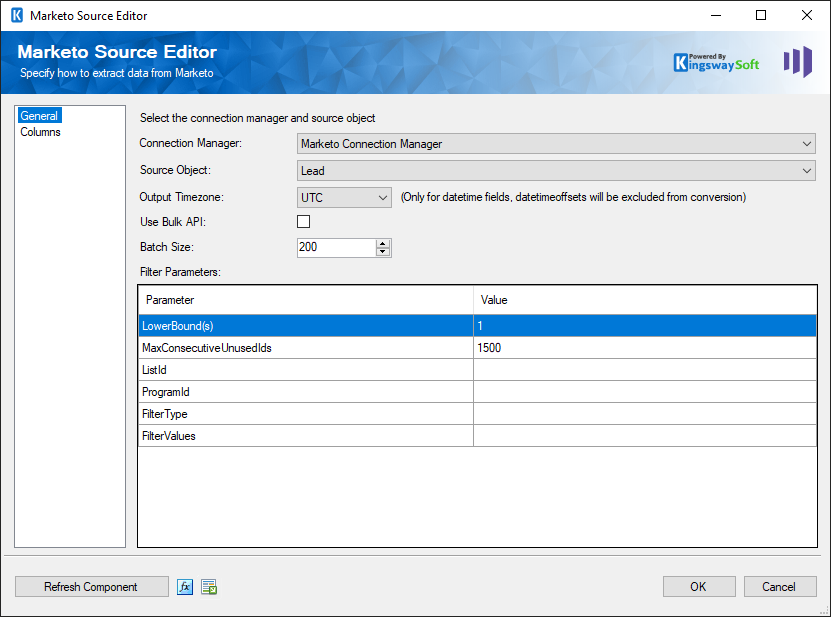
- Connection Manager
-
The Marketo Source Component requires a Marketo connection in order to connect with Marketo. The Connection Manager drop-down will show a list of all Marketo connection managers that are available to your current SSIS package.
- Source Object
-
The Source Object drop-down lists all of the currently supported objects that you can read from.
- Use Bulk API (since v3.0)
-
Use Bulk API option specifies whether you want to use Marketo Bulk Export API to read data from your Marketo organization. This option can be used when you have a significantly large number of records in the Marketo system.
Note: This option will only be available to Lead and Lead Activities objects.
- Polling Throttle Rate (minutes) (since v3.0)
-
The Polling Throttle Rate determines the frequency rate to poll the status of the job to determine if it has been completed.
Note: This option will only be available when the Use Bulk API option is enabled.
- Download Chunk Size (kilobytes) (since v3.0)
-
The chunk size to use when retrieving the export data.
Note: this option will only be available when the Use Bulk API option is enabled.
- Batch Size
-
The Batch Size lets you specify how many records to retrieve per service call to Marketo. The default is set to 200.
- Lead Activity Types
-
The Lead Activity Type drop-down is enabled when the LeadActivities Source Object is specified. You may select as many Lead Activity Types as you prefer.
It is important to note that when you choose a combination of Lead Activity Types, you may have duplicate Column Names on the Columns page. If this is the case, this issue can easily be corrected by going into the Input and Output Properties tab of the Advanced Editor of the Destination Component, and changing the name of the field listed in the Output Columns.
- Filter Parameters
-
You can specify filtering parameters so that the source component only returns those records that satisfy such filtering parameters. Filter Parameters are supported by most objects and some objects require a Filter Parameter to be specified. If you wish to specify multiple values for a single Filter Parameter, just separate the values with a comma. In some cases, an object will support the use of "LowerBound(s)" and "MaxConsecutiveUnusedIds" parameters. These special parameters do the following:
The LowerBound(s) specifies the ID value(s) you would like to start reading records from.
The MaxConsecutiveUnusedIds parameter specifies the maximum number of empty consecutive IDs starting from the LowerBound(s) values onwards until it hits the maximum consecutive unused IDs you have specified. It will either start reading again from the next LowerBound value or stop if no additional LowerBound values are listed. This is an option that can help retrieve the entire list of records when there have been some large deletions in the past in which a large number of records were removed. For instance, if you have ever removed 10,000 records altogether once, then you could set the parameter to 10,000 to accommodate the gap created by such deletions when the source component pages through the records.
Since v3.1, we added the support that allows you to get specific record(s) by setting MaxConsecutiveUnusedIds = 0. If you specify a list of record ID(s) separated by comma(s) in LowerBound(s) option, the component will only return the record(s) you've specified.
If the LowerBound(s) and MaxConsecutiveUnusedIds parameters are not specified (and they are supported in the currently selected object), the default values of 1 and 1500 will be used.
The Lead Activities object supports SinceDatetime as a filter parameter to retrieve the next page token for a given date. (since v1.1)
The supported datetime format is as follows:
- 2014-10-06T13:22:17 or 2014-10-06T13:22:17-08:00
- 2014-10-06T13:22 or 2014-10-06T13:22-07:00
- 2014-10-06
- Refresh Component Button
-
Clicking the Refresh Component button causes the component to retrieve the latest metadata and update each field to its most recent metadata.
- Expression fx Icon
-
Click the blue fx icon to launch SSIS Expression Editor to enable dynamic updates of the property at run time.
- Generate Documentation Icon
-
Click the Generate Documentation icon to generate a Word document that describes the component's metadata including relevant mapping, and so on.
Columns Page
The Columns page of the Marketo Source Component shows you all available attributes from the object that you specified on the General page.
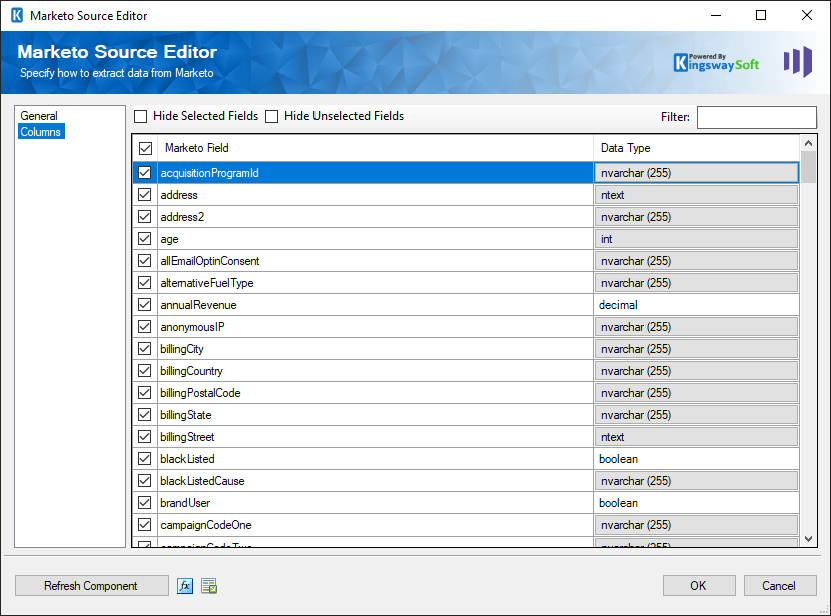
On the top left of the grid, you can see a checkbox, which can be used to toggle the selection of all available Marketo fields. This is a productive way to check or uncheck all available fields.
Note: As a general best practice, you should only select the Marketo fields that are needed for the downstream pipeline components.
Using the Marketo Destination Component
The Marketo Destination Component is an SSIS data flow pipeline component that can be used to write data to Marketo. You can Create, Update, Upsert, or Delete objects that allow a particular action with this component. There are three pages of configuration:
- General
- Columns
- Error Handling
The General page is used to specify general settings for the Marketo Destination Component. The Columns page allows you to map the columns from upstream components to Marketo fields in the destination object. The Error Handling page allows you to specify how errors should be handled when they occur.
General Page
The General page allows you to specify general settings for the component.
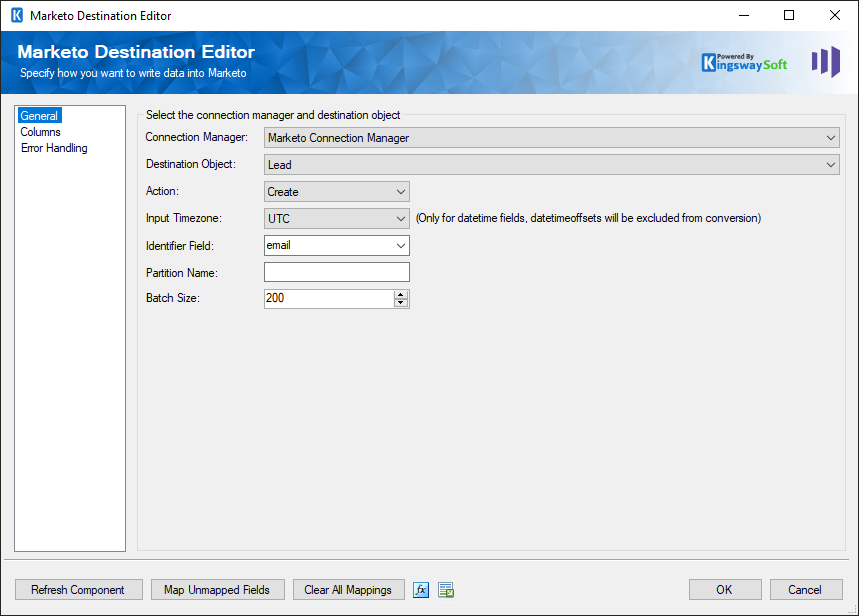
- Marketo Connection Manager
-
The Marketo Destination Component requires a Marketo connection. The Marketo Connection Manager option will show all Marketo connection managers that have been created in the current SSIS package or project.
- Destination Object
-
The Destination Object drop-down lists all of the currently supported objects which you can write to.
- Action
-
The Action option allows you to specify how data should be written to Marketo. There are currently five (5) supported:
- Create
- Update
- Upsert
- Delete
- Merge (since v1.4) (Lead object only)
- Dedupe By
-
The Dedupe By option is available when performing an Update action on most objects. "Dedupe" is a Marketo term for de-duplicate. You can choose to dedupe by Dedupe Fields or the Id Field. Depending on what option is selected determines what field(s) will uniquely identify records while updating.
- Delete By
-
The Delete By option is available when performing a Delete action on most objects. You can choose to delete by Dedupe Fields or the Id Field. Depending on what option is selected determines what field(s) will uniquely identify records while deleting.
- Identifier Field
-
The Identifier Field specifies the field that will behave like the primary key field. This only applies to the Lead object when you are Creating, Updating, or Upserting. The way the field behaves is different for the different actions:
- Create: The Identifier Field behaves like a duplicate detection field. The record cannot be created if the value of the Identifier Field matches that of a record in Marketo.
- Update: The Identifier Field behaves like a selector. The record in Marketo that gets updated is the one whose Identifier Field matches that of the record being sent.
- Upsert: The Identifier Field behaves like a combination of the Create and Update actions.
- Partition Name (since v2.2)
-
The Partition Name allows you to specify the partition when creating or updating leads in Marketo.
Note this option will only be available to the Lead object with Upsert action and use Email as Identifier Field.
- Bulk API (since v3.0)
-
Use Bulk API option dictates whether you want to use Marketo Bulk Import API to write to your Marketo system. By default, this option is not selected. When using Marketo Bulk API, your data will be processed asynchronously, which can provide some significant performance improvement.
Note: This option will only be available to Lead and Custom Objects.
When the option is enabled, the following bulk API-related options become available for configuration.
- Static List Id (Lead Object Only)
-
Specify the ID of the static list to import Leads into.
- Polling Throttle Rate
-
The Polling Throttle Rate determines the frequency rate to poll the status of the job to determine if it has been completed.
- Batch Size
-
The Batch Size lets you specify how many records to send per service call to Marketo.
- Refresh Component Button
-
Clicking the Refresh Component button causes the component to retrieve the latest metadata and update each attribute to its most recent metadata.
- Map Unmapped Fields Button
-
By clicking this button, the component will try to map any unmapped Marketo attributes by matching their names with the input columns from upstream components. This is useful when your source component has recently added more columns, in which case you can use this button to automatically establish the association between input columns and unmapped destination attributes.
- Clear All Mappings Button
-
By clicking this button, the component will reset all your mappings in the destination component.
- Expression fx Icon
-
Click the blue fx icon to launch SSIS Expression Editor to enable dynamic updates of the property at run time.
- Generate Documentation Icon
-
Click the Generate Documentation icon to generate a Word document that describes the component's metadata including relevant mapping, and so on.
Columns Page
The Columns page of the Marketo Destination Component allows you to map the columns from upstream components to the Marketo destination fields.
On the Columns page, you will see a grid that contains four columns as shown below.
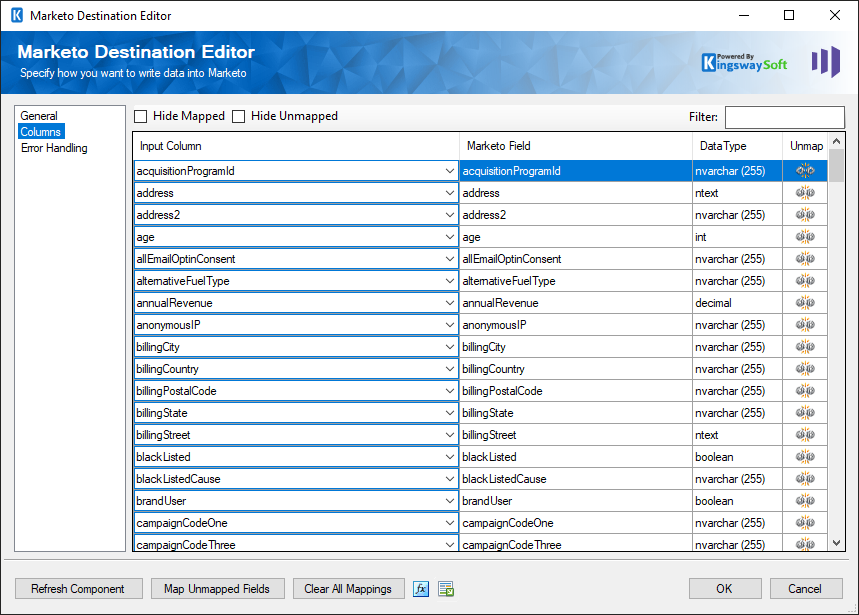
- Input Column: You can select an input column from an upstream component for the corresponding Marketo field.
- Marketo Field: The Marketo field where you are writing data.
- Data Type: This column indicates the type of value for the current field.
- Unmap: This column can be used to unmap the field from the upstream input column, or otherwise it can be used to map the field to an upstream input column by matching its name if the field is not currently mapped.
Error Handling Page
The Error Handling page allows you to specify how errors should be handled when they happen.
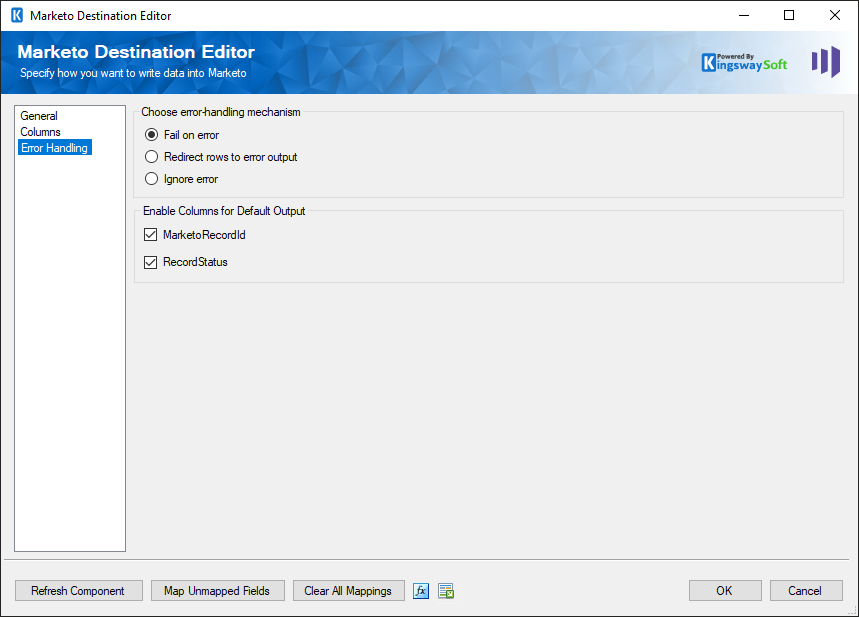
There are three options available:
- Fail on error
- Redirect rows to error output
- Ignore error
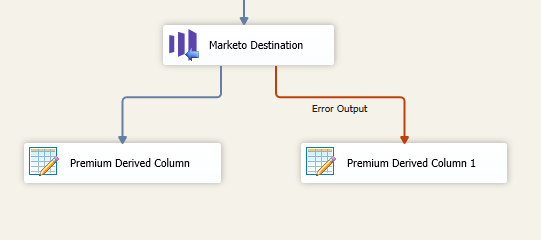
When the Redirect rows to error output option is selected, rows that failed to write to Marketo will be redirected to the 'Error Output' output of the Destination Component. As indicated in the screenshot below, the green or blue output connection represents rows that were successfully written, and the red 'Error Output' connection represents erroneous rows. The 'ErrorMessage' output column found in the 'Error Output' may contain the error message that was reported by Marketo or the component itself.
Note: Use extra caution when selecting the Ignore error option, since the component will remain silent for any errors that have occurred.
Enable Columns for Default Output.
- MarketoRecordId: Contains the ID of the Marketo item
- RecordStatus: Contains the status of the Marketo record
License Manager
SSIS Integration Toolkit comes with a license manager program that helps you manage and activate the product license key to be used for the toolkit. The below information is useful for development workstations and Single Server license management. For Azure-SSIS IR deployments, license management and activation will be handled through the PowerShell script, see Running SSIS Integration Toolkit on the Cloud for further details.
Without a commercial license, SSIS Integration Toolkit will operate under the Developer License which is free to use for development or evaluation purposes. Under the developer license, you can use the software within the development tool (SSDT-BI, BIDS, or Visual Studio).
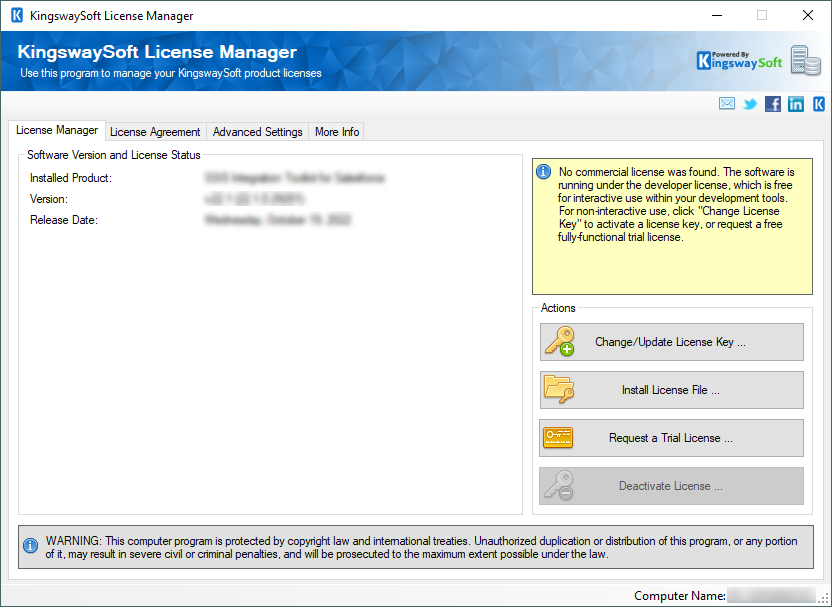
The only limitation of the free developer license is the inability to run the software outside of the development tool (SSDT-BI, BIDS, or Visual Studio). If you would like to run the software outside the development tool, such as running SSIS packages on a scheduled basis or from a command line, you will need to acquire a license from us.
If you want to test out the functionality by scheduling your SSIS packages, a trial license can be requested. To do so, you can launch the License Manager program, then click the "Change License Key" button, where you can request a free trial license after filling out the necessary Licensee Information.
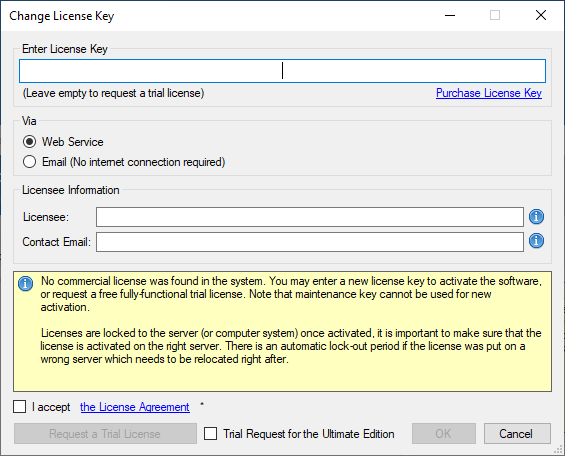
If you have received a product license key from us after placing an order through our online shopping cart system, you can also click the "Change License Key" button and enter the product license key in order to activate the software to use the fully-featured commercial license.
The Licensee field is where you will specify the company the software is licensed to, you can include your system's machine name for future reference. For example, the Licensee can be "ABC Inc." or "XYZ Corp (SQLSVR-001)." The Contact Email would be the person we reach out to for any license-related notices such as renewal reminders.
To request a free trial license or activate a product license key that you have received, you can use the Web Service option to complete the process by sending the request to our license server directly. An Internet connection is required when the Web Service option is used. This is the option that we recommend.
Alternatively, you can choose the Email option so that the license manager will generate an email for you which you can send to us. The Email option should only be used if your system has no Internet access. It requires manual processing so please expect to wait for 24 to 48 hours before receiving a license file from us. Once you have received the license file from us through email, you can save it to a local file, which you can then install by clicking the "Install License File..." button in the License Manager.
If you have acquired a license from us, once the software has been activated, your license manager should look as shown below:
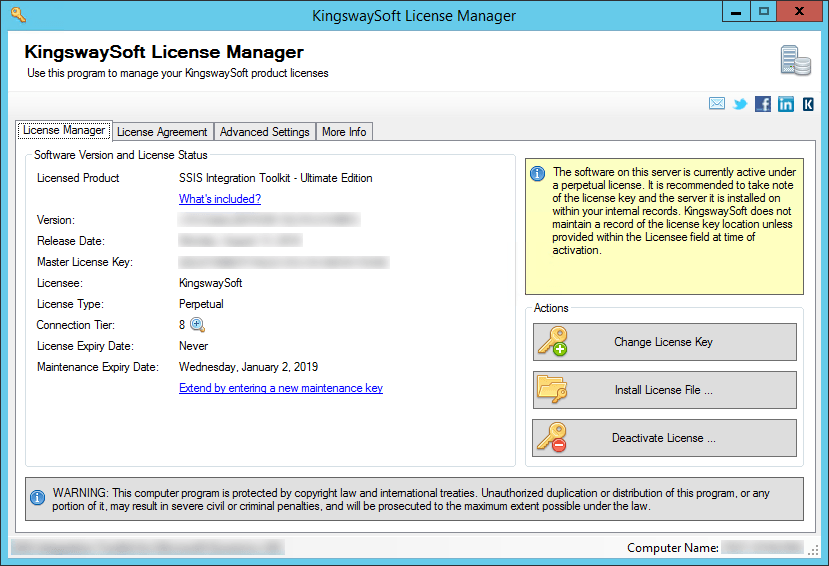
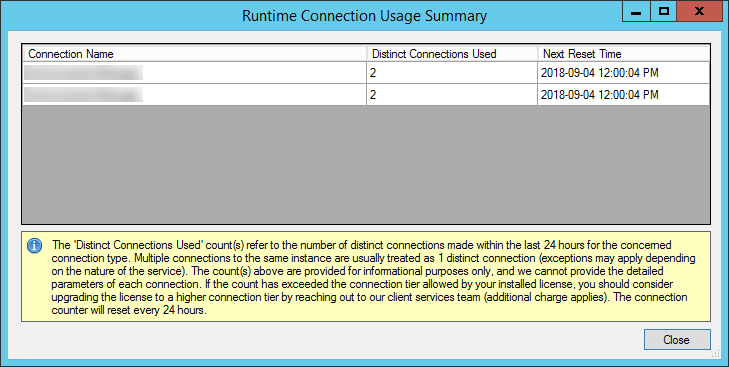
Connection Tier will display the number of distinct connections your license supports per connection type within 24 hours at run-time. Multiple connections to the same instance are typically treated as 1 distinct connection (exceptions may apply depending on the nature of the service). Selecting the magnify icon will launch the Run-time Connection Usage Summary window which will display counts on the number of connections made per connection type and when the 24-hour period will reset.
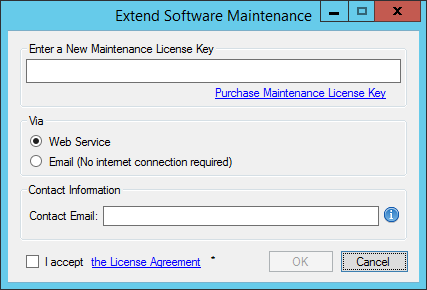
You can see your Maintenance Expiry Date in the License Manager program if you are using a perpetual license. By default, your perpetual license comes with a one-year maintenance and upgrade, which entitles you to use any version of the software released before your Maintenance Expiry Date. You can extend it by entering a new maintenance license key that you have acquired from us.
If your commercial license is a subscription license, you will not see the Maintenance Expiry Date option in the License Manager program, since your subscription license comes with maintenance and upgrade for the entire subscription period. Instead, you will see your license expiry date and a progress bar with the number of days left on your subscription.
Note: You must run the License Manager program under a local administrative account due to the privileges required to write license files to the system.