Using Snowflake command task for function execution
When it comes to Snowflake integration, there are times that you might need to execute a particular Snowflake function as part of the overall ETL process. Such functions can be used to prepare data or in some cases they can be used to retrieve data from Snowflake for later use. Such data retrieval can return a list of records, but oftentimes it would return a single value (or otherwise referred as the scalar value). You might think that such data retrieval can be done using a KingswaySoft Snowflake source component, but that would involve using an additional data flow, which can be tedious to implement considering that we don't really intend to write such data anywhere except when we use them in an SSIS variable. In this blog post, we will discuss the latter scenario which is to read a particular value from Snowflake, and save it as an SSIS variable for later use in the ETL process. This is accomplished using one single control flow task which is a much simpler design in comparison to the use of a data flow task. With that being said, we will be using the following components from our SSIS Productivity Pack product to achieve the purposes:
- Snowflake Command Task
- Premium ADO.NET Destination Component
- Data Spawner Component
- Premium Derived Column Component
Let's get started.
Creating function in Snowflake
The first step here would be create a Snowflake function. In order to do so, you would need to login to your snowflake instance from browser and create a new worksheet. By using the Snowflake function creation syntax, you could create your function for a particular database. For more details on how Snowflake function syntax works, please check the following API document page from Snowflake.
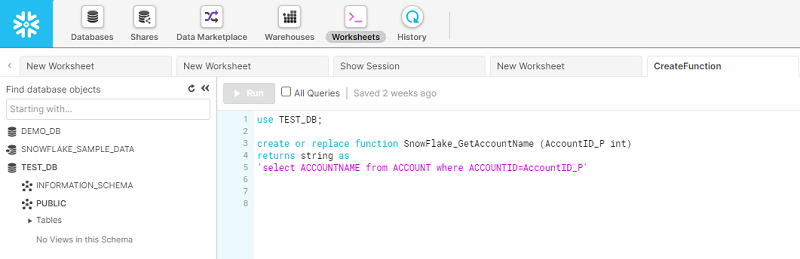
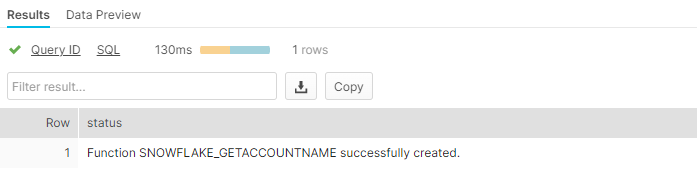
As you can see from the above screenshot, we have used the SQL UDF function syntax to create our function. It is worth noting, as mentioned in the above documentation, when creating your Snowflake functions, you could use other languages such as JavaScript etc. After you have created the function, you could click on the Run button to confirm that function works. If yes, you should get a successful message in the Results panel at the bottom of the page.
Now that we have created a function, we are ready to make calls to the function in an SSIS ETL process. This can be done through the Snowflake Command Task Component available in SSIS Productivity Pack in order to facilitate such function execution in our SSIS ETL process.
Configuring the Snowflake Command Task
In our snowflake Command Task, you could choose the connection manager that was previously created and enter the command to be executed. In our case, we have entered the full command in a text format. It is worth noting that you could potentially make the query dynamic by including SSIS variables to generate the final command text that will be executed. To do so, you can simply drag and drop the variables to the text editor.

In the output page, there are different Output Type options for selection with each of them serving a different purpose. In our case, the function is simply return one value, therefore we are choosing the Scalar option which means that the output of the query returns a single value. Next, we have chosen to send the output value to an SSIS variable.

And in the Error Handling page we can define a strategy when error occurs. In our case, we have chosen to write any encountered error to a define SSIS variable.

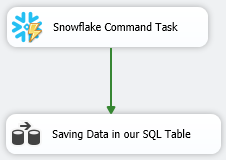
Now we need to write the variable to the database. For doing that we have added a new Data Flow Task in our package. And then connect the Snowflake Command Task to it using precedence constraints to run the Data Flow Task after running the Snowflake command task.
Configuring the Data Flow Task for writing data to the SQL Database
We can now use our variable inside the Premium Derived Column component. Since the Premium Derived Column component is a transformation component, a source component is required in the upstream. Our Data Spawner component can be used for this. You can follow below design.
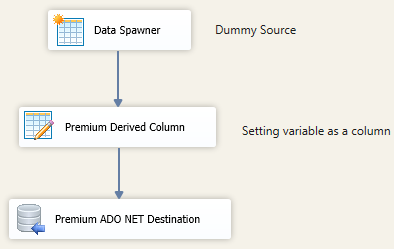
In our Premium Derived Column component, we have assigned our variable to a column, to act as a column value.

And then, open the Premium ADO.NET Destination component to configure its properties. Select the recently created Connection Manager and choose the Insert action.

Next, select the appropriate table that the value needs to be written to. The Premium ADO.NET Destination component provides a useful feature called Create Table. The Create Table option automatically generates a create table command using the schema from input data. However, you can modify the command, as needed, before executing. Please note that this is required only if you do not have an existing table to work with. In the Columns page, select the Input column that needs to be mapped to the Destination Table column.

Once the required field has been mapped, click the OK button to save, and close the Destination Editor. Now by executing the package the result of snowflake function will be written to our table.
Conclusion
This is a simple example to showcase how the Snowflake command task can be utilized. You could call and execute complex functions from Snowflake using this task, and it being in the control flow has its own advantages, and can use precedence constraints to control the flow without going into the data flow.